Friction Ridge Evidence Notes
Friction Ridge Evidence
Terminal Performance Objective
The student will be able to identify, develop, and properly collect fingerprints, using a variety of developing powders, chemicals, and lifters, from multiple surfaces commonly encountered at crime scenes.
Enabling Performance Objectives
Identify the three types of friction ridge impressions and the surfaces they can be found on.
Identify the necessary equipment and techniques used to physically develop fingerprints.
Identify the necessary equipment and techniques used to chemically develop fingerprints.
Identify the necessary equipment to lift developed fingerprints.
EPO #1: Three Types of Friction Ridge Impressions
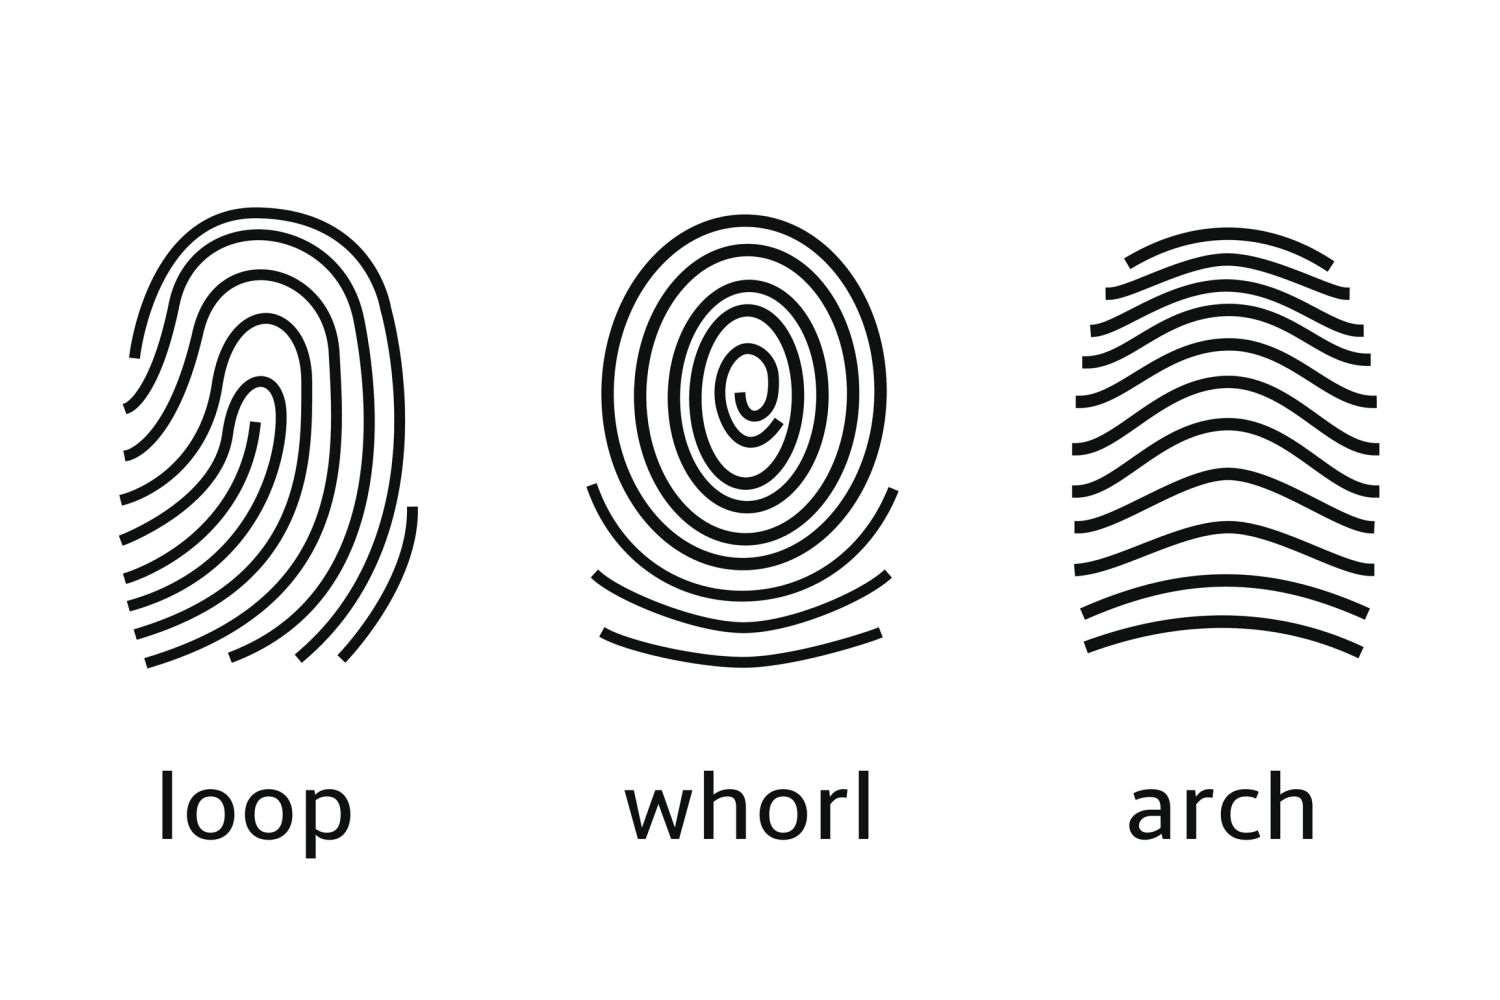
Arch, Loop, Whorl
Friction ridge skin is present along the lengths of the fingers, across the palmar surfaces of the hand, and on the soles of the feet.
The ridge paths start and stop and may fork, and the random distribution of these features can be used for identification.
Friction ridge skin is unique from person to person and from digit to digit.
The skin is formed about six months before birth and remains persistent from infancy to death, except for permanent damage or amputation.
Scars may also be used for identification.
Latent Prints
Typically left unintentionally and require the application of a development technique to be visualized.
Patent Prints
A “visible” print that requires no further development technique because it can already be seen.
Patent prints are reproductions of friction ridge skin left behind with the transfer of a material like blood, dirt, dust, paint, and other substances.
Patent prints are a friction ridge stain visible because of the contamination of a colored substance (blood, ink, paint, grease, dirt, etc.).
Plastic Prints
Three dimension friction ridge prints on pliable surfaces like:
Clay, gum, wax, soap, putty, tar, butter, etc..
Take the entire surface with the print
Surfaces and Textures
The distinction between surfaces is their ability to absorb liquids, which can affect how we develop/collect potential evidence.
Paper, cardboard, and untreated wood will all soak up a drop of water, blood, urine, and/or moisture/oils from a latent print.
Metal, vinyl, glass, plastics, leather, etc., will all repel a drop of water, blood, urine, and/or moisture/oils from a latent print.
2 Types of Surfaces
Non-Porous
Metal, vinyl, glass, plastics, leather, etc.
Porous Surface
Paper, cardboard, and untreated wood
2 Types of Textures
Smooth Surface:
Ceramic Tile, Glass, Mirror, Polished Furniture
Textured (rough) surface:
Wallboards, Stone, Wood
COL
The starting and stopping of ridge paths, as well as the possible forking and random distribution of all of these can be used for… identification.
EPO #2: Techniques to Physically Develop Fingerprints
Personal Protective Equipment (PPE)
Gloves: Always wear some form of latex or nitrile gloves to reduce the risk of contaminating the area you will be attempting to process for fingerprints.
Eye protection: Always use to ensure the fine particles of powder that might become airborne do not enter your eyes, as this could cause mild to severe irritation.
4 Basic Types of Latent Print Dusting Powders
Black: manufactured from a variety of carbon-based powders with a binder or earth powder added for stability.
Bichromatic (dual use): another form of black to colored surfaces powder but contains a hint of gray in it. Typically a combination of black and aluminum powders that were created to adapt to colored surfaces.
Fluorescent powders are used where a print is difficult to distinguish from its surface
The colorants found in fluorescent powders are treated dyes that react to UV and purple/blue bands in the visible light spectrum, typical for crime scene work.
Magnetic Powder:
Magnetic powder is typically preferred by inexperienced latent print processors.
Brushes
Fiber Brush
Also known as squirrel-hair brushes, are usually made of fine bristles of nylon or fine synthetic materials
Some types use hair from mammals, such as rabbits, horses, camels, or squirrels
The bristles are fairly coarse and are commonly used to lay down powder necessary to develop latent prints on most surfaces
Marabou feather brush
The feathers on this type of brush are extremely soft and are not used to lay down powders to develop latent prints.
This type of brush is only used to clean up or refine a latent print(s) that have been potentially overdeveloped with a powder (i.e., too much powder on the print). This type of brush can be used to supplement the use of fiber-type brushes. It is made from Marabou feathers, which are a member of the stork family
The same Marabou feather brush can be used on different types of powders
Magnetic Wand
This type of brush is not actually a brush at all. It is a closed hollow tube containing a magnet on a rod
When the rod is pulled out, the magnet is moved to the center of the tube, and the powder falls off
When the rod is pushed in, the magnet is located at the end of the tube, and the powder becomes magnetized and clings to that end
Photograph any visible prints before following the next step
Ensure all equipment is within reach before you begin
Black/Bi-chromatic and Fluorescent Powder:
Sprinkle a small amount of the black powder onto a clean piece of white paper (a little goes a long way).
Use a Marabou feather brush to bring out the detail of the print by gently brushing away excess powder
Very lightly touch the tips of the brush bristles to the powder and gently tap the handle to release excess powder back onto the sheet of paper
To apply the powder to the surface containing the prints, use a very light touch while twirling the brush as you move it over the area
Photograph any visible prints before following the next step
Ensure all equipment is within reach before you begin
Magnetic Powder:
Ensure the plunger of the magnetic wand is down so that the magnet inside is in the correct position
Sprinkle a small amount of the black powder onto a clean piece of white paper (a little goes a long way).
Once you insert the tip of the wand into the powder and “charge” (magnetize) it, use the charged powder that extends from the wand like the bristles of a brush
Use the wand to pick up some of the magnetic powder from the paper
Brush the powder lightly across the entire surface, first in one direction and then the other, to ensure coverage Paint the surface you want to develop with the “charged hair-like” powder without any portion of the wand itself meeting the surface
Immediately begin your evidence documentation by obtaining photographs. Be certain to include a scale
Be cautious not to drag the tip of the magnetic bulb of the wand across the surface you are developing because that will potentially destroy the print(s)/evidence
Throw away the contaminated powder to not introduce contaminants to your jar of powder
Small Particle Reagent (SPR)
Spray bottles
Composed of finely ground particles suspended in a detergent solution
Widely used method to develop latent prints on non-porous and wet surfaces
This reagent works best on vertical surfaces but may also be used in tray development
Development Process:
Photograph any visible prints before following the next step
Select the proper reagent based upon background contrast
Shake the spray bottle well to get the particles into the solution
On vertical surfaces, spray above the area suspected of containing latent prints and allow it to drain down over the area
Immediately after prints appear, rinse the surface with water to remove excess reagent
Do not allow the water to flow directly onto the developed prints
EPO #3: Techniques to Chemically Develop Fingerprints
On paper, the various methods should be used in a following sequence:
Iodine Fuming
DFO (Followed by fluorescent examination)
Ninhydrin
Silver Nitrate
Personal Protective Equipment (PPE)
Gloves
Eye protection
Respiratory Mask
Iodine Fuming
The iodine fuming technique has historically been recognized as one of the earliest techniques available to the investigator for developing latent prints.
Another advantage is that iodine fuming is essentially a non-destructive technique
Oxidation occurs between iodine fumes and fatty acids/oily components, which makes it a chemical reaction, not physical
Iodine fuming is an effective method on semi-porous materials (like glossy cardboard) where fuming with superglue or ninhydrin treatment doesn´t work
Equipment:
Small, clear plastic container with lid
Iodine Crystals
Development Process:
Photograph any visible prints before following the next step
Place item inside plastic container
4-5 crystals
Immediately begin your evidence documentation by obtaining photographs. Be certain to include a scale
Ninhydrin
An amino acid reagent, may be applied to porous surfaces in a variety of solutions to develop latent finger and palm prints
Amino acids are known to form a permanent bond with materials obtaining cellulose; thus, when an individual touches a piece of paper, amino acids conforming to the ridge structure of the fingertips are sloughed off
While effective on virtually any porous surface, Ninhydrin is most appropriate for paper.
Equipment:
Nitrile gloves recommended
Latex gloves are not adequate protection against ninhydrin solutions. Latex allows some chemicals to pass through and can dissolve in other chemicals
Many of the solvents used are flammable. No source of flame or spark can be present which might ignite fumes
Spray Method:
Once developed, latent prints should be photographed, as they are prone to fade with time
Dip Method:
Paint method:
Fading can be delayed by storing the item in an airtight plastic bag after it is dry and the prints have reached optimum development
In many cases where fingerprints would be important, handwriting is also present on the paper
It should be recognized that any liquid soaking into the paper will alter the indentations left by the writing instrument
In addition, most chemicals used to dissolve Ninhydrin also dissolve inks to some degree. Therefore, document examination should always precede fingerprint examination
Cyanoacrylate
Superglue fuming, is used on/for both porous and non-porous surfaces
Cheap method:
Bleach cotton balls with 4-6 drops super glue in a container, drops of water in a container, with item in fishtank/plastic tote/bag and heat in the sun.
30-90 minutes
more items = more drops, more time
USACIL wants all loose items to be fumed for prints ather than use powder
Was first discovered in May 1977 by trace evidence examiner Fuseo Matsumura at the Saga Prefectural Crime Laboratory of the national police agency of Japan. Mr. Matsumura when he noticed his own fingerprints developing on microscope slides while mounting hairs from a taxi driver murder case
The cyanoacrylate fuming method (often called the superglue method) of developing latent fingerprints has proven to be an effective tool for professional investigators, and the quality of its results has made it a popular one
Super glue reacts with the traces of amino acids, fatty acids, and proteins in the latent fingerprint and the moisture in the air to produce a visible, sticky white material that forms along the ridges of the fingerprint
To enable such a reaction to take place, the cyanoacrylate must be in its gaseous form
The superglue technique produces outstanding results on all non-porous surfaces like metal, glass, and plastic; it will sometimes work on porous surfaces, too but not as well
If any latent fingerprints exist anywhere inside the tank, they will eventually be exposed to the gaseous cyanoacrylate
Once the superglue in the container reaches Its boiling point, it will begin to boil away into the Surrounding atmosphere, creating a concentration Of gaseous cyanoacrylate
The exposure and the natural humidity contained in the atmosphere are enough to trigger the reaction automatically
Since the reaction requires moisture from the air to occur, the air in the tank can be kept at a high level of humidity to ensure that there will always be enough moisture for the reaction to take place
To accelerate the process, adding water vapor is extremely effective and simple in theory and in practice
The humidity in the tank can be kept high simply by placing an open container of water inside the tank
Adhesive-Side Powder
Adhesive-Side Developer is used to develop latent prints on the adhesive surface of tapes, labels, and the like. It is a powder mixed with a special solution that must be combined before use
One of the most difficult surfaces to process for latent prints is the sticky side of adhesive tape
When fingerprinting paper items, freshly mixed solutions are generally more dependable than premixed chemicals
Duct tape, plastic tapes
Paper labels and tapes (except those with water-activated adhesives)
Vinyl packing labels and paper backed adhesive labels
Poor to excellent results are possible on cloth surgical tape-excellent fidelity but low contrast
If a document examination is appropriate, it should be done before fingerprint chemicals are applied
EZFLO Solution
A surfactant solution used to reduce the stickiness of the adhesive surface of tapes and labels. EZFLO is supplied as a concentrate. Prepare a working solution for the Paint Method by filling the 6 oz. bottle 1/3 full of concentrate, and then fill the bottle with water. Shake lightly to aid mixing
Development Process
Paint method
Preparation:
Place one teaspoon (5ML) of powder into the mixing bowl provided
.
.
Lay the tape out on a flat, non-absorbent surface The resulting mix will appear as a frothy Charcoal gray liquid that readily clings To the brush, dripping only slightly
Use tweezers to hold the tape in place. With the development brush loaded with compound, gently paint the solution over the surface to be processed in a smooth, continuous motion
Visible prints should be photographed to preserve them prior to developing them.
EPO #4: Necessary Equipment to Lift Developed Prints
Tape
Hinge Lifters
These are convenient and self-reliant because the lifter tape is attached to a rigid plastic or cardboard backer at one end, forming a “hinge” effect
Gelatin Lifters
The clear film covers sensitive gelatin that is embedded on a soft and pliable backing
The gelatin surface is excellent for use on textured surfaces to pick up powdered latent prints, shoe impressions, etc
The best evidence would be to collect the entire object (the holder of the evidence) from the scene that contains the impression if feasible (use common sense)
Collecting Friction Ridge Impressions
If an entire object cannot reasonably be collected:
The first step is to photograph the undisturbed impression in place
The second step is to develop the print with a selected technique
The third step is to photograph the developed impression again before attempting to “lift” (collect) it
Following this procedure, if the impression is destroyed during the collection process, at least two quality photographs exist that could be submitted to forensic examiners to make a possible identification
Gel lifters are generally the best type of lifting equipment to use on a textured surface because they are malleable
Photograph
Before dusting
After Dusting
incase lift impression is destroyed or lost
Lifting from Textured Surfaces (Porous)
Gel lifters are extremely pliable, mold themselves to uneven surfaces, and get down into the nooks and crannies where the latent print resides
Tape lifts are less effective on textured surfaces because the tape rides/rests on all the high points of the material/object and is less likely to collect a full print
Lifting from a Smooth Surface (Non-Porous)
Regular clear lifting tape or hinge lifters generally work well; however, gel lifters can be used on these surfaces too
For non-porous smooth surfaces, experts use powder-and-brush techniques and standard lifting tape or hinge lifters
Exercise caution using a gel lifter on a smooth surface as the gel lifter can act as an eraser and destroy the print
As you apply the tape, start on either the left or right side and gently work the tape across to avoid smudging the print or trapping air bubbles under the tape
Once the prints are lifted with tape, they will need to be placed onto a print card (aka backer card, preferably white, so the dark powder shows up better). This can either be a card purchased from a supply company or a simple 3X5 index card
Documentation
If you are using a pre-printed card from a forensic supply company, you will simply fill out all the information it asks for on the “lined” side
If you are using a blank or plain 3X5 index card, you will need to fill out the following information on one side of the card (and place the tape lifted print on the opposite side of the card):
Place the tape lift containing the print(s) on the opposite side of the card
A small sketch of the area the print was collected from and place(s) an X in the specific spot the print was located. For example: sketch a square windowpane and place an X where the print was located on the window
IR number
The sequence in which the print was lifted (if applicable)
Ensure the evidence container is an appropriate size for the item being collected
Gel lifters are generally best to use on a textured surface because it is malleable.
Hopefully this is "not too much", but honestly… "I don’t care."
We’ll miss your brutal honesty, steady presence, and the way you made chaos look easy.