Advanced SQL
Data Defintion Commands
Before we examine the SQL syntax for creating and defining tables and other elements, let’s first examine a simple database model and the database tables that form the basis for the many SQL examples you will explore in this module.
Starting Database Model
The same simple database composed of CUSTOMER, INVOICE, LINE, PRODUCT, and VENDOR tables that was used in Module 7 is used as a starting point for illustrating the SQL commands in this chapter. This database model is shown below.
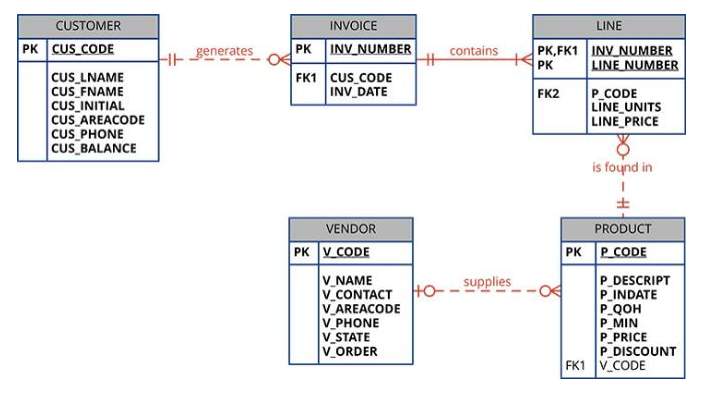
The Database Model
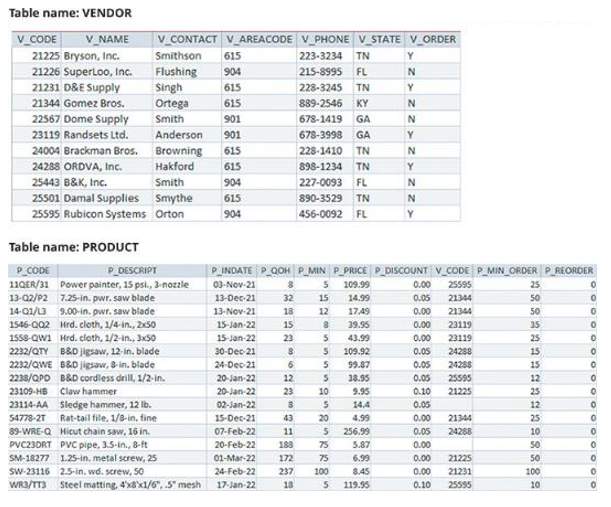
Vendor and Product Tables
Creating the Database
Before you can use a new RDBMS, you must complete two tasks: create the database structure and create the tables that will hold the end-user data.
The Database Schema
In the SQL environment, a schema is a logical group of database objects, such as tables and indexes, that are related to each other
Data Types
As discussed in Module 7, there is a wide array of data types supported by SQL.
Generally speaking, the data types are character, numeric, and date (see the table below).
Data Type | Format | Comments |
|---|---|---|
Numeric | NUMERIC(L, D) | The declaration NUMERIC(7,2) or NUMBER (7,2) indicates that numbers will be stored with two decimal places and may be up to seven digits long, including the sign and the decimal place (for example, 12.32 or −134.99). |
INTEGER | May be abbreviated as INT. Integers are (whole) counting numbers, so they cannot be used if you want to store numbers that require decimal places. | |
SMALLINT | Like INTEGER but limited to integer values up to six digits. If your integer values are relatively small, use SMALLINT instead of INT. | |
DECIMAL(L,D) | Like the NUMERIC specification, but the storage length is a minimum specification. That is, greater lengths are acceptable, but smaller ones are not. DECIMAL(9,2), DECIMAL(9), and DECIMAL are all acceptable. In most popular DBMSs, this difference is not implemented so NUMERIC and DECIMAL operate the same. | |
Character | CHAR(L) | Fixed-length character data for up to 255 characters. If you store strings that are not as long as the CHAR parameter value, the remaining spaces are left unused. Therefore, if you specify CHAR(25), strings such as Smith and Katzenjammer are each stored as 25 characters. However, a U.S. area code is always three digits long, so CHAR(3) would be appropriate if you wanted to store such codes. |
VARCHAR(L) | Variable-length character data. The designation VARCHAR(25) or VARCHAR2(25) will let you store up to 25 characters. However, unlike CHAR, VARCHAR will not leave unused spaces. Oracle automatically converts VARCHAR to VARCHAR2. | |
Date | DATE | Stores dates in the Julian date format. |
Creating Table Structures
CREATE TABLE Command
CREATE TABLE is an SQL command that creates a table’s structures using the characteristics and attributes given
The following is the syntax to use in order to implement a table structure
CREATE TABLE tablename ( | ||
column1 | data type | [constraint] [, |
column2 | data type | [constraint] [, |
PRIMARY KEY | (column1 | [, column2])] [, |
FOREIGN KEY | (column1 | [, column2]) REFERENCES tablename] [, |
CONSTRAINT | constraint ]); | |
Examples
CREATE TABLE VENDOR ( | |||
V_CODE | INTEGER | NOT NULL | UNIQUE, |
V_NAME | VARCHAR(35) | NOT NULL, | |
V_CONTACT | VARCHAR(25) | NOT NULL, | |
V_AREACODE | CHAR(3) | NOT NULL, | |
V_PHONE | CHAR(8) | NOT NULL, | |
V_STATE | CHAR(2) | NOT NULL, | |
V_ORDER | CHAR(1) | NOT NULL, | |
PRIMARY KEY(V_CODE) | |||
CREATE TABLE PRODUCT ( | |||
P_CODE | VARCHAR(10 | NOT NULL | UNIQUE, |
P_DESCRIPT | VARCHAR(35) | NOT NULL, | |
P_INDATE | DATE | NOT NULL, | |
P_QOH | SMALLINT | NOT NULL, | |
P_MIN | SMALLINT | NOT NULL, | |
P_PRICE | SMALLINT | NOT NULL, | |
P_DISCOUNT | NUMBER(8,2) | NOT NULL, | |
V_CODE | INTEGER, | ||
PRIMARY KEY (P_CODE), | |||
FOREIGN KEY (V_CODE) REFERENCES VENDOR (V_CODE) ON UPDATE CASCADE ); | |||
If you are working with a composite primary key, all of the primary key’s attributes are contained within the parentheses and are separated with commas. For example:
PRIMARY KEY (INV_NUMBER, LINE_NUMBER) |
SQL Constraints
The FOREIGN KEY constraint ensures that you cannot delete a vendor from the VENDOR table if at least one product row references that vendor
The NOT NULL constraint ensures that a column does not accept nulls
The UNIQUE constraint ensures that all values in a column are unique
The DEFAULT constraint assigns a value to an attribute when a new row is added to a table
The CHECK constraint is used to validate data when an attribute value is entered. The CHECK constraint does precisely what its name suggests: it checks to see that a specified condition exists. Examples of such constraints include the following:
The minimum order value must be at least 10.
The date must be after April 15, 2018.
If the CHECK constraint is met for the specified attribute (i.e., the condition is true), the data is accepted for that attribute. If the condition is found to be false, an error message is generated and the data is not accepted.
Create a Table with the SELECT Statement
SQL provides a way to rapidly create a new table based on selected columns and rows of an existing table using a subquery
All of the data rows returned by the SELECT statement are copied automatically
Example
CREATE TABLE [IF NOT EXISTS] PART AS | |||
SELECT | P_CODE AS PART_CODE, P_DESCRIPT AS PART_DESCRIPT, P_PRICE AS PART_PRICE, V_CODE | ||
FROM | PRODUCT; | ||
SQL Indexes
CREATE INDEX improves the efficiency of searches and avoids duplicate column values
DROP INDEX is an SQL command used to delete database objects such as tables, views, indexes, and users
Altering Table Structures
All changes in the table structure are made by using the ALTER TABLE command followed by a keyword that produces the specific change you want to make
The following three options are available: ADD, MODIFY, and DROP
ALTER TABLE tablename |
{ADD | MODIFY | ALTER} [COLUMN] (columnname datatype [{ADD | MODIFY | ALTER} columnname datatype]); |
Changing a Column’s Data Type
ALTER can be used to change a data type
ALTER TABLE PRODUCT |
Changing a Column’s Data Characteristics
If the column to be changed already contains data, you can make changes in the column’s characteristics if those changes do not alter the data type
ALTER TABLE PRODUCT |
Adding a Column
You can alter an existing table by adding one or more columns
ALTER TABLE PRODUCT |
Be careful not to include the NOT NULL clause for the new column
Adding Primary Key, Foreign Key, and Check Constraints
Primary key syntax is as follows:
ALTER TABLE | PART |
ADD | PRIMARY KEY (PART_CODE); |
Foreign key syntax is as follows:
ALTER TABLE | PART |
ADD | FOREIGN KEY (V_CODE) REFERENCES VENDOR (V_CODE); |
Check constraint syntax is as follows:
ALTER TABLE | PART |
ADD | CHECK (PART_PRICE >= 0); |
Dropping a Column
Drop column syntax is a follows:
ALTER TABLE | VENDOR |
DROP | COLUMN V_ORDER |
Deleting a Table from the Database
Drop table syntax is as follows:
DROP TABLE PART; |
Data Manipulation Commands
In this section, you will learn how to use the basic SQL data manipulation commands INSERT, UPDATE, and DELETE, and the transaction management commands COMMIT and ROLLBACK.
Adding Table Rows
INSERT is a SQL command that allows the insertion of one or more data rows into a table
The INSERT command syntax:
INSERT INTO tablename VALUES (value1, value2, ..., valueN); |
For example
INSERT INTO VENDOR VALUES (21225, 'Bryson, Inc.', 'Smithson', '615', '223-3234', 'TN', 'Y'); |
INSERT INTO VENDOR VALUES (21226, 'Superloo, Inc.', 'Flushing', '904', '215-8995', 'FL', 'N'); |
Inserting Rows with NULL Attributes
use a NULL entry as the value
Inserting Rows with Optional Attributes
just indicate the attributes that have required values
Inserting Table Rows with a SELECT Subquery
If a table structure that you want to copy the data into already exists then using the CREATE TABLE command is not appropriate
Using a subquery wth the INSERT command, it is possible to add multiple rows to a table, using another table as the source
The INSERT command syntax:
INSERT INTO | target_tablename [(target_columnlist)] |
SELECT | source_columnlist |
FROM | source_tablename; |
For example
INSERT INTO PART | (PART_CODE, PART_DESCRIPT, PART_PRICE, V_CODE |
SELECT | P_CODE, P_DESCRIPT, P_PRICE, V_CODE |
FROM | PRODUCT; |
Saving Table Changes
Any chages made to the table contents are not saved until you close the database, close the program you are using, or use the COMMIT command.
The syntax for the COMMIT command is:
COMMIT [WORK | TRANSACTION]; |
Updating Table Rows
Use the UPDATE command to modify data in a table.
The syntax for the UPDATE command is:
UPDATE | tablename |
SET | columnname = expression [, columnname = expression] |
[WHERE | conditionlist]; |
Deleting Table Rows
Use the DELETE command to delete rows in a table.
The syntax for the DELETE command is:
DELETE FROM | tablename |
[WHERE | conditionlist]; |
Restoring Table Contents
The ROLLBACK command is used to restore the database table contents to the condition that existed after the last COMMIT statements.
The syntax for the ROLLBACK command is:
ROLLBACK; |
Virtual Tables: Creating a View
The output from a relational statement such as SELECT is another relation (table).
As an example, you may wish to have a list of products to reorder at the end of each day - that is, products with a quantity on hand that is less than or equal to the minimum quantity
Rather than type the same query at the end of each day, it would be better to save the query in the database - that is the function of a relational view.
A VIEW is a virtual table that is based on a SELECT query.
You create a view by using the CREATE VIEW command:
CREATE VIEW viewname [(columnlist)] AS SELECT query; |
Example:
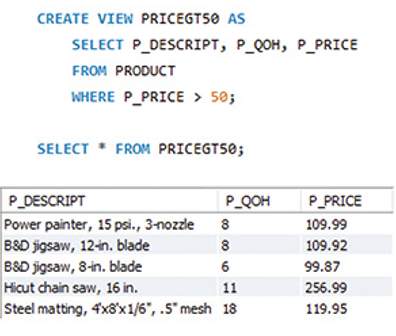
Creating a Virtual Table with the CREATE VIEW command