Lab 1 Brightfield Microscopy
Background
Brightfield Microscopy: produces image made from light that is transmitted through a specimen; uses a cone of light onto a specimen
What the light rays do when in contact with the specimen:
Absorbed by specimen
Scattered by organelles/storage granules in specimen
refracted due to difference in the refractive index between cytoplasm and water
More complex the specimen is (due to organelles/subcellular organelles) the easier it is to see the specimen using bright field microscopy
Increased scattered light
Light absorbed or scattered → do not enter the objective lens → contrast between specimen (darker) and background (lighter)
Diaphragm controls the diameter of beam of light that enters condenser
Bacteria and archaea too small to see using bright-field → poor contrast
Increasing the contrast would either use a phase contrast or are often stained with dyes
Dyes kill cells and often shrink affecting their size and shape as well as arrangement
A. Introduction to Microscopy
Important Concepts in Microscopy
Objective lenses: series of lens nearest specimen; magnifies speci
men and produces a real image
Ocular/eyepiece: magnifies real image by 10X
Resolving power:

Wavelength of visible light range ~400 to 700 nm (550 nm approx average and often used in calculating resolving power) → only for parallel light rays
When oblique and parallel rays illuminate specimen
Relationship becomes
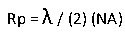
Numerical aperture (NA): measure of lens’ ability to “capture” light coming from specimen and use it to make image
Max resolution using visible light as an illuminating source is 0.2 micrometers → more resolution if used EM
With immersion oil, the refraction is decreased and more light rays pass directly into objective to be fully illuminated and results in improved resolution and clearer image
Other terms
Working Distance: clearance between specimen and objective lens when object is in focus
Shorter the focal length of the objective lens, the shorter the working distance
Aberrations: lenses have aberrations; they have 2 categories: spherical and chromatic
Spherical aberrations: result from the use of curved surfaces for lenses and are evident even in monochromatic light; many types of spherical aberrations including the curvature of field
Chromatic aberrations: result from dispersion and only occur with heterochromatic light
Manifested often by change of color of image as the focus is adjusted
Every wavelength is differentially refracted; the shortest the most and the longest the least
Instead of sharp image with white light, the image is surrounded by colored halos and responsible for the observed change in color of the image as focus is adjusted → high quality lenses are made to reduce this effect
B. Use of the Axio Lab. AI Student Microscope
Structures and Functions
Locate and learn names and functions of components of microscope (Lab Instructor should highlight these)
Calculation of Resolving Power
Complete table in PowerPoint and include in lab notebook; all calculations
Condenser Height Adjustment
Should be pre-centered, but should be few mm below the slide if not set at the appropriate height
Adjusting the Condenser Height
Place slide/specimen with sharpie mark on stage
Rheostat should be fully turned up and the aperture diaphragm lever should be used to adjust light intensity
Raise condenser to few mm below the glass slide
Get specimen into focus (use 10X objective lens)
Close field diaphragm when small circle of light shown
Adjust condenser height, raise or lower the condenser adjustment knob until circle is octagon
Centering the condenser/cone of light
Use condenser alignment screws with aid of instructor to make the circle of light centered
Open field diaphragm until circle of light fills the field of view , adjust rheostat/aperture diaphragm lever to lessen glare and optimal resolution of specimen
Rotate 40X objective in place and repeat
Lamp used at full intensity for all observation
If glare results when using low or high dry objectives, attempt to control it by adjusting aperture diaphragm not rheostat
Observation of Life in a Drop of Pond Water
Place small drop of pond water on clean glass slide
Spread thin layer of petroleum jelly on palm on hand
Carefully draw edge of coverslip through jelly to create narrow ridge
Lower cover slip, jelly side down onto drop of pond water and press into place
Record observations in lab notebook under 100X, 400X, and 1000X (easy or difficult to see specimens)