Lab 303 Pre Reading Knowledge:
TOPIC 3A: Pits and fissures and the importance of protection
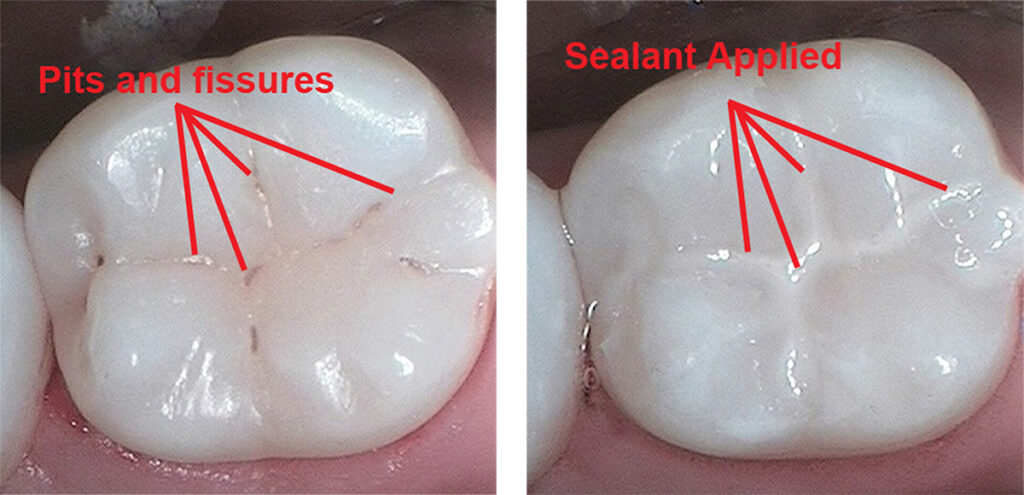
Pits and fissures are natural grooves and depressions found on the chewing (occlusal) surfaces of teeth, especially the molars and premolars.
Pits are small, pinpoint depressions found on the surface of the teeth, often at the intersection of grooves.
Fissures are deep grooves that run along the tooth surface, particularly on the occlusal surfaces of molars and premolars.
Importance in Dentistry:
Susceptibility to Decay – Pits and fissures can trap food and bacteria, making them prone to dental caries (cavities), as they are difficult to clean with regular brushing.

Sealants – Dental sealants are often applied to these surfaces to prevent decay by sealing off the grooves and making them easier to clean.
Diagnosis – Dentists assess the depth and structure of pits and fissures to determine the risk of cavities and decide on preventive or restorative treatments.
Fissure Sealants (Dental Sealants)
Fissure seals are a preventive measure designed to protect the chewing surfaces of the molars and premolars, which often have deep grooves or fissures prone to trapping food and bacteria. These fissures can lead to the development of cavities if not properly sealed. The procedure involves applying a composite resin material to the tooth’s occlusal surface, effectively creating a barrier that prevents decay.
Fissure Sealant Indications
Fissure sealants are applied to occlusal surfaces to prevent decay by sealing deep grooves where bacteria and food particles accumulate.
✅ When to fissure seal:
Deep pits and fissures – Teeth with deep, narrow grooves that are difficult to clean, even in a low-risk patient.
High caries risk – Children or adults with a history of cavities in molars, poor oral hygiene, or frequent sugar intake.
Erupting permanent molars – Newly erupted first (6-year) or second (12-year) permanent molars in children, especially within 2 years of eruption.
Early enamel caries (incipient lesions) – Non-cavitated white spot lesions in pits and fissures that can be sealed to prevent progression.
Special needs patients – Individuals with limited ability to maintain oral hygiene, increasing their risk of decay.
Orthodontic patients – Those with braces who may struggle to clean occlusal surfaces effectively.
🔹 Not typically needed for:
Shallow, self-cleansing grooves
Low-risk patients with good hygiene
Indications for when to apply a fissure sealant
So you're all thinking, uh, if fissure sealants are so great and are so good at um preventing dental caries, why don't we just fissure seal everybody's teeth as soon as they come into the mouth? Well, that's a good thought, but it's actually um costs money to treat people and fish sealants, even though they cost less than a filling. Um, actually do cost money. And there's always, with every single treatment we do on people, there is always risks associated with that. So we have to ask ourselves carefully, which teeth are we going to seal and which will we choose not to seal. And there are a number of criteria we would use to help us make that decision. First of all, we look carefully at the anatomy of the fissure. So, if the fissure is deep, And, uh, unable to be cleaned effectively by the patient with a toothbrush, then we would consider that would be a good, um, tooth potentially to, um, seal. However, if there's a, not a deep groove, but a quite a smooth, rounded surface that sees a cleansable, we may choose not to seal that particular tooth in that particular case at that particular time in their life. So it's not just seal everything up because everything's going to decay. It's, it's making a judgement about which teeth are more at risk of tooth decay and therefore they're the ones that we should prioritise. So when we're asking ourselves the question, there's really two criteria we should use. If the pits and fissures of the teeth are already displaying signs that they are starting to decay. But if they are displaying those signs that tell us that the tooth decay process has started, but is in its very early stages, then we would elect to therapeutically seal that tooth. So I use the term therapeutically because what we're actually doing when we seal a tooth that has early signs of tooth decay is we are treating the early stages of the disease. And we do that by eliminating the area where the plaque can gather or accumulate and therefore we stop the disease process. The other case where we would decide to use a fissure sealant is where there is not yet signs of disease, but we have determined that because of the nature of the tooth or the person in which the tooth is in, that's not very good grammar, is it? Because of the patient's risk status and or the shape of the pits and fissures, the tooth has not yet decayed, but there is a high likelihood that it might decay in the the near future. In these two cases, we would elect to seal that tooth, um, to prevent problems in the future. Now, just a reminder, we can only use pit and fissure sealants on. Pit and fissures, we cannot use them on the smooth surfaces, so the lip side of my front teeth, the pit and fissure sealant will not be effective, that's because it will not be retained, it won't stick there. So what we need to do is carefully examine the surfaces of the teeth. And the pits and fissures, 4 signs of early decay, and the red arrows, red arrow here is indicating a white area in the pit or immediately adjacent to the pit or fissure. And that's telling us that there's very early signs of demineralization or early dental caries. We examine other areas of the tooth, which tell us that there are deep pits and fissures. Uh, and again, that is a risk area. So in this case, we would choose to, um, fissure sealant, fiss seal those teeth, but it requires careful examination of the tooth, diagnosis of disease or early disease, or a prediction of future disease, and then we decide to fish a seal. Now, when we want to protect those um pits and fissures that we have um determined are at risk through our examination, there are two options for us in terms of fissure protection. The first group of options is to use chemicals on the tooth surface that will do something chemically to the tooth surface to either reverse the early disease, so replace the minerals, or to strengthen the tooth so that the minerals are not lost from it during a Key's attack. So that's our first cluster of options. The second cluster of options is to physically occlude the, the, uh, pit and fissure. Now, you may make a decision to use a chemical, um, instead of physically occluding the tooth because of a number of reasons. The behaviour of the patient, so very young children cannot sometimes tolerate. A fissure sealant, in which case a quick application of a highly concentrated fluoride application might be more appropriate, or there could be lots of other reasons why uh you might not choose this one. Uh, but you have to have a very good reason for your selection of either a chemical solution or a physical occlusion of the, um, fissure, petal fissure because they each have pros and cons. So, if fissures are considered to be at risk, if you think there's something about a pit or fissure that tells you that there might be a problem in the future, this looks suspicious, then you should do something. Whether it's the chemical, um, fissure protection, or a, uh, pet and fissure sealant, you should do something. If you think that the fissure is at risk, then something needs to be done. You should not do nothing and then wait, and we might just wait and see what happens. Maybe it'll decay, maybe it won't. All right? If you think it's at risk of decaying, there should be an action that follows that thought. OK? That should be some sort of intervention. So, let's look at the first, um, uh, little tool kit we've got, which is the use of, uh, chemicals. So, uh, placing chemicals in contact with the area that you consider is at risk. And of course the one that, um, everybody probably knows about is fluoride. And fluoride uh is a uh a chemical agent. Um, that it, it, it, uh, is derived from fluorine. Fluorine is a naturally occurring element in the Earth's surface. I think it's the 16th most abundant, uh, element in, in the Earth's crust. Uh, it is a naturally occurring, um, um, ion. Now, fluoride has been, um, shown in studies to prevent tooth decay, uh, and that has led to fluoride toothpaste, for example, and also to the addition of fluoride to our water supplies. But we can also use it in a concentrated form. Uh, in, in a paint or a varnish that we can place on the tooth surface. And in a very concentrated form, it has a number of effects on the tooth surface. And just to summarise, cause we'll look at the, but just for now, know that it does two things. One, it repairs tooth surface that has been damaged by, by the decay process. So it replaces minerals onto the tooth surface that have been lost through, um, the curries process. So it, uh, repairs the surface, and the second thing it does is it strengthens the surface so that later carious or or decay attacks, uh, are less dangerous. So it actually inhibits chemically, once it's incorporated into the tooth surface, it actually chemically inhibits, uh, the dissolution of the, um, hydroxyappatite crystal. That's, that's the fancy word for tooth enamel. So flu fluoride in a concentrated form is a very useful thing for applying to surfaces to help repair and then prevent future attack. Now When you're looking at fluoride versus uh fissure sealants, there's some debate in the literature about which one's more effective. Some studies have shown that um fluoride, concentrated fluoride applications to pits and fissures is just as effective in the long term as placing a fissure sealant. But other studies have shown that fluoride is actually not as good as vicious sealants. Now, the black, you know, it's it's not black and white, unfortunately, when you look at research literature surrounding, uh, the effectiveness of dental treatment, and that's probably something, uh, you should get used to. So it's really about what is uh the most appropriate treatment for this person at this time, given the available evidence. Now there is some strong evidence that that suggests another Cochrane review that um resin-based sealants are actually superior or better than fluoride varnish application. Uh, in permanent molars, um, and other low quality evidence for resin-based sealant and fluoride varnish over fluoride varnish alone. So, as I said, it's not black and white, but there seems to be a suggestion that pit and fissure sealants, Um, are actually a little bit more effective than fluoride application. However, if fluoride application is the only thing that can be applied to a tooth in a particular situation, then it, it appears as though it has particular benefits as well. So if a tooth or a person is able to accept a fissure sealant over a fluid. application. At this stage, with the current evidence, I would say go for the fissure sealant. If for some reason they can't afford it or their behavior's not, you know, they're demented or they're a very young child, for example, and you cannot physically place the fissure sealant effectively, then use, use the fluid concentrated fluoride varnish. There are some other chemicals as well as fluoride, um, silver damine fluoride, which is a a a a a combination of silver and fluoride, has been shown to be very effective in, um, uh, eliminating the bacteria associated with, so the silver does that, eliminates the bacteria, it's antibacterial, and then the fluoride provides a remineralization. Uh, this chemical has a tendency to turn, um, early, uh, decay lesions of black colour, and sometimes patients don't like that. So it may not be widely used, um, above fissure sealants. Chlorhexidine is another, um, broad spectrum anti, uh, microbial. which has been applied to pits and fissure, shown some effect but not as strong as fluoride. And povidine iodine is something you might also see. But, uh, the fluoride and the fissure sealant above that are the most effective. There's less evidence to support the use of these chemicals.
There are two main types of fissure sealants, each with different properties and indications:
1. Resin-Based Sealants
🔹 Composition: Bis-GMA-based resin (similar to composite restorations)
🔹 Curing: Light-cured or self-cured
🔹 Adhesion: Requires enamel etching (phosphoric acid) for retention
🔹 Durability: Long-lasting with good wear resistance
🔹 Moisture Sensitivity: Requires a dry field for optimal bonding
🔹 Best for: High-risk patients with deep fissures and good moisture control
💡 Variants:
Filled resin sealants – More wear-resistant but slightly harder to apply
Unfilled resin sealants – Flow better into fissures but wear down faster
2. Glass Ionomer Sealants (GIC)
🔹 Composition: Fluoride-releasing glass ionomer cement
🔹 Curing: Self-cured or light-cured
🔹 Adhesion: Bonds chemically to enamel without etching
🔹 Durability: Less wear-resistant than resin-based sealants
🔹 Moisture Sensitivity: More tolerant of saliva and moisture
🔹 Best for: Erupting molars, high caries risk, or patients with poor isolation ability
💡 Variants:
Conventional GIC – Fluoride-releasing, moisture-friendly but wears faster
Resin-modified GIC (RMGIC) – Improved strength and adhesion, still fluoride-releasing
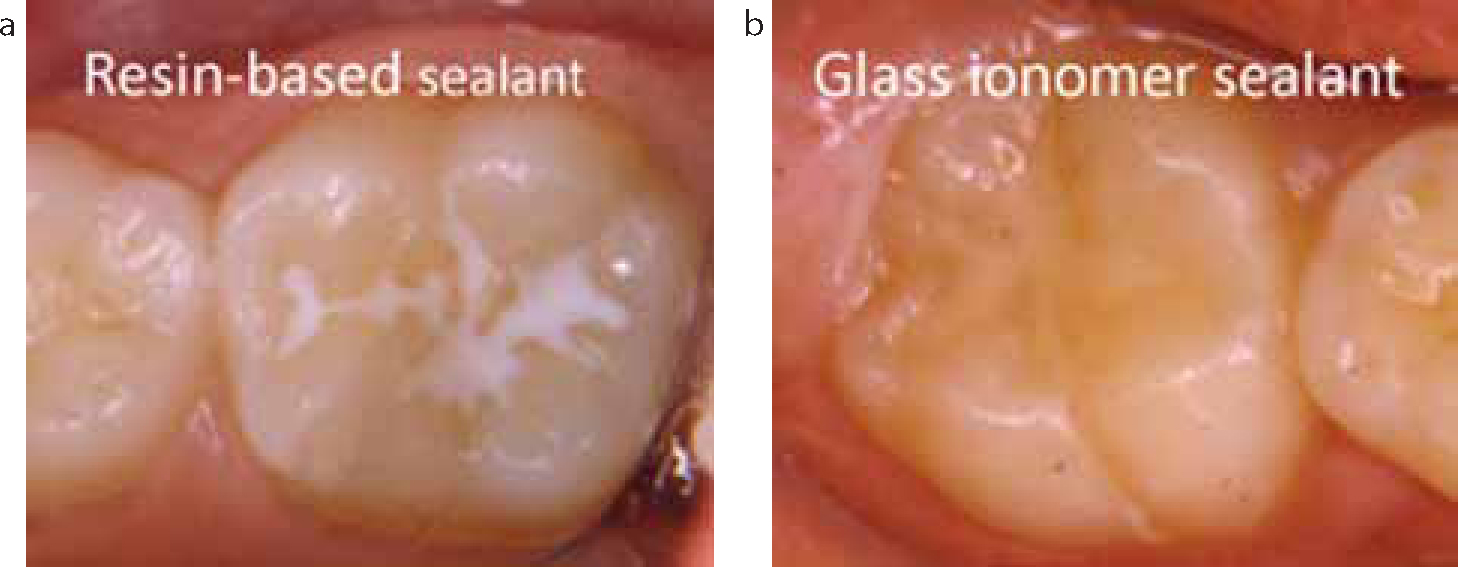
Choosing the Right Sealant:
For dry, well-isolated teeth → Resin-based sealants
For partially erupted teeth or moisture-prone areas → Glass ionomer sealants
For high caries risk patients → Fluoride-releasing GIC or RMGIC
Key Points to Understand:
Purpose: Prevent decay in the occlusal grooves of molars and premolars.
Materials Used: Typically composite resins.
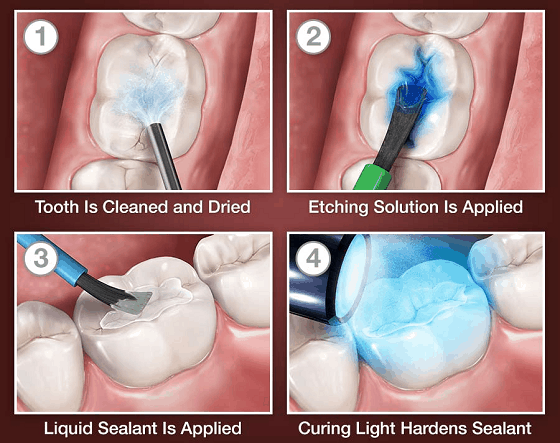
Procedure Overview: Tooth preparation (cleaning), etching, application of resin, and curing.
Advantages: Non-invasive, quick, and effective for cavity prevention.
TOPIC 3B: Fissure sealant - Conseal f Resin
Conseal f Pit and Fissure Sealant
Conseal f is a pit and fissure sealant used in dentistry to protect teeth from decay. It is specifically designed to seal the pits and fissures of teeth, which are common areas where cavities form due to the difficulty of cleaning these narrow grooves. Below are the key features of Conseal f:
Low Viscosity: Conseal f is a low-viscosity resin, meaning it flows easily into the deep grooves and fissures of teeth, ensuring superior penetration and coverage.
Fluoride-Releasing: The sealant releases fluoride, helping to prevent cavities by providing a fluoride boost during and after application, thus offering long-term protection.
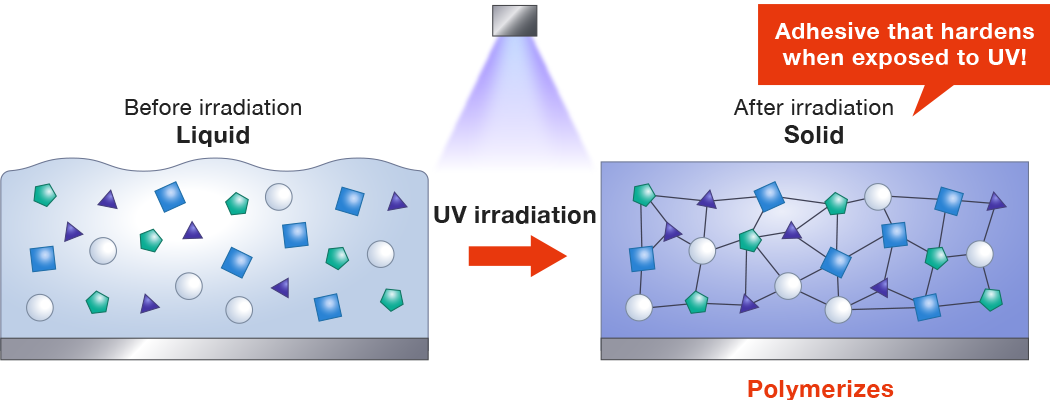
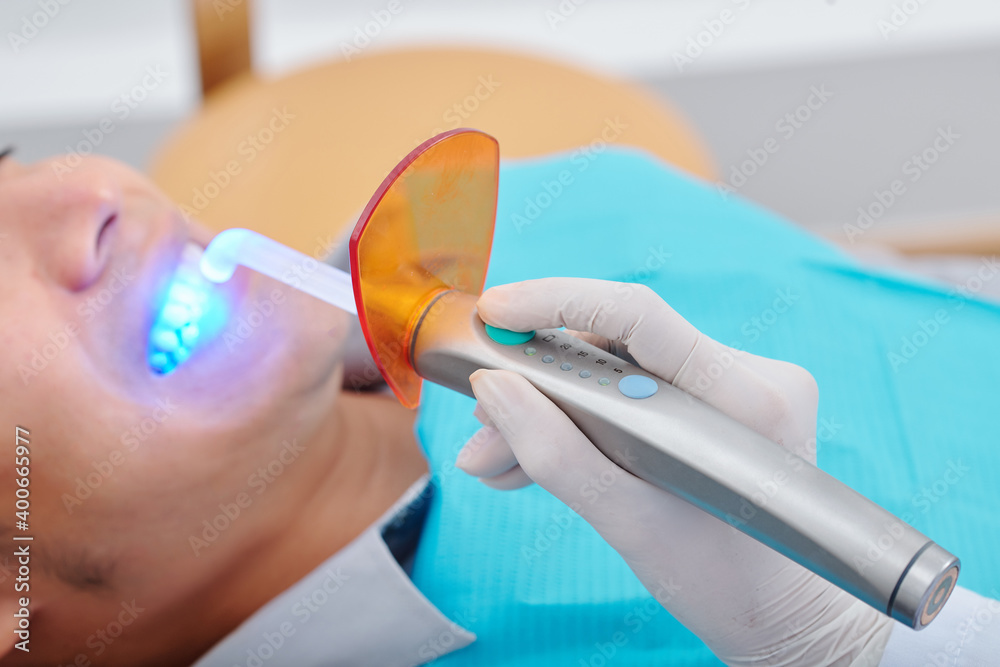
Light-Cured: Conseal f hardens when exposed to a light source (typically LED light with a wavelength of 440-480 nm). This light-curing process ensures that it forms a solid, durable layer over the fissures.
Improved Retention: The sealant’s formulation is designed to provide stronger mechanical retention to the tooth surface, reducing the likelihood of premature wear or dislodgement.
Indications: It is primarily used for sealing sound but vulnerable pit and fissure sites, especially those with minimal or no decay. It is also used for teeth with minimal pit and fissure caries.
Aesthetic: The resin has a natural appearance, making it ideal for aesthetic restorations on the occlusal surfaces of teeth.
Instructions for Use
Tooth Preparation:
Clean the occlusal surface using a bristle brush and slow speed handpiece
Thoroughly rinse with water and isolate the tooth.
Etching:
Dry the surface with clean, dry, oil-free air.
Apply 37% phosphoric acid (Super Etch or Super Etch LV) for 30 seconds.
Rinse thoroughly with water and dry the tooth for 15 seconds.
Ensure a matte white appearance of the etched enamel.
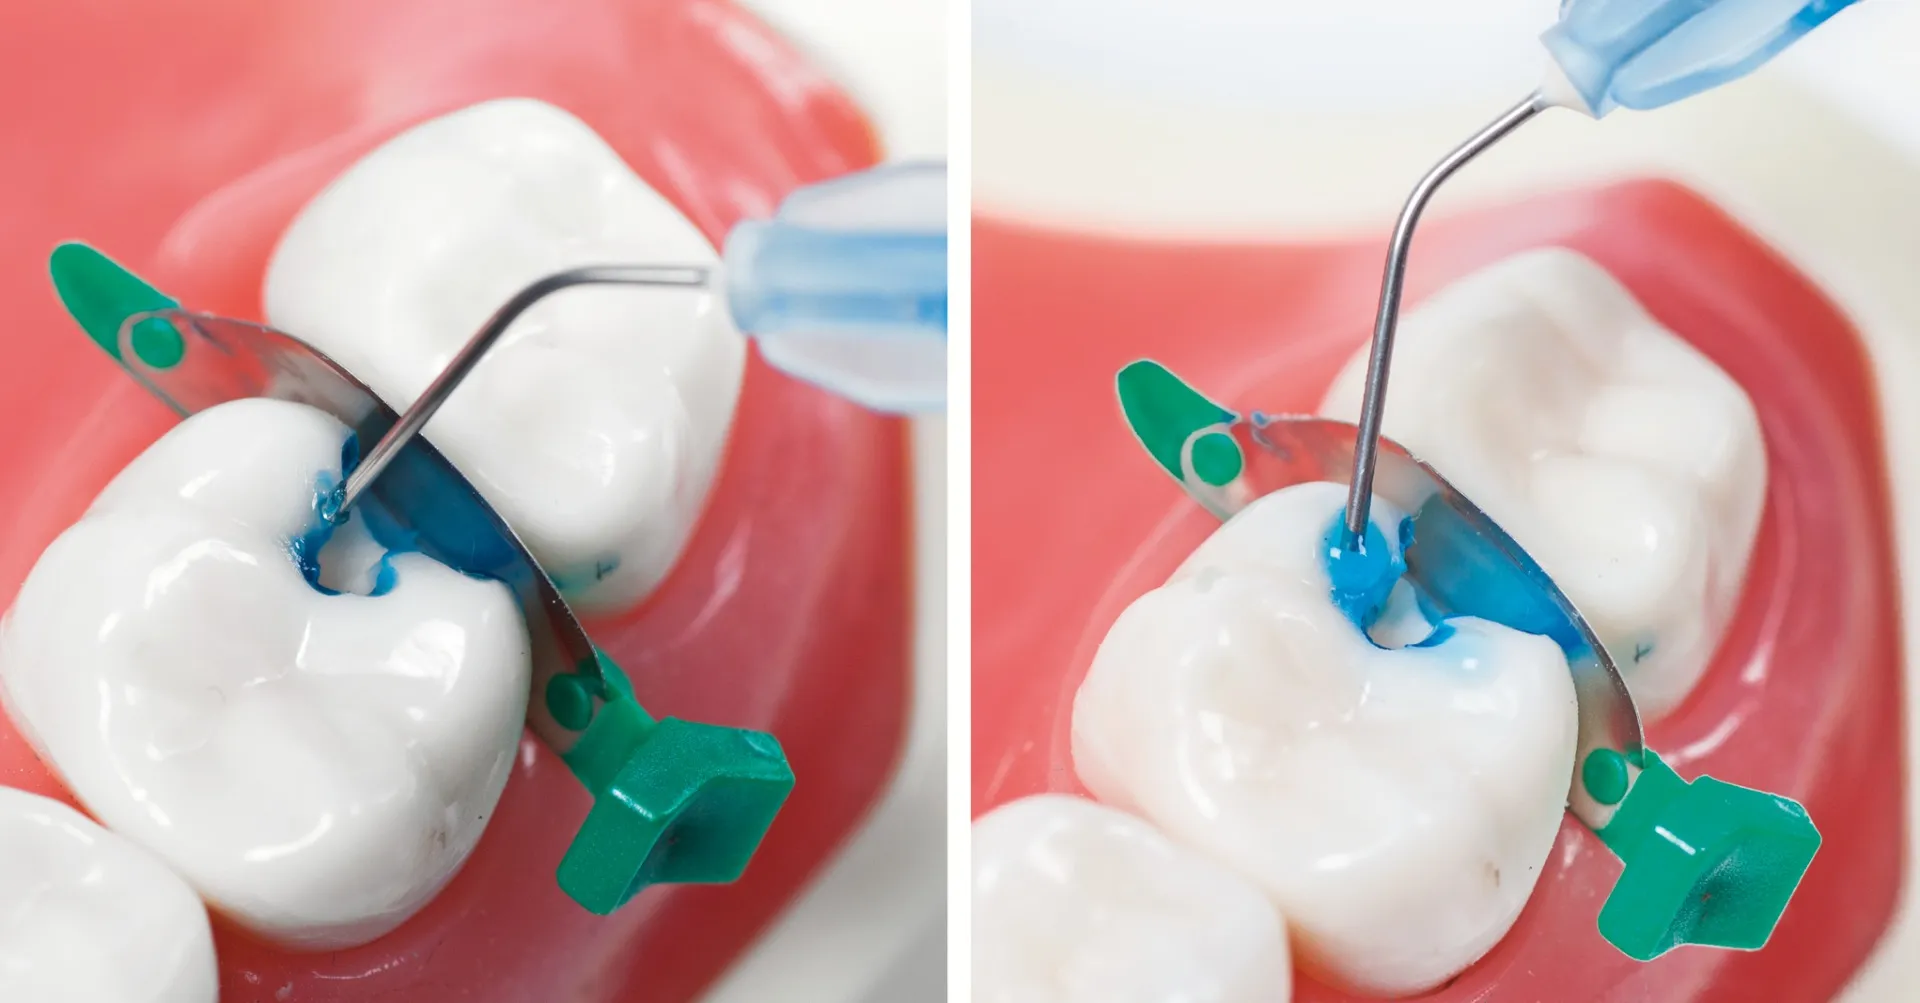
Sealant Application:
Ensure the syringe dispensing tip is securely attached.
Extrude a small amount of sealant into a dappens dish, protect from light
Apply the sealant to the etched surface with a blunt instrument
Light Curing:
Light cure for 20 seconds using an LED curing light (440-480 nm wavelength).
Check for voids and wipe off the oxygen-inhibited layer after curing.
Storage and Handling
Store between 10°C and 25°C (50°F – 77°F).
Use at room temperature (20°C – 25°C / 68°F – 77°F).
Avoid exposure to ambient light to prevent premature curing.
Precautions
For professional use only.
Keep out of reach of children.
Avoid skin and oral tissue contact to prevent irritation or sensitization.
First Aid Measures
Eye Contact: Rinse thoroughly with water and seek medical advice.
Skin Contact: Remove with alcohol-soaked cloth and wash with water.
Ingestion: Drink plenty of water and seek medical attention if symptoms persist.
Inhalation: No symptoms expected.
Understanding resin composite fissure sealants and how they work
Let's look first at the resin uh composites. Now these are materials which as the name suggests, are a composite of materials um that are held together uh with a resin. So, um, I'm not sure what this is, but this is a, this might be a cake or something or a or a biscuit or a slice, a hedgehog maybe, I don't know what it is. Uh, or it might be Styrofoam, but you can see, um, I'm just sort of demonstrating the way these materials work. So there are these, uh, material, these little fillers here, little chunks of, uh, of material that are then held together by a glue or a resin. So when the whole thing sets together, you get a relatively strong, uh, composite material. And just to simplify that a little bit further, uh, you can see here that it's made up of what we call inorganic filler. So these little particles here, little chunks, little solid, um, pieces of the filler are suspended, uh, in a resin matrix. So the, the area surrounding these little shapes is representing that resin. And before it is set or polymerized, the material is malleable, so it will flow like a thick um custard, uh, if it's a a um a fissure sealant material, or if you're using it as a restorative material, it will come as relatively viscous or thick. It'll be malleable, but it will be much thicker uh than the form in which we use it for um fissure sealants. Now the key here for this material is that it will not harden or set until it is polymerized. So there is a polymerization process which is activated once the material is placed on the tooth. And that polymerization, most commonly in most resin composites these days, uh, is done with a. So there will be a particular uh spectrum of light that will um activate um a lot of um free radicals, uh that will cause the, the, the hardening or the um polymerization of the material. There are some resin composites that as soon as you add, the organic fillets, so they come as a separate powder and a um, Um, uh, a liquid, which is then mixed together. Now once that mixing, uh, commences, the polymerization, um, reaction or chemical reaction starts and they will set automatically without the light, um. The, the light cured, so that's what we call it, light cured, uh, resin composites will set when we want them to, uh, when we expose them to light. However, having said that, uh, if you leave these resin composites, these, these, um, command cure, light cured, uh, resin composites in natural light, they will slowly start to set. So you can't muck around with them, you need to place them and then use the light to cure them. So some fun facts about resin composites, um, they can be filled or unfilled, and we'll talk about that in a moment. Uh, the materials are fluid, as I said, and then they set hard after we cure them. Um, so there's the light curing, light polymerization, or auto cured through a chemical reaction. So as soon as the, the, the two, the two, the powder and the liquid are, um, mixed together, they then start to cure. All right. You may come across some of these, uh, in clinical dentistry, but mostly these days we'll use light cured or light polymerized, uh, resin composites. The fluid resin allows flow. OK, so we want the resin to flow into the pits and fissures to flow along the pits and fissures, and we want them to flow down as far as possible into the base of the pits and fissures. So we want resin composites used in glass in um fissure sealants to be relatively fluid. So the flow, That is, it's, it's flowability uh is related to the amount of filler. So the more filler you have, the thicker the material is, right? It's like adding, um, uh, flour to water. The more you put in and stir, the thicker the solution gets until eventually it'll turn into dough. If you put a very little amount of flour in, you'll get a relatively, um, watery, uh, flow of. So it's the same concept, uh with resin composites, so the less fill they have, the more flowable they are, right? So in uh fissure sealants you'd expect there'd be less fill to allow them to flow into pits and fissures. So, we use unfilled uh composites for um that high flow, right, for, for, for resin sealants. So what that means though is because we are reducing the filler in the material, we're actually making the material less strong, less um able to withstand compressive forces, right? So what this means is that we need to ensure that the fissure sealant is in the is in the fissure pit or fissure only. It's not sitting on the pointy bits or the cusps of the tooth because if it is, the tooth above it will come together and crack it off because it won't be very strong. OK? So it's important when you're placing res uh resin composite uh fissure sealants that you ensure that you don't overfill the pits and fissures. Otherwise it will come into contact with the tooth above it, when when a person bites together, and they will fracture off. But we don't actually need the bulk of strength to, um, uh, protect the fissure. All we need to do is block off the entrance to the fissure to stop the sugars and plaque from getting into the fissures. So we don't actually need that strength, right, so if they're placed appropriately, um, this low viscosity, uh, or low filler is not an issue. The other thing that's interesting to note, and we know this from scientific uh clinical studies, is that we don't actually need the fissure sealant to flow all the way into the base right down to the bottom of that, um, fissure. All we need for it to do is to block off the top. OK. So the seal is the deal. And it just as an analogy to think about how that works, if you've got a bottle, an empty bottle, just placing a top over the opening to the bottle will prevent anything from getting into it. You don't actually have to fill the whole bottle up with concrete in order to stop anything getting into the bottle, right? So as long as you're sealing up the entrance, if you're sealing it well, Nothing can then penetrate into the base of the fissures. So with fissure sealants, the seal is the deal, OK? Now here's a really nice picture uh of a tooth that has had a fissure sealant placed and has been then cut in half so that you can see the material here, resin composite, and you can see the enamel here. And you can see this one is beautifully sealing. Here's the mouth up here, sealing off the mouth from the base of that pit and fissure where the toothbrush bristle couldn't reach. So this seal here, even if it didn't actually penetrate all the way to the base, as long as it was sealed around this area here, would provide protection for this tooth. OK, so really, even if it went to this level here, it would still be providing protection for this area here. So this is very cleansable with a toothbrush. So the materials resin sealants require in order to adhere to the tooth, they actually require that we prepare the tooth surface uh to receive the um material. And what we need to do with resin composites is because they don't bond chemically to the tooth. GICs do, but these don't. We actually need to um treat the surface of the tooth in a way that creates little locks in the enamel, little microscopic locks or micro pores in the enamel, that the material will flow into and when set will lock, Uh, to the tooth surface or to those micro pores. Now, in order to produce the micro pores, we actually need to, um, demineralize the tooth surface. And we do that using a very, very strong concentrated acid, orthophosphoric acid. Uh, it's extremely, um, uh, acidic, and, uh, so don't get it on your skin, cause if you get it on your skin or your clothes, it'll burn a big hole in them, right? So it's required though because the tooth is highly mineralized and in order to demineralize and create little pores or locks for the resin, we actually need to use this strong concentration of fluoride. And we call that process etching the tooth. Alright, so the etchant. The acid will etch the tooth, and if you've ever seen glass that has been etched by an acid with, you know, a picture or a name on it. And you run your finger over the area that's been etched, you'll notice that it is roughened. OK, that's what we're doing with this edge. It's extremely strong and extremely dangerous, so we'll very carefully introduce you to this material before we use it. So we edge the surface with orthophosphoric acid. Uh, the concentration of the acid is about 40%. It then creates these micro pores in the enamel. And the little pores are like little locks in the enamel that the material then flows into. And a low viscosity, uh, resin can flow into these, um, pores to about a depth of 50 to 100 microns. And then when you zap it with the light, it will set hard and the resin inside the pores will set hard and be locked into the tooth surface. And that's what retains the resin composite. I'll give you some references to textbooks to get a more detailed, um, description of how that works, but just for now, um, In a nutshell, that's how it works. Here is a picture taken with a lot of magnification of enamel that has been etched with um orthophosphoric acid. So the etching has created these little areas um around the enamel rods, which then allows the material to flow into it. And once it's in there, we then set it and it locks in place so it won't pull back off the surface. And here you can see another um uh very magnified image where the resin has been placed on the tooth surface. It is then, the tooth has then been sectioned um down the middle, so it's cut in half. So we can actually see here, these streaks here are actually the resin composite that has flowed down into little spaces. This is the enamel rod here. OK. Oops. I knew that would happen. This is the enamel rod here, and etching has actually opened up spaces between each of those rods. The resin has just flowed into it and then it's been set hard with uh the light. And you can see, uh, here is the fissure sealant here, here are the resin tags, and it holds or anchors, uh, into the tooth surface. So resin composite is a really effective um material for occluding uh fissures and and pits. But it does have um one significant uh drawback. It is extremely sensitive to moisture. So the resin composite material is what we call hydrophobic. It hates water, so it's very moisture sensitive. And if you try to place uh resin composite on a wet tooth surface, it will not stick. OK, it will be compromised and it will fall off. So that's problematic when you're dealing with a human mouth because they're full of saliva, which is a fluid, right? So what we actually have to do is isolate the tooth surface from the saliva, uh, and keep it dry while we're placing the resin composite. And, and there's lots of ways we can do that and we'll talk about that another time. But you cannot use it in the presence of moisture. OK, so if you cannot isolate a tooth effectively to keep it dry during the procedure, you should not use a resin composite. Because if you do, the sealant will fail and decay will then occur. We will talk about tooth isolation and particularly rubber dam isolation as the most effective way to keep teeth dry while we're operating them on. But just for now, keep in mind that really important uh critical factor, Uh, that the tooth must be kept completely dry, and here is a tooth with a rubber dam in place. OK, so it's got a rubber, um, uh, coat over it, which is held in place by this clamp. Uh, resin composites require this, otherwise the moisture, uh, present in the mouth will cause them to fail.
TOPIC 3C: Etchant and Etching Technique in Dentistry
Etching is a fundamental procedure in restorative dentistry, primarily used to prepare the tooth surface for the application of bonding agents, adhesives, or restorative materials. The etching technique modifies the tooth surface to increase the bond strength between the tooth and restorative materials, such as composite resins or dental sealants.
Super Etch 37% Phosphoric Acid Etchant for Enamel and Dentin
Super Etch 37% wt phosphoric acid etchant is a highly effective dental etching agent designed for use on enamel and dentin to promote strong bonding of restorative materials. It plays a critical role in adhesive dentistry by removing the smear layer, creating micro-retentions in enamel, and exposing collagen fibres in dentin to enhance the penetration of bonding agents.
This blue-tinted, easily controlled gel flows under direction rather than gravity, ensuring precise application without running. Its high viscosity allows for accurate placement while remaining easy to rinse away after the etching process. Super Etch is commonly used in procedures such as composite restorations, bonding of orthodontic brackets, and the application of pit and fissure sealants.

In the Simulation Class, You Will Be Using:
Super Etch 37% Phosphoric Acid Etchant for enamel and dentin conditioning.
For Fissure Sealants or Cavity Restorations
Clean and isolate the tooth.
Etch the tooth surface with Super Etch LV for at least 30 seconds.
Wash thoroughly with water.
Completely dry the tooth. A dry field is essential for the next steps.
⚠ CAUTION: Ensure the dispensing tip hub is firmly attached to the Super Etch syringe by twisting the hub securely onto the syringe. NB: Etch is dispensed into a dappens dish and applied with a microbrush.
Hazards and Precautions
🔴 Hazards:
Irritant – Contains phosphoric acid, which may cause skin, eye, and mucous membrane irritation.
Corrosive – May damage soft tissues upon prolonged exposure.
Inhalation risk – Avoid inhaling vapors or mist.
🛑 Precautions:
Use Dental Dam isolation to protect the patients susceptible tissues
Use personal protective equipment (PPE): Wear gloves, safety glasses, and a mask.
Avoid skin and eye contact: In case of contact, rinse immediately with plenty of water and seek medical attention if irritation persists.
Do not swallow: If accidentally ingested, seek medical assistance.
Store safely: Keep out of reach of children and away from direct sunlight or heat sources.
Proper disposal: Dispose of used materials according to local regulations.
TOPIC 3D: Light Curing of Resin in Dentistry
Light Curing of Resin in Dentistry: Why and How It Works
Light curing, also known as photopolymerization, is a crucial step in many dental procedures, especially when using resin-based materials like composites, sealants, and bonding agents. This process ensures that the material properly hardens, providing strength, durability, and optimal adhesion to the tooth structure.
Why Is Light Curing Used for Resin?
Light curing is essential for activating the polymerization process in resin-based composites. These materials consist of monomers such as Bis-GMA, UDMA, and TEGDMA, which remain soft and workable until exposed to a curing light. Unlike self-cured composites, which begin hardening immediately upon mixing, light-cured resins allow clinicians ample working time to shape and adjust restorations before setting them.
A key advantage of light curing is its ability to produce strong, durable restorations. When properly cured, resin composites exhibit high mechanical strength, wear resistance, and longevity. Inadequate curing, on the other hand, results in weak restorations prone to fracture, microleakage, and secondary decay. Additionally, light curing plays a crucial role in bonding the resin to tooth structures, ensuring a tight seal and preventing future complications.
Another significant benefit of light-cured resins is their aesthetic quality. These materials are available in various shades and translucencies, allowing them to blend seamlessly with natural teeth. Furthermore, unlike amalgam, which requires mechanical retention, resin composites bond directly to the tooth structure, enabling minimally invasive cavity preparations that preserve more enamel and dentin.
How It Works
Dental curing lights emit light with a specific wavelength that activates photoinitiators within the resin material. The most common photoinitiator, camphorquinone (CQ), absorbs blue light in the 400–500 nm wavelength range. When exposed to this light, camphorquinone reacts with an amine co-initiator, generating free radicals that start the polymerization process.
These free radicals trigger the formation of long polymer chains by linking monomers together in a three-dimensional network. This transformation turns the soft, moldable resin into a rigid and durable material capable of withstanding occlusal forces and daily wear. While polymerization continues even after the light is turned off, adequate exposure is essential to ensure full curing and optimal mechanical properties.
One crucial consideration is the depth of light penetration. Most dental curing lights can only cure up to 2 mm of resin at a time. If the resin is applied in thick layers, the bottom layers may remain under-cured, compromising the restoration’s integrity. To prevent this, clinicians use the incremental layering technique, curing each layer separately before adding more resin.
Types of Dental Curing Lights
Several types of dental curing lights are available, but the most commonly used today are LED (Light Emitting Diode) curing lights.
LED curing lights: These are more modern and efficient, emitting a more focused and consistent light. They produce minimal heat, consume less energy, and have a longer lifespan compared to older halogen lights. LED curing lights typically emit blue light in the 400–500 nm range, making them highly effective at activating camphorquinone-based resins.
Halogen curing lights: These were widely used in the past but generate more heat and require filters and cooling fans to regulate temperature. While effective, they are being phased out in favor of LED technology due to their higher energy consumption and shorter lifespan.
Plasma arc and laser curing lights: These offer extremely fast curing times but are less commonly used in routine dental practice due to their cost and complexity.
Tips for Successful Light Curing
Use a calibrated curing light - Ensure your curing light is functioning correctly and delivering the appropriate light intensity.
Follow manufacturer's instructions - Adhere to the recommended curing times and protocols for the specific resin material you are using.
Position the light tip correctly - Ensure the light tip is at a 90-degree angle to the surface being cured.
Overlap the light tip - Move the light tip slightly to ensure that all areas of the surface are adequately cured.
Use a blue-blocking shield or glasses - Protect your eyes and the patient's eyes from the intense blue light emitted by the curing light.
Regularly check the light output - Use a radiometer to ensure that your curing light is still delivering the appropriate light intensity.
Common Light Curing Issues and Their Solutions
Several issues can arise if the light curing process is not performed correctly. For example, if the resin remains soft or sticky, it is often due to insufficient curing time or low light intensity. Increasing the exposure time and checking the light output can resolve this problem. Similarly, if the restoration is weak or brittle, it may be under-cured due to excessive resin thickness. Using incremental layering ensures proper polymerization.
Postoperative sensitivity is another common issue, often caused by shrinkage stress or inadequate bonding to the dentin. Applying resin in smaller increments and ensuring proper adhesive techniques can help alleviate this. Additionally, if the cured resin appears yellowish or discolored, it may be due to the wrong light wavelength or contamination during the procedure.
Lastly, excessive heat generation from prolonged curing can cause pulpal irritation. This can be prevented by using pulsed curing modes and cooling techniques
Safety Considerations for Dental Solutions
Safety Considerations for Pre-Clinical Materials
Etch (32% Phosphoric Acid)
R isks: Causes serious skin burns and eye damage.
Safety Measures: Always wear gloves and safety glasses. Handle with caution and apply carefully with a microbrush to avoid spillage.
Bond (Clearfil Bond – Two-Step System) Risks:
Irritant to eyes, skin, and respiratory system. Highly flammable.
Safety Measures: Wear gloves, mask, and safety glasses. Keep away from open flames and heat sources due to its flammability. Avoid skin contact.
Dentine Conditioner (10% Polyacrylic Acid Solution) Risks:
Can cause serious skin burns and eye damage.
Safety Measures: Wear gloves, mask, and safety glasses. Handle carefully to avoid contact with skin and eyes.
Fissure Sealant (Conceal – Composite Resin Sealant) Risks:
Irritant to eyes, skin, and respiratory system, may cause skin sensitization.
Safety Measures: Use gloves, safety glasses, and mask when handling. Avoid prolonged exposure to prevent skin irritation.
Glass Ionomer Capsules (GC Fuji)
Risks: Irritating to eyes, skin, and respiratory system. May cause skin sensitization.
Safety Measures: Always wear gloves, mask, and safety glasses when handling. Use in a well-ventilated area to minimize inhalation risks.
Hand-Mixed Glass Ionomer (Vitrebond – Powder & Liquid)
Risks: The liquid can be toxic or harmful if it contacts the skin.
Safety Measures: Wear gloves to protect skin, and safety glasses to avoid eye contact. Wash hands thoroughly after handling the material.
Composite (Gradia Direct X – Light Cured Restorative Material)
Risks: May cause allergic skin reactions and eye irritation.
Safety Measures: Wear gloves and safety glasses when handling. Avoid skin contact, and keep the material covered to prevent premature curing.
GC TriPlaque ID Gel (Plaque Disclosing Gel)
Risks: Irritating to eyes and skin, and may cause burns.
Safety Measures: Use gloves and safety glasses to protect against accidental exposure. Avoid contact with eyes or broken skin.
General PPE Requirements:
Always wear gloves, safety glasses, and a mask when handling any dental materials.
Ensure materials are stored and disposed of properly to minimize exposure risks.
Work in well-ventilated areas to avoid inhaling fumes or particles.
Following these safety protocols will reduce the risk of injury or harm while working with dental materials in the pre-clinic.