RESPIRATORY
Overview
In the hospital setting, the nurse completes a respiratory assessment at least once every 8 hours. This information is used as a baseline to monitor for changes or improvements in the client's condition.
Some clients have chronic physical conditions that result in findings that are different than those expected in a client who does not have the altered health condition. For example, a client who has COPD can develop a barrel-shaped chest over time. This becomes an expected finding for that client but is an unexpected finding in a client who does not have a chronic respiratory disorder. Understanding what each client's baseline is will help you recognize a change that might need to be addressed. The essence of any assessment is to observe overall changes but also to monitor for subtle changes, such as chest pain when breathing, shortness of breath, cough, change in sputum color, or sleep disorders.
When assessing findings, prepare for a more focused assessment if your initial findings indicate a deviation from those that are expected. Once a focused respiratory assessment has been completed, you will need to consider the next steps to take. When considering the next step, complete further related assessments such as the client's temperature and pulse. Consider implementing incentive spirometry and coughing and deep breathing as interventions and notify the provider of any findings that indicate a decline in the client's condition.
Tools
In preparation for a respiratory assessment, check that the clinical environment is appropriate and essential tools are available.
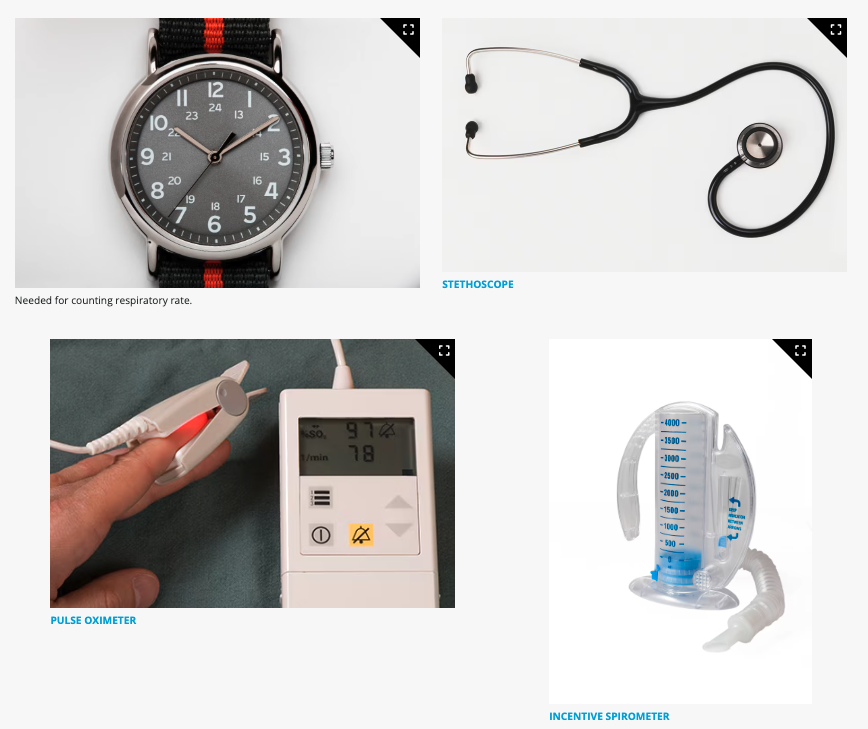
A watch is needed for counting respiratory rate.
A stethoscope is necessary for auscultation. It takes patience and practice to become skilled at hearing the different sounds that can be present in the lungs. There may be times when your visual exam points out something urgent before you even listen with your stethoscope. An example would be when only one side of the chest is moving during inspiration or expiration or the client is in obvious respiratory distress. In these situations, adjust your usual pattern of assessment to address the unexpected finding. Listen to healthy lungs of your friends or family and you will be certain to realize unexpected breath sounds when you hear it. It will take time to become comfortable figuring out what the abnormal sounds are exactly. Does it sound like a musical high-pitched sound? Or a more low-pitched, grating or crackling sound? Or are there sounds in one spot, but not in another? It is also acceptable to ask someone else to double-check what you think you are hearing. The key is to realize that it is an unexpected sound. Over time, you will get used to identifying the location and type of unexpected breath sounds.
The pulse oximeter is a noninvasive monitor that gives a real-time look at the client’s oxygen level. A light wave reflects off of circulating hemoglobin that is oxygenated and deoxygenated and is used to provide a percentage of the oxygen saturation in the arterial blood. The pulse oximeter also will provide a pulse reading. The pulse oximeter comes in many different forms, both portable and compact, or stationary on a monitor. The oximeter device is connected to a client with a finger clip or with a sticker probe attached to the client’s finger, toe, or earlobe. Any noninvasive monitor is subject to the condition of the client.
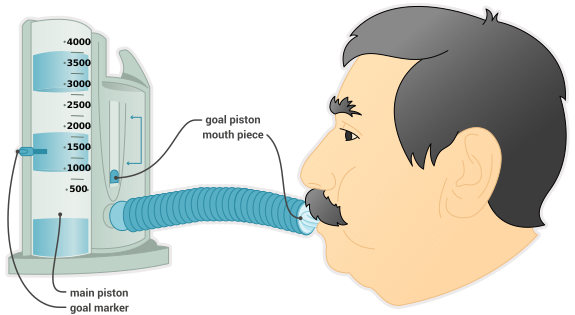
Incentive spirometers are used to improve ventilation of the lungs, loosen secretions for expectoration, and promote the exchange of gases by expanding collapsed alveoli. The flow-oriented spirometer has one or more cylinders with balls that rise when the client inhales. A volume-oriented spirometer has a bellows that rises during inspiration. When using an incentive spirometer, the client should sit upright in a position of comfort. Then, the client should be instructed to seal the mouthpiece with their lips and inhale slowly and deeply. This action makes the ball or the bellows rise in the cylinder. The client should be instructed to hold their breath for 2 to 6 seconds at the end of inspiration before releasing it. The exercise should be repeated 4 to 10 times per hour. This tool can be used in the hospital or home setting and is often recommended to clients who have lung disease such as COPD to maintain adequate oxygenation while preventing acute atelectasis that can develop into pneumonia.
Anatomy
When completing a respiratory assessment, use landmarks on the outside of the body to help identify the body’s internal structures. The Angle of Louis, located at the manubriosternal junction before the body of the sternum, is useful for rib identification. Other landmarks are an essential component of respiratory assessment when examining the anterior, lateral, and posterior chest wall.
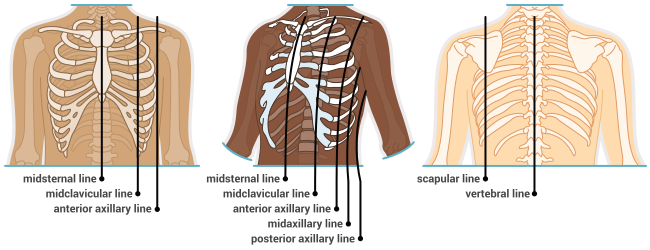
The midsternal line is located down the center of the sternum.
The midclavicular line is a vertical line from the middle of the clavicle over the nipple and down to the lower ribs on the left and right chest wall.
The anterior, midaxillary, and posterior axillary lines are located down from the axilla to the lower rib cage.
Posterior lines include the scapular line, drawn down through the inferior angle of the scapula, and the vertebral line, located down the spinous process of the spine.
The lungs are divided into the following lobes.
The right upper lobe of the lung begins slightly above the clavicle and extends to the fourth rib.
The right middle lobe then extends to the sixth rib.
The right lower lobe lies more laterally and extends to the eighth rib. The eighth rib is visible from a lateral view because it angles posteriorly. The liver sits just under the lower lobe of the right lung. The lobes on the right are smaller than the left lobes.
The left upper lobe also starts slightly above the clavicle and extends to the sixth rib.
The left lower lobe is a wedge shape ending at the eighth rib.
The ribs, sternum, nipples, and shoulder blades can be used to locate the lung fields and can assist with identifying the location of unexpected findings.
The diaphragm and intercostal muscles are used for breathing. These muscles allow the client to inhale by drawing in oxygen through the nose past the paranasal sinuses or through the mouth past the oropharynx structures. The oropharynx structure includes the uvula, tonsils, adenoids, epiglottis, and glottis. Then the air flows down past the larynx to reach the trachea and then to the right and left bronchus.
The lungs are found on both sides of the chest. On the left side there are two sections, which comprise the upper and lower lobes. The right side includes three sections: the upper, middle, and lower lobes. These lobes are smaller because of the liver lying below the lower right lobe.
The trachea divides into the right and left mainstem bronchi that are connected to the upper lobes of the right and left lungs. The right mainstem bronchus is wider and straighter than the left, which makes aspiration of food, liquids, or other objects more likely to occur on the right side. From there, the bronchial passages get smaller as they divide into bronchi, bronchioles, and then alveoli. The alveoli are tiny sacs, or balloons, where the exchange of oxygen and carbon dioxide take place. Each lung is covered in separate double-walled pleura, or serous membrane. The visceral pleura is attached to the outer surface of the lung, while the parietal pleura is attached to the thoracic cavity and diaphragm. Friction is decreased between the two pleurae by a small amount of liquid. The lungs are protected by the thoracic vertebrae, ribs, and mediastinum.


Gas Exchange Through the Lungs
The function of the respiratory system following inspiration is to move oxygen from areas of high concentration to areas of low concentration, and then to oxygenate the cells within the body. Through inhalation, oxygen is carried into the trachea, and floats down the trachea to the right and left bronchus, to the bronchioles, and land in the alveoli. Once oxygen arrives at the alveoli, it’s exchanged through capillaries with carbon dioxide, which is removed from the respiratory system after it moves from the pulmonary capillaries to the alveoli and flows back up through the trachea.
Physiology
The function of the respiratory system following inspiration is to move oxygen from areas of high concentration to areas of low concentration and then to oxygenate the cells within the body. Through inhalation, oxygen is carried into the trachea and floats down the trachea to right and left bronchus, to the bronchioles, and lands in the alveoli. Once oxygen arrives at the alveoli, it is exchanged through capillaries with carbon dioxide, which is removed from the respiratory system after it moves from the pulmonary capillaries to the alveoli and flows back up through the trachea.
Alterations in gas exchange can occur related to multiple causes, such as pulmonary edema. When this occurs, the level of carbon dioxide increases in the blood (hypercarbia). This has widespread systemic effects, including the neurological and renal systems.

Preliminary Stats
Observe Client
Observe the client by performing a visual and auditory inspection while checking their respiratory rate along with rhythm, depth, and effort it takes to breathe.
Are they sweating?
Do they have a strained look on their face?
Do you hear noises while they breathe?
Position of Breathing
Once the client is settled, observe the client for their breathing position. What position is best for the client's ease of breathing? Clients who experience respiratory conditions may find that leaning forward in a sitting position while grabbing their knees or using pillows to prop themselves up is more comfortable.
Expected Findings
A relaxed posture, either sitting or standing, is expected when there is no difficulty with respirations. An occasional sigh is purposeful to expand the alveoli.
Expected Variation
Thoracic breathing is an expected variation in which the chest rises and expands with inspiration and falls and contracts with expiration. Thoracic breathing is more common in females and diaphragmatic or abdominal breathing is more common in males.
Unexpected Findings
An unnatural position will give a clue to the client's distress. Clients who have chronic obstructive pulmonary disease (COPD) will sit in a tripod position with their body leaning forward and hands resting on their knees or a table to aid in expiration of carbon dioxide. When using this position, the client is using abdominal, intercostal, and neck muscles to facilitate breathing. They may exhale through pursed lips and may have difficulty talking.
Pay particular attention to the muscles around the neck and throat, as the neck muscles may appear hypertrophied from forced respirations.
If breathing is difficult, intercostal muscle retractions can occur in which the muscles between the ribs pull in toward the center of the body. If additional effort is needed, infraclavicular (below the clavicle) and supraclavicular (above the clavicle) muscle retractions can also occur. The client might also use abdominal muscles or engage in diaphragmatic breathing. Diaphragmatic breathing is when the abdomen moves out with inspiration and moves in with inspiration. This extra muscle work requires additional energy and oxygen use and can lead to greater distress if not resolved.
Using accessory muscles to breathe for a long period of time can cause fatigue. Working so hard to breathe due to distress requires the use of increased energy (calories burned) and can result in anorexia.
Assess Level of Consciousness
While collecting preliminary data, observe for signs of decreased oxygenation or hypoxia. Assess the client’s level of consciousness by asking several pointed questions about their current condition and past medical history. While talking, how does their facial expression appear? A client may appear anxious or be confused, which could be signs of hypoxia, a lack of oxygen to the brain.
hypoxia
The brainstem controls the type of breathing effort. The amount of oxygen that gets to the brain, the amount of hemoglobin in the blood, and the physical characteristics of the chest all play a role in how the respiratory system functions.
Expected Findings
Clients should look relaxed and comfortable.
Unexpected Findings
A client may appear anxious, agitated, or confused, which are manifestations of hypoxia, a lack of oxygen to the brain.
Frequent sighing can be unexpected and can indicate hyperventilation or an altered respiratory disorder.
Assess Skin and Fingers for Signs of Hypoxia
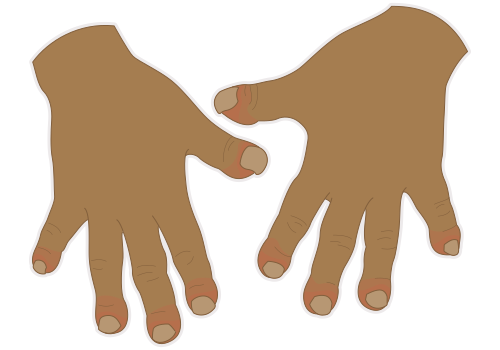
Inspecting the client’s skin color is a good way to evaluate if the client has adequate oxygenation. Lighter skin tones will have a pinkish hue to the cheeks and nail beds. Darker skin tones will have darker pigmentation to the oral mucosa and nail beds.
Unexpected Findings
In respiratory distress, the skin can be cool and damp, as well as pale or blue around the lips, nail beds, and mucous membranes. This is called cyanosis, which is a manifestation of late-stage hypoxemia, low oxygen levels in the blood. In darker skin tones, cyanosis can appear as an ashen or dusky blue tone of the oral mucosa or nail beds. Clubbing of the ends of the fingers or toes and a ruddy or darkish red appearance to the lower extremities are manifestations of long-term hypoxia, low oxygen levels to the tissues. General pallor can mean anemia, which can result in decreased oxygenation levels and give darker skin an ashen appearance. The client may have dyspnea (shortness of breath) and orthopnea (difficulty breathing when lying supine), which may require the client to have to two or more pillows when resting in bed or have the head of the bed elevated.
Check Respiratory Rate
Breathing is an automatic action that the client does without thinking. It should be smooth, even, and silent without use of accessory muscles. Count the rate for one minute while observing the depth, rhythm, and effort of the client’s breathing. Several factors can cause the rate to be too low or too high. Anxiety and fear can cause the client to breathe rapidly, greater than 20 breaths per minute. Typically, the expected respiratory rate for a healthy client is 12 to 20 breaths per minute, referred to as eupnea. Placing your hands on the ribs during respirations will help you count the respiratory rate. Sedation or injury can cause the rate to be lower than the expected rate. When counting the respiratory rate, continue to inspect and assess for any signs of distress.
Check Pulse Oximetry
The pulse oximeter is a monitoring tool used to measure the oxygen content of the hemoglobin in the arterial blood. An expected value is greater than or equal to 95%. A value less than 90% is considered a clinical emergency and requires action by the nurse. Assessing the pulse oximetry, in addition to both the subjective and objective data obtained from the client, will help you determine the client’s overall respiratory status.
Values less than 90% indicate decreased perfusion of the tissues. Ensure the probe is placed correctly. Remember that the oximeter reading is unreliable in cases of hypothermia, cardiac arrest, shock, or other conditions resulting in hypoperfusion such as peripheral vascular disease.
Take Note
The expected reference range for oximetry is 95% to 100%.
Intervention Needed: Hyperventilating
Assessment
Measure Respiratory Rate
Hyperventilation, breathing faster and deeper than usual, causes more carbon dioxide to be exhaled than is made through cellular metabolism resulting in an imbalance. Low levels of carbon dioxide in the blood (hypocarbia) result in respiratory alkalosis.
Manifestations of hyperventilation include numbness and tingling of the extremities, heart palpitations, chest pain, lightheadedness, and—if left uncorrected—unconsciousness.
Observe the client’s respiratory pattern, measure the respiratory rate, and take note of increased depth of respirations along with frequent sighing.
Measure Oxygen Saturation
Pulse oximetry provides immediate information regarding the client’s level of oxygenation. Measure and record oxygen saturation and respiratory rate, and note findings outside expected reference ranges.
In this case, oxygen saturation is expected to be within the expected reference range.
Nursing Actions
Usually, hyperventilation is self-limiting and does not require interventions. You play an important role with the client who is hyperventilating by offering support and remaining calm. You can provide a safe environment that allows the client to be at ease.
Instruct Client to Sit Down
When assisting the client who is hyperventilating, your priority is to ensure the client’s safety. Do this by assisting the client into a position of comfort; sitting to avoid falls or elevating the head of the bed.
Assist Client to Slow Breathing
Assist the client to slow their rate of breathing. Instruct the client to maintain eye contact with you and to focus only on your voice. Talk softly, but calmly and clearly. Instruct the client to breathe in through their nose and out through their mouth, slowing the rate and decreasing the depth of their respirations. Another intervention that may be useful is to instruct the client to breathe in and out of a paper bag or a rebreather mask so that carbon dioxide is inhaled back into the lungs rather than being expelled into the environment.
Determine and Treat the Cause
Hyperventilation can occur in several different situations that are not necessarily respiratory related. Nausea, pain, anxiety, or exercise can cause the client to hyperventilate. On occasion, hyperventilation occurs as a result of a medical condition. Finding and treating the cause is a key factor in assisting the client who is hyperventilating. For example, the client who is experiencing hyperventilation as a result of uncontrolled pain will need to have the pain addressed following the initial intervention of controlling the respiratory rate and depth.
Notify Provider
Notify the provider of any new findings. Use the SBAR format or another communication tool to inform the provider of the client’s condition. Include any interventions and the client’s response to them.
Recheck Status
Recheck respiratory status following any intervention to be sure of its effectiveness. Be sure to auscultate the anterior, lateral, and posterior lung fields, count respirations, note the rhythm and depth of respirations, and assess the client's oxygen saturation level. Ask the client about their perception of their breathing, level of anxiety, and the presence of any manifestations they had experienced, such as dizziness, lightheadedness, or numbness. You may need to contact other health care professionals, to assist with anxiety. Document if any other professionals are assisting with the care of the client.
Health history interview
Overview
An important factor during the respiratory assessment is the client’s report of illness, distress, or concern including shortness of breath. Many times, distress may not be noticeable to family members or others that are in the company of the client on a regular basis. You may see an opportunity to notice even a slight level of distress and be able to ask the appropriate questions to gather information about the client’s breathing. The client can have vital signs slightly out of the expected reference range and report a new onset of shortness of breath. Listening to what the client reports is an important part of the data collection after you ask specific questions. It is important to interpret extraneous information from clear data that is pertinent.
Do you have any difficulties breathing or problems with your lungs?
Do you have a history of respiratory problems (COPD, pneumonia, asthma, anemia, pulmonary emboli)?
Are you ever short of breath or have noisy breathing, cough, or sputum?
Do you have chest pain with inspiration or expiration?
Do you need to sit up to help with breathing?
Do you have difficulty breathing when lying flat in bed?
Do you ever cough up blood?
Do you ever have chest tightness?
Have you ever been exposed to any type of environmental contaminant?
Do you smoke?
Pipes, cigars, cigarettes, or vape?
How much per day (packs)?
Does anyone in your immediate family have respiratory problems?
Case Study
A nurse is collecting subjective data from an older adult client who arrives at the provider’s office with reports of shortness of breath, and a general feeling of fatigue. After escorting the client to an exam room, the nurse measures a set of vital signs.
Findings include a heart rate of 128 beats per minute, and a respiratory rate of 24 breaths per minute, which are noticeably greater than the expected reference range. Pulse oximetry reading is 91% on room air, and blood pressure is mildly elevated, at 140 over 89 millimeters of mercury. Upon inspection, the skin appears clammy and pale for their overall skin tone.
The client is sitting in a chair, and their shoulders move up and down slightly with every breath. The nurse auscultates breath sounds and notices that breath sounds are absent on the right lower lobe. Toward the right middle lobe, the nurse hears what sounds like a washing machine.
How are you feeling right now? I’m doing OK. I’ve been better.
It looks like you’re having difficulty breathing. When did this start?
I’ve been getting tired when I walk for a few days now, but yesterday I started coughing a lot, and feel like I can’t catch my breath. I think the thermostat is too low in the house, and it’s giving me a chill. I didn’t want to come, but my partner thought I should. My partner said that when I breathe, there’s a whistling sound with each breath. I don’t know. I don’t hear it.
Have you had a fever at all?
Well, I did wake up sweaty last night and shivering, so maybe I do. My partner thinks I’m sick, but I’m just tired and need to get a good night’s rest.
Do you have any health problems?
I think I have high blood pressure. The doctor put me on these little, white pills and told me to take them every morning. I don’t remember the name of them. Oh, and I have plantar fasciitis. I think I can’t catch my breath when I walk because of that.
Do you smoke?
Not anymore. I quit nine years ago-- cold turkey on February the 14th. My father died of lung cancer, so I figured I better stop. I don’t even crave it. It actually bothers me now when someone smokes around me. No one in my family smokes.
Do you have any pain anywhere?
Well, I have a slight headache, so I took an over-the-counter pain med.

Anterior Chest
Overview
Positioning the client begins the assessment and inspection of the respiratory system. Position the client sitting or lying on their back. If the client is having respiratory distress, make sure the head of the bed or exam table is elevated. You may need to support the client’s back to enable the client to sit up during the assessment if the client has difficulty or weakness. Clients who have underlying respiratory diseases will sit in the position that is most comfortable for them to breathe.
To access the anterior chest for inspection and auscultation, ask the client if they are okay with removing the gown to expose the trunk of the body, or have the client put their gown on backward and access one side of the anterior chest at a time for modesty while leaving the other half covered. While inspecting the chest, look at the overall shape and configuration, skin color, and respiratory effort and rate. Palpation of the anterior chest wall can occur simultaneously while you are inspecting the chest.
Chest Shape and Configuration
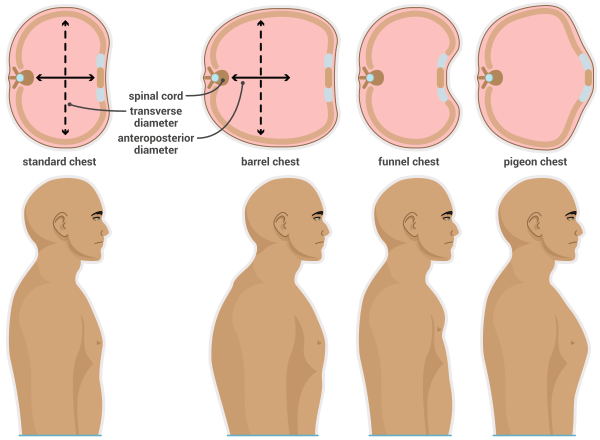
As a part of inspection and palpation of the chest, make note of symmetry. All aspects of the chest should be even on both sides, including the ribs and chest muscles. Assess for equal movement of both sides of the chest wall through observation and palpation during inspiration and expiration. The shape of the chest is wider than it is deep. The anteroposterior (AP) diameter of the chest is less than the transverse diameter with a ratio of 1:2.
The shape of the chest and musculature should be appropriate for the age, weight, and body build of the client. The rib cage should be angled slightly downward, as opposed to horizontal or full. In clients who are obese or pregnant, determining the shape of the chest can be challenging. Placing your hands on the ribs during a breath will help you feel for symmetry. Both sides of the chest should expand and retract equally with breathing.
Expected Findings
The client should appear relaxed and comfortable.
When evaluating if adequate amounts of oxygen or hemoglobin are in the bloodstream, assess the color of the skin, mucous membranes, and nail beds. A client who has fair skin will have a pinkish hue to their cheeks, mucus membranes, and nail beds. A client who has darker skin tone can have a reddish-purple tone to their nail beds and mucous membranes. The skin should be dry and warm to touch.
Expected Variations
If the client has scoliosis, oxygen exchange can be compromised due to poor lung expansion.
Unexpected Findings
Barrel Chest
A barrel chest is caused from hyperinflation of the lungs due to a disease process called chronic obstructive pulmonary disease (COPD) and can also be associated with the typical aging process. The anterior/posterior to transverse diameter is equal and the ribs, typically in a downward slope, laying horizontal. The client may sit in a tripod position to obtain adequate oxygen exchange.
Funnel Chest
Funnel chest, or pectus excavatum, is when there is a marked sunken sternum and costal cartilage. This condition usually begins at the second intercostal space. Funnel chest should not cause any respiratory distress.
Pigeon Chest
A pigeon chest, or pectus carinatum, is a protrusion of the sternum with a backward sloping of the ribs. Pigeon chest should not cause any respiratory distress.
Chest Expansion and Quality of Respirations
Watch the client when breathing, noting the expansion of the chest wall on inspiration. Note the symmetry and smoothness of expansion with each breath. Notify the provider of any noted asymmetry or lack of smoothness with inspiration or expiration. Both sides of the chest should expand and retract equally with breathing. Ask yourself, “Is there a delay with expansion?” Pneumonia or other impairment can prevent air from entering the lungs adequately and cause a delay in lung expansion.
Expected Findings
Breathing is an automatic action that the client does without thinking. It should be smooth, even, and relaxed.
Unexpected Findings
Along with an acute condition such as pneumonia causing unexpected findings in the respiratory assessment, chronic diseases can also alter the findings. For example, the client who has asthma, emphysema, and COPD can have a large, inflated chest or noisy breath sounds. The assessment directs the course of action needed.
Tachypnea is rapid breathing, over the rate of 20 breaths per minute in a healthy adult. Tachypnea may be an expected finding in a clinet who has been exercising, is responding to fear, or has a fever.
Bradypnea is decreased breathing, with a rate of 12 or less breaths per minute.
Hypoventilation is a pattern of irregular, shallow respirations, often at a rate that is less than the expected reference range.
Hyperventilation is a pattern of rapid, deep breathing at a rate of greater than 24 breaths per minute. It is often related to a disease process or extreme exertion. This can lead to manifestations such as lightheadedness or dizziness, sighing, and numbness and tingling of the extremities.
Cheyne-Stokes breathing can occur if the central nervous system is grossly affected by lack of oxygen or disease progression. It appears to have a respiratory “start-stop” breathing pattern. The client will have deeper breathing that may quicken, followed by hypoventilation and progress to apnea, a lack of respirations. This is an end-of-life breathing pattern.
Ataxic breathing is another unexpected breathing pattern that involves periods of apnea. In this pattern the breathing is very irregular with varying depths of respiration and periods of apnea. It can be caused by brain injury, meningitis, and respiratory depression.
Auscultate
Client Positioning and Stethoscope Placement
Proper positioning of the client and knowledge of anatomical landmarks related to the thoracic cage is important to obtain an accurate respiratory assessment. Being able to identify the ribs by numbers makes identifying the lobes of the lungs and the location of unexpected breath sounds easier. Between each rib is the intercostal space where the stethoscope is placed to auscultate breath sounds.
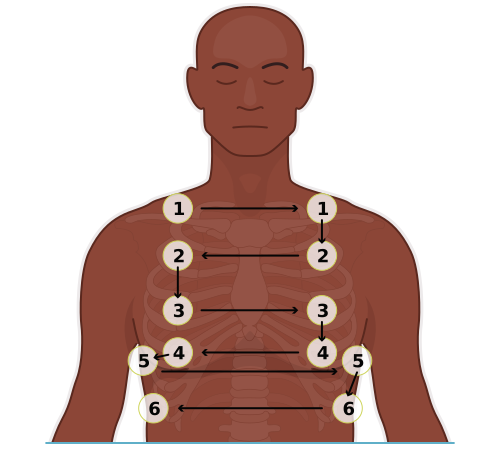
To begin the auscultation on the anterior chest, you will follow a sequence in the shape of a ladder. You can start right-to-left or left-to-right. What is important is comparing one side to the other. Also, be aware that a female client may need to assist the nurse with displacing the breast tissue during auscultation. This will allow for better accessibility of the client's intercostal spaces. To begin, imagine a ladder on the anterior chest with the first rung at the clavicles.
Place the diaphragm of the stethoscope directly on the skin to prevent friction and additional noise.
You can place the diaphragm of the stethoscope to the right or left side of the anterior chest.
Listen first to one side (right or left) and then the opposite side (left or right) in the same level.
Ask the client to take one or two slow deep breaths through their mouth with each placement of the stethoscope.
While auscultating, note the intensity of the air flow, pitch, and duration of breath sounds.
Auscultate the following positions in order.
Above the clavicle at the midclavicular line
Second intercostal space at the midclavicular line
Fourth intercostal space at the midclavicular line
Sixth intercostal space at the midclavicular line and laterally to nipple line
Along the anterior axillary line at the sixth intercostal space
Between the midclavicular and anterior axillary line at the eighth or ninth intercostal space
Interventions
You are responsible to intervene when unexpected findings are discovered.
Assess breathing posture and type of breathing.
Assess the use of accessory muscles.
Assess for the presence of retractions.
Posterior and Lateral Chest
Overview
Position client sitting up to access the back, with the back of the gown open or shirt off. Remember to be mindful of the environment and examine the client in a private area that is quiet with an appropriate temperature. Offer a blanket for comfort and modesty. If the client cannot sit, be sure to have assistance when rolling them onto their side and use good body mechanics.
Chest Shape and Configuration
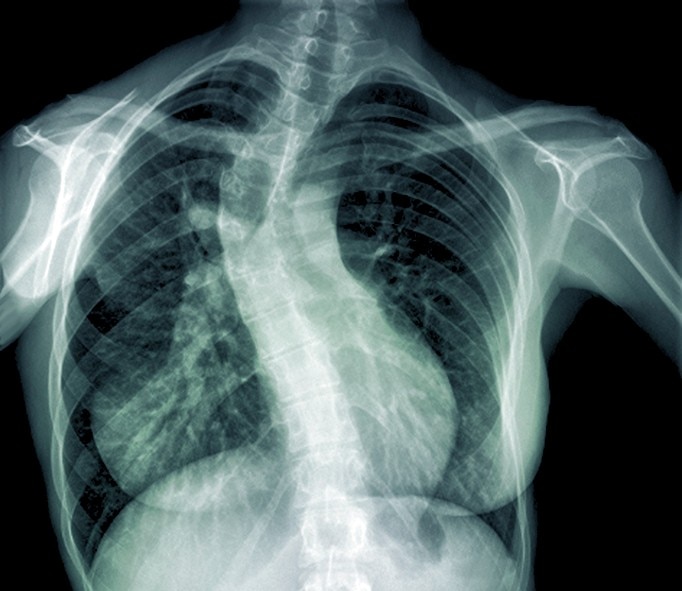
While standing behind the client, and if the client is sitting, watch the shape and movement of the posterior thorax while the client takes several slow, deep breaths in and out through their mouth. Assess if both sides of the posterior thorax move together symmetrically and note if there are any retractions or use of accessory muscles. Assess for any deformities of the spine that can impair respiratory function, including scoliosis and kyphosis. Scoliosis is a lateral curvature of the spine. If it is severe, the curvature can impact the ribs and lungs, causing difficulty with expansion of the lungs. Some cases may require surgery that involves the placement of metal rods in the back to straighten the spine.
Kyphosis is a posterior curvature of the thoracic spine that is outward and rounded. Typically, it occurs in older adults, although it can occur at other ages, and may cause a hunchback shape to the spine if severe. Kyphosis can impair pulmonary function by decreasing the ability to fully expand the lungs.
Scoliosis
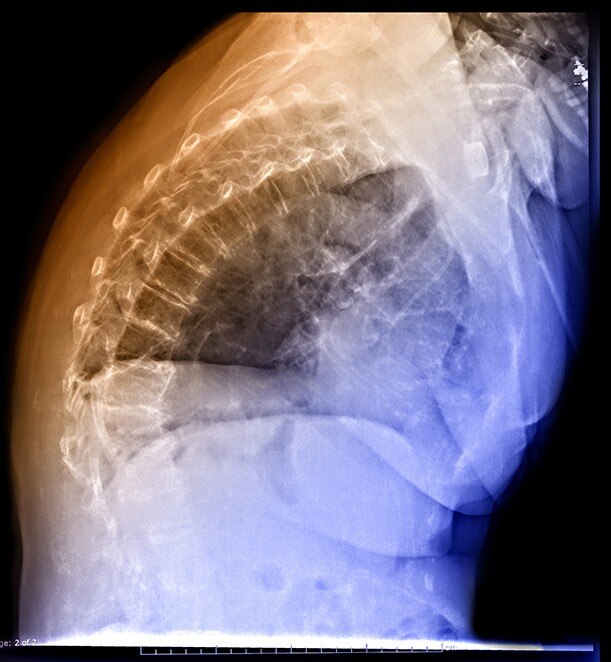
Expected Findings
When inspecting the posterior chest or thoracic cage the ribs should slope downward at a 45-degree angle in relation to the spine. The thoracic chest wall should expand equally with each breath. Bilateral scapulae should appear equal in symmetry and the spinous processes should appear straight.
Expected Variations
If a client has COPD, the anterior-posterior and transverse diameters of the chest can be equal, giving the chest a barrel shape and the appearance of the client holding continuous inspiration. The client's ribs lie horizontally. If a client has scoliosis or kyphosis, the chest wall expansion will be unequal and can impair the respiratory function.
Unexpected Findings
Unequal expansion for the posterior chest can indicate the client has experienced thoracic trauma such as rib fractures or collapsed lung called a pneumothorax. Pneumonia or inflammation of the pleura can hinder chest expansion.
Breathing Posture and Type of Breathing
Expected Findings
The client will continue to sit in a position that is most comfortable for breathing.
Unexpected findings
Posture
Chronic pulmonary diseases can cause the client to sit in specific positions, such as a tripod. Other clients may not be able to sit still and can appear agitated.
Hypoxia, or late stage of oxygen depletion, affects the client’s brain and can cause the client to display breathing patterns that are not within the expected findings and personality behaviors that display as confusion. With hypoxia, there may be an absence of breath sounds in many areas of the lungs, which is a sure sign of an impending emergency.
Retractions
When assessing the posterior chest, retraction is an unexpected finding and can indicate respiratory distress. Retractions are more noticeable in the lower intercostal spaces. However, the tugging or retractions can appear at the sides of the chest. Therefore, you would reassess the client's breathing posture and determine the client's breathing pattern.
Palpation
To palpate the posterior chest, place your thumbs at the level of T9 or T10 with your palms and fingers placed toward the posterolateral walls. Gently slide your thumbs up slightly to elevate a small amount of skin between the thumbs. Watch the movement of your thumbs as the client inspires deeply. The thumbs should move apart symmetrically. The thumbs should then return to the beginning position at the end of inspiration.
Expected Findings
Expected findings when assessing chest expansion includes the symmetric movement of the thumbs away from each other during inspiration and then back toward the starting position with inspiration. Additionally, smooth symmetrical movement and even expansion of the thoracic cage during inspiration and expiration should be felt by the fingers and palms.
Unexpected Findings
Unexpected findings during palpation of chest wall movement include a hesitancy or unequal movement of one side or a sensation to the fingers and palms of grating. Unequal movement can be an indication of trauma or the presence of a pneumothorax. Hesitancy can be an indication of atelectasis, guarding to reduce pain with breathing, or pneumonia. A grating sensation is an indication of a pleural friction rub. These findings indicate the need for further investigation.
Auscultate
Auscultation of lung sounds requires a quiet and private environment. Position the client upright or on their side if unable to sit unassisted. Remember to use proper body mechanics when positioning the client on their side. You may need to place a pillow or blanket roll between the knees if the client has a disability caused by musculoskeletal disease. Always consider the condition of the client when attempting the assessment.
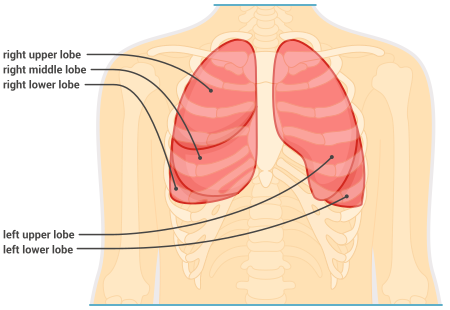
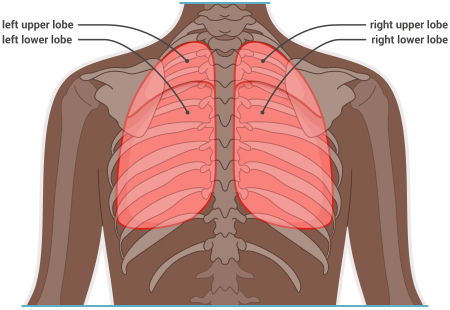
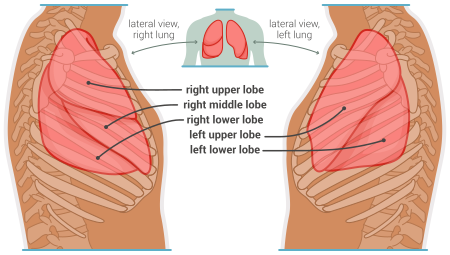
The posterior chest should be exposed for proper placement of the stethoscope according to where each lobe of the lung is located.
Remember the right lung of the client has three lobes. On the posterior chest, be aware of the thoracic vertebrae and their location to assist with identification of the lobes. Starting from just above the scapula to the third thoracic vertebrae are the bilateral upper lobes. The bilateral lower lobes are located at the tenth thoracic vertebrae. The right middle lobe is best auscultated from the right lateral chest along the midaxillary line. It will be necessary to raise the right arm to complete the lateral assessment and auscultate the middle lobe of the right lung, as this lobe is not accessible on the posterior.
When auscultating the posterior chest, compare one side to the other. Follow the ladder sequence, starting with either side, going right to left or left to right.
Start about 3 inches to one side of the spine around C7, and then move to the opposite side.
Continue moving side to side down the ladder to reach the lower thoracic spine.
Then auscultate on the lateral sides slightly below the axillary area, again comparing sides, then down to the seventh or eighth rib.
Allow the client to take a full breath at each location, but be aware that lightheadedness can occur. Allow the client the opportunity to catch their breath before starting the examination again.
Respiratory Posterior Chest Inspection and Auscultation
Step one. Inspect the client’s back as they breathe. Observe the client’s posture, the shape of their chest wall, the curvature of their spine, and effort the client is exerting to breathe.
Step two. Place your hands on the client’s back, along their lower rib cage, with your thumbs pointing toward their head. Observe your thumbs move apart during inspiration to assess for equal chest expansion.
Step three. Instruct the client to open their mouth and take a deep breath each time they feel your stethoscope touch their chest. Instruct the client to tell you if they feel dizzy or faint. If this occurs, take a break from auscultating until the client feels better. Always remember to clean your stethoscope prior to each client encounter.
Step four. Position your stethoscope on the skin of the client’s back, approximately three inches—7.5 centimeters—to one side of the spine, between the ribs, at the level of C-7.
Step five. Listen closely during inspiration and expiration. Repeat this step in the same location on the opposite side of the client’s back.
Step six. Reposition your stethoscope two inches—five centimeters—lower, and auscultate during inspiration and expiration. Repeat this step on the opposite side of the back.
Step seven. Continue repositioning your stethoscope and auscultating at two inch—five centimeter—lower intervals, until you reach the client’s lower thoracic spine area.
Step eight. After auscultating along the lower thoracic spine, reposition your stethoscope to the axillary line and auscultate. Repeat this step on the opposite side of the client’s chest.
Step nine. Lastly, reposition your stethoscope to the eighth or ninth intercostal space at the axillary line, and auscultate during inspiration and expiration. Repeat this step on the opposite side of the client’s chest.
Breath Sounds
Overview
Breath sounds can be clear to auscultation but have a different tone based upon the location of the stethoscope. There are four types of breath sounds.
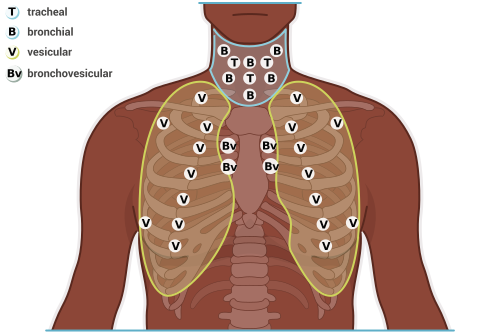
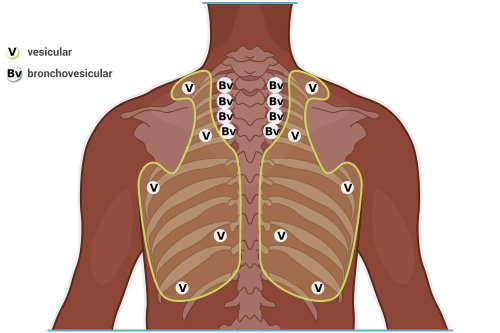
Tracheal breath sounds are heard over the trachea of the anterior neck area.
Bronchial breath sounds are heard to the right and left of the trachea and larynx. Bronchial breath sounds are auscultated over the anterior chest only.
Bronchovesicular breath sounds are heard over the right and left major bronchi. Place the stethoscope between the first and second intercostal space to the left and right of the sternum when auscultating the anterior chest and between the scapulae and the vertebral column when auscultating the posterior chest wall.
Vesicular breath sounds are auscultated over the anterior and posterior chest wall. Vesicular breath sounds are heard over a large percentage of the bilateral lung fields from the clavicle to the lower rib cage.
Expected Findings
There can be times when identifying the unexpected sound is challenging. Sometimes, unexpected breath sounds are found by comparing the sounds from the last assessment provided. The expected breath sounds are as follows.
Tracheal breath sounds have a loud intensity and high pitch. Both inspiration and expiration duration of sounds are equal.
Bronchial breath sounds have a loud intensity and high pitch. The client’s inspiration is a shorter duration than the expiration.
Bronchovesicular breath sound —especially on the right—have a moderate intensity and pitch. Bronchovesicular inspiration and expiration duration are equal.
Vesicular breath sounds have a more intense and loud airflow in the upper anterior lobes but have a softer intensity with a low pitch throughout the other lobes. These breaths are soft-sounding like wind blowing through trees. Vesicular inspiratory sounds last longer than expiratory sounds.
Unexpected Findings
Change from the client’s expected findings can begin with noting a decrease in breath sounds. This could be due to shallow breathing, airway obstruction from a foreign body, tumor, or respiratory disorder. Auscultation of breath sounds is a skill that requires much practice and understanding of anatomy and physiology. When you understand the function of the respiratory system and the effects of illness on the lungs, adventitious breath sounds begin to make sense. Adventitious breath sounds are extraneous or additional sounds that are heard. They can be the result of mucus within the airway or the popping open of an airway that has been partially collapsed. If heard, ask the client to take a deep breath and cough to clear the airway, then auscultate the breath sounds again. If the client still has adventitious breath sounds, then it is your responsibility to identify the type of sound heard; whether they are heard on inspiration, expiration, or both; and the location. Unexpected breath sounds that are classified as adventitious are discussed below.
Pleural friction rub is a low-pitched, coarse, grating tone like rubbing two pieces of leather together. Pleural friction rub is heard on inspiration and expiration. It is caused from inflammation of the pleura and is very painful.
Crackles (rales) are an intermittent rattling, crackling, popping, or bubbling sound. These sounds can be fine and high-pitched or coarse and low-pitched and are not cleared by coughing. Various lung conditions, such as an increase in fluid, inflammation, or consolidations, can take up the space around not fully inflated alveoli and produce crackles. Fine crackles are heard at the end of inspiration when the client breathes in and air causes the partially deflated alveoli to pop open, making a crackling sound. Coarse crackles do not clear with coughing. They are heard during inspiration and are loud, similar to the sound made when air is blown into a straw that is in a container of liquid. It is the result of reinflating alveoli or air passing through mucus-filled airways. Clients who have pneumonia, chronic pulmonary disease, or heart failure can have crackles of different degrees. If crackles are found, perform a full respiratory assessment that evaluates the effort required to breathe, signs of distress, and any other concerns.
Wheezes are whistling, high-pitched musical sounds made when air flows through narrowed airway passages. The client may have inspiratory wheezes, expiratory wheezes, or both. Chronic conditions such as asthma or bronchitis can cause edema in the bronchioles. The client will display some distress with wheezing depending on the severity of airway swelling and the cause. Wheezing as a manifestation of asthma can have an allergic trigger, which can make the wheezes worse if the allergen remains or if the edema in the bronchioles is not treated with medication.
Rhonchi is a continuous, low-pitched, snoring-type sound that can be heard with inspiration and expiration. It is caused by fluid, mucus, or a growth in larger airways. It can sometimes clear with coughing.
Stridor is a high-pitched crowing sound that can be heard without a stethoscope. It is the result of upper airway obstruction caused by inflammation or a foreign body and can be life-threatening.
Intervention Needed: Minimal Air Movement
Assessment
Measure Oxygen Saturation
Begin by measuring and recording oxygen saturation and note findings outside expected reference ranges.
A pulse oximeter reading that is less than 90% indicates that the client’s tissues are not receiving enough oxygen and requires immediate intervention.
Observe Rate and Depth of Respirations
Hypoventilation can refer to a slower than expected respiratory rate, shallower respirations than are expected, or both. This breathing pattern moves only a small amount of air through the chest and can make auscultation of breath sounds difficult. Another altered breathing pattern, stridor, involves a blockage of a large airway and can result in minimal air exchange.
Inspect the Chest for Movement and Symmetry
Inspect the client’s anterior and posterior chest and observe depth of the respirations and the movement of the rib cage as the client takes a breath in. A decrease in the movement of the rib cage or an unequal rise of the chest may indicate that a disease process is present.
Observe the Effort of Breathing
Clients who are experiencing a decreased flow of air through their lungs may have nasal flaring and may use accessory muscles in an attempt to maintain adequate levels of oxygen. Accessory muscle use can include intercostal retractions, observed as the pulling in of the soft tissue between the client's ribs during inspiration. Additionally, infraclavicular and supraclavicular retractions may be used in the client's attempt to increase airflow. This is observed by the rising of the clavicles and a sinking of the skin above or below the clavicles during inspiration. Other observations you may note in the client include the use of pursed-lip breathing.
Additional Nurse Actions
Elevate the Head of the Bed
Elevating the head of the bed to a semi- or high-Fowler's position will allow for improved lung expansion. Failure to breathe deeply, hypoventilation, is a common cause of decreased lung sounds, which leads to collapsed alveoli and poor air exchange. Assist the client into a tripod position with the client leaning forward and the arms supported on a bedside table which has been placed over the bed or, if the client is sitting in a chair, placing the forearms on the knees. This expands the lung field and can improve air exchange. Some clients may need to lie on their side with support behind their back. Ensure any position the client assumes is not contraindicated by any other condition the client is experiencing.
Instruct to Breathe Deep and Cough
Instruct the client to attempt to breathe deep and then cough, which can help to clear any mucus in the airways. An incentive spirometer can be used to facilitate deep breathing.
Apply Oxygen
Apply oxygen, depending on oxygen saturation from the oximeter reading. The provider will order the amount of oxygen required by the client. It will be delivered via nasal cannula, face mask, or tent depending on the client’s needs. Remember that some clients have a chronically low oxygen saturation level (less than 95%) due to a disease process such as COPD. In this case, an increase in the flow rate of oxygen delivery might not be recommended.
Notify the Provider
Notify the provider of new findings. Depending on the severity of the client’s distress, assessments should be completed frequently until the client is stabilized, then at least every 2 hours. If breath sounds are progressively diminishing or if unexpected breath sounds develop, notify the provider in addition to documenting all findings. It is always acceptable to ask the client if they feel better or worse than previously. “Since your first breathing treatment today, do you feel like you are breathing any easier?”
Documentation
Clear and concise documentation is essential to provide an accurate picture of the client’s condition to all members of the health care team. Use descriptive words, facts, and observations when documenting the physical findings of the client. Documentation for a client who has respiratory distress should include the type of breath sounds you auscultated, the type of breathing that was inspected, the respiratory rate, the oximeter reading, and what action you took.
Recheck Status
Recheck respiratory status by reassessing lung sounds, mental status, signs of cyanosis, or work of breathing along with the client’s respiratory rate and oxygen saturation level. Ask yourself if the client needs to change positions. Is there improvement in the adventitious breath sounds? Be sure to auscultate the anterior as well as the posterior chest and all lung fields. Are there any new sounds that were not there in the previous assessment? You may need to increase the amount or frequency of interventions depending on the assessment. Be sure to keep the provider up to date on the status of the client, and notify them immediately if the respiratory status is dramatically worse.
Health Promotion
Overview
When assessing the client and gathering data from the health history, it is important to make note of their social habits along with their medical history. This not only helps guide the assessment, it also is useful when planning education with the client.
Does the client use tobacco products or are they exposed to secondhand smoke in the home?
Have they received the proper vaccines—such as influenza, pneumococcal, and COVID-19—and when was the last time one was given?
Are they exposed to any environmental or occupational conditions that may impact their respiratory or general health?
Providing health education is necessary. However, it can be challenging. Some clients may be resistant to hearing about changing behaviors to promote healthy habits. Other clients may feel overwhelmed with having to make decisions that impact their health. Approach the topic gently if it appears to be a sensitive area for the client. It may be helpful to have handouts or pamphlets to give to the client, so they can read them on their own time.
Tobacco Use
One of the goals of the Healthy People 2030 initiatives is to reduce tobacco-related illnesses, disabilities, and deaths. As a part of this initiative, routine assessments regarding the use of tobacco and exposure to secondhand smoke along with counseling is recommended. Along with the risk for the development of respiratory disease, tobacco use is also associated with heart disease, peripheral vascular disease, increased risk of stroke, and cancers of the colon, bladder, kidney, stomach, liver, and pancreas.
Secondhand smoke exposure can lead to asthma, heart disease, lung cancer, and respiratory and ear infections. It can also contribute to sudden infant death syndrome (SIDS). Smoking during pregnancy contributes to preterm births and low birth weights.
When counseling the client on the dangers of smoking, it is important to remain judgment-free. Rather than telling them how many years will be taken off their life, prepare a smoking cessation plan that includes both cognitive and pharmacologic therapies. Assess the client’s interest in quitting and offer resources to assist the client. The client may have tried to quit before and will need support and guidance for any new attempts. Inform the client that nicotine is highly addictive and attempts at cessation are often not successful the first time.
Immunizations
Immunization plays an important role in respiratory health. Influenza is a viral illness that affects many people a year. It can cause mild to severe illness and have disabling effects for several days. Death from influenza can also occur. The Centers for Disease Control and Prevention strongly recommends that a yearly influenza vaccine be administered to everyone who is older than 6 months. Influenza vaccines are administered annually prior to the start of the flu season, beginning in September and lasting into the following year. It is important to dispel any myths the client may have heard regarding the flu vaccine. The number one myth is that receiving the vaccine will cause them to get the flu. The influenza vaccine takes up to 14 days to become effective so exposure to influenza prior to or shortly after being immunized can still result in illness. The client may develop a sore arm from the injection or even flu-like symptoms for a day or two. Remind the client that this is an expected finding and that the symptoms will resolve.
People who have some chronic illnesses (such as chronic obstructive pulmonary disease) and those older than 65 years old, are also encouraged to receive the pneumonia vaccine. The vaccine helps to prevent respiratory infections caused by the Streptococcus pneumoniae bacteria. This respiratory illness can cause hypoxia and tachycardia, and can result in death.
Coronavirus disease (COVID-19) is a highly infectious respiratory illness that is caused by the SARS-CoV-2 virus. Manifestations of the illness can appear 2 to 14 days following exposure, and can range from mild to moderate respiratory symptoms, such as cough, fever, fatigue, shortness of breath, loss of taste or smell, to severe illness or death. Individuals who have underlying medical conditions, such as heart or lung disease, diabetes mellitus, or are immunocompromised, are at greatest risk for severe illness from COVID-19. The Centers for Disease Control and Prevention (CDC) recommends that everyone 6 months and older get vaccinated against the disease. Primary vaccination includes a series of one to two injections, depending on the vaccine manufacturer. Adverse effects of the vaccine can range from minimal discomfort at the injection site to mild fever and malaise, and generally go away in a few days. Following primary vaccination, boosters are recommended to stay up to date with the latest strains of the virus as the CDC continues to monitor the latest information.
When providing the client with information regarding immunizations, it is important to assess the client’s perceptions of vaccines and any religious views pertaining to them. Presenting the client with accurate information about the vaccines, including possible adverse effects can increase the likelihood of the client obtaining a vaccine.
Also consider the possibility of the client asking for an opinion as to how they should proceed with health promotion and vaccines. The best approach is to provide the client with the risks and benefits of smoking and of vaccinations so they can make an informed decision that is not influenced by the personal thoughts of the health care provider.
Summary
Overview
The respiratory assessment includes inspection, palpation (which is performed by an advanced practitioner or physician), and auscultation of the anterior, lateral, and posterior chest.
The right lung has three lobes and the left has two lobes. Identifying the ribs by number will help identify the location of where each lobe sits. The tools needed include a stethoscope, incentive spirometer, and pulse oximeter. Be sure equipment is either single-use only or cleaned appropriately before client contact.
Inspection
Inspection includes observing the behavior of the client and their mental status. If there is not enough oxygen reaching the brain, the client's level of consciousness may be impaired. Inspect skin color and mucous membranes for any pallor or cyanosis. Note the shape of the thoracic cage anteriorly, laterally, and posteriorly. Inspect the overall work of breathing the client exhibits. Are there retractions, shoulder shrugging, tripod position, or other signs of distress? Assess for anxiety or pain that can lead to hyperventilation.
Palpation
Palpate the chest to evaluate symmetry and smoothness of movement with inspiration and expiration. Be sure to document and notify the provider of any unexpected findings.
Ascultation
Auscultate breath sounds noting the expected tracheal, bronchial, bronchovesicular, and vesicular breath sounds. Is there audible stridor with inspiration? If unexpected or adventitious breath sounds are heard, describe them in regard to location and whether the breath sounds were heard on inspiration, expiration, or both. Note the absence of air movement in any area of the lungs and notify the provider immediately. It may be necessary to ask the client to cough to clear mucus from the airways and then reassess breath sounds.
Documentation
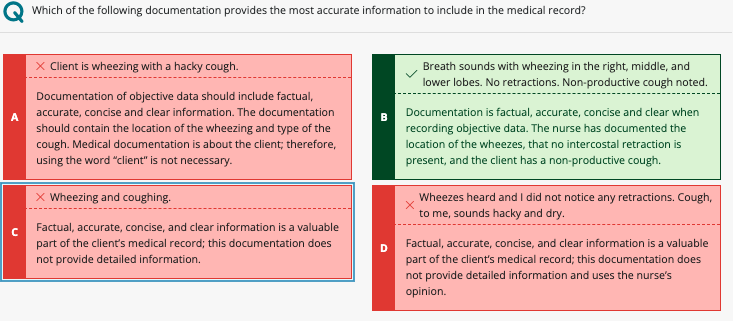
Documentation of your findings is a legal and permanent part of the client health record. Document both subjective and objective data. Any direct quotes from the client are to be placed in quotation marks. Objective data should be descriptive, clear, and concise. Avoid offering your opinion of the problem and promote an environment of trust with the client.
Now that you understand what is involved in the assessment of the respiratory system, you are expected to be able to identify and differentiate between expected and unexpected findings. While conducting the assessment, make note of the unexpected findings with the inspection of the client’s mental status, positioning to ease breathing, the work of breathing, and the presence of any cyanosis. Document adventitious breath sounds including pleural friction rub, crackles, rhonchi, wheezes, and any absence of breath sounds. Note if the adventitious breath sounds are heard on inspiration, expiration, or both. Assessments should be done after any interventions to determine their effectiveness and need for changes. Documentation and communication are essential for all providers and health care professionals to assess the client’s progress and potential recovery. The nurse’s documentation is the only evidence that interventions ordered have been completed.
Documenting the respiratory assessment is important to properly relay information to all providers and health care professionals. The nurse will include in the documentation the subjective and objective data collected during the respiratory assessment. Note that it is also important to notify the provider of any unexpected findings, such as inspiratory retractions or use of accessory muscles to breathe, in addition to documenting them.
What symptoms did the client report experiencing?
How long has the client been experiencing?
Is the client reporting any pain or shortness of breath?
Does the client have a cough? If so, is it productive? Describe any color to mucus.
What was observed during inspection of the chest?
Describe the lungs sounds heard during auscultation.
Case Study
You are preparing to complete documentation for a client with the following findings.
The client is age 45 and is being seen for reports of frequent nighttime coughing, sneezing, and a headache. The client appears anxious with beads of sweat on their forehead. The following are their vital signs.
Heart rate: 100/min
Respirations: 15/min
Blood pressure: 132/82 mm Hg
Oxygen saturation: 97%
Upon auscultation, there is some wheezing in the right middle and lower lobes. There are no retractions or other signs of increased work of breathing but there is a cough that sounds dry and hacking. Skin is warm and dry. There is no clubbing or cyanosis when hands are inspected. The client takes escitalopram 75 mg once a day. They also states that he had left knee surgery about 5 years ago for a torn ACL. They live alone and has a cat. The client states that they only smoke when out socially and only drink occasionally.