PCO5 Introduction to the Lab
Alginate and Study Model Materials
To be able to make any Prosthesis or Splint, we must make an accurate replica of the Patients mouth. To do this we take an Impression, and make a cast Gypsum model from the Impression.
Materials Included are -
ALGINATE – This is the usual material of choice, - accurate, easy to use and inexpensive.
DISINFECTANT - This is applied to all surfaces that have had any contact with the Patient. Confirmation of the disinfecting procedure must also be logged on the Laboratory Prescription Card.
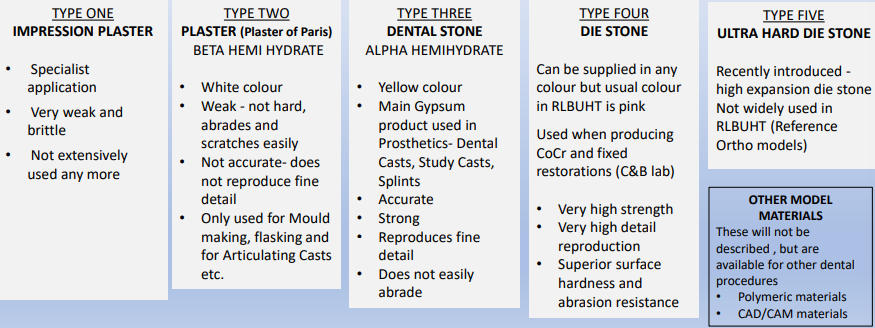
GYPSUM – (Calcium Sulphate) This material is provided in five versions, they are selected by the Laboratory for their intended use. (accuracy, hardness and expense.)
DISINFECTANTS
It is stated in COSHH regulations that the Clinician is responsible for any Cross infection Issues with work supplied to the Laboratories. All impressions, (and surfaces handled with Clinical gloves) are disinfected in the Clinic.
The person who completed the procedure must sign the Prescription (Lab Card), this confirms the Disinfection of items - NO WORK WILL BE UNDERTAKEN WITHOUT THIS SAFEGUARD
The Impressions are completely immersed in PERFORM, a disinfectant, for 10 minutes.
CONSTITUENTS OF PERFORM – supplied as a powder and mixed with water
0.2g Potassium Peroxomono Sulphate
0.15g Sodium Benzoate
0.1g Tartanic Acid
5-15% Anionic surfactants
5-15% Non ionic surfactants
Less than 5% soap, Phosphonate, and Fragrance
Surface Surfactants- (UNODENT) Supplied as an Alcohol-free spray, they are for use mainly on nonporous material. Fungicide and Bactericide
Kills:
Hepatitis B/ TB in 2minutes
Yeast and Fungus in 1 minute
Bacteria in 30 seconds
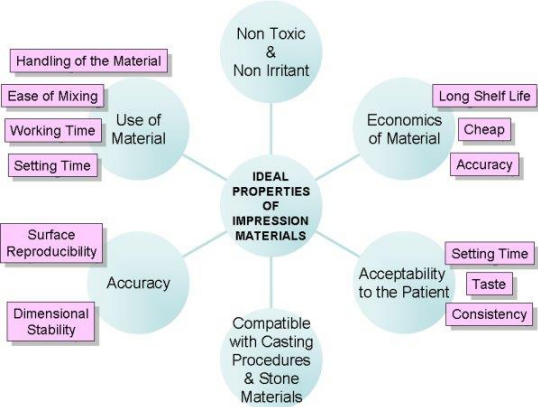
IDEAL PROPERTIES OF IMPRESSION MATERIAL
ALGINATE - Elastic Impression Material
The main Prosthetic Impression material
A powder turns to GEL when mixed with water and further converts into elastic material on manipulation, setting by SOL/GEL transition.
Used in conjunction with “FIX” Adhesive
Very accurate and reproduces fine detail
Poor long term stability
Water and component loss
Fluid can be absorbed - Imbibition
Fluid can be lost - syneresis
Constituents can also leach from the material
INGREDIENTS - NOTE, the Alginate container should be inverted before mixing, to disperse the constituents and ensure correct measures.
• Sodium alginate (from seaweed) very quickly reacts with Calcium sulphate dehydrate (CaSO₄ 2H₂O) to form a GEL
• K₂SO₄, silicates, Borates - counterbalance GEL effect (slows it down)
• Sodium Phosphate- retarder for Calcium/ alginate reaction
• Diatomaceous Earth - Main bulk/inert filler- 70% mass (also known as Kieselguhr, where it was first discovered)
Storage and Transport of ALGINATE IMPRESSIONS
To maintain accuracy, Alginate Impressions should be Cast as soon as possible after they have been Disinfected.
The material suffers from loss of moisture, (called SYNERESIS), so Impressions should be stored in a MOIST CONDITION, ie, wrapped in moist tissue and placed in a sealed Plastic Bag.
Do not use too much water as the Alginate material can also soak up any excess moisture,(called IMBIBITION).
If the Alginate loses or gains any liquids it loses accuracy.
If Alginate is left for too long a period before it is cast, it exudes some of its constituents which contaminate the Gypsum model.
Cast Gypsum Models
GYPSUM (Calcium Sulphate) is supplied as a Powder. It is mixed with water and then it is poured into the Impression. Then it will “SET” hard, forming the accurate replica of the mouth.
These Models are very accurate and are used by the Laboratory to construct Dental Appliances/Prosthesis.
It is supplied in different grades and the Laboratory will select the type of Gypsum appropriate to the use intended.
STUDY MODELS.
These can be cast in DENTAL STONE, or DIE STONE (more expensive).
The material usually employed is DENTAL STONE.
GYPSUM MATERIALS - CALCIUM SULPHATE- CaS0₄ 2H₂0
These are used to form accurate replica models of the mouth, Dental Moulds and Fixtures in the Lab
There are different types, all are chemically identical but differ in their morphology and physical properties due to differences in the manufacturing process
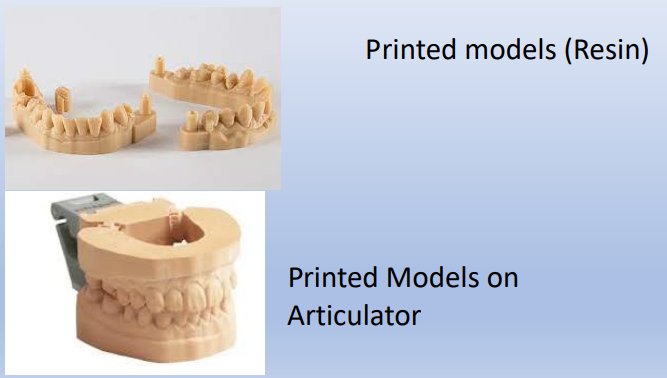
CAD/CAM STUDY MODELS
Where facilities for CAD/CAM are available –
The Patients mouth is electronically scanned, this eliminates the need for an Alginate Impression.
The information gathered can be stored in the Computer for long term reference, or used to make a physical model by the Computer Printing technique.
The information can be presented “On-Screen” for Patient education. Images from different periods of the Dental treatment can be screened together to illustrate and measure the progress made.
CAD/CAM Printed Models
Model Casting Technique
Mixing ratio
For one impression:
400g dental stone
120ml cold water
For two impressions:
800g dental stone
240ml cold water
Mixing
Measure the correct quantities of the dental stone and cold water
Sprinkle the dental stone onto the water
Do not add too much stone at once
Keep adding the stone until an excess forms on the surface
The stone will eventually float on the surface and begin to crust
After about 30 seconds the crust will absorb moisture and turn a darker yellow
The water and stone can now be mixed
A circular action should be used to avoid air bubbles being incorporated into the mix
Keep turning the bowl this ensures that the spatular scrapes the bottom and the sides of the bowl
This will include all the stone that has been added to the mix
Allow the plaster to drop off of the spatula in order to check the final consistency
The mix should resemble custard or double cream when mixed
Casting
The stone mix is now ready to pour into the impression
Add the stone in small increments so that air isn’t trapped in the anatomical portion of the impression
It is necessary to lightly tap the impression against the side of the bowl, to encourage the plaster to flow into the impression
Alternatively, a vibrating table can be utilised to achieve this effect
Basing
Once the anatomical area of the impression has been filled with stone, it is put to one side and plaster is placed on a paper towel
This is the beginning of the model base
The stone mix is gradually added to this mound until there is sufficient stone to form the model base
If the stone mix is too thin or the mound is created too quickly it will spread outwards rather than upwards
We are trying to achieve height rather than width
The impression can then be gently inverted onto the mound
Take care not to push the impression into stone which is starting to harden
If the mound is starting to set, then it is better to discard the base stone and make a new mix
The mound should be sufficiently stable to support the weight of the impression
The impression is then gently eased down into the base slightly
Trimming
The edges of the base mix are then trimmed and shaped and pushed up around the periphery of the impression
This is to ensure that all the anatomical areas are recorded
It is important to cover and support the heels and labial/buccal sulci
Make sure that there is an excess of base material around the full periphery of the impression
The stone base should by this time have consistency like plasticene and so can easily be trimmed, using a plaster knife, this is to remove any excess
The excess material is then removed and placed in a plaster bin
Cleaning
If you have not had chance earlier
Scrape any excess material from the bowl and discard the plaster in a plaster bin
Then wash the bowl and spatula ready for later use
Trimming
Allow the stone to set thoroughly before attempting to remove the impression
This will normally take at least 30 minutes
1-2 hours is preferable if possible
Dental Gypsum Products
Dental Stone:
Colour yellow
Used for study models and working models
Mixing ratio 22-35ml water to 100g powder
Plaster of Paris:
Colour white
Used for flasking, mounting casts on articulator and basing casts
Mixing ration 50-60ml water to 100g powder
Ideal Properties
Dimensional accuracy and stability
Ease of use
Accurate reproduction of fine detail
No interaction between impression and model or die material
Good strength and hardness
Relatively inexpensive
The ability to resist abrasion
Good colour contrast
Dental Stone
(CaSO4)2.H2O
Alpha form, produced by heating gypsum under steam pressure in an autoclave at 120-150 degrees
It is composed of small regularly shaped prismatic particles
Particles with low porosity which pack together tightly
Initial set 5-20 minutes
Linear expansion 0.1-0.2%
Plaster of Paris
(CaSO4)2.H2O
Beta form is obtained by heating gypsum in an open vessel at 150-160 degrees
Part of the water of crystallisation is driven off
Possesses high porosity, a short setting time
Characterised by large irregularly shaped particles
Initial set 5-10 minutes
Linear expansion 0.3-0.4%
Casting Gypsum Models
1st Stage - Pouring casts/creating models
Dental stone powder and water are mixed, then applied and vibrated into the preliminary primary impression
A base is then created for each of the models
The stone is sculpted to form the rough outline of the base
When the stone has set sufficiently, the impressions are removed and trimmed (firstly using a model trimmer with water coolant)
This produces casts of a more manageable size whilst at the same time preserving the important peripheral area of the impression
Casts are then further trimmed using a plastic knife to remove excess amounts of stone
Bleaching Trays
Tooth whitening, Bleaching.
This can be achieved using Laser Light, or using a Bleaching Gel held onto the Teeth by a Thermoplastic Tray.
The Tray method is described here.
Tooth whitening can be used on an individual Tooth, or whole sections of the Dental Arch, (Aesthetic Zone).

Method of Manufacture
An accurate Alginate Impression of the Teeth and the surrounding Gum area is essential.
An accurate Dental Stone model is made.
The base of the Cast model is trimmed to suit the equipment being used, (Height and Shape).
Design for Bleaching Tray
Following manufacturers recommendations, the amount of BLEACHING Gel in contact with the Teeth can be varied.
THE CLINICIAN must prescribe the method of Tray manufacture.
The choice is between the use of -
METHOD ONE. The Tray being in intimate contact with the surface of the Tooth.
METHOD TWO. The Gel Reservoir
METHOD ONE. The Tray can be made directly onto the surface of the Model. A thin film of Gel will be in contact with the Teeth.
The Tooth surface is reproduced by the Dental Stone model.
The Bleaching Tray material is formed over the model, giving an exact fit. The viscous Gel will be held against the Tooth surface.
The Bleaching Tray is trimmed around the edges.
Palatal/Lingual areas are extended about 10mm beyond the gingival margin.
NO GEL IS PLACED ON THESE SOFT TISSUE AREAS. Mucosal irritation!
The Labial face of the Bleaching Tray is trimmed TO THE LABIAL GINGIVAL MARGIN.
The Gel is held against the Tooth Enamel –NOT THE SOFT TISSUE.
METHOD TWO.
Wax or Resin material can be added on to the surfaces of the teeth.
These additions, called RESERVOIRS, increase the amount of Gel material that is in contact with the Tooth surface.
The model is an exact replica of the Tooth surfaces.
Wax or Resin is applied to the surfaces to be Bleached. Approximately 0.5mm thick,(variable).
This forms a space under the Bleaching
The tray which will be filled with Gel.
It is important to shape the Reservoir so it does not extend onto the Gingival margin.
The Tray will form a seal against the Enamel and prevent the Gel from irritating the Gingival margins
The Bleaching Tray is formed over the model and Reservoirs. The edges are trimmed -
Palatal/Lingual extend about 10mm from the Gingival margin.
Labial edge is shaped to the Gingival Margin.
This forms a space under the Tray which can be filled with Bleaching Gel
The Bleaching Tray material is manufactured as thin sheets of Thermoplastic Blanks.
Various types are available.
There are different types of Thermo forming machines. Each manufacturer has developed their own Machine and their own Tray Blanks.
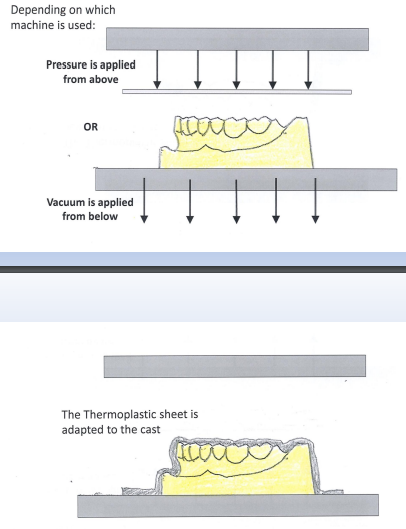
The Machines fall into two groups –
1) Machines which heat the Blank until soft ,then VACUUM FORM the blank onto the Model.
2) Machines which heat the Blank until soft, then High Pressure air is applied to the surface to push the blank onto the surface of the model.
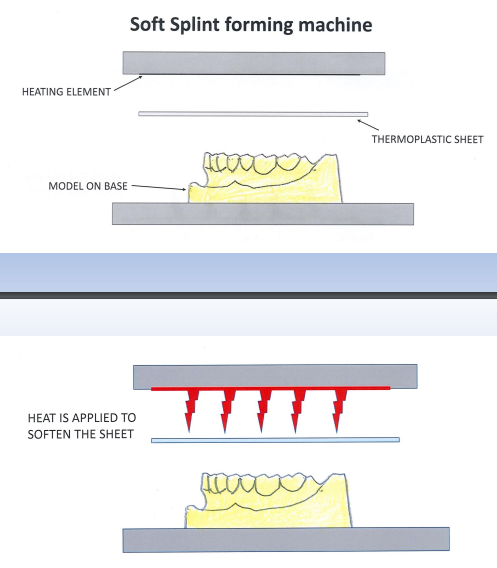
The Soft splint is trimmed to shape using scissors and appropriate dental burs.
The completed splint is then returned onto the model and sent to Clinic
The Patient is taught how to apply the Gel and use the BLEACHING TRAY
FLUORIDE APPLICATION TRAYS
Essentially, these are made in exactly the same way as the Bleaching Trays.
The exception being – we do not form Reservoir areas on the Teeth. The viscosity of the Fluoride Gel is sufficient for surface application.
Other Splints.
Thermo forming Blanks are a common method to make Custom devices for the mouth.
These include –
Active and Passive Splints.
Sports Mouth Guards (Gumshields).
Anti-Snoring devices.
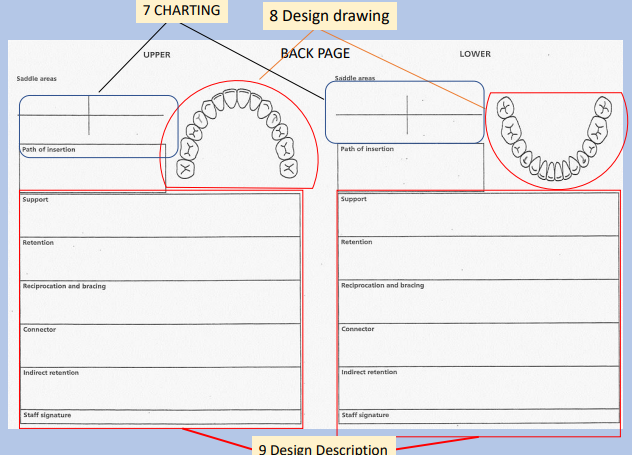
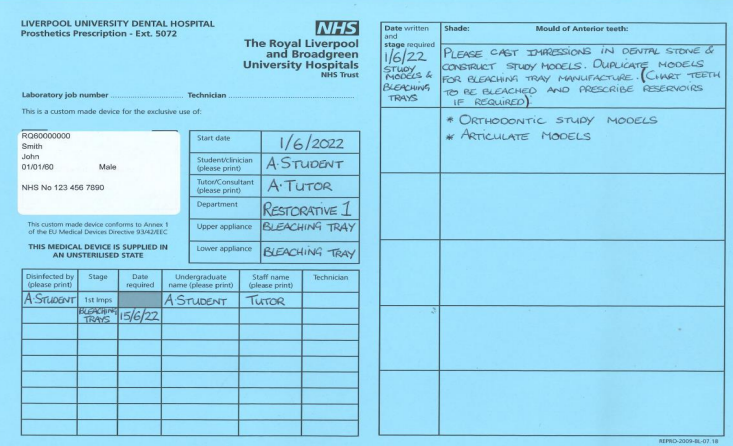
Prosthetic Laboratory Prescription Card
LABORATORY PRESCRIPTION CARDS
• A laboratory prescription card is a legal document.
• All details must be printed, clear and legible.
• Do not use felt tip pens, the card will be placed in a moist environment and it will smear.
• Do not enclose the card with damp impressions.
• All cards need valid signatures.
• Always disinfect clinical work and sign the relevant area;
WORK WILL NOT BE ACCEPTED BY THE LABORATORY WITHOUT THIS CONFIRMATION