Chapter 2: Crime Scene Investigation
The very first thing any first responder must ascertain is safety: safety of officers, safety of emergency medical technicians EMTs, safety of victims, safety of witnesses, and safety of the public at large.
This initial assessment will then lead to control of the scene. The officers need to control access to the scene and make sure any personnel on the scene are necessary.
Defining a Crime Scene
A crime scene is defined as the location where an illegal activity has taken place, which may encompass both the immediate area of the offense and any associated locations relevant to the investigation.
The officer in charge of the scene is responsible for defining it.
Protect the scene from loss and damage of evidence. This damage can come from people, cars, sprinklers on the scene, weather (wind, rain, snow, etc.), or a myriad of other places. Do what you can to stop it.
Create a perimeter around the scene using barricades, crime scene tape, and additional officers.
Limit entry to the crime scene. Only essential personnel (CSI, EMTs, or anyone deemed necessary by the detective in charge) should be allowed to pass the perimeter.
You need to set up boundaries that include the location in which the crime occurred, any and all apparent items of potential physical evidence, potential paths of enter/exit, any place where the victims and/or evidence may have been moved.
a scene perimeter can always be made smaller, but it can never be made larger.
Primary Crime Scene → The spot where the original criminal activity is found
Secondary Crime Scene → Any area where subsequent crimes took place after the primary scene.
Macroscopic Crime Scene → A large crime scene (such as a room or a house)
Microscopic Crime Scene → Smaller crimes scenes apart of one major crime scene
Uses for Information
The objectives of crime scene investigation are to recognize, preserve, collect, and (correctly) interpret all physical evidence at the scene.
The ultimate goal is to reconstruct the events that happened at that scene
Proper identification and analysis of crime scenes and evidence can bring about the following:
Linkage of person, objects, or scenes — This is the major thrust behind any crime scene investigation. Linkage of persons, scenes, or objects is based on Locard’s exchange principle. Linking suspects and victims is the most important linkage, and (as it happens) is the most common.
Investigative leads — The analysis of physical evidence can give detectives and other investigators indirect information, that is, leads, about the events at a crime scene. Since not every crime scene has individualizing evidence, these leads can be crucial in sending investigators down the right path toward a suspect.
Suspect identification — Identification of suspects (and/or witnesses, victims, etc.) can be accomplished by identifying individualizing physical evidence at the scene (DNA, fingerprints, etc.).
Corpus delicti — “Corpus delicti” literally means “the body of the crime,” and figuratively means concrete evidence of a crime, or facts and circumstances constituting a breach of a law. Analysis of physical evidence at the crime scene can give investigators proof that a crime was committed, or that actions happening at the scene were innocent.
ID of unknown substances — Along the same lines as determining if there was a crime committed, unknown substances at the scene can be identified through forensic practices. Is that white powder flour or cocaine? Is that poison or just table salt? The proper identification of these substances will inform the investigators if there is a crime to be investigated.
Modus operandi — As you’ll learn later in the book, criminals repeat their behavior. Some criminals use a particular behavior has their “signature” or preferred method of operation, known as the modus operandi (MO). The physical evidence left behind due to the MO can be used to identify suspects and link different crimes together.
Support of witness statements — Witness statements are notoriously unreliable. The presence or absence of certain types of physical evidence can support or disprove a witness’s statement, thereby making it more reliable.
Tangible objects — A major advantage of physical evidence is it provides a tangible object for juries to see during the trial. This visual impact is extremely high and can make or break a case.
Reconstruction of the crime — This is the last step in crime scene investigation and the one that brings everything to a close. The investigator wants to know what happened, when, and by whom. Physical evidence analysis allows for this reconstruction without too much personal interpretation.
General Crime Scene Procedures
One of the most important factors determining the quality of crime scene investigations is the existence of departmental policies governing the conduct of CSIs and other personnel.
These policies should outline the protocols for securing the scene, collecting evidence, and maintaining the chain of custody to ensure the integrity of the investigation.
FIRST RESPONDERS
Safety first
Preserving the integrity of the scene.
Secure a scene
first responder should look for likely boundaries and easily managed entry and exit points.
once the perimeter is secured, it must remain so until the completion of the crime scene search and documentation.
a permanent record of everyone who enters the scene should be started as soon as the perimeter is secured.
Locate and sequester any suspects and/or witnesses that may be on scene
Tour the crime scene and make note of the conditions of the scene
any points of possible entry and exit
any major evidence that can be seen
Establish a pathway for people entering and leaving the scene.
should be clearly documented in the officer’s notes in order to provide a permanent record for the case file.
The first responder should be prepared to answer these questions for investigators:
What happened?
What physical area does the crime scene cover?
Who was involved?
What time did the incident take place?
Who has entered the scene?
What items in the scene have been disturbed?
If anything has been removed, where is it now and who has custody?
If the victim has been removed, where is the victim?
The Crime Scene
First responders secure the scene, but CSIs, detectives, forensic scientists, and other team members will take on the task of searching, collecting, and analyzing the evidence.
This process begins by searching the scene in a systematic, methodical way for any physical evidence. A systematic approach to the documentation of the scene and the collection of evidence is essential to ensure that all proper steps have been taken so that the evidence may be best presented in court
e.g., note-taking, videography, photography, and sketching.
NOTES
thorough notes should be taken during the entire scene search and should reflect any and all actions taken at the scene
should include notations regarding a list of the photographs taken, a list of evidence collected, any sketches that were prepared at the scene, and observations made during processing a scene.
PHOTOGRAPHY
should begin before any processing and evidence collection happens so that the scene as it was can be referred to later on
layout or overview/overall photographs should be taken first to illustrate the condition of the scene.
next, photographs from the point of view of eyewitnesses should be taken in order to document whether or not witnesses were in a position to see what they state in their witness statements.
midrange photographs should be next, and are used to illustrate spatial relationships of all evidence items and their relationship to the overall scene:
close-up photographs of the evidence items should be taken
specific photographs of each piece of evidence should be taken to illustrate location, condition of the evidence, and size of the evidence
a minimum of two photographs of each piece of evidence is necessary: the first should be just the evidence without any markers or other objects in the picture, and the second should be taken with a numbered marker and a ruler for scale.
VIDEOGRAPHY
videography of a crime scene should be used to enhance other documentation methods, not to replace them.
video tapes, SD cards, and other storage media are considered evidence.
any editing, enhancement, or other changes that need to be made to the video should be done on a copy of the video rather than on the original recording itself.
videography of the crime scene should not include narration, crime scene team members, or the crime scene member’s equipment.
the video should begin with a general overview of the scene and surrounding area, much like the overview photographs.
the videographer should walk through the scene, using both wide-angle and close-up views to capture the full layout of the scene, the location of any evidence, and the relevance of the evidence within the crime scene
The Crime Scene Sketch
The crime scene sketch is an invaluable source of information during an investigation. It is a permanent record that gives investigators extra information that is not as easily visualized with photographs and notes.
The crime scene sketch has several strengths when compared to other methods of scene documentation:
(1) The sketch can depict the overall layout of a location
(2) The important evidence found in a location can be highlighted while showing the relationship of the evidence to its surroundings
(3) The path the victim took and the distances involved can be shown clearly
(4) It can be used when questioning suspects and witnesses for illustration
(5) During the trial, the diagram can correlate testimony of witnesses and serve as a tool for relaying reference and orientation points to the prosecutor, judge, and jury.
There are two basic types of sketches that are employed at a crime scene:
Rough Sketch — a preliminary drawing created at the crime scene, without attention to the exact scale
Final Sketch — a much more polished version of the sketch, with careful attention to scale, placement, and measurements.
Types of sketches:
The overview sketch —This is the most common type of sketch and consists of a bird’s-eye view or floor plan sketch of the scene. The evidence is shown on a horizontal plane.
The elevation sketch —This type of sketch portrays a vertical plane. This is important for things on the walls such as bloodstain patterns or bullet holes.
The exploded view sketch —This type is also known as a cross-projection sketch. It consists of a combination of the overview and elevation sketch. It has the floor plan, and the walls have been laid out flat. The objects on the walls and the floor are shown in their relative positions.
The perspective sketch —This depicts the scene or an item of interest in 3D. It is a difficult sketch and requires some artistic skill on the part of the sketch artist.
Depending on the type of sketch, it may or may not be drawn to scale. When you draw to scale, you avoid a distorted view of the scene.
The items in such a sketch are placed in the diagram based on approximation, it should be clearly marked Not to Scale.
CREATING THE SKETCH
If the scene is large, try to get an overall view of the area and highlight some permanent landmarks.
Use these landmarks as reference points to help in accurately positioning other items in the sketch.
Lay down a baseline. This is the longest, uninterrupted side of the room (or curb line, building line, or even an imaginary line between two fixed points if you are outdoors)
Take measurements of the periphery of the scene and add them to the established baseline
Add the various objects within the scene in their proper positions related to the baseline and boundaries.
Ensure that all measurements are taken with precision, recording both distance and angle to maintain accuracy.
Use a measuring tape or laser rangefinder for greater reliability in capturing dimensions.
Write these measurements either directly on the sketch or in a chart that accompanies the sketch.
Critical measurements should be checked by two people to ensure accuracy.
For every object placed in a sketch, you need to measure two distinct points. These points are most commonly measured along rectangular coordinates. In other words, an object is located by making a measurement at right angles from each of two walls. This works very well for indoor measurements:
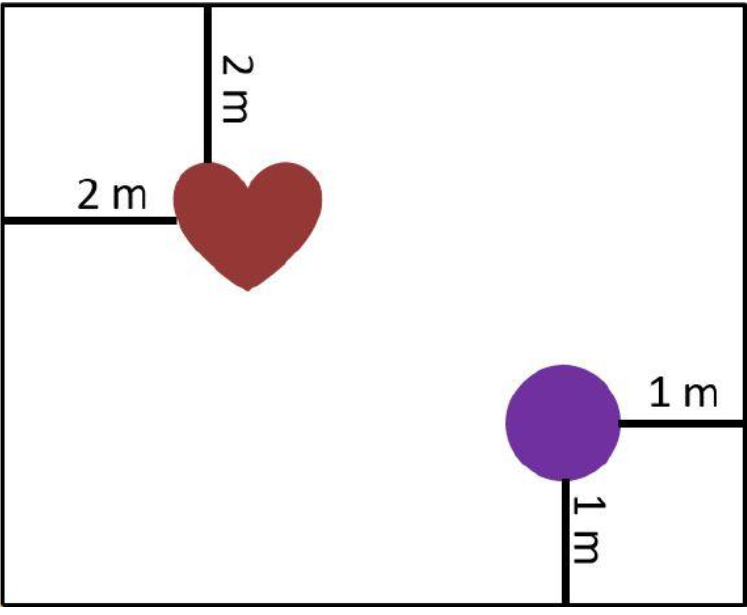
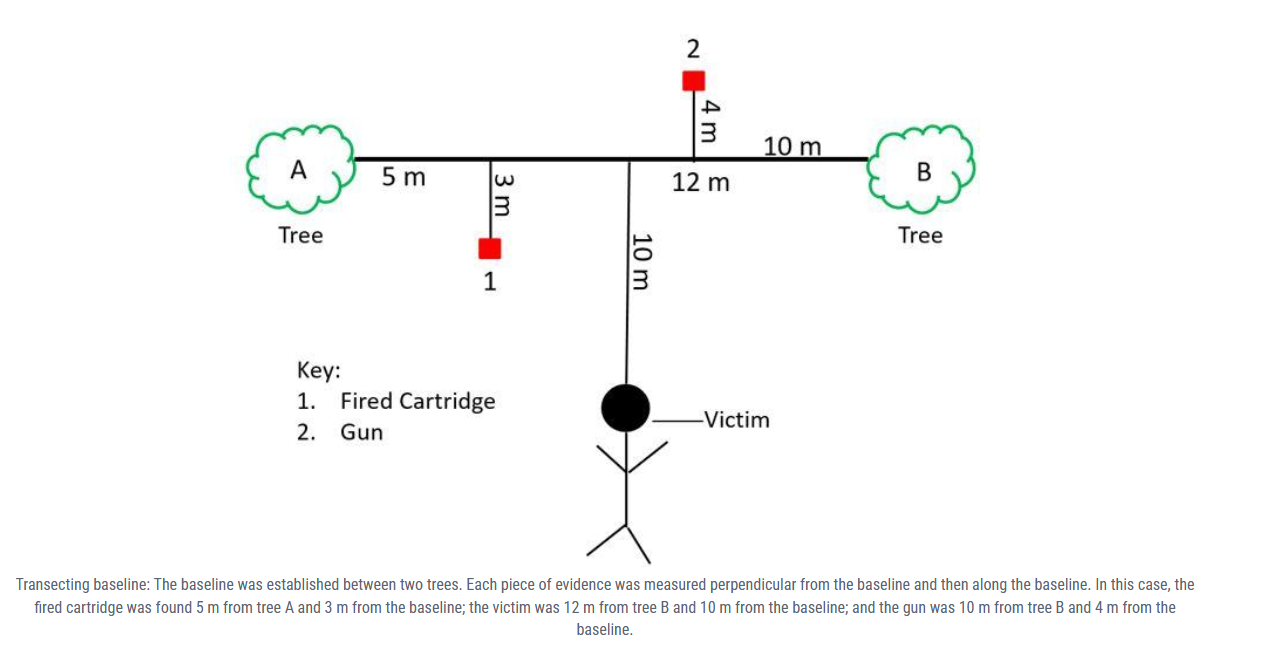
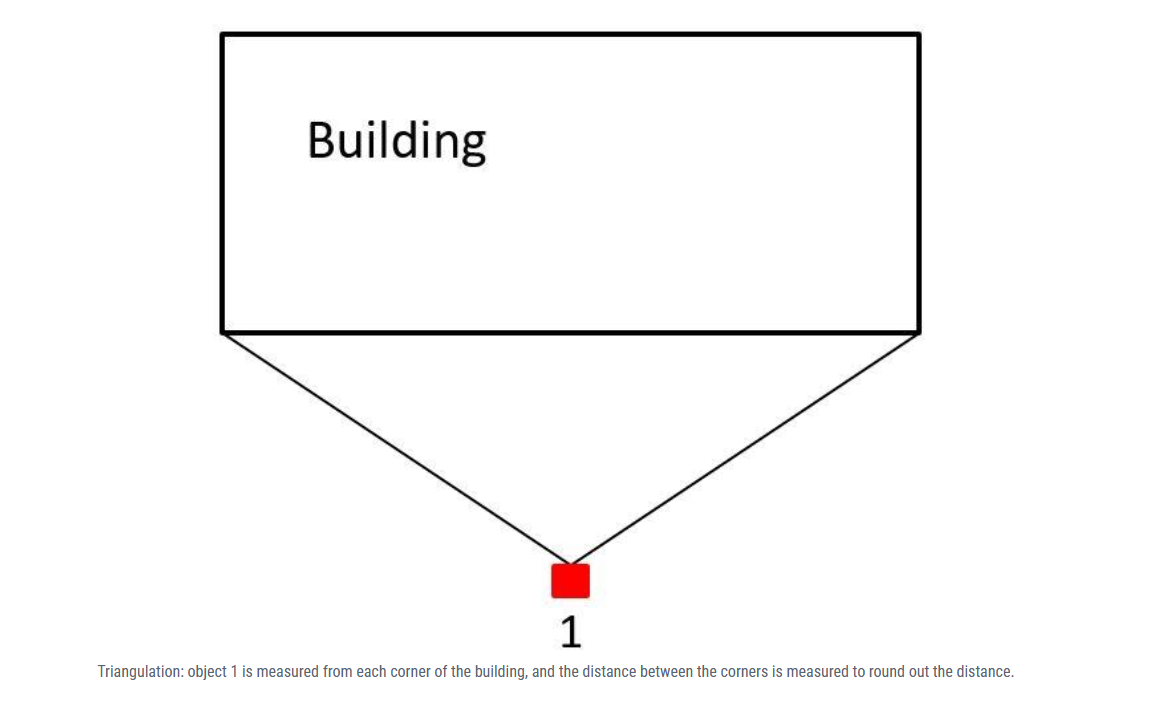
A third way to measure location within a scene is through triangulation. In this case, three measurements are needed: the distance from two separate fixed points to the object at the scene, and the distance between those fixed points:
ILLUSTRATING AND LABELING THE SKETCH
Once you have all your measurements and have located all the important points in the scene, you need to add them to your sketch.
use letters, numbers, symbols, shapes, figures, or points to represent various objects and explain the symbols in a key on the sketch itself.
Photography will likely be a part of the scene examination, and investigators will be using photo markers. Make sure that the numbers you assign to evidence in your sketch match the photo marker numbers
Label all landmarks or significant architectural features.
If there are stairways or other passages, use arrows to show the direction they go. Any unnecessary height or length may be cut off with jagged lines.
Include all doors and windows, and add a curved line to indicate which way a door swings
Each sketch should include information about the case, the scene, and anything else that might be relevant:
Address or location of scene
Case number
Date sketch was made, and by whom
A key to what the symbols on the sketch mean
An arrow to show the direction of north
The scale used for the sketch, or a note stating “not to scale.”
Searching the Crime Scene
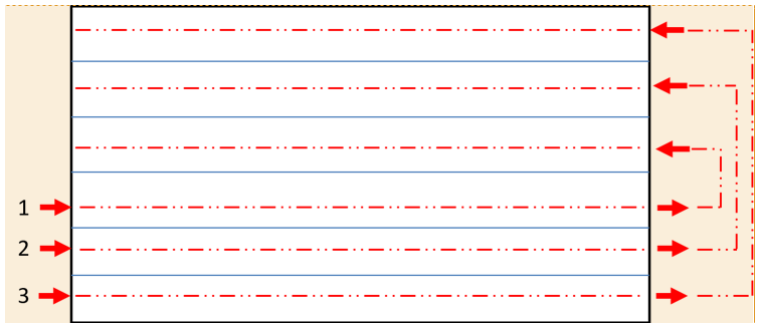
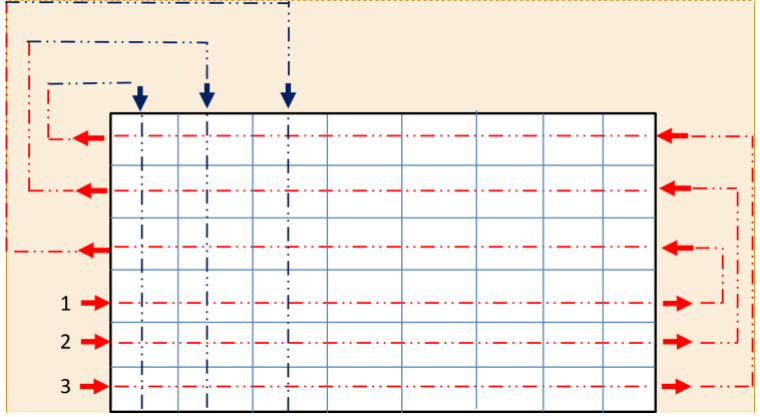
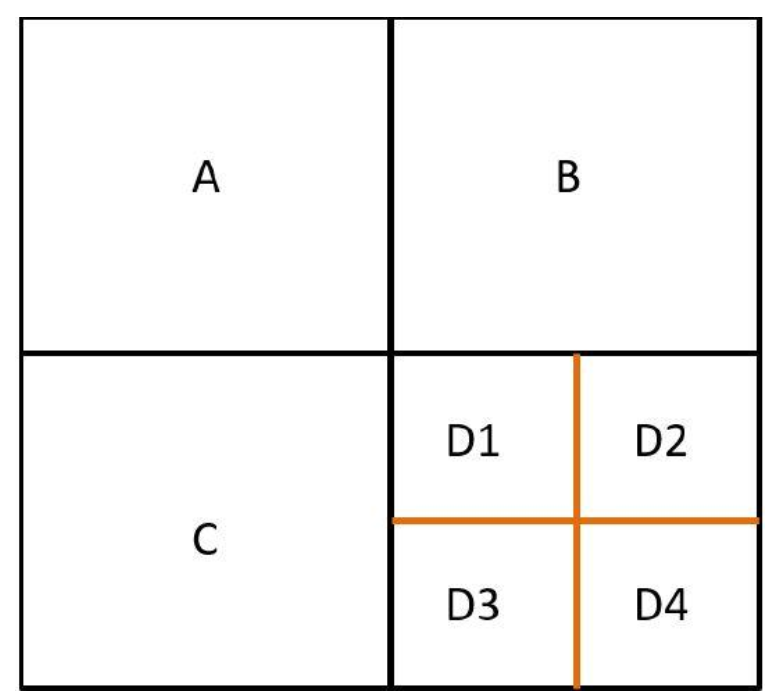
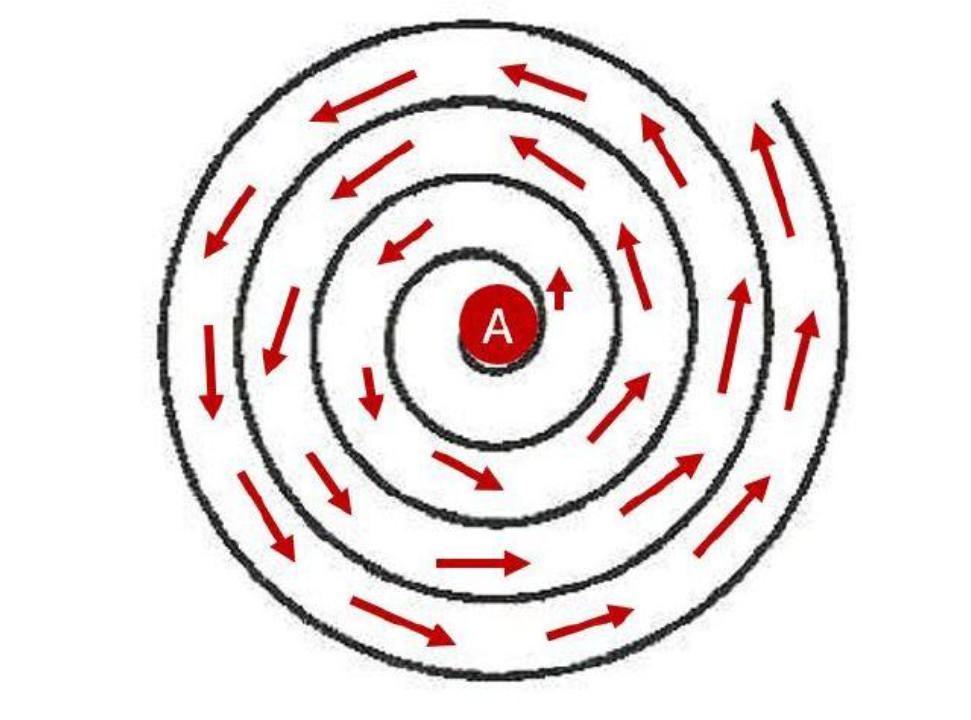
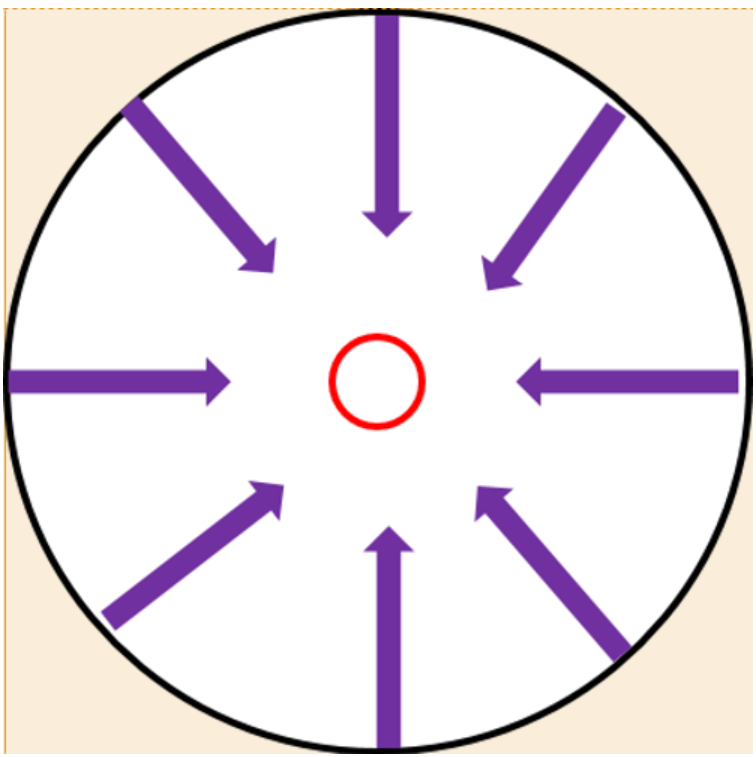
Crime scene search methods include line or strip searching, wheel or ray, zone or grid, and spiral searching.
Scenes should be broken up into smaller, manageable pieces to facilitate accurate location of evidence. Outdoor scenes are best searched using a line search, or a strip search method:
The second type of search is the grid or double strip method:
A zone search works well for areas with numerous rooms, or with lots of barriers:
A spiral search is good for irregular areas, or areas where a great deal of evidence might be found in the center of the scene:
The wheel or ray search pattern is best used on small, circular scenes:
Evidence Collection
As the scene is searched, evidence should be marked, photographed, measured, and sketched as it is found. Once this documentation is complete, then (and only then!) the evidence can be collected.
Process for fingerprints at the time the item is collected if possible. You want to make sure that fingerprint processing does not destroy trace evidence.
If latent print processing cannot be done at the scene, then package the evidence carefully and mark “for trace evidence/latent fingerprint processing” in large letters on the package.
Mark and record each item on an evidence list at the time of its collection
Package each item of evidence securely, so that any trace evidence present is not disturbed, lost, or contaminated.
EVIDENCE PACKAGING
There is no rigid order for collection of the evidence, but some evidence types by their very nature should be given priority.
Fragile, easily lost, easily damaged, or transient evidence should be collected first.
Most of the items collected at the scene will be packaged into a primary container, which is then placed into a secondary container.
Folded paper or envelopes can be used to secure any possible trace evidence around an item, and this item is then placed into larger envelopes, packets, canisters, paper bags, or plastic bags.
If the evidence is liquid or needs to be stored in liquid, then it should be placed into plastic or glass vials or other containers, sealed, and placed in paper evidence bags.
The outer container should be completely sealed with tamper-resistant tape.
The tape should cover any and all openings in the outer evidence package.
The edges of the tape are then marked with the initials of the collector and the date and time of the collection.
Wet, moist, or living biological evidence can be temporarily stored in airtight containers but should be allowed to air-dry in a controlled environment and then repackaged with the original containers in new, permeable containers such as brown bags
Each item of evidence should be packaged separately to prevent cross-contamination.
CHAIN OF COMMAND
The chain of custody (or chain of evidence) refers to the foundation that the prosecution needs to establish for physical evidence to be introduced into a court of law.
The chain of custody should be set up at the scene, during the documentation phase and before any evidence is collected. As items are discovered, they are collected, packaged, recorded, and then listed on the evidence list.
If the evidence changes hands, then the person who receives the evidence signs that he or she received it, what time it was received, and why it was handed over.
FINISHING A CRIME SCENE
At the end of a crime scene search, a crime scene debriefing team should be created before the scene is released.
The team should address these topics and questions:
Have all the areas been searched and documented?
Have witness statements given information that may lead to further searching?
Has everyone completed their assignments?
Is all evidence collected, documented, properly packaged, and accounted for?
Has good search of the scene been made?
Should the scene remain secured?
Initiate any actions identified during debriefing required to finish the scene.
Discuss potential forensic testing and the sequence of tests performed.
Establish post-scene responsibilities for law enforcement and other responders.
Perform a final survey of the crime scene.
CRIME SCENE RECONSTRUCTION
The final step
Reconstructing the crime scene is the process of determining or eliminating the events that could have occurred at the crime scene by the analysis of the crime scene appearance, location, and position of physical evidence, and the forensic laboratory examination of the physical evidence.
Crime scene reconstruction is based on observation, scientific experimentation, and experience of the investigator. Its stages follow basic scientific principles, theory formulation, and logical methodology
Here are the major steps in crime scene reconstruction:
Data collection— All information and documentation gleaned from the crime scene, witnesses, and victims are necessary for full reconstruction of the scene. Data about the condition and type of physical evidence, patterns, impressions, victim status, and so on, are reviewed, organized, and studied.
Conjecture— Before any detailed analysis happens, a possible explanation of what might have happened at the scene is developed. This is not a fixed thing—it’s simply a preliminary explanation that gives investigators a starting point. This explanation will change as more information comes to light.
Hypothesis formulation— Just like in science, when additional data becomes available after examination, investigation, and interviews then scientists and detectives can begin to formulate a comprehensive reconstruction hypothesis to explain the data and observations.
Testing— Once a hypothesis has been developed, then that hypothesis needs to be tested to support or disprove the hypothesis.
Theory formulation— Additional information may be found during the investigation that needs to be added to the overall reconstruction. As this information is discovered, the hypothesis should be adjusted to account for and explain the new info (that’s the point of a working hypothesis, after all!). When the hypothesis has been thoroughly tested and supported by analysis, then the final reconstruction theory can be formulated.