SISB Lec 4: Introduction to Hearing Aid Verification - REMs✔️
Hearing Aid Verification and Real Ear Measurements (REM)
Learning Objectives
Describe hearing aid verification procedures involving real ear measures
Explain how the following real ear measures are derived: unaided response, unaided gain, insertion gain, aided response, aided gain
Differentiate between appropriate and abnormal real ear measures
Discuss the limitations and potential inaccuracies of real ear measures
Compare methods of stimulus intensity calibration
Describe the impact of stimulus types, intensity and patient positioning on real ear measures
Verification of hearing aids
Verification
The process of ensuring HA meets specific criteria (→ confirm that the hearing aid provides sufficient amplification in wearer’s ear)
measuring response/gain of HA in patient’s ear
response/gain of HA will be measured with an analyser employing a probe microphone
**Real Ear Insertion Gain (REIG): Gold-standard
Two possible approaches to verification:
Test HA whilst being worn by the user (REM: Real Ear Measures)
Test HA in a standard coupler (Test box measures)
Real Ear Measures (REM)
REM (aka probe tube measures): A method of assessing sound pressure levels in client’s ear canal
Using a thin silicone probe tube placed close to the eardrum and attached to a mic
Measure:
natural resonance of external ear (*the loss of this when a HA is placed in the ear)
HA amplification (electro-acoustic) characteristics
Mould effects (tubing, venting, length, tightness of fit, etc) (considers everything that affects amplification)
When perform?
HA fitting appointment
Review appointments (based on client feedback / adjustments being made to devices)
any time to know how much amplification a HA is providing in client's ear / to verify actual performance of a HA
Specific measures
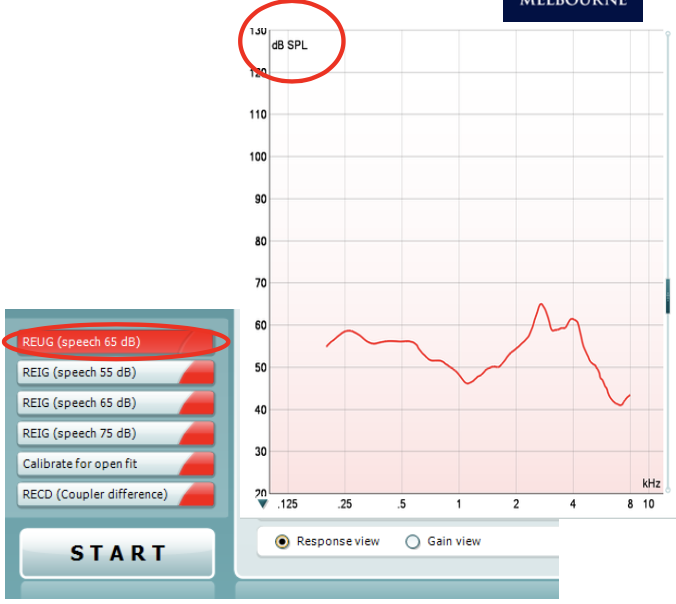
Real Ear Unaided Response (REUR): the sound pressure level in the ear canal without the hearing aid present, in response to a given stimulus
Real Ear Unaided Gain (REUG): the gain (in dB) produced by the ear canal and pinna without the hearing aid, relative to the input level
Real Ear Aided Response (REAR): the sound pressure level in the ear canal with HA in place and turned on, in response to the same stimulus
Real Ear Aided Gain (REAG): the gain (in dB) with HA on, relative to the input level
Real Ear Insertion Gain (REIG): the gain contributed by the HA itself, isolating HA’s effect from the ear canal resonance
REIG:
Real Ear Occluded Response / Real Ear Occluded Gain (REOR/REOG)
Real Ear Saturated Response (RESR)
Real ear-to-coupler difference (RECD) – needs REM and coupler measures (test box); often used in paediatrics
Equipment required
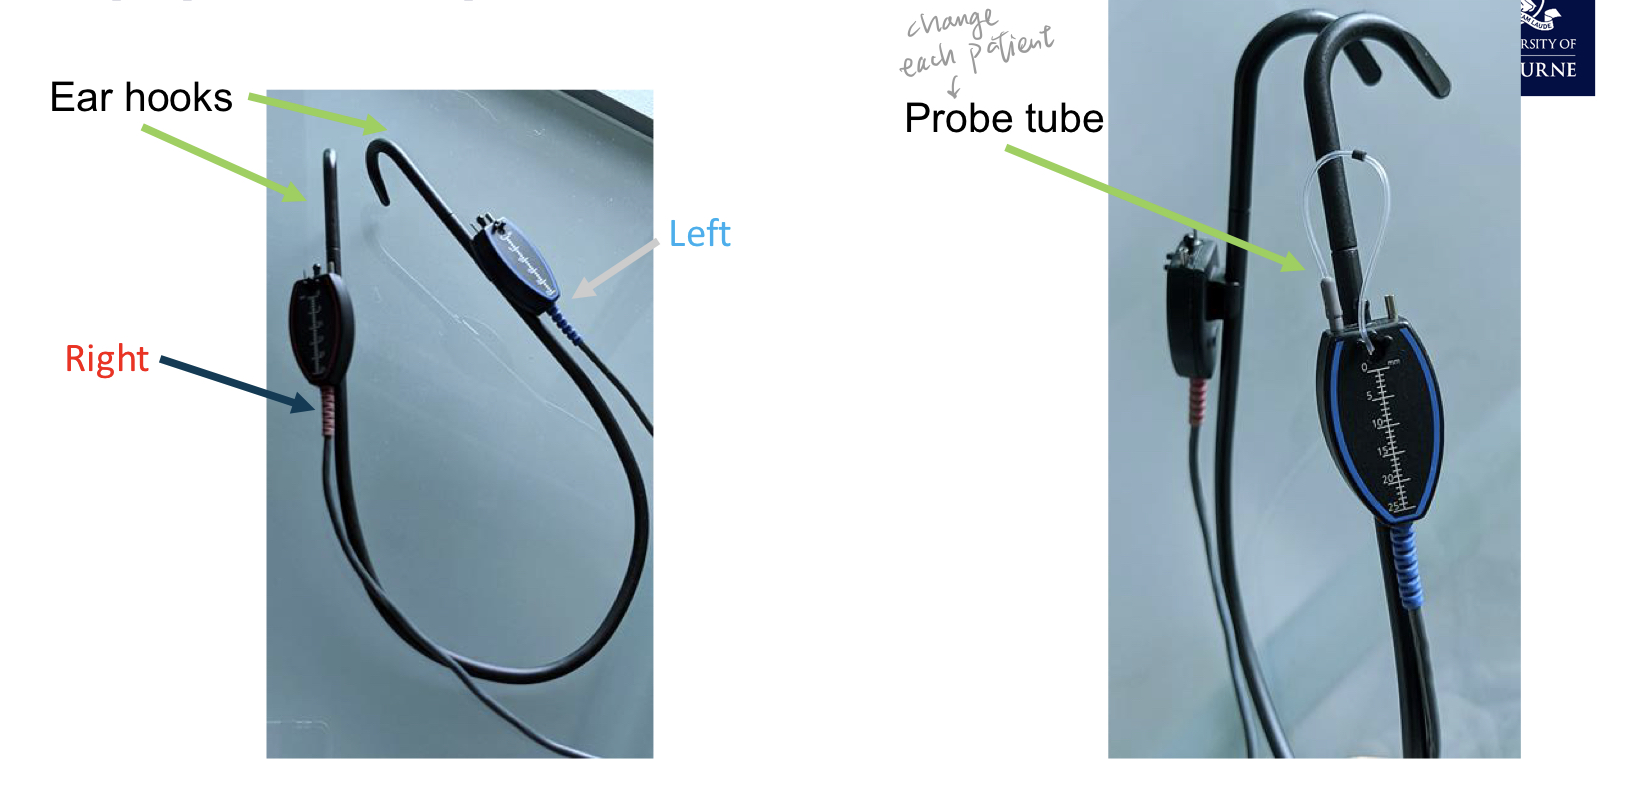
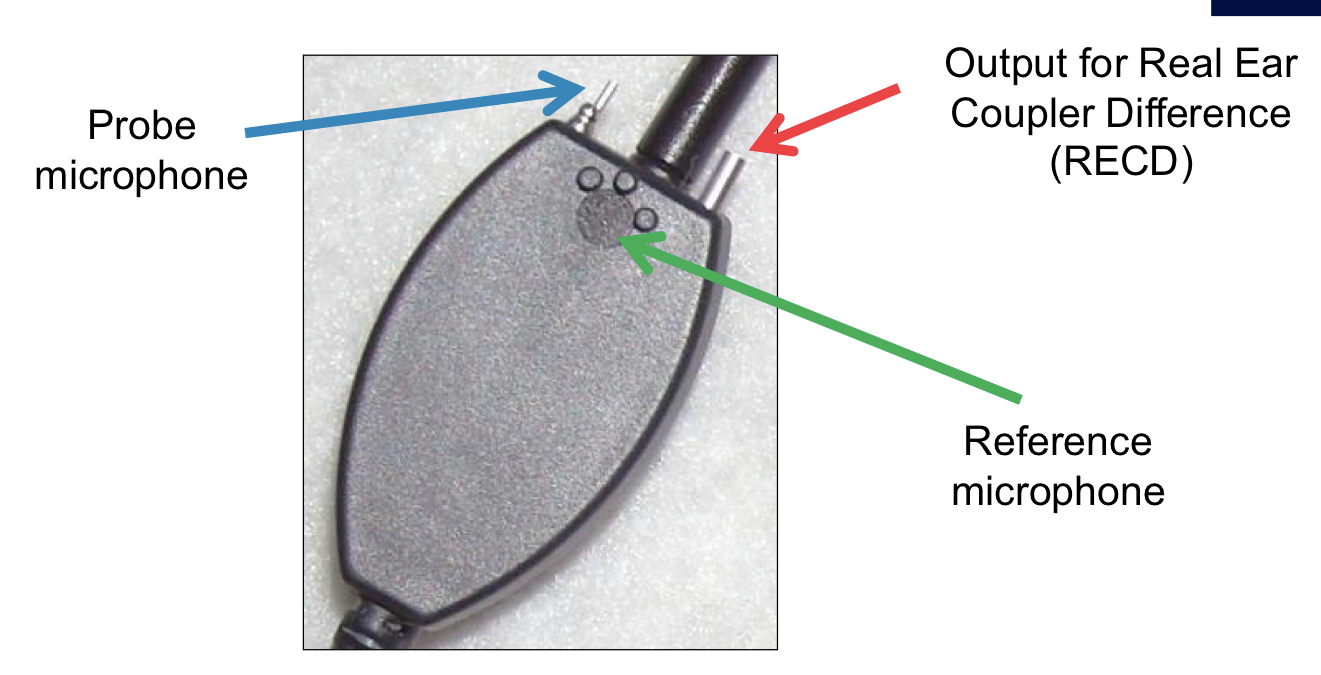
Probe tube (a thin silicone tube) connected to probe mic in the headset
Reference microphone (on the headset) to monitor input levels during pressure method calibration
A housing box (e.g., affinity/odometer) that interfaces with the REM software for data collection and visualisation
HA verification process
Calibrate probe tube mic (before clinic)
Ensure no wax in the ear canal → affect accuracy of measures
Measure probe tube length using HA as a guide (mark the length)
Probe tube placed in the ear canal, at a point that is sufficiently close to TM
Stimulus is played through the test speaker (situated in front of patient) and the probe tube mic will measure the intensity of the sound reaching it in the ear canal (without HA / Real ear unaided response/gain)
HA is then inserted with probe tube in-situ (ensure probe tube does not move) & response is measured again to determine the amount of amplification provided by the HA (Real ear aided response/gain)
Adjust HA gain to match to prescription target as necessary – reverify if necessary
Subjective checks
1) Calibration of Probe Tube Microphone
acoustics of probe tube need to be considered & effectively removed → ‘acoustically invisible’
ideally should calibrate probe tube microphone each time probe tubes are changed NOT just at the start of clinic day
calibration achieved by comparing levels at probe tube mic and reference mic
ensure the probe tube is patent & working properly
2 & 3) Check wax & Measure up probe tube
probe tubes positioned as close to the ear drum as possible (at least within 5-6mm)
measuring the probe tube length depends on the HA/earmould length
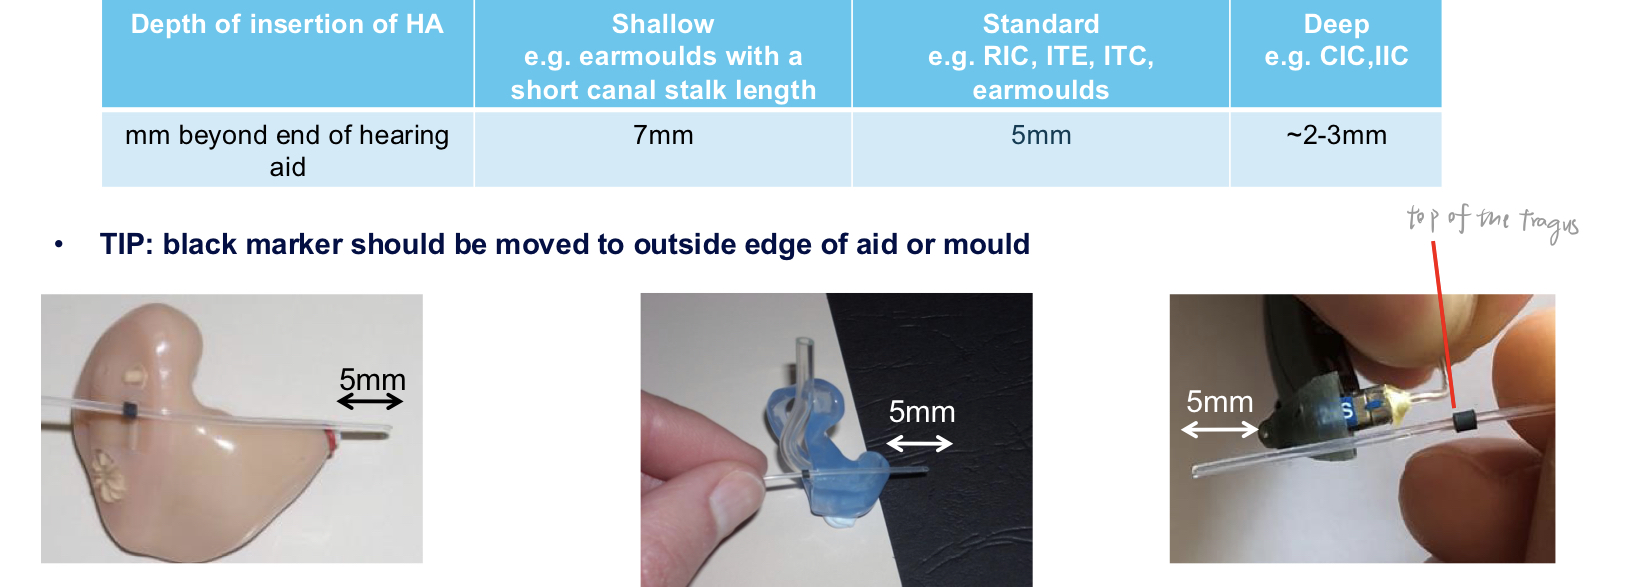
use the black marker on the probe tube to mark the insertion depth at the tragus; typically aim to have the end inside the ear canal such that the distance to the tympanic membrane matches the planned depth.
4) Positioning the probe tube
average adult ear canal length: approx. 24mm
6mm from the eardrum = 18mm past the ear canal entrance
1.5mm more for males; 1.5mm less for females
depth of the probe tube is important for obtaining accurate measures of the sound in the ear
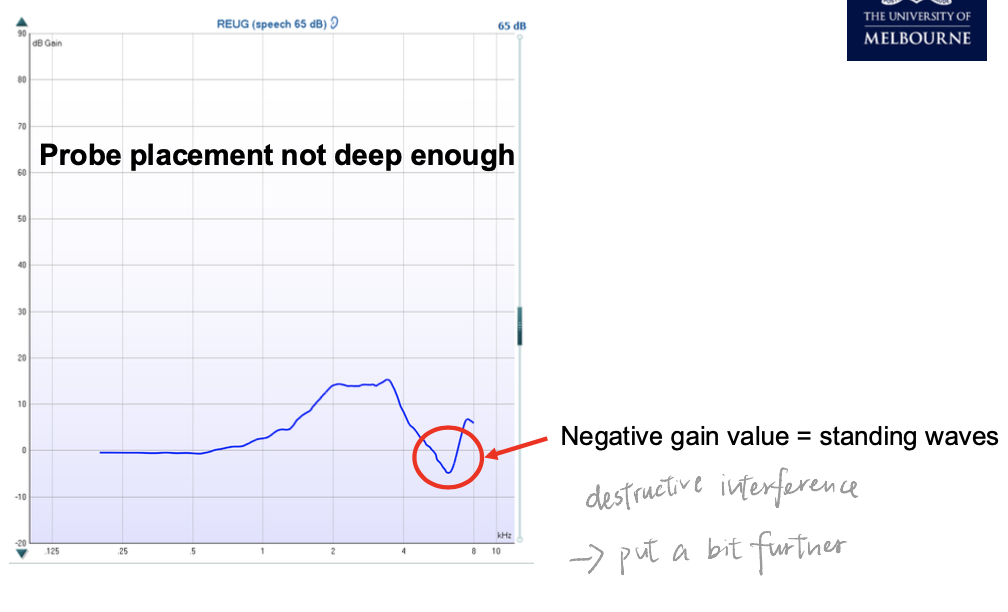
if probe tube is placed too shallow → may not adequately measure HF
Positioning and field considerations
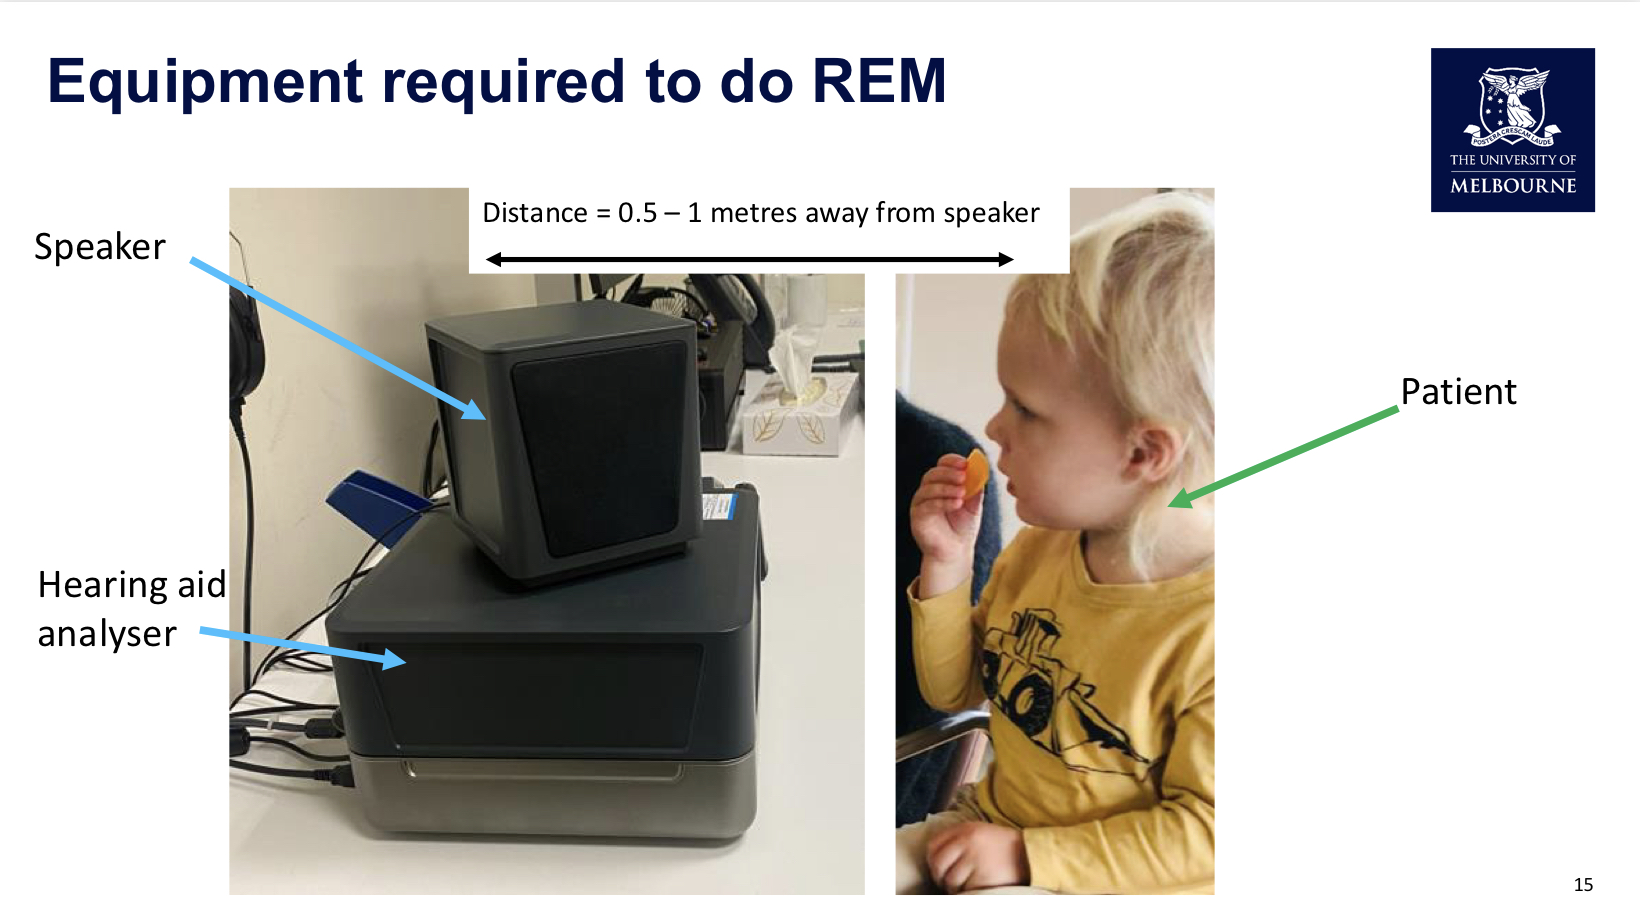
Distance from loudspeaker: half a meter to one meter.
Room: quiet, minimize background noise (noise can contaminate measurements).
Head/ear orientation: for binaural fitting, patient faces the speaker at 0° azimuth; for monoaural fittings, patient is positioned at ~45° to the ear with the hearing aid.
Loudspeaker to deliver the stimulus at a known level (commonly 65 dB SPL input).
Stimulus and measurements
Stimulus often used: speech-based signal (e.g., ISTS – International Speech Test Signal) and sometimes swept pure tones.
The ISTS is a multi-language speech-like signal designed to reflect real-world speech across languages and fundamentals.
Measurements cover unaided response/gain and aided response/gain as the patient is tested with and without the hearing aid.
Verification sequence (typical order)
1) Calibrate the probe tube (and reference microphone) using pink noise or another calibration signal to ensure the tube is acoustically invisible and readings match the reference microphone when the stimulus is presented.
2) Check for occlusion and measure the probe tube length; set depth (5 mm standard; 7 mm for shallower ears; 2–3 mm for deeper canals) and confirm depth with the black marker.
3) Place probe tube near the tympanic membrane (roughly 5 mm from the eardrum).
4) Present a stimulus (often speech) via the loudspeaker; record the unaided response (REUR) and unaided gain (REUG).
5) Keep the probe tube in place and insert the hearing aid, turn the aid on, and measure the real ear aided response (REAR) and aided gain (REAG).
6) Compute insertion gain (REIG) using the formulas above and compare against fitting targets; adjust the hearing aid as needed to meet targets.
7) Perform subjective checks with the patient (sound quality, comfort, occlusion, binaural balance, and overall satisfaction).Why REMs are important
Real-ear measures reflect the actual sound in the patient’s ear, accounting for ear canal resonance and coupling effects, which are not captured by coupler-based (test box) measurements alone.
In Australia, insertion gain is the preferred verification measure because it isolates the hearing aid’s contribution within the patient’s ear space.
REMs guide verification and aid fine-tuning for better audibility and patient satisfaction, especially after large fitting changes.
Distinctions: response vs gain (interpretation and axes)
Real Ear Unaided Response (REUR): measured output in dB SPL (sound pressure level) at the tympanic membrane without the aid.
Real Ear Unaided Gain (REUG): gain relative to input in dB, derived from REUR and input level.
Real Ear Aided Response (REAR): output in dB SPL at the tympanic membrane with the aid on.
Real Ear Aided Gain (REAG): gain relative to input in dB, derived from REAR and input level.
Real Ear Insertion Gain (REIG): the amount of gain contributed by the hearing aid itself, isolating the aid’s effect within the ear canal.
Key mathematical relationships
Input level is typically the stimulus level presented at the loudspeaker (commonly 65 dB SPL).
If the measured unaided response is REUR (in dB SPL) and the aided response is REAR (in dB SPL) with the same input, then the insertion gain can be expressed as:
If you calculate gains with the software, you can also use:
Practical interpretation
REUR/REUG reflect the ear canal's natural resonant properties without the aid.
REAR/REAG reflect what the hearing aid contributes inside the ear, including the ear canal's resonance when the aid is in place.
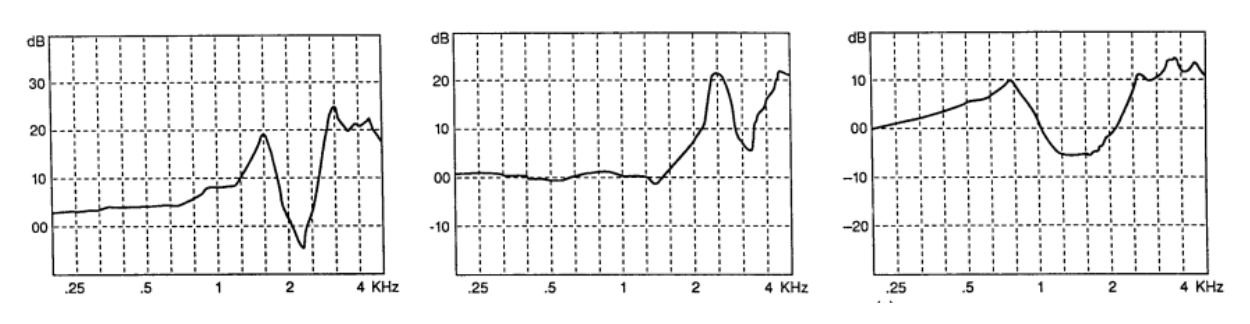
Peaks typically appear around 3–6 kHz in the unaided gain due to ear canal resonance; expect variations among individuals.
What to look for in unaided vs aided REM graphs
Unaided response (REUR) and unaided gain (REUG)
Expect natural ear canal resonance with peaks around 3–6 kHz depending on the individual.
A typical REUR curve will show an overall level around the input (e.g., 65 dB SPL) with peaks due to ear canal resonance; the exact shape varies by person.
In REUG, expect a baseline around 0 dB with peaks at the resonant frequencies (3–6 kHz) representing the ear canal’s amplification.
Common issues in REUR/REUG graphs
Notches below baseline or abnormally flat curves may indicate improper probe depth, occlusion, or measurement errors.
Notches near the tympanic membrane depth (probe not deep enough) can create standing waves and distort the reading.
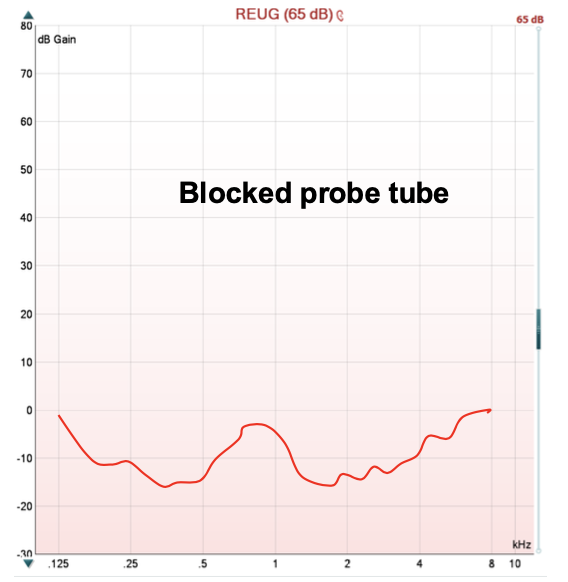
A completely negative/attenuated response may indicate a blocked probe tube or excessive occlusion.
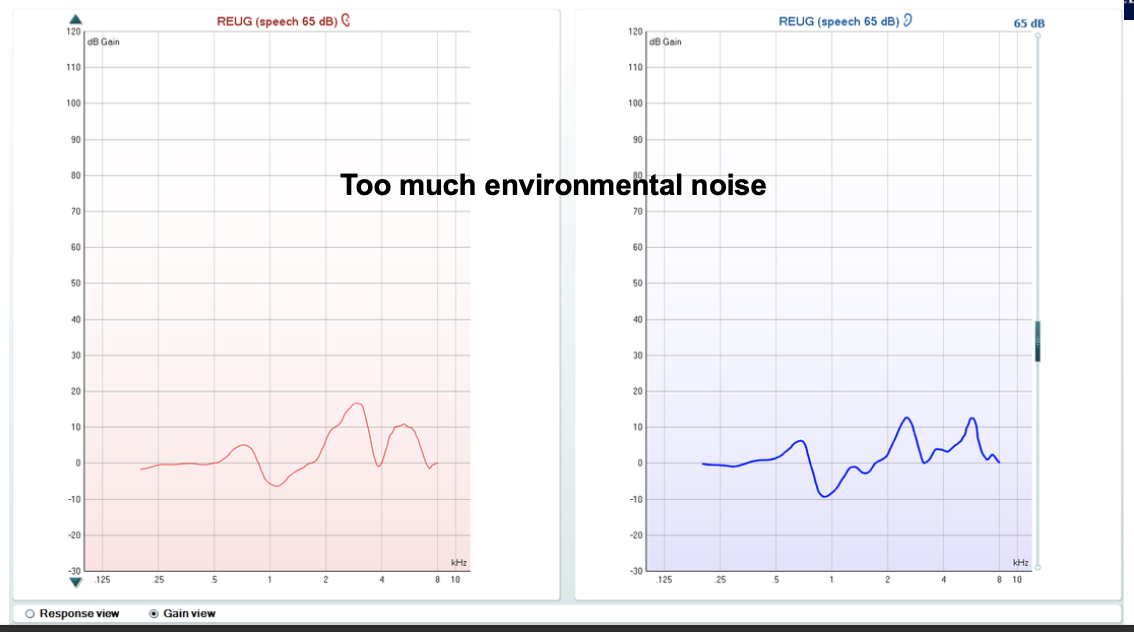
High environmental noise or patient movement can create multiple, inconsistent peaks.
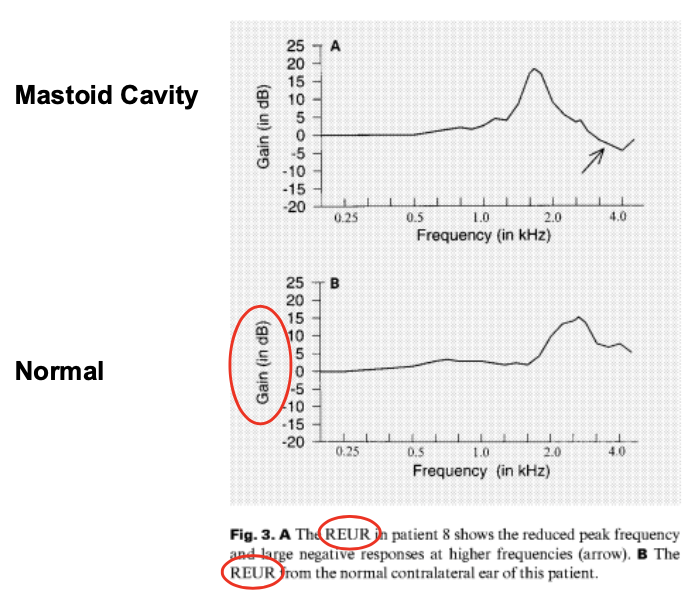
Tympanic membrane perforations or mastoid cavities shift the resonance toward lower frequencies.
Insertion gain (REIG) and fitting targets
Insertion gain represents how much amplification the hearing aid provides beyond the ear canal’s own resonance.
Computing insertion gain
From gains:
From responses:
Use case and interpretation
Compare measured REIG to a prescribed target curve (e.g., NL2 or other fitting targets) at a standard input level (commonly 65 dB SPL).
The software can display a target curve (often a straight line or a smoothed target) and the patient’s actual insertion gain; clinicians adjust the hearing aid to align readings with the target.
Practical visualization and workflow notes
Retain two software windows open: one for fitting software (parameters, gain targets), and one for REM verification software to compare insertion gain to target.
In practice, if the measured IG deviates, adjust the hearing aid’s gain in high-frequency bands and re-run the REM to verify improvements.
Stimuli and calibration details
Stimulus levels and types
Common input level: 65 dB SPL (conversation level) used for standard REM measurements.
Other possible inputs: soft (e.g., 50–55 dB), medium (65–70 dB), and loud (80 dB) to assess a range of real-world speech levels.
Stimuli used: ISTS (International Speech Testing Signal) or swept pure tones; ISTS is constructed from multiple languages to reflect real speech properties.
Real Ear Saturation Response (RESR) can use swept tones to measure maximum output of the hearing aid.
Calibration methods
Pressure method (most common): the headset reference microphone actively monitors the input signal, ensuring the actual level at the ear matches the target (e.g., 65 dB SPL) even if the patient or equipment moves slightly.
Pros: robust to small positional changes; cons: leakage from open fittings may contaminate the probe microphone signal.
Substitution method (used for open fittings): calibrate the stimulus level without the patient present; no active monitoring from the headset reference microphone during verification.
Pros: avoids leakage impact from open fittings; Cons: movement of the patient cannot be compensated during verification.
Practical notes on calibration
Always calibrate the probe tube and verify the measurement with pink noise or a known signal.
Confirm a clean, sinusoidal trace during calibration; if readings are peaky or irregular, the probe tube may be damaged or the environment too noisy.
Check calibration for both left and right ears; keep depth and positioning consistent across measurements to improve test-retest reliability.
Probe tube depth and depth-related effects
Depth considerations and the impact on high-frequency measurements
If the probe tube is too far from the tympanic membrane (e.g., ~1 cm), high-frequency (8 kHz) readings can show substantial attenuation (~10 dB) compared with the ideal when measured at 0 μm distance.
Closer depth (about 6 mm from the tympanic membrane) reduces attenuation at high frequencies and yields more reliable high-frequency data.
Practical depth rules
Standard depth: ~5 mm from tympanic membrane; shallower ears: ~7 mm; deeper ears (e.g., CIC/IIC): ~2–3 mm.
After placing the depth, align the black marker with the tragus to maintain a consistent insertion depth during measurements.
Common measurement patterns and interpretations
Real Ear Unaided Response (REUR) and Real Ear Unaided Gain (REUG)
Expect a flat response in the low frequencies (without ear canal resonance) with resonant peaks in the 3–6 kHz range due to the outer ear and ear canal characteristics.
Gains (REUG) should stay near 0 dB baseline overall, with peaks around 3–6 kHz; any major notches or deviations warrant rechecking depth and occlusion.
Real Ear Aided Response (REAR) and Real Ear Aided Gain (REAG)
The presence of the hearing aid shifts the response to reflect both the device’s amplification and the ear canal’s resonance.
The insertion gain (IG) shows the device’s contribution; it should align with target amplification curves across the frequency range.
Practical issues and troubleshooting
Probe tube or ear mold issues
Probe tube occlusion or blockage by ear wax can yield unreliable measurements (negative gains or flatlines); inspect and replace the tube as needed.
Compression or improper seating of the earpiece can cause the tube to be pressed against the wall or into an occluding position; reposition and re-measure.
Movement and test-retest reliability
REM test-retest reliability is typically around ±6 dB of the true value and up to ±10 dB at high frequencies.
The main source of variability is movement of the probe tube between measurements; minimize movement and maintain consistent depth.
Patient-specific factors and anatomical considerations
Children often have shorter ear canals; insert depth will be shallower and require careful repositioning.
Ear pathologies (perforations, mastoid cavities) alter ear canal resonances and shift the curves toward lower frequencies.
In severe cases (high-power hearing aids, gag reflex), insertion gain may be difficult to obtain; alternative verification methods (e.g., validation measures) may be necessary.
Subjective verification and clinical workflow after REM
Subjective checks with the patient
Assess sound quality, clarity of voice, and comfort in everyday listening; use conversational tasks and different noise scenarios.
Check perceived loudness, voice quality, and whether the patient notices occlusion (boomy voice) or other feedback effects.
Objective + subjective integration
If REM indicates matches to targets, proceed; otherwise adjust hearing aid programming and re-run REM.
Confirm bilateral balance (binaural fitting) and ensure no excessive feedback.
Practical notes on exam and real-world application
REM is a gold-standard tool for verifying the output of HA fittings; it is essential when large fitting changes are performed (e.g., significant gain adjustments or coupling changes).
The process improves audibility, overall satisfaction, and ethical practice by ensuring accurate amplification.
In the course context:REM-focused lectures are followed by additional, less-common methods (e.g., occluded measures) in later weeks; expect a quiz in week 5 covering REM concepts.
Quick reference: common quantities and units
Sound pressure level (SPL) in dB:
Gain in dB: (no SPL suffix)
Input level typically used:
Distances: half meter to 1 meter from the loudspeaker; probe tube depth from tympanic membrane: approximately (standard), (shallower canals), or (deeper canals)
Ear canal length (average): approximately
Frequency range of interest: roughly for resonance peaks, with high-frequency data sensitive to depth
Exam-ready questions you should be able to answer
What is the difference between REUR and REAR? What about REUG and REAG? How is IG derived?
How do you calculate insertion gain from unaided and aided measures? Show the two equivalent formulas.
Why is insertion gain the preferred verification metric in Australia?
What factors can bias REM results, and how would you troubleshoot them?
What is the role of depth placement in REM accuracy, and how would you adjust for shallow/deep ear canals?
What are ISTS and swept tones, and why are they used for verification?
When would insertion gain not be feasible, and what alternatives exist?
How do you perform subjective checks after REM to ensure overall patient satisfaction and safety?
Glossary quick reference
REM: Real Ear Measures
REUR: Real Ear Unaided Response
REUG: Real Ear Unaided Gain
REAR/REAR): Real Ear Aided Response
REAG: Real Ear Aided Gain
REIG: Real Ear Insertion Gain
ISTS: International Speech Testing Signal
IG: Insertion Gain
dB SPL: decibels in sound pressure level
dB: decibels (difference scale, not SPL)
NL2: a common fitting target reference curve (example used in demonstration)
Note on training and resources
In-clinic practice videos and software demonstrations are provided (e.g., REM software tutorials, practice scenarios).
Week-by-week plan: initial lectures cover core REM concepts and procedures; later weeks cover alternative measures and nuance (validation measures, pediatrics, etc.).
🧠 1. What is Verification?
Definition:
Verification = ensuring the hearing aid meets a specific fitting criterion → that the client receives appropriate amplification in-ear.
In practice:
Measure response or gain (amplification) of the hearing aid in the patient’s ear.
Use a probe microphone attached to an analyzer (e.g., Affinity box).
In Australia → Real Ear Insertion Gain (REIG) is the gold standard.
Two main approaches:
In-ear testing (live patient) → covered today.
Test-box / coupler measures → covered later (Week 11).
🎧 2. Real Ear Measures (REMs) – Overview
Also known as: Probe-tube measures
Purpose: Measure sound pressure levels (SPLs) in the client’s ear canal.
Equipment: Thin silicone probe tube placed close to tympanic membrane (TM), attached to a microphone.
What REMs can measure:
Natural resonance of ear canal (without aid).
Amplification of the hearing aid (aided).
Effect of coupling piece or mould.
Australian clinical practice:
Perform REMs at first fitting and again at review if:
Significant changes made in fitting software.
Coupling piece (dome/mould) changed.
⚙ 3. REM Equipment Setup
Core Components
Affinity Box – audiometer + hearing aid analyzer.
Loudspeaker – placed 0.5–1 metre from client.
Headset for REMs:
Probe microphone port (narrow) – connects silicone tube.
Reference microphone (silver plate) – monitors signal from speaker.
Ruler – measures insertion depth.
Room requirements:
Quiet environment – background noise affects accuracy.
🧩 4. Step-by-Step Verification Procedure
Step | Action | Key Points |
|---|---|---|
1 | Calibrate probe tube | Using pink noise; compare probe & reference mic readings (both should read equal SPL, e.g., 65 dB). |
2 | Check ear canal | Ensure no occluding wax. |
3 | Measure probe-tube length | Use ruler & black marker to mark tragus position. |
4 | Insert probe tube | End ≈ 5 mm from TM; varies by coupling style. |
5 | Play speech stimulus (65 dB SPL) | Measure unaided response/gain (natural resonance). |
6 | Insert and switch on hearing aid | Without moving probe tube; measure aided response/gain. |
7 | Calculate Insertion Gain (REIG) | = (Aided − Unaided). |
8 | Adjust gain if needed | Match curves to prescription target (e.g., NAL-NL2). |
9 | Perform subjective checks | Confirm comfort, balance, feedback, loudness, voice quality. |
📏 5. Probe Tube Depth Guidelines
Type | Distance from sound bore → TM |
|---|---|
Standard RIC/ITE/ITC | 5 mm |
Shallow mould | 7 mm |
Deep CIC/IIC | 2–3 mm |
Average adult ear canal: ≈ 24 mm long.
Target: Probe tip ~ 6 mm from TM.
Check:
Too shallow → attenuation of HF (~10 dB loss @ 8 kHz).
Too deep → discomfort.
Verify depth via otoscopy after insertion.
🎛 6. Terminology – Response vs. Gain
Term | Definition | Units |
|---|---|---|
Response | absolute level of sound (output) Gain (G) + Input level (I) | dB SPL |
Gain | amplitude of signal measured when probe tube is in-situ relative to the amplitude of signal going in Output level (O) - Input level (I) | dB |
Typical input: 65 dB SPL (speech).
→ Gain = Output – Input.
E.g., 80 – 65 = 15 dB gain.
🔍 7. Real Ear Unaided Response & Gain
REUR (Response):
Baseline measurement — the resonant properties of the unoccluded external ear structures (i.e., resonance of ear canal, concha and pinna)
Total SPL at TM (input + ear canal resonance).
Peaks: ~3 kHz & 6 kHz (resonance from canal and also secondary resonances from concha & pinna)
Flat below 2 kHz; decreases above 6–8 kHz.
Unit: dB SPL.
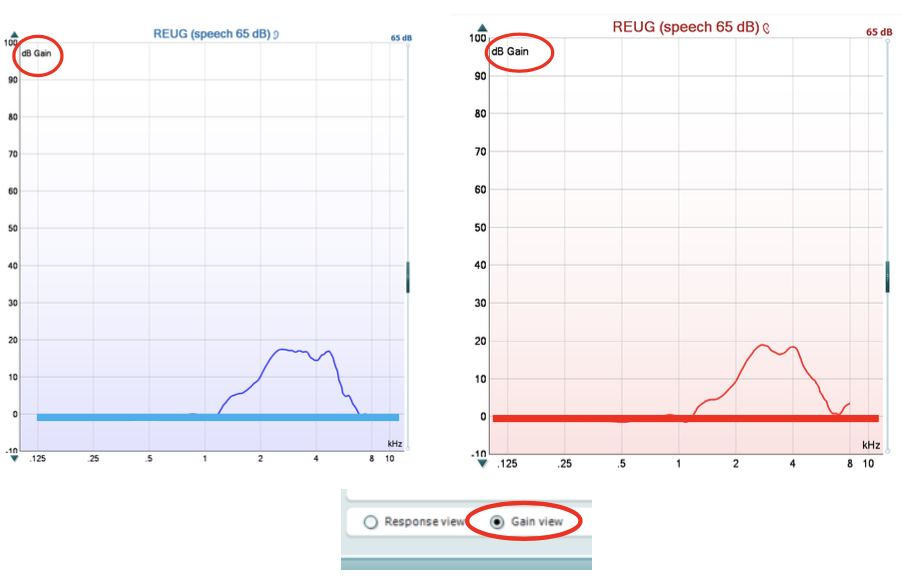
REUG (Gain):
same measure but the input lv. is subtracted from the lv. measured at the probe mic — resonance contribution only (response − input)
Isolates natural ear amplification (no aid)
Unit: dB
Expected peaks ≈ +15–20 dB at 3–6 kHz.
If negative/notched response:
→ Probe too shallow → standing waves / destructive interference.
→ Re-insert deeper (~6 mm from TM).
Abnormal examples:
Blocked tube / wax: flat or negative.
Too noisy room: spurious peaks.
TM perforations
Mastoid cavity: resonance moves lower due to larger volume.
*look at the scale to see which it is. (REUR = dB SPL; REUG = dB Gain)
🎧 8. Real Ear Aided Response & Gain
REAR (Response):
Measured SPL at TM with hearing aid on (input + aided output).
REAG (Gain):
REAR(dB SPL) – input level(dB SPL)
→ amplification provided by hearing aid + canal resonance
→ Reflects total aided output, not yet isolated to the HA itself
🧮 9. Real Ear Insertion Gain (REIG) – Gold Standard
Definition:
Amount of gain provided by the hearing aid alone
REIG = REAG−REUG
or
REIG = REAR−REUR
Purpose:
Isolate the hearing aid’s true amplification effect (remove natural ear resonance).
Procedure:
Measure unaided → measure aided → software calculates REIG.
Match to target (e.g., NAL-NL2 65 dB SPL input curve).
Adjust fitting software if mismatch (commonly high-freq region).
Typical inputs used for multiple targets:
Soft = 50 dB SPL
Medium = 65 dB SPL
Loud = 80 dB SPL

🧠 10. When Insertion Gain May Not Be Possible
Very high-power HAs → feedback contamination due to probe tube presence (not often an issue these days ← improvements in FB
cancellation)
Bone conduction HAs → air-conduction not applicable
Gag/vagal reflex → retch/gag when probe tube inserted → Use alternative validation measures instead e.g. aided audiogram (free field)
⚠ 11. Potential Inaccuracies & Troubleshooting
Error | Likely cause | Fix |
|---|---|---|
Unreliable reading / variation | Probe moved between measures | Keep probe in same position |
Negative or flat curve | Blocked tube (wax) | Pull tube out, examine the end for wax; remove / replace |
Strange peaks | Tube touching canal wall / compressed | Reposition |
Zero output | Tube cracked / disconnected | Replace tube |
Noisy trace | Room noise / patient talking | Ensure quiet environment |
Test–retest reliability: ±6 dB of true value (or ±10 dB in HF). Mainly probe tube position movement
Children: shorter ear canals → probe tube insertion depth shorter than for adults
🗣 12. Subjective Checks
Assess how client perceives sound:
Sound quality: conversational listening, paper crumple, table tap.
Own-voice perception: check for occlusion (boomy sensation).
Balance: ensure both sides equally loud (localisation)
Feedback: hand-cup test for whistling.
Maximum Power Output (MPO): comfort at loud sounds e.g. clapping, spoon in cup
Goal: ensure comfort + clarity, not “normal” hearing.Expectation: things sound diff. with HAs but are comfortably diff.
📐 13. Factors Influencing REM Accuracy
(a) Client orientation & position
Setup | Use case | Position |
|---|---|---|
0° azimuth | Binaural fittings | Facing speaker directly |
45° azimuth | Monaural fitting | Test ear facing the speaker |
180° azimuth | Test directional microphone | Speaker behind client |
Distance: 0.5 – 1 m from loudspeaker.
Speaker height: at ear level.
Too close → head shadow effects
Too far → reverberation field → errors
🧾 14. Calibration & Stimulus Types
Stimulus intensity:
high enough to be unaffected by low-level BGN, but low enough to avoid saturating the aid
comparable to conversation levels (60 – 70dB SPL) → best reflect real-world listening situations
Calibration Methods
Method | Description | Used for | Pros | Cons |
|---|---|---|---|---|
Pressure method |
| Most verification systems / fittings (closed/standard) | Does not matter if client moves during test | Sound leakage from open fittings can contaminate ref mic. |
Substitution method |
| Open fittings | Sound leakage is not a problem → avoids contamination | Client must sit in that spot (and not move head position) → movement affects accuracy |
*differ in the function of reference mic
Test Stimuli
Speech-like test stimuli — non-linear HAs process swept signals (e.g. warble tones) & broadband signals (e.g. speech) differently
noise reduction algorithms & feedback cancellers may categorise non-speech signals as noise/feedback & reduce the gain provided
HA algorithms designed to improve speech intelligibility → speech-like test stimuli measure how HA will respond in real-world environments
International Speech Test Signal (ISTS):
Recordings of internationally recognised passage “North Wind and the Sun” in 6 languages (English, Spanish, German, French, Mandarin, Arabic)
As many relevant speech-like properties as possible (i.e. variation of F0, modulation spectrum harmonics etc.)
Swept pure tones (100–8000 Hz):
Stable signal over time (not fluctuate)
Measure Real Ear Saturation Response (RESR) — Maximum Power Output (MPO) with HA in-situ
Not ideal for general verification
🧩 Clinical Importance
REMs = Gold standard verification.
Ensures accurate audibility & patient satisfaction.
Skipping REMs = unethical if time allows.
Perform REMs:
At first fitting.
When changing prescription or dome/mould.
After large software gain adjustments.