Advanced Composite
How successful are composite restorations?
Clinical Effectiveness of Direct Anterior Restorations – A Meta-Analysis Heintze & Rousson (2015) Dental materials, 31(5), 481-495
• Median success rate (without replacement) over 10 years
• Class III 95%
• Class IV 90%
• Recurrent caries 2.5% over 10 years
Clinical Effectiveness of Direct Class II Restorations – A Meta-Analysis Heintze & Rousson (2012) The Journal of Adhesive Dentistry, (5), 407-431
• Success rate over 10 years
• Composite = 92%
• Amalgam = 94%
• Restorations placed with etching enamel with 37% phosphoric acid and dental dam showed the best overall performance
Isolation
Saliva, blood, gingival crevicular fluid, moisture in breath, protect oropharynx
Absolute
• Dental Dam
• Dental Dam Clamps
• Oroseal
• Floss Ligatures
• Wedjets
Relative
• Cotton Wool Roll
• Split dam
• Optra gate
• Isovac
• Dry Guard
Do I need to use a dental dam?
“Class III restorations that were placed without a rubber dam were associated with a significantly higher frequency of caries adjacent to restorations than those restorations that were placed with a rubber dam”
“The application of rubber-dam (absolute isolation) compared to cotton rolls and suction (relative isolation) significantly reduced the occurrence of material fractures and therefore promoted the overall success of the restorations”
Dental Dam Clamps
• Haller Clamps - have arms that extend well beyond the clamp itself (used for the most posterior tooth in the arch)
• Tiger Clamps - used where you are struggling to get a nice seal (where the tooth is partially erupted or has very little undercut, etc)
• Brinker Clamps - used anteriorly for gingival retraction
• Soft Clamps - preferred clamp
Gingival Crevicular Fluid/Gingival Bleeding
• 15.5% Ferric Sulphate
• 15% Aluminium Chloride
• Electric cautery machine
• Local anaesthetic
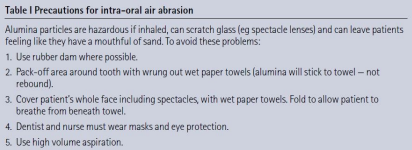
Air Abrasion
• 27-micron Aluminium Oxide (other sizes available)
• Does not obviate the need for acid etching of enamel
• Could be considered as an adjunct to the acid etch technique
• Controversial issue – some studies report increased bond strength while others do not
• Not available on Restorative Clinics
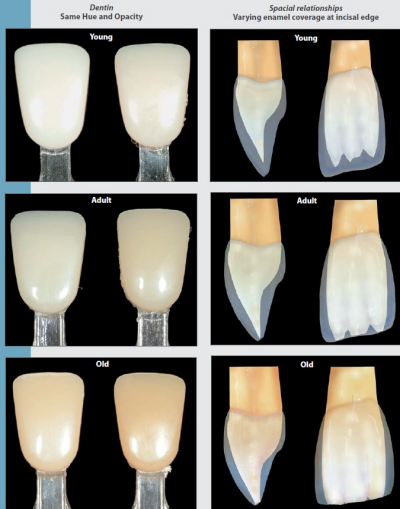
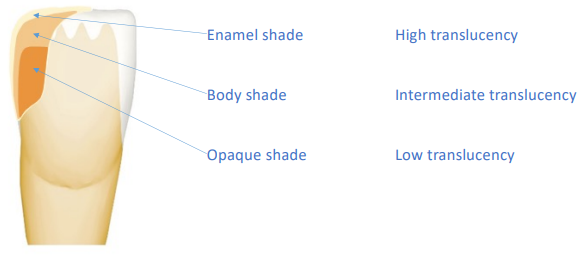
The transillumination of natural teeth shows the major features. Dentine gives the tooth its colour, the perception of which is modulated by enamel, a semi-translucent and highly opalescent material
Enamel findings
• Young enamel – white tint, high opalescence, less translucency
• Adult enamel – neutral tint, less opalescence and intermediate translucency
• Old enamel – yellow tint and higher translucency
Opalescence = exhibiting a play of colour like that of the opal, having a milky iridescence
Dentine findings
• Dentine – single hue, single opacity, varying chroma
• Young – dentine low chroma, enamel white with highly marked opalescence
• Adult – dentine high chroma, enamel neutral with increased translucency
• Older – dentine very high chroma, enamel high translucency which gives enamel yellow-grey appearance
Hue = change in colour
Value = lightness from black to white
Chroma = strength of colour (colour purity)
Spatial Relationship - enamel and dentine
The relationship between enamel and dentine is changing in the incisal third due to wear, dentine is progressively exposed and the amount of enamel covering the incisal edge will be reduced
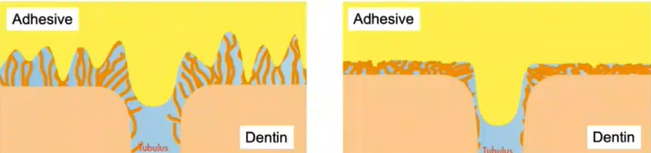
Hybrid Layer
Reliable adhesion to dentine is achieved when the adhesive penetrates into the depth of the collagen network and gets cured. The result is the “hybrid layer”, a mix of collagen and resin.
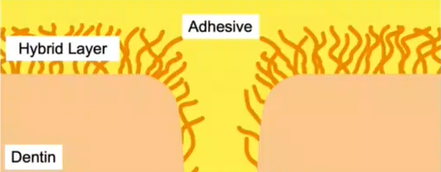
Too wet or too dry dentine surfaces can make adhesion difficult to achieve.
Overwet dentine surface: the adhesive does not penetrate the collagen network. No formation of the hybrid layer.
Overdried dentine surface: the collagen fibres collapse. No formation of the hybrid layer.
Prime and Bond Active
Manufacturers Claim:
• Able to manage excess water
• Able to erect collapsed dentine fibres
• Reduced post-operative sensitivity
• Less sensitive to moisture when bonding to dentine
• Thin film thickness
Long-term clinical evidence not yet available
Composite Materials
Ceram.x Spectra ST
Spectra ST Effects
SpectraST Flow
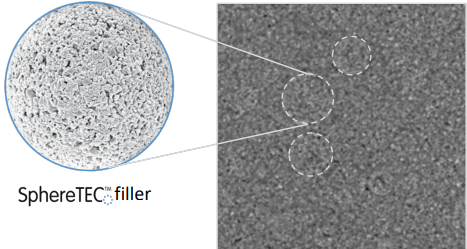
SphereTEC
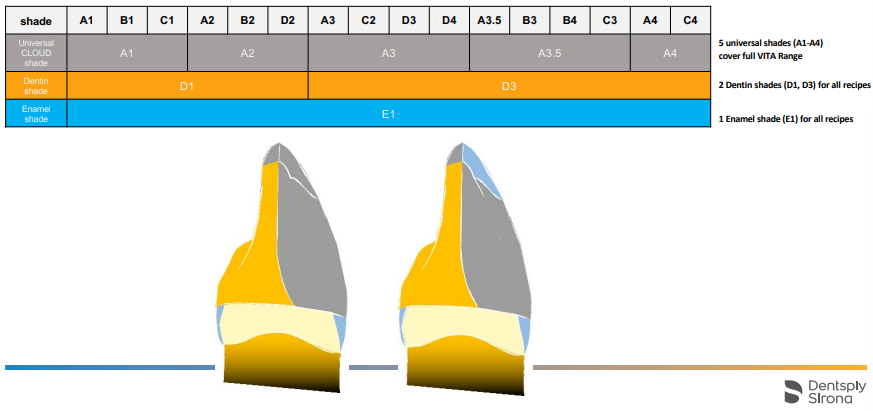
Concept: 5 Ceram.x Spectra ST A-shades match 16 Vita shades
Ceram.x Spectra ST - composition and ultrastructure
Other components:
§ Submicron barium glass filler
§ Radiopacifier
§ Dimethacrylate resin
§ Initiators and stabilizers
§ Pigments according to shade
§ Nano-ceramic particles
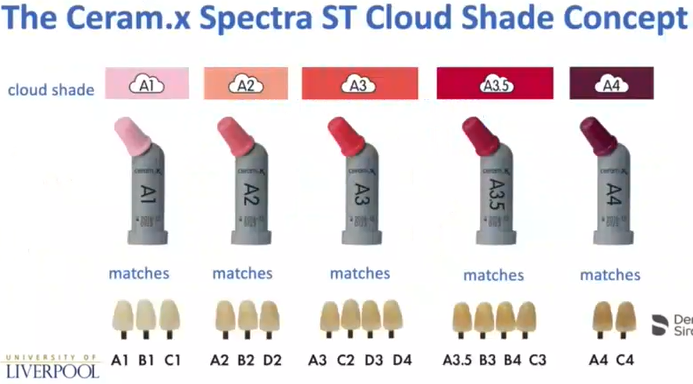
You can stick the Cloud shade label to the back of the shade guide
How do the Universal Cloud Shades work?
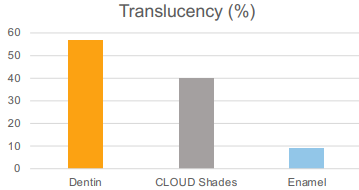
§ Intermediate translucency
§ More translucent than dentine
§ Less translucent than enamel
Layering techniques (principle)
Venus Diamond

CeramX Spectra® ST Effects Simplified Layering System in a nutshell
3 simple rules
1. Do everything you can with CeramX Spectra ST Universal CLOUD shades
2. In large defects - place CeramX Spectra ST Effects Dentine first, Then 1. above
3. OPTIONAL - In transparent areas (incisal edges) place Spectra ST Effects Enamel
Simplified Composite Layering System (SLS)


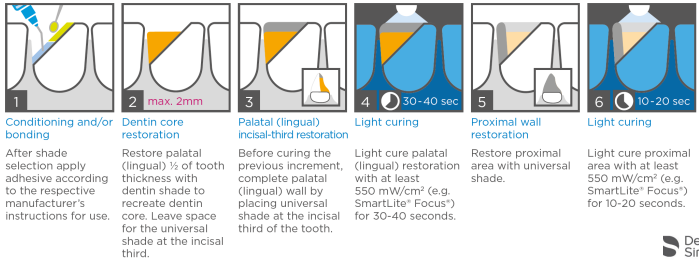
Conditioning and/or bonding
After shade selection apply adhesive according to the respective manufacturer’s instructions for use
Dentine core restoration
Restore palatal (lingual) ½ of the tooth thickness with dentine shade to recreate the dentine core. (Max 2mm) Leave space for the universal shade at the incisal third.
Palatal (lingual) incisal-third restoration
Before curing the previous incremet, complete the palatal (lingual) wall by placing universal shade at the incisal third of the tooth
Light curing (30-40s)
Light cure palatal (lingual) restoration with at least 550mW/cm2 (e.g. SmartLite Focus) for 30-40 seconds
Proximal wall restoration
Restore the proximal area with universal shade
Light curing (10-20s)
Light cure the proximal area with at least 550mW/cm2 (e.g. SmartLite Focus) for 10-20 seconds
Vestibular (facial) surface restoration
Complete the vestibular (facial) portion of the tooth thickness with a universal shade
Incisal edge effect (optional)
For a highly translucent incisal edge, use the enamel shade on the incisal third of the vestibular (facial) area.
Alternative: Incisal space for enamel 1/3 of vestibular-palatal thickness
Simplified Layering Technique

Finishing and Polishing
• Finishing use red and yellow composite finishing burs
• Polishing will highlight what you have done earlier if there are voids or a poor surface texture present these faults will be highlighted
• Make sure you spend lots of time finishing before polishing
Suggested MolyDenBoo Protocol
1. Occlusion, ledges
2. Incisal edge, embrasures, proximal surfaces
3. Labial surface – 3 planes
• Sof-Lex discs Medium/Fine/Superfine
• Enhance bur
• Beige polishing wheel
• White polishing wheel
4. Palatal surface
Ensure light pressure!
Enhance Burs
• Aluminium oxide impregnated
• The aggressiveness of the Enhance bur is controlled by the pressure applied to the surface of the composite. Use moderate to light, intermittent pressure in a buffing motion – take care not to overheat pulp
Enhance® PoGo
• Diamond impregnated
• Can be used after Enhance to polish restoration

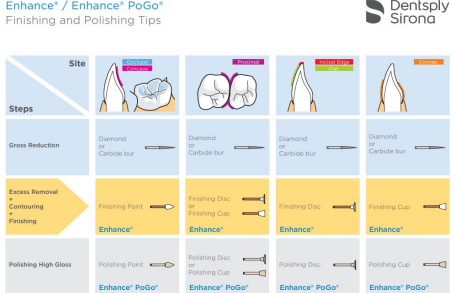
Finishing and Polishing:
Enhance
Smooths and contours
Choice of shaped finishers
Pogo
Polishes
Smoother than super-fine Sof-Lex
Single-use diamond-impregnated cured urethane dimethacrylate resin polishing devices
For use in the final polishing of all accessible composite resin and compomer restorations.
For optimal surface polish, use with Prisma Gloss Composite Polishing Pastes
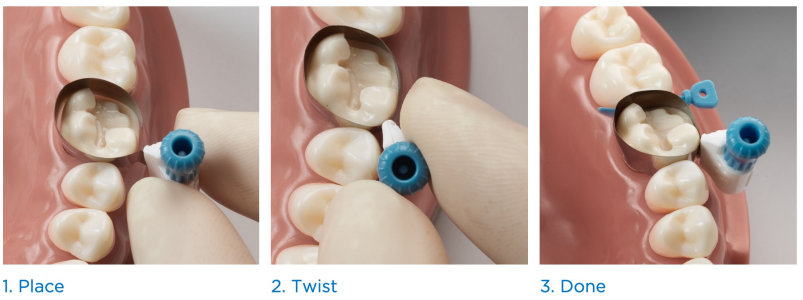
Sectional Matrix Systems
Palodent sectional matrix band
Garrison matrix system
Face contact matrix system
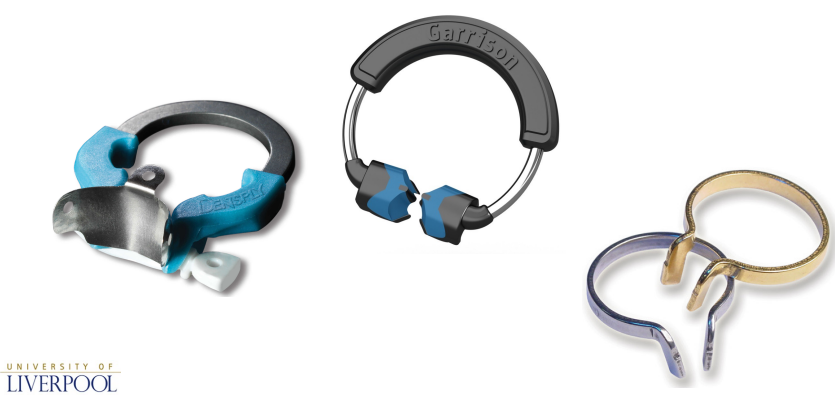
Why use sectional matrix bands for small to medium class II cavities?
Circumferential bands tend to have a very straight profile to them and cause a contact point
A sectional matrix band has a convex profile and tends to produce a more natural, broad and wide contact area.
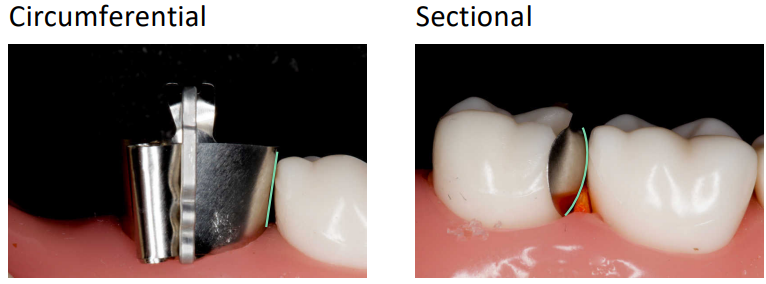
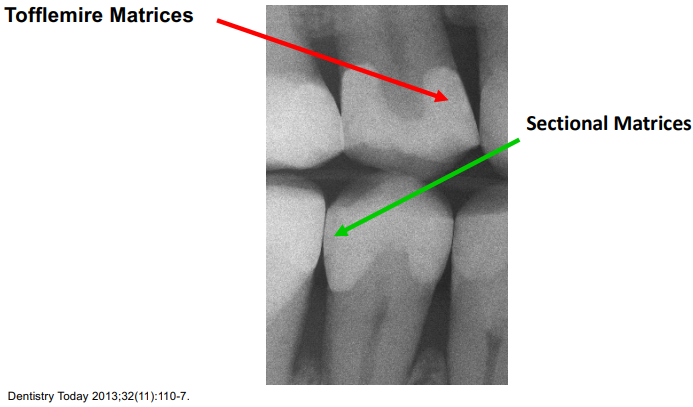
Tofflemire v. Sectional Matrices
Palodent V3 Sectional Matrix System
Iatrogenic damage during Class II cavity prep
Primary dentition 65%
Permanent teeth 69%
*In patients aged 4-17
“Damage to adjacent tooth surfaces was observed in all cases”
49-60%
97%
WedgeGuards
WedgeGuards will protect adjacent tooth surfaces from iatrogenic damage
The anatomic flexible wedge allows for stacking in extreme cases due to the V-shape design
Beware it is possible to perforate through the wedge guard!
Remove the band & leave the wedge in the proximal space.
With a sectional matrix always use a dental dam to protect the oropharynx!
Pin Tweezers
The Pin Tweezers provide secure grip of the matrix band
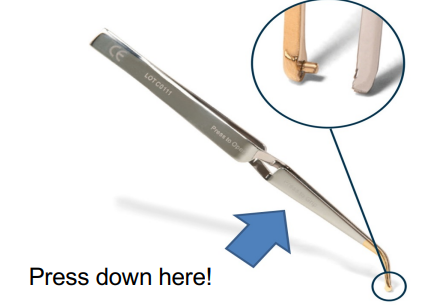
Hold the matrix at its punch with pin tweezers (i.e. pin) for facilitated insertion.
Gold side of tweezers should be directed towards the occlusal surface for facilitated release of the band.
Bend town tab in order not to hinder cavity access throughout the restoration process
For a more pronounced contour, bend the matrix prior to application.
Hold the wedge at its punch with pin tweezers (pin)
The anatomic flexible wedge allows for stacking in extreme cases due to the V-shape design
Staple wedges over one another to enhance cervical adaptation of matrix band
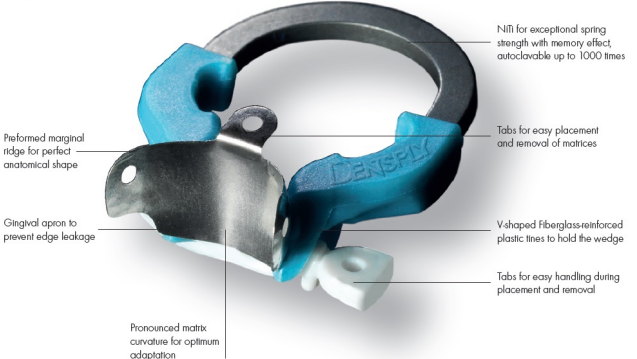
Nickel-titanium (NiTi) rings with anatomically shaped tines
Sizes
§ Universal (light blue)
§ Narrow (blue)
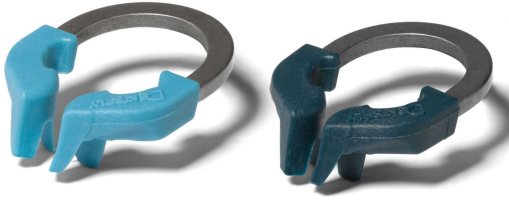
Anatomically shaped tines
§ Hold matrix safely on the tooth (even minimal tooth substance left)
§ Provide adaptation of matrix to lateral cavity margins
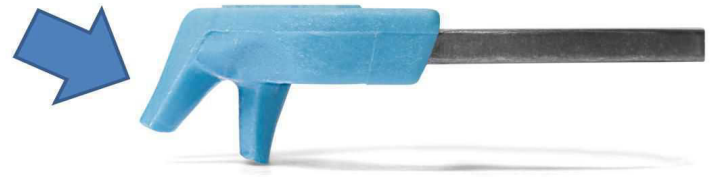
Forceps to securely lock nickel-titanium rings
Wedges can be applied before or after ring placement
Tight adaptation of matrix to cervical and lateral margins avoids excess and minimizes finishing effort
Rings hold on teeth, even with little tooth substance left.
No indents, even with cusps missing.
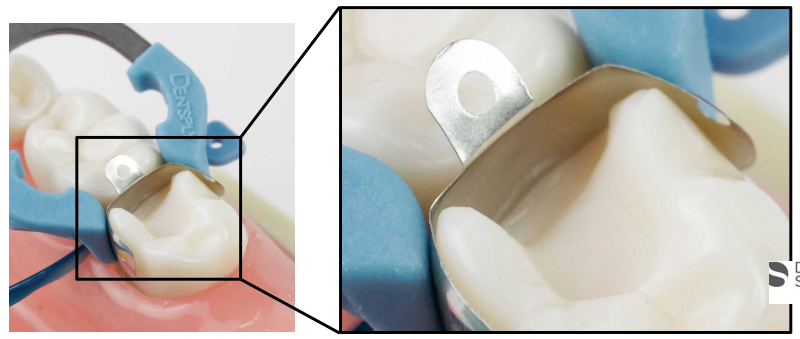
Possible insertion of two matrix bands into adjacent MO and DO cavities
Anatomically shaped tines adapt matrix bands to lateral cavity margins
Virtually no composite excess at lateral cavity margins
Circumferential Matrix Band
A high degree of coronal destruction still requires the use of a circumferential matrix.
Palodent 360
SDR Flow+ - Bulk Fill Flowable
Incremental Placement v Bulk fill
• Incremental placement to overcome polymerisation shrinkage
• SDR flow+ is not a self-adhesive composite, so a bonding agent must always be used
• SDR flow+ can be placed in increments of up to 4mm
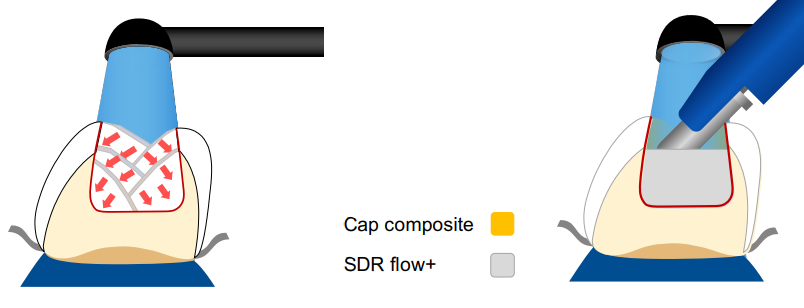
Bulk-fill cavity in up to 4 mm increments.
Keep the cannula tip buried inside the material to avoid the formation of air bubbles!
4 mm depth of cure in 20 sec @ 550 mW/cm2 energy density
Note: Leave 2mm space for application of the cap composite
The slender steel tip ensures unhindered sight into the cavity during the application process.