Rotation 1 Molecular Biology/Instrumentation Unit
Week 1 - Pipetting & Bacterial Cloning
Pipetting
Gilson style (only 2 stops)
measure/transfer
0.2 to 1000 microliters
named by the maximum volume they pipette
labelled on top with P followed by maximum number for volume of given pipette
P 2 pipettes between 0.2 and 2 microlitres
P 20 pipettes between 2 and 20 microlitres
P 200 pipettes between 20 and 200 microlitres
P 1000 pipettes between 100 and 1000 microlitres
you should never use a pipette to measure volumes outside of its range
P 200 for lower than 20 or higher than 200 can result in inaccurate volume measurements & can lead to damage
each has a vertical row of numbers in the body of the instrument
set the volume, use the thumbwheel or push button
dial numbers indicate different numbers depending on the pipette
P 2: 1.52 microlitres (52 in red)
P 20: 15.2 microlitres (2 in red)
P 200: 152 microlitres (no red)
P 1000: 052 means 520 microlitres (0 in red)
100 = 1000 microlitres (max volume for this pipette)
upper number is in red (indicates the number of milliliters)
once set volume, add tip
P 20 and P 200 use same yellow
P 1000 uses larger, blue
filter tip: sterile filter prevents contamination
narrow side = palm
push into pipette tip
apply right amount of pressure to give airtight seal
1st stop then (holding), push tip about 2 mm into liquid you wish to draw up
P 20 set to 2 microlitres will push less than a P20 set to 20 microlitres (more)
release push button (slowly allowing it to return to original position)
pause, to ensure all required liquid has been drawn up
place inside recipient container & slowly push down button, beyond first stop
fully withdraw pipette tip from liquid before taking it out of liquid
for very small amounts, may be a drop
touch to side of container, while pushing down
eject tip with tip ejector (small white button)
make sure tip is inside waste container
new clean tip for new liquid (or if it touches any other surface)
when in doubt, change tip
common things to avoid:
do not use pipette without tip attached
liquid should never enter the body of the pipette
could cause the pipette to corrode& be source of contamination
do not use pipette beyond limits
don’t repeatedly jam pipette into tip
repeat procedure with new tip if doesn’t stick
don’t push past 1st stop when taking up liquid
volume would be too large
don’t let go of push button (can be sprayed around inside walls—contamination & inaccuracies)
release in controlled manner
pause when taking up
make sure tip stays below surface
don’t lay pipette down when there is liquid in pipette
small volumes: touch pipette tip into wall to ensure liquid is released into recipient container
Eppendorf
reference 2: 1 operation pipette
just one knob for dispensing, blow out, tip ejection
more ergonomic & stressless
piston movement of 16 mm is best for ergonomics
knob is stopped from movement if not changing volume
cannot slip to side by accident
indents so easier to grip & change volume
allow smooth movement of knob (less friction)
diameter: 15 mm (if smaller, functional stress of thumb)
colour-coded tip
blue tip: 1000 microlitre
Bacterial Cloning
bacterial cloning (aka DNA cloning): make identical copies of a fragment (insert) of DNA
fragment of DNA is in a plasmid
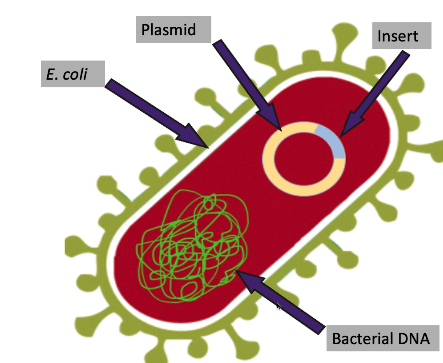
bacterial (genomic) DNA: also circular but much larger than plasmid
Applications for bacterial cloning:
biopharmaceuticals: the bacteria will transcribe and translate genes in the plasmid to produce a protein of interest
i.e. insulin
used in the creation of transgenic organisms
creation of cDNA libraries: used for genotyping and phenotypic screening studies
genome organization, expression, and sequencing
What is required for bacterial cloning?
competent bacteria: bacteria are able to take up exogenous DNA such as a plasmid
appropriate plasmid: plasmid that can be taken up and expressed in bacteria
contain features that allow us to screen the bacteria for plasmids that contain our insert
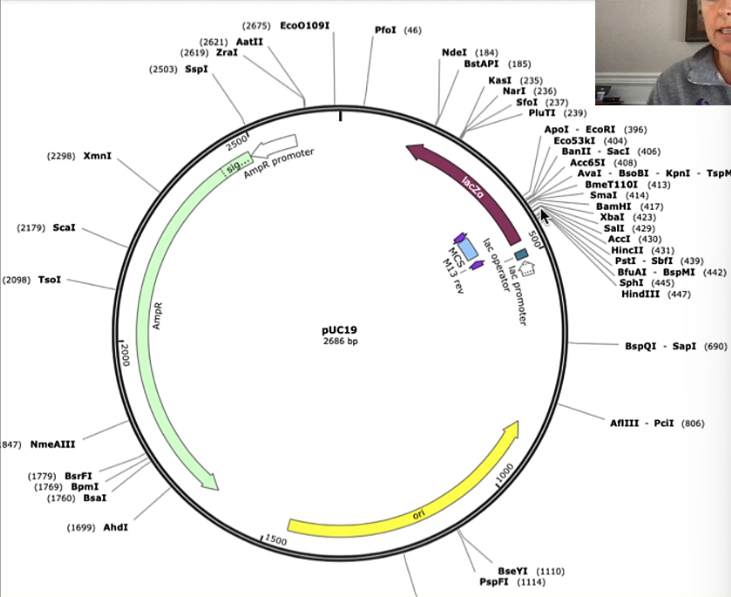
pUC19: p for plasmid
plasmid map: identifies the key features in the plasmid, as well as a number of restriction enzyme sites
e.g. EcoR1
centre = arrows that indicate key functional features of the plasmid
DNA insert: piece of DNA that we are interested in expressing/replicating
Plasmid Map:
ori: where replication of particular plasmid begins
modified version of E. coli ori (plasmids are modified to use in molecular biology)
important to have multiple copies of the plasmid in the bacteria
as bacteria replicate, each daughter cell needs at least one copy of the plasmid
need to have multiple copies of the plasmid before the bacteria itself replicates
ideal to have multiple copies per bacteria
often modified to allow the E. coli to contain more copies of bacteria than it would normally allow
Antibiotic resistance: AmpR (amp resistance cassette)
expresses a protein that confers antibiotic resistance
i.e. ampicillin (for AmpR)
destroys ampicillin molecules (allows survival in presence of ampicillin)
the bacteria will be put on LB + agar plates that contain that antibiotic
only bacteria with plasmid will survive
this case: contain ampicillin
selectable marker: require this gene to survive (required to be active)
without this, will not get colonies
Multiple Cloning Site (MCS)
area with a high density of restriction enzyme cut sites
where a DNA fragment can be inserted (ligated) into the plasmid
high density of many different restriction enzymes so there are many options to choose from to cut insert and plasmid with
located within the LacZ operon
LacZ Operon
codes for Beta-galactosidase
protein creates a blue pigment when it metabolizes its substrate
substrate is added to the LB + agar plates
so substrate is available for Beta-galactosidase to metabolize
Marker gene: colonies appear different depending on whether the gene is active or not
get colonies regardless of whether gene is functional
active = blue, inactive = white
contains MCS — if you do not get ligation of insert into MCS, lacZ operon remains intact and Beta-galactosidase is successfully transcribed and translated
if insert is successfully ligated into the MCS (in lacZ operon), disrupts transcription and translation of Beta-galactosidase (do not get it)
will have a mixture of blue and white colonies
blue: plasmids that did not have an insert ligated into the MCS
white: plasmids that did successfully ligate insert into MCS (interested in these)
Cloning Workflow (& Timing)
Day 1, Time 0: Restriction digest
both the plasmid and the DNA insert must be digested with the same restriction enzyme(s) to create compatible ends
kit: fast digest (takes 30 minutes)
Day 1, Time 45 min: Ligation
Ligase is used to “stick” the digested insert and the digested plasmid together
insert is ligated into the MCS of plasmid
fast digestion kit (10 mins)
Day 1, Time 1 hr: Transformation
The component E. coli must be transformed with the now recombinant (plasma containing insert) plasmid
the transformed E. coli are then plated on antibiotic-containing plates and incubated overnight (37 degrees)
this incubation will allow colonies to form
Day 2: grow liquid culture
E. coli colonies that contain the insert (white colonies) are “picked” and added to liquid LB
liquid culture is incubated overnight (shaking incubator)
Day 3: Miniprep
miniprep is done on the overnight liquid culture
purpose of the procedure is to isolate the plasmid from the bacteria
plasmids can now be used in downstream applications
isolate the plasmid DNA from E. coli
we will then sequence it!
We want to ligate our insert into a plasmid so that it can be expressed in E.coli JM101. In a later lab this "recombinant" plasmid will be transformed into E. coli JM101.
Restriction Digest
Restriction Digest OLM:
restriction enzyme: Restriction enzymes recognize specific sites of a plasmid (within the multiple cloning site) and cuts the plasmid at that site. They are specialized to recognize a specific sequence of base pairs (about four to eight base pairs long), which are usually palindromic. This allows us to add our DNA insert so it can be ligated into the plasmid.
Restriction enzymes recognize specific sites (i.e. recognition sites) of a DNA sequence and cut at that site. They are specialized to recognize a specific sequence of base pairs (about four to eight base pairs long), which are usually palindromic. In microbiology, restriction enzymes allow us to open up a plasmid (within the multiple cloning site) and add our DNA insert so it can be ligated into the plasmid.
Restriction enzymes can recognize very specific DNA sequences (4-8 bases long). Once the enzyme locates the appropriate recognition sequence, it will bind to the DNA molecule and break the phosphate bonds in the DNA sequence, which results in a breakage or “cutting” of the DNA molecule.
This characteristic of restriction enzymes has become an excellent tool for scientists to exploit. In DNA cloning, additional DNA fragments can be inserted into the newly “cut” DNA strand, and ligated (the reformation of the phosphate bonds) into a new DNA molecule that contains both the original DNA sequences as well as the newly introduced DNA sequence. Another useful technique is the use of restriction enzymes to simply “cut” or “digest” DNA molecules to generate a restriction map. The restriction map is an excellent tool to identify the cut sites on a plasmid by looking at different fragments of DNA. Plasmids are extrachromosomal DNA circles found in bacteria and carry antibiotic resistance genes on them and are useful in transfer or manipulating genes.
we must cut our plasmid with 1 or 2 restriction enzymes, allowing us to open the plasmid up and insert our DNA insert to be ligated into the plasmid
occurs in the multiple cloning site (MCS)
contains a large number of restriction enzymes so we have lots of different choices
restriction enzymes recognize specific sites
blunt end restriction digest: cut opposite to each other
e.g. only 1 (only ever need 1) restriction enzyme
just slides on (don’t worry about complementary) and gets ligated
not as efficient because no attraction of complimentary base pairs to position it
sticky ends restriction digest: cut sites are offset
e.g. uses 2 different restriction enzymes
helps insert find where it wants to ligate on plasmid (strong bond)
recognize a specific sequence of base pairs (4-8 bp in length)
usually palindromic: L → R and R → L (bottom) works
Class Experiment Digest
will be digesting a plasmid (for specific plasmid see OWL page) plus some samples for controls
first step in cloning our DNA of interest
insert (DNA of interest) is provided to you already digested with the same enzyme and will be used in the next step (ligation)
only digesting plasmid
refer to the protocol posted to the OWL page (name, size, concentration)
each chart is a separate tube: 3 separate tubes (3 separate restriction digests)
insert tube: digest the plasmid (& will also receive digested insert as well)
will get DNA of interest ligated into it
sample of interest: the tube that will get the plasmid and insert
Ligation technical control: tells us if ligation is working properly
Transformation Technical Control: tells u if transformation is working properly
volume of buffer is filled in for you (would have to figure out: 10/5x concentration)
volume of enzyme is indicated by manufacture
start with volume of plasmid: figure out by how much DNA want to add & concentration of supply
want 50 ng of plasmid, supplied at 25 ng/microlitre
put in 2 microlitres of plasmid DNA!!!!
fill in each of 3 charts (TE buffer included)
next is distilled water values: adding water to make our final volume actually 10 microlitres (add to each one)
How to Perform Restriction Digest
set up 5 microcentrifuge tubes
label them as indicated in protocol
add components to each tube withe sterile pipette tips
keep lid on tips closed!!! sterile
can use same pipette tip (same reagent, empty tubes)
always close the lid of the tip to prevent contamination
water (4 μL), 5x fast digest buffer (i.e. insert) (2 μL), plasmid DNA (2 μL) & TE buffer (2 μL) to TE tube, restriction enzyme
put pipette tip in liquid to ensure it’s getting to bottom
pulse plunger between first and second stop to mix
the restriction enzyme is digesting in the MCS of the plasmid
vortex mixes
centrifuge brings liquid to the bottom of the tube
restriction digest incubates @ 37 C for 15 minutes
Ligation OLM
recall from restriction digest module: plasmid has been cut in the MCS by a double, single, or blunt end digest
the insert has been digested with the same enzyme(s) or modified (PCR) to have the same ends
single digest: only 1 enzyme
double digest: used 2 different enzymes
blunt end: instead of sticky, blunt ends
the insert that we want to ligate into our plasmid has to have matching ends
may be digested with same restriction enzyme(s) or PCR it to add the corresponding ends to the insert
our case: digested by same enzyme (done for us)
single/blunt digest ligation
insert can go into plasmid in either orientation
if flip around, base pairs still line up
have no control over which way it’s inserted
if you want to express the mRNA (and eventually the protein), this will be a problem because it’s in the wrong way
not going to get transcribed and translated appropriately
sometimes we don’t care about orientation (e.g. just for sequencing)
double digest ligation: if we care about orientation of digest
insert and plasmid have 2 different sticky ends (2 different enzymes)
if flipped around, can’t go in the other way
complementarity does not match
insert to vector ratio
this is a molar ratio for the amount of insert relative to the amount of vector (plasmid)
this means the size of the insert or plasmid will influence the amounts added to the ligation
normalizing based on size
normalizing the amount of insert to plasmid based on the size of those 2 pieces of DNA
ratio often needs to be optimized but a good starting point is 3:1 insert : vector
insert : vector calculation example
(ng of plasmid)*(size of insert (kbp) / (size of plasmid (kbp)) * ratio
ng of plasmid = 50 ng
size of plasmid = 2686 bp (example only)
insert size: 1507 bp = 1.507 kb
ratio = 3:1
insert concentration = 21 ng/microL
(50ng)(1.507 kb)/2.686 kb x 3/1 = 84.1 ng
volume of insert = 84.1 / 21 = 4 microL
need to add 4 microlitres of insert to the ligation
ligation is performed in the same tube as the restriction digest
since ligation reagents are added to the RD tube, plasmid is already there
volume is the volume of RD
buffer volume is determined by total volume and its 5x concentration
4 microlitres for buffer in 1x concentration
ligase volume is defined by provided protocol
insert volume determined by insert : vector ratio calculation
determine volume of insert
other tubes don’t get insert (they are controls)
determine volume of dH20 to add to bring total volume to 20 microL (will have less in insert tube than other two)
demo of ligation
we have 4 tubes from the restriction digest
add all components for ligation directly into RD tube (not getting new tube)
add buffer first (good to do this first)
(plasma DNA is already in tube)
insert only goes into insert tube
other 2 tubes do not get insert
other tubes will get water instead of insert
always good practice to add enzyme last (buffer is in, environment is friendly)
ligase is very unstable outside of -20
ligase should go in last (add to each tube)
can vortex, then centrifuge
set to touch, hold tube in, vibrates (contents are over side of tube)
take to centrifuge, give it a quick spin to bring contents down (centrifuge isn’t used for mixing)
sit on bench for 10 mins to allow ligation to proceed (can sit for a bit longer)
BIG PICTURE — for discussion & results
bacterial cloning
getting the INSR insert (insulin receptor insert) into a plasmid — ligating the INSR into a plasmid
RD, ligation of insert (insulin receptor)
transformation into E. coli JM101
determine insulin concentration in spent media (media bacteria had been growing in) via standard curve
get rid of bacteria
measure insulin in media with 1) Spec 20 and 2) Plate Rader
have to figure out which one is better
interested in how INSR insert affects the insulin concentration in the spent media
RD and plasmid map (figure out the eccentricities of ligation)
which orientation does the INSR insert go into plasmid
use experimental details
insulin concentration
learn the theory of miniprep and liquid culture (not used in lab report)
getting pH and microscope experience (not part of class experiment)
completed in lab, not part of lab report
results (VBL): this worked and it showed me this