Week 3: Transformation and MiniPrep
Transformation
the final step of bacterial cloning, which is transforming our recombinant plasmid into competent bacteria
How does this fit in our experiment?
we need to get our recombinant plasmid created during Week 1 into the bacteria so we can express the insert
Transformation OLM:
bacterial cell (E. coli) has genomic DNA (circular & large) + circular plasmid
transformation is simply getting that circular plasmid into our bacterial cell
our plasmas remain exogenous — they will be floating around within the bacterial cell
they will not be incorporating themselves into the bacterial genome
transformation is difficult to achieve and even through we are going through all the steps of the transformation process and try to get the plasmid into the bacteria
it is a VERY rare event so when we go to calculate our transformation efficiencies, they are actually very low
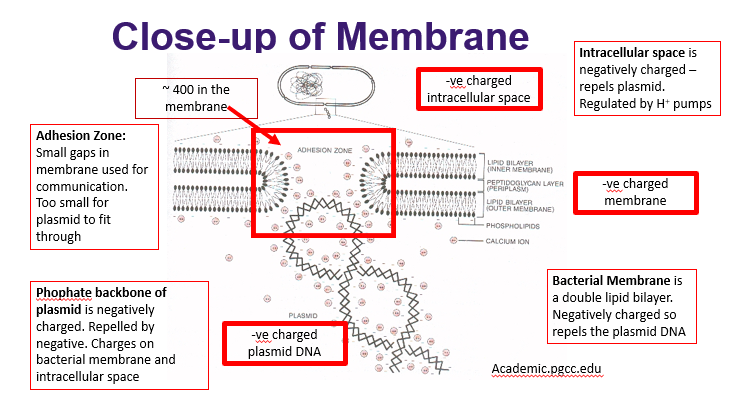
adhesion zone: small gaps in membrane used for communication
too small for plasmid to fit through
in their natural state, it’s too small for the plasma to fit though
about 400 of these approximately in the bacterial membrane
basically small gaps in the membrane and they’re used for communication between the bacteria
phosphate backbone of plasmid: negatively charged
repelled by negative charges on bacterial membrane and intracellular space
plasmid is negatively charged as with all DNA → because it has a negative change and the plasma membrane has a negative charge, they’re going to repel each other
it’s difficult for the plasmid to get close to the plasma membrane
propelled by the negative charge in the intracellular space
bacterial membrane: double lipid bilayer
negatively charged so repels the plasmid DNA
intracellular space: negatively charged — repels plasmid
regulated by H+ pumps
globally negatively charged
wants to repel the plasmid from getting into it
Transformation Protocol
steps of the protocol are performed to decrease the effect of the barriers to transformation
the effect of the barriers will be lessened but it’s important to know what they are still present
this is why transformation remains a very rare event
although the effect of the barriers will be lessened, it is still present
10 minute ligation reaction at room temperature has been completed
hopefully we have some insert that has been ligated into our plasmid
now we need to get the plasmid into the E. coli so that the bacteria can replicate
we can get lots of copies of our plasmid
orange tubes = competent E. coli
using E. coli JM101
Overcoming Barrier: Negative Charges
bacteria are made competent by treatment with CaCl2
in solution, the Ca2+ and Cl- ions dissociate
Ca2+ helps neutralize the negative charges on the bacterial membrane and the plasmid
ice cools the bacteria and solutions
slows the movement of molecules
helps to stabilize the negative charges on membrane and DNA
makes it easier for Ca2+ to neutralize those charges
competent: they are able to take up exogenous DNA (such as plasmids)
the process of making bacteria competent is one of the first ways we start to overcome the barriers to transformation
we make bacteria competent through treatment with CaCl2
Cl- dissociate the positively charged Ca2+ ions
Ca2+ ions help neutralize the negative charges that are found on the bacterial membrane
Ca2+ ions mask the negative charges on the phosphate backbone of the plasmid as well as the lipids on the plasma membrane
tubes of component E.coli have already had 2 uL of E. coli in the tube
going to add the transformation components directly to these tubes
E. coli must stay on ice at all times unless they’re in a water bath
come out of -80 & don’t like to be at room temperature
keep bacteria on ice at all times when not in a water bath: another way we overcome the barriers to transformation
the ice cools the bacteria and the solution as we know from physics, the cooling down of objects slows the movements of the molecules
this helps to stabilize the negative charges on the membrane and the DNA, which makes it easier for the positively charged Ca2+ ions to neutralize those negative charges
start with adding 10 uL of each of our ligation reactions to the corresponding tube that is labelled in the same way
plasmid: lower volume because not diluted with the reagents of our ligation and restriction digest
we’re only adding 2 uL of that to our transformation reaction
tubes of competent e coli with ligation components
give them a flick (easier than pipetting up and down)
E. coli doesn’t like to be vortexed → too rough
whenever the tubes have been sitting, bacteria may have settled to bottom of tube
sit on ice for 5 minutes
incubate in 45 degree water bath for 100 seconds
45 degrees C heat pulse plays anther role in overcoming the barriers to transform
Overcoming barrier: adhesion zones too small for plasmid
45 C heat pulse releases lipids from bacterial membrane
this opens pores in the membrane
the pores fuse with the adhesion zones to create opening large enough for plasmid to pass through
temperature gradient → draws plasmid in
osmotic gradient → draws plasmid in
if we open large holes, less of barrier between intracellular and extracellular environment
plasmids and lipids can flow down temperature gradient
cooler inside than outside because we’re briefly putting tube in 45 C water bath
osmotic gradient by opening up larger holes in the membrane
allows the cell to try and equalize this gradient
also help to draw the plasmid in as water flows into the cell down the osmotic gradient
Overcoming barrier: intracellular negative charge
45 C heat pulse shuts down the proton pumps (H+ pumps)
increases the amount of positively charged H+ ions in the bacteria
equals decreasing the negative charge (more positive interior)
if we shut these pumps down it increases the amount of positively charged H+ ions in the bacteria
therefore this equals decreasing the net negative charge in the intracellular environment
45 degree heat shock for 200s
all steps up to this point are considered the COMPETENT phase of transformation
i.e. getting the plasmid into the bacteria
however simply getting the plasmid into the bacteria does not mean we have a successful transformation yet
we also need to transcribe and translate and replicate the plasmid
(this is the next phase)
lag phase: transcribe, translate, and replicate the plasmid
cool to closer to physiological temperature range
add LB broth (food for bacteria; normally found in glass containers)
add 250 uL of broth to each tube
we no longer have to worry about overcoming barriers to transformation because the plasmid is already in the bacteria
however, we want to optimize the functioning of the bacteria so that we can transcribe, translate, and replicate that plasmid
the addition of lb is one of these essential protocol steps to maximize the function of the bacteria
Essential Protocol Step - LB
lb broth contains nutrients and growth factors for bacteria
this will help to ensure that the bacteria is in its most optimal environment in order to metabolize at its optimal rate
want bacteria to be able to function optimally during lag incubation
preventing contamination is particularly important with the lb broth because it’s basically food for bacteria
very easy to contaminate the lb broth if it’s left open
37 degree water baths (just set instead) — stay here for lag incubation
Essential Protocol Step — LAG INCUBATION
37 degrees Celsius is the optimal temperature for bacteria
time and temperature required to “establish” the plasmid in the bacteria
establish means transcribe, translate, and replicate the plasmid
DO NOT CONFUSE WITH REPLICATION OF BACTERIA
transcription and translation of antibiotic resistance cassette on plasmid is essential for bacteria to survive
essential for bacteria to survive when plated on antibiotic lb plates
plasmid must be replicated so that there are multiple copies to be passed to daughter cells
also want multiple copies of our insert DNA (the more copies, the better)
for when bacteria eventually divides
during incubation: set up part of the serial dilution
-2, -4, -6 (10^-2 etc.)
going to dilute the transformation in 5% NaCl
could use lb but it’s more expensive
NaCl is friendlier to cells that water because of the salt
not changing the pipette tip because empty tubes & using same solution in each tube
slowly release plunger (particularly important for large pipettes) to get accurate pipette with no air bubbles
after lag incubation, transformation reactions can stay at room temperature
dilute the tube of cells that’s the TE buffer ligation
dilute to 10 ^ -6
the diluted tube is yet another control
we must dilute so there will be individual colonies present
put 10 uL of cells + TE into 10^-2 tube
flick cells because they’ve probably settled
get a very inaccurate dilution if the cells are all settled
quick vortex (even though cells don’t like vortex)
for dilution — do in between each one
5 tubes: insert, plasmid only, H2O, TE buffer tube (not diluted), diluted 10^-6 tube
each tube will go on a separate lb or lb plus ampicillin plate
lb only plate (label around the perimeter of the plate on the agar side (in case lid comes off)
around outside to see colonies
light Bunsen burner
turn gas on until you hear it, give it a light
want to be doing this close to flame — area of sterility
going in from ethanol to flame to plate
don’t ever put spreader over ethanol?
lb only gets dilution
agar plates are stored agar side up so no condensation (flip it over)
crack plate open, put dollop in middle
take spreader through the flame once (let flame burn off & cool for 10 s)
lift lid and touch the agar to make sure spreader is not too hot
back and forth from edge to edge while turning plate at same time
lid always stays over top of plate
at least 2 rotations
over flame + not fire + back in ethanol
agar side down until down → soak in then flip plate over
incubate plates overnight at 37
very different from lag incubation at 37 degree water bath for 15 minutes
Picking Colonies:
after incubating our plates for 24 hours, bacterial colonies will form
to select our colonies, we “pick” them and grow a liquid culture of each picked colony
for our class experiment, we will not do this in lab (done for you behind the scenes)
this is only because we don’t have enough weeks to have you perform this yourself
picked colonies will be used to grow liquid cultures for each biological replicate using the Simvastatin assay
OLM Video:
next step after selecting transformants we would like to isolate and before miniprepping
assumption: each colony originated from a single bacterium
means all bacteria in that colony are identical
replicated to make many copies to produce colony
bacteria in different colonies may not be the same
might contain different plasmid with different insert
we want to “pick” a colony and create a liquid culture
put into liquid lb — amplify number of identical bacteria that contain a single plasmid with a particular insert
can isolate plasmid in next step
mixture of blue and white colonies: interested in white colonies
take a sterile toothpick and the take plate (lift it off lid)
search for big white colony
touch the toothpick to the white colony, then take liquid lb and drop the entire toothpick into liquid lb
sits overnight in shaking 37 degree incubator
after 24 hours, will become cloudy → all the bacteria that have grown in liquid culture
MiniPrep:
this is the theory of a very common technique and one that often follows picking colonies
as with picking colonies, time restraints mean that this will be performed for you behind the scenes
the resulting isolated plasmids will be used in the plasmid mapping lab
plasmid miniprep: refers to the process of isolating plasmid DNA from a bacterial cell
there are many different methods of performing a miniprep but the most common is to use spin column technology
this module will cover the main steps of miniprep using this technology
midiprep: higher volume
maxiprep: even higher volume (everything else is the same)
Miniprep Steps:
Harvesting: collect E.coli from the liquid culture (isolate bacteria)
achieved by centrifuging the liquid culture to pellet the cells at the bottom
the liquid left over is supernatant and it is discarded
we keep the pellet of cells
Lysis: bacteria need to be lysed so that we can get the plasmid DNA out
this is done with a lysis buffer that has SDS (ion detergent) and high concentrations of chaotropic salts
these salts destabilize proteins and weaken the association of nucleic acids to water
these properties aid in the binding of nucleic acid to the silica membrane in the spin column
Neutralization: done to aid in precipitation of SDS and proteins
if we do not use a neutralization buffer, the plasmid DNA yield will be lower
the SDS will start to degrade the DNA as well
can’t leave in lysis buffer for too long
also removes proteins from isolate
DNA binding: tube is centrifuged to pellet the cellular waste
plasmid DNA is now supernatant which is applied to the spin column
cellular waste is in pellet
keep supernatant, discard pellet
transfer to spin column
this column has a silica gel membrane
spin column is centrifuged to drive the supernatant through the membrane, into collection tube at bottom
in the presence of high concentrations of chaotropic salts (in lysis still present in isolate), the silica membrane will preferentially bind RNA and DNA
spin column: centrifugation in between each step
Wash: now that the plasmid DNA is bound to the silica membrane, the chaotropic salts must be washed away as they can interfere with any downstream enzymatic reactions (PCR, restriction digest, ligation)
this is done with a series of alcohol based washes
Elution: release plasmid DNA from silica membrane in DNA binding tube
this is done with a low ionic strength solution like H2O or TE buffer
apply to spin column, centrifuge it
as low ionic strength solution is forced through silica membrane, will bring plasmid DNA and elute to fresh new tube below