Chapter 15 Pain assessment and basic comfort
Skill 15.1 pain assessment and basic comfort
SKILLS AND PROCEDURES
Skill 15.1 Pain Assessment and Basic Comfort Measures (346)
Skill 15.2 Nonpharmacological Pain Management (352)
Skill 15.3 Pharmacological Pain Management (358)
Skill 15.4 Patient-Controlled Analgesia (363)
Skill 15.5 Epidural Analgesia (368)
Skill 15.6 Local Anesthetic Infusion Pump for Analgesia (373)
Skill 15.7 Moist and Dry Heat Application (376)
Skill 15.8 Cold Application (381)
Introduction
Pain is the primary reason individuals seek health care, with approximately 126 million people in the U.S. requiring pain management services (Nahin, 2015). Nurses play a key role in assessing and addressing patient pain, aiming to alleviate suffering (ANA, 2018). Advances in pain treatment, including precision medicine, allow for tailored pain management strategies (National Academies of Sciences, Engineering, and Medicine, 2017). Effective pain control improves safety and quality of life.
Practice Standards
American Nurses Association (2018): Ethical responsibility to manage pain.
Chou et al. (2016): Guidelines for managing postoperative pain.
The Joint Commission (2017, 2019): Standards for pain assessment and management focusing on patient safety and identification.
Evidence-Based Practice: Pain Management in Older Adults
As the global population ages, with projections showing over 25% will be over 60 by 2050 (Savvas and Gibson, 2016), pain management in older adults becomes critical. Age-related changes make pain management complex (Wickson-Griffiths et al., 2016).
Practice Issues/Principles
Engage older adults in setting realistic pain management goals and monitor for toxicities (Marcum et al., 2016).
Acknowledge cognitive deficits that limit self-reporting of pain (Savvas and Gibson, 2016).
Current literature indicates limited success of digital health interventions for pain management in older adults (Bhattarai and Phillips, 2017).
Start opioid therapy at lower doses and adjust carefully (Greene Naples et al., 2016).
Safety Guidelines
Use multidimensional assessment tools alongside unidimensional pain scales (ASPMN, 2016).
Favor nonpharmacological treatments for chronic pain and evaluate risks versus benefits for pharmacological options.
Monitor sedation levels with the Pasero Opioid Sedation Scale (POSS) during opioid administration, as increased sedation can predict respiratory depression.
Pasero Opioid Sedation Scale (POSS):
S= Sleep, easy to arouse1= Awake and alert2= Slightly drowsy, easily aroused3= Frequently drowsy, arousable, drifts off during conversation4= Somnolent, minimal response to stimulationAssist patients with mobility while on opioids to prevent falls, particularly those with liver or kidney issues (Greene Naples et al., 2016).
Monitor vital signs and for adverse effects of analgesia, such as hypotension or altered lower-extremity sensation (National Guideline Clearinghouse, 2016).
Ensure infusion pumps are functional and assess readiness for patient self-management (Chou et al., 2016).
Evaluate the patient’s risk for injury regarding heat or cold applications, considering age, skin condition, and ability to communicate or sense temperature changes.
Recognize how heat application impacts vital signs, particularly its potential to lower blood pressure and increase fall risk.
SKILL 15.1 Pain Assessment and Basic Comfort Measures
Purpose
Accurate pain assessment is essential for identifying the nature of a patient's pain, which informs appropriate nursing diagnoses and therapies. The goal is to reduce pain to an acceptable level rather than complete elimination. Ongoing education and interprofessional collaboration are critical for effective pain management (ANA, 2018). It’s important to assess the patient’s understanding of pain through appropriate tools and to reflect on personal and cultural attitudes toward pain.
Delegation and Collaboration
Pain assessment cannot be delegated to nursing assistive personnel (NAP), but NAP can screen for pain and provide nonpharmacological interventions (e.g., back rubs) as guided by the nurse. Nurses direct NAP to:
Eliminate environmental factors worsening pain (e.g., noise, temperature).
Ensure maximum rest and comfort for patients, turning them every 2 hours.
Report behavioral signs of pain and any patient-reported pain levels above established goals.
Equipment
Pain rating scales (per agency policy)
Assessment Steps
Identify Patient: Use two identifiers to ensure safety (TJC, 2019).
Collect Data: Review patient's health record for key data including demographics and pain history (Pasero et al., 2016).
Hand Hygiene: Perform hygiene before examining the pain area.
Self-Reported Pain: Directly inquire if the patient is in pain and assess for nonverbal indicators. Use family input if necessary (Gélinas, 2016).
Signs of Pain: Look for physical, behavioral, and emotional responses to pain (Gallagher et al., 2017).
GI Symptoms: Assess for constipation and nausea, especially related to opioid use (Lacy et al., 2016).
Other Symptoms: Look for insomnia, fatigue, or anorexia, as they often co-occur with pain (Baker et al., 2017).
Pain Characteristics: Assess using the PQRSTU framework to understand pain nature and intensity.
P: Provoked: What makes the pain worse or better?
Q: Quality: What type of pain is it?
R: Region: Where is the pain located?
S: Severity: How bad is the pain?
T: Time: When did the pain start and how long?
U: You: How is pain affecting U
Previous Interventions: Evaluate the patient's past responses to analgesics (Pasero et al., 2016).
Medication Allergies: Identify any allergies to prevent adverse reactions (Laidlaw and Cahill, 2017).
Health Literacy: Assess patient's understanding of pain management (CDC, 2016).
Planning
Expected Outcomes: Patient reports pain relief and displays relaxed nonverbal cues.
Set Goals: Collaborate with patient to establish individual pain-intensity goals.
Provide Privacy: Ensure conversations regarding pain relief occur in a confidential setting.
Environment Prepare: Optimize patient comfort by minimizing distractions and organizing care.
Implementation
Hygiene: Ensure hand hygiene before any intervention.
Teach Pain Scale: Educate the patient on using the pain rating scale accurately.
Administer Medications: Follow orders for appropriate pain medications.
Minimize Pain Stimuli: Reposition the patient for comfort and reduce any irritants.
Splinting: Teach the patient to splint over painful areas to minimize movement-related pain.
Address Emotional Factors: Use cognitive-behavioral techniques for pain management (Houzé et al., 2017).
Check Positioning: Ensure the patient is comfortable and safe before leaving.
Patient Safety: Make sure side rails are appropriately used and the call system is within reach.
Evaluation
Reassess Pain: Evaluate pain 30-60 minutes after interventions (TJC, 2017).
Goal Comparison: Assess current pain against goals set collaboratively with the patient.
Functionality Assessment: Compare patient's ability to perform activities before and after interventions.
Nonverbal Observations: Apply observational pain-assessment tools where self-report isn’t possible (Varndell et al., 2017).
Side Effect Monitoring: Observe for any adverse drug reactions and adjust the plan accordingly.
Teach-Back: Confirm understanding of pain management strategies by asking the patient to explain back the information provided.
Unexpected Outcomes
If pain exceeds goals, repeat assessment and consider alternative pain-relief strategies. Notify healthcare provider as needed.
If adverse medication reactions occur, assess and notify the healthcare provider, and administer an antidote if required.
Recording
Document the nature and severity of the pain before interventions, the therapies used, and patient responses.
Hand-Off Reporting
Communicate pain management efficacy and any adverse effects of treatments during hand-off.
SKILL 15.2 Nonpharmacological Pain Management
Purpose
Developing complementary health strategies for managing pain was established as a key objective by the National Center for Complementary and Integrative Health (NCCIH, 2016). Complementary therapies (used with Western medicine) and alternative therapies (replacing Western practices) include mind and body practices (biofeedback, hypnosis, meditation, music therapy) and other approaches like acupuncture, massage, deep breathing, and distraction (Chou et al., 2016; Houzé et al., 2017).Research supports acupuncture for chronic pain and depression (MacPherson et al., 2017) and massage therapy for reducing stress and anxiety, promoting relaxation (Nelson and Churilla, 2017). Nonpharmacological techniques can diminish physical pain effects and enhance patient control.
Delegation and Collaboration
While patient pain assessment cannot be delegated, NAP can implement nonpharmacological strategies under nurse guidance, including:
Identifying best nonpharmacological measures for the patient.
Adapting strategies to patient restrictions.
Reporting any signs of worsening pain.
Equipment
Pain rating scales
Materials for distraction (reading, video games, music)
Relaxation music
Massage supplies (lotion, towel)
Assessment Steps
Identify Patient: Use two identifiers (e.g., name and DOB) to ensure accuracy (TJC, 2019).
Hand Hygiene: Perform to reduce infection risk and guide assessment (Pasero et al., 2016).
Language & Values: Assess patients’ value and understanding of alternative pain-relief approaches.
Respiration Assessment: Establish baseline for relaxation techniques.
Review Orders: Confirm that nonpharmacological therapies are authorized.
Understanding & Willingness: Assess patient’s readiness and openness to nonpharmacological therapies.
Preferred Activities: Identify distractions such as games or music to enhance effectiveness.
Guided Imagery Preferences: Determine preferred images for relaxation techniques.
Mobility Restrictions: Assess mobility and positional constraints for effective pain management.
Health Literacy: Evaluate patient and family caregiver understanding of pain management strategies.
Planning
Expected Outcomes:
Patient demonstrates recounted pain-relief measures and experiences relaxation.
Patient reports pain relief via intensity and behavioral measures.
Provide Privacy: Enhances relaxation.
Set Up Equipment: Maintains organization.
Explain Techniques: Facilitates patient participation and accurate pain reporting.
Set Pain-Intensity Goals: Involve the patient in strategy planning.
Optimal Timing: Perform techniques when the patient can concentrate.
Administer Analgesics: Provide medication 30 minutes prior to interventions for comfort.
Position Patient: Ensure comfort during treatment.
Implementation
Environment Preparation: Control temperature, sound, lighting, and minimize interruptions to enhance relaxation.
Massage Techniques: Communicate position and preferences; ensure all actions promote relaxation, using various techniques such as:
Effleurage: Light, gliding strokes to promote circulation.
Pétrissage: Kneading tense muscle groups for local circulation.
Progressive Relaxation with Breathing: Guide deep breathing and relaxation of muscle tension from feet to head.
Guided Imagery: Lead patient through the use of calming imagery while promoting slow, rhythmic breathing.
Distraction Techniques: Engage patient with music, storytelling, or activities to redirect focus from pain.
Post-Procedure Care: Ensure safety and dispose of supplies properly; place nurse call system within reach.
Evaluation
Observation: Assess respiratory character, body position, facial expressions, and verbal reports for relaxation effectiveness.
Pain Rating Scale: Document changes in pain intensity.
Technique Performance: Confirm patient’s ability to utilize learned techniques.
Teach-Back: Validate understanding of nonpharmacological strategies.
Unexpected Outcomes
If pain persists or escalates, evaluate pain characteristics and consider further analgesia. Review environment suitability and consult healthcare provider for adjustments in therapy.
Recording
Document assessment findings, techniques used, patient responses, and learning outcomes in the care plan.
Hand-Off Reporting
Report unusual responses, inadequate pain relief, and patient responses to nonpharmacological interventions at shift changes.
SKILL 15.3 Pharmacological Pain Management
Purpose
Analgesics are essential for effective pain relief, but inadequate pain assessments often lead to suboptimal management. Critical thinking and knowledge of transcultural implications are necessary for proper pain assessment. Many patients, especially the elderly and critically ill, may struggle to communicate pain due to cognitive impairments or ventilator use, leading to potential undertreatment.
Opioids
The opioid epidemic in the U.S. is alarming, with nearly 65,000 overdose deaths in 2016. Key actions include improving prescription practices and expanding naloxone access. Healthcare providers must assess risk factors for addiction and use multimodal pain management strategies. Nurses play a critical role in educating patients on opioid safety.
Key terms:
Physical dependence: Withdrawal syndrome due to abrupt cessation.
Addiction: Chronic disease characterized by compulsive use despite harm.
Drug tolerance: Diminished effect of a drug over time.
opioid-reversing agents (naloxone): are critical tools in managing opioid overdoses, as they can quickly restore normal respiration in individuals experiencing respiratory depression.
Delegation and Collaboration
Analgesic administration is a nursing responsibility that cannot be delegated. Nurses must monitor patient behaviors related to pain and discuss comfort measures.
Assessment Guidelines
Verify medication accuracy on MAR against orders.
Assess patient history and allergies.
Perform hand hygiene and conduct pain assessments.
Know the onset, peak effect, and side effects of analgesics.
Tailor medication timing around scheduled activities.
Monitor prior medication administration and pain relief.
Assess risk factors for NSAIDs or opioids.
Discuss individual pain management strategies with the patient.
Evaluate knowledge and health literacy of the patient and caregivers.
Planning
Expected outcomes include:
Patient sets pain-intensity goals.
Achieves acceptable comfort levels and reports pain effectively.
Active participation in decision-making about pain management.
Implementation
Ensure accuracy of MAR and perform the “seven rights” of medication administration.
Right Patient – Verify the identity of the patient before administering the medication.
Right Medication – Ensure the correct medication is being given by checking the prescription and medication label.
Right Dose – Confirm the correct dosage is administered according to the prescription.
Right Route – Use the correct method of administering the medication (e.g., oral, intravenous, intramuscular).
Right Time – Administer the medication at the right time as specified in the prescription.
Right Documentation – Record the administration of the medication accurately in the patient’s medical records.
Right Reason – Ensure the medication is being given for the appropriate reason, considering the patient’s diagnosis and condition.
Identify patients using two identifiers and confirm allergies.
Administer analgesics promptly.
Combine pharmacological approaches with nonpharmacological comfort measures.
Monitor ongoing pain and side effects post-administration.
Evaluation
Assess pain intensity and effectiveness of pain management strategies.
Monitor vital signs for adverse effects, especially respiratory depression.
Document and adjust pain management plans as necessary.
Unexpected Outcomes
For uncontrolled pain, reassess pain management and consider alternative interventions.
In cases of respiratory depression, withhold additional doses, monitor vital signs, and be prepared to administer naloxone as ordered.
Recording and Reporting
Document pain ratings, responses to analgesics, and report any adverse reactions to healthcare providers for further action.
SKILL 15.4 Patient-Controlled Analgesia Purpose:
PCA allows self-administration of analgesics via an IV or epidural pump, effective for acute and chronic pain including postoperative and cancer pain. Common medications include morphine, hydromorphone, and fentanyl.
Patient Safety: Risks for oversedation include age, obesity, and opioid-naïve status; patients must understand PCA use, while families should not press the button unless authorized. PCA is not recommended when pain can be managed orally.
Delegation and Collaboration: PCA administration is a nursing responsibility and cannot be delegated. Assistive personnel may report changes but not administer PCA doses.
Equipment: PCA pump, analgesic cartridge, naloxone, and vital sign monitoring tools should be ready.
Assessment Steps:
Verify MAR accuracy.
Assess patient allergies and history.
Pruritus
an itchy feeling on the skin that makes you want to scratch
not an allergic reaction
Perform hand hygiene and evaluate pain and vital signs.
Ensure patient can cognitively manage PCA.
Check IV patency and environment.
Inspect surgical sites and previous pain management understanding.
Assess patient knowledge and health literacy.
evaluate PT IV location and surrounding tissues
if pt had surgery asses incision site geantly palpate
assess pts knowledge of pain management
assess pts caregiver of pain management knowledge
Planning: Anticipate outcomes of pain relief, PCA operation proficiency, active patient participation, and alertness without oversedation.
Implementation Steps:
Perform hand hygiene.
Follow the “seven rights” for medication administration.
Identify the patient with two identifiers.
Confirm PCA setup with another nurse.
Educate the patient and family collaboratively.
Ensure patient comfort and secure all connections.
Program the PCA pump and administer a loading dose if prescribed.
Educate the patient on PCA use before leaving.
Maintain safety with side rails and call systems.
Dispose of supplies properly.
Evaluation:
Evaluate pain intensity using a scale.
Monitor for side effects and sedation levels.
Have the patient demonstrate PCA use.
Document delivery and patient engagement.
Use Teach-Back to confirm understanding.
Unexpected Outcomes:
If pain persists, assess for complications.
If sedated, discontinue PCA and provide airway support.
If difficulties with PCA arise, consult for alternative methods.
Recording: Document PCA-related information including drug usage and responses.
Hand-Off Reporting: Communicate PCA settings and patient status during shift changes to ensure continuity and safety.
SKILL 15.5 Epidural Analgesia
Purpose
The administration of analgesics into the epidural space is an efficient intervention to manage:
Acute pain during labor (Sng and Sia, 2017);
Post-surgical pain (Roeb et al., 2017; Solanki et al., 2017);
Pain following trauma to the chest, abdomen, pelvis, or lower limbs (Bouzat et al., 2017);
Chronic cancer pain (ASCO, 2016; He et al., 2015).
The epidural space contains vessels, nerves, and fat located between the vertebral column and the dura mater. An anesthesia provider places a catheter into the epidural space below the second lumbar vertebra with sterile technique. Opioids and local anesthetics, separately or in combination, are delivered into the epidural space to block pain transmission through the spinal cord. Reported benefits of epidural analgesia include higher patient satisfaction and reduction in complications such as oversedation and nausea (Sng and Sia, 2017; Bouzat et al., 2017).
Delegation and Collaboration
The skill of epidural analgesia administration cannot be delegated to nursing assistive personnel (NAP). The nurse directs NAP to:
Observe the dressing over the insertion site;
Avoid pulling the patient up in bed while lying flat;
Report catheter disconnections or leakage immediately;
Report any change in patient status, comfort level, or loss of sensation or movement.
Equipment
Clean and sterile gloves;
Prediluted preservative-free opioid as prescribed;
Infusion pump and compatible ISO tubing;
Antibacterial filter;
Tape and labeling materials;
Equipment for vital signs and medication administration records (MAR).
Assessment Steps
Verify health care provider's order against MAR.
Assess patient’s informed consent and understanding of risks.
Check if the patient has recently received anticoagulants.
Assess for herbal medications that may interfere with clotting.
Safe Patient Care
Contraindications to epidural analgesia include allergies to anesthetic, hypovolemia, increased intracranial pressure, insertion-site infection or sepsis, thrombocytopenia (<100,000 µl), prior spinal surgery, spinal instability/abnormalities, and lack of staff trained in essential competencies for managing epidural analgesia (Schreiber, 2015).
Perform hand hygiene and complete pain assessment.
Assess patient’s sedation level using commands and alertness.
Check respiration rate, pattern, depth, blood pressure, and temperature.
Assess initial motor and sensory function of lower extremities.
Safe Patient Care
For all patients on patient-controlled epidural anesthesia (PCEA), assess for sensory and motor function before ambulation or transfer
Inspect catheter insertion site for signs of infection or complications.
Follow catheter tubing for secure connections and check tubing patency.
Confirm patient’s knowledge of the procedure and risks.
Planning
Expected Outcomes:
Patient verbalizes pain relief within 30 to 60 minutes.
Patient reports no headache or complications.
Patient remains normotensive and alert.
Patient’s respirations are adequate, and voiding occurs without difficulty.
Epidural system functions as intended.
Considerations:
Provide privacy and set up equipment efficiently.
Position patient comfortably close to the nurses' station for monitoring.
Implementation
Perform hand hygiene and follow “seven rights” for medication administration.
Administer presumptively prescribed infusion under sterile conditions.
Monitor patient continuously, educating them on signs to report.
Ensure patient comfort and proper disposal of supplies.
Keep IV line patent for emergency medications post-infusion.
Evaluation
Evaluate pain levels with pain rating scales.
Monitor vital signs closely, especially in the first 12 hours.
Inspect catheter insertion site regularly.
Observe for pruritus, nausea, and other side effects.
Monitor intake and output for urinary retention.
Unexpected Outcomes and Interventions
Increase in pain intensity or sedation: check catheter function and medication doses.
Patient experiences adverse reactions: stop infusion, monitor vital signs, and prepare to administer naloxone if necessary.
Recording
Document all relevant pain management data, including drug details and patient responses during shifts.
Hand-Off Reporting
Convey the patient's pain management plan, infusion details, and vital sign status during shift changes.
SKILL 15.6 Local Anesthetic Infusion Pump for Analgesia
Purpose
The insertion of a small one-way catheter into a surgical site delivers a local anesthetic to maintain analgesia during and after surgery (Rawal, 2016). The catheter is secured to the skin with a surgical dressing (e.g., Tegaderm) and attached to a portable infusion system. This system delivers local anesthetic agents (such as bupivacaine, lidocaine, ropivacaine, or mepivacaine) that constantly “bathe” the specific nerves responsible for pain at the surgical site.
Local infusion pumps provide targeted pain relief for up to 5 days and may feature variable flow-rate settings and/or patient-controlled bolus devices. Although local anesthetic pumps can significantly decrease early postoperative pain, patients may still require oral analgesics, typically at a reduced dosage (Chou et al., 2016; Cooney, 2016). These pumps are intended for one-time use and allow patients to manage postoperative pain at home, with education provided for catheter removal and signs of local anesthetic toxicity.
Delegation and Collaboration
Managing local anesthetic infusion pump analgesia cannot be delegated to nursing assistive personnel (NAP). Nurses should direct NAP to:
Monitor insertion site for dislocation;
Report moist dressings or catheter disconnections;
Notify nurses of changes in patient status or comfort levels.
Equipment
Pump in place from surgery
Home Catheter Removal supplies:
Clean gloves
Sterile 4 × 4–inch gauze pads
Band-Aids
Tape
Plastic bag
Assessment
Verify patient identity using two identifiers.
Review surgeon's operative report for catheter position.
Perform hand hygiene and assess the surgical dressing and catheter insertion site.
Check labeling and connection security of the catheter.
Conduct a complete pain assessment (see Skill 15.1, Steps 2–9).
Compare medication label on the device with the MAR or orders.
Assess for any blood backup in tubing to avoid catheter displacement.
Determine patient activity levels according to orders.
Confirm patient allergies and assess for signs of local anesthetic toxicity.
Evaluate patient's or caregiver's knowledge level.
Assess understanding of the infusion's purpose and duration.
Planning
Expected outcomes include:
Patient verbalizes pain relief.
Reduction of nonverbal pain indicators.
Increased patient participation in activities and easier communication.
Safe catheter removal by the patient or caregiver.
Ensure privacy to promote comfort.
Prepare equipment and organize the work area.
Implementation
Perform hand hygiene.
Prepare patient for possible discharge by connecting to a smaller home pump.
Educate about home removal of the catheter (instructions provided).
Evaluation
Assess patient-reported pain intensity.
Monitor for signs of adverse drug reactions.
Observe patient's mobility and participation in daily activities.
Inspect the surgical dressing and catheter exit site during follow-up.
SKILL 15.7 Moist and Dry Heat Application
Purpose
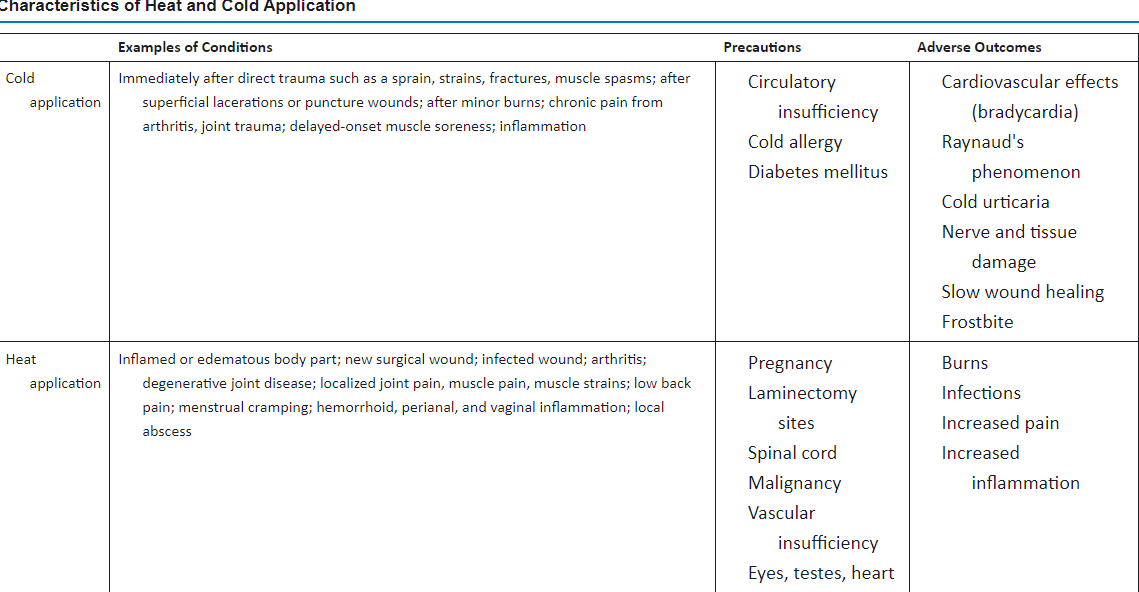
Heat and cold therapies can be beneficial in promoting healing of wounds and soft tissue injuries. Moist heat increases muscle and ligament flexibility, promotes relaxation and healing, and relieves spasm, joint stiffness, and pain. Commonly used after the acute phase of musculoskeletal injuries, childbirth, surgery, and superficial thrombophlebitis. Moist heat applications include warm compresses, commercial moist heat packs, warm baths, soaks, and Sitz baths. Dry heat therapy also aids in reducing pain and increasing healing by increasing blood flow in tissues, with less risk of tissue injury. Common forms include aquathermia pads, electric heating pads, and commercial dry heat packs. Both types effectively relieve pain, improve range of motion (ROM), and facilitate healing. The primary responsibility of the nurse is to assess risks and apply heat safely.
Temperature Ranges for Hot and Cold Applications
Temperature | Celsius Range | Fahrenheit Range |
Warm | 34°–37° | 93°–98° |
Tepid | 26°–34° | 80°–92° |
Cool | 18°–26° | 65°–79° |
cold | 10°–18° | 50°–64° |
Equipment
All Moist Heat Applications:
Prescribed analgesia (if ordered)
Dry bath towel, bath blanket
Warmed prescribed solution (e.g., normal saline) or commercially prepared compress
Biohazard waste bag
Clean gloves
Compress
Clean basin
Waterproof pad
Ties or cloth tape
Clean gauze or towel
Dry Heat Applications:
Aquathermia pad and control unit or commercial chemical heat pack
Distilled water (for aquathermia pad)
Bath towel or pillowcase
Ties, tape, or gauze roll
Assessment
Identify patient using at least two identifiers according to agency policy.
Refer to health care provider's order for type of heat application, location, duration, and desired temperature.
Review patient's medical record for contraindications to heat application, including unstable cardiac conditions and active bleeding.
Perform hand hygiene and assess skin condition around the area to be treated, including neurovascular assessments for sensitivity.
Assess wound characteristics if treating a wound, and perform hand hygiene after.
Inform patient to describe pain intensity on a scale of 0 to 10 and assess ROM if applicable.
Check vital signs to establish baseline.
Assess mobility for positioning during treatment.
Evaluate patient's level of consciousness and responsiveness.
Inspect the aquathermia pad for electrical safety.
Assess patient's or caregiver's knowledge about the procedure.
Planning
Expected Outcomes After Procedure:
Affected area is pink and warm to touch.
After multiple applications, wound shows signs of healing.
Patient denies burning sensation.
Patient reports increased mobility and decreased pain.
Blood pressure and pulse remain stable.
Patient can self-apply therapy safely.
Implementation
Perform hand hygiene and apply clean gloves.
Apply moist sterile compress or prepare an aquathermia pad as per agency guidelines.
Ensure the patient is comfortable, and apply the treatment as prescribed.
Monitor condition of the skin and patient sensation throughout the application.
After treatment, assess the area and ensure proper follow-up actions are taken based on findings.
Provide patient education on future heat applications.
Evaluation
Inspect skin condition after treatment.
Obtain and compare vital signs to baseline.
Ask the patient to rate comfort and any sensations of burning.
Evaluate ROM of the affected area.
Use Teach-Back to confirm the patient or caregiver's understanding of at-home applications.
Unexpected Outcomes and Related Interventions
Skin redness or burn: Discontinue application and verify the temperature.
Persistent pain after treatment: Discontinue use, monitor, and notify health care provider.
Increased discomfort: Adjust temperature and assess skin breakdown.
Incorrect application: Reinstruct and consider home health referral if necessary.
Recording
Document type of application, location, duration, and patient's response.
Hand-Off Reporting
Report details on heat therapy application, medication used, duration, skin assessment, and response to the therapy.
SKILL 15.8 Cold Application
Purpose
Cold therapy treats localized inflammatory responses of an injured body part that may present as edema, hemorrhage, muscle spasm, or pain. It aids in improving joint mobility by reducing pain and swelling, inhibiting muscle spasm, and reducing muscle tension. Cold therapy is commonly used immediately after soft tissue and musculoskeletal injuries, as well as in postoperative settings for orthopedic surgeries, spinal fusion, and lumbar discectomy. Common modalities include cold compresses, ice packs, electrically controlled continuous-flow devices, and cold-water immersion. The primary nursing responsibilities include assessing the risk for injury, understanding normal body responses to cold, and ensuring proper function of equipment.
Delegation and Collaboration
Applying cold applications may be delegated to nursing assistive personnel (NAP) under certain conditions. The nurse must assess the patient and explain the treatment purpose. If risks or complications are present, the nurse retains responsibility. NAP should know to:
Keep the application in place as ordered.
Report excessive redness, increased pain, or decreased sensation.
Inform when treatment concludes for nurse evaluation.
Equipment
All Compresses, Bags, and Packs
Clean gloves (if blood or body fluids are present)
Cloth tape or ties or elastic wrap bandage
Soft cloth cover (towel, pillowcase, etc.)
Bath towel or blanket and waterproof absorbent pad
Cold Compress
Absorbent gauze (folded to desired size)
Basin
Prescribed solution at desired temperature
Ice Bag or Gel Pack
Ice bag
Ice chips and water or reusable commercial gel pack or disposable chemical cold pack
Electronically Controlled Cooling Device
Cool-water flow pad or cooling pad and electrical pump
Gauze roll or elastic wrap
Assessment
Identify the patient using at least two identifiers to ensure safety.
Refer to the healthcare provider's order for type, location, and duration of application.
Review medical history for contraindications like peripheral vascular diseases or diabetic neuropathy.
Perform hand hygiene and inspect the affected body part.
Assess the patient's level of consciousness, which may affect sensation response.
Perform neurovascular checks (pulses, temperature, color).
Consider time since injury to apply therapy promptly.
Ask the patient to rate pain intensity and assess ROM if applicable.
Assess health literacy and knowledge about the therapy.
Planning
Expected Outcomes After Completion of Procedure:
Affected area is slightly pale and cool to touch.
Decreased edema or bleeding from the injury site.
Patient reports pain reduction.
Increased ROM.
Patient or caregiver states how to apply cold therapy at home.
Implementation
Perform hand hygiene and apply clean gloves.
Place a towel or absorbent pad under the treatment area.
Apply the cold compress, ice pack, gel pack, or electronically controlled cooling device as required. Maintain proper protective layers to avoid skin injury.
Monitor skin condition every 5 minutes for adverse reactions such as mottling or redness.
After the designated time (usually about 20 minutes), remove the application, assess skin condition, and dry the area gently.
Assist the patient into a comfortable position.
Evaluation
Inspect the affected area for integrity, color, and temperature after treatment.
Palpate for edema, bruising, or bleeding (if safe).
Ask the patient to report pain level.
Measure ROM of the affected body part.
Use Teach-Back to assess understanding of cold application.
Unexpected Outcomes and Related Interventions
Skin appears mottled or reddened: Stop treatment and notify the healthcare provider.
Patient complains of burning pain: Stop therapy and notify the healthcare provider.
Patient cannot demonstrate knowledge of the therapy: Provide further instruction.
Recording
Document the condition of the skin and body part; application details and patient's response.
Hand-Off Reporting
Report any adverse reactions to cold therapy experienced by the patient during treatment and overall treatment plan.