LAB PRACTICUM 2- CONTENT
Exercise 8-3 Anatomy of the Appendicular Skeleton
L.O. 8.3 Identify bones and markings of the upper limbs, pectoral girdles, lower limbs, and pelvic girdle.
Key Terms
You should be familiar with these terms before coming to the lab.
Pectoral GirdleUpper LimbPectoral girdleHumerusScapula Humeral headGlenoid cavityTrochleaCoracoid processCapitulumAcromionOlecranon fossaScapular spine RadiusClavicleUlnaOlecranon processTrochlear notchCarpalsMetacarpalsPectoral GirdlePectoral girdleScapula Glenoid cavityCoracoid processAcromionScapular spine ClavicleUpper LimbHumerusHumeralheadTrochleaCapitulumOlecranonfossaRadiusUlnaOlecranonprocessTrochlearnotchCarpalsMetacarpals
Pelvic GirdleLower Limb Pelvic girdleFemur Coxal bonesFemoral head IliumGreater trochanter IschiumMedial and lateral femoral condyles PubisPatella AcetabulumTibia Obturator foramenMedial malleolus Iliac crestFibula Anterior superior iliac spineLateral malleolus Greater sciatic notchTarsals Ischial tuberosityCalcaneus Pubic symphysisTalus Pubic archMetatarsalsPhalangesPelvic Girdle Pelvic girdle Coxal bones Ilium Ischium Pubis Acetabulum Obturator foramen Iliac crest Anterior superior iliac spine Greater sciatic notch Ischial tuberosity Pubic symphysis Pubic archLower LimbFemurFemoralheadGreatertrochanterMedialandlateralfemoralcondylesPatellaTibiaMedialmalleolusFibulaLateralmalleolusTarsalsCalcaneusTalusMetatarsalsPhalanges

Pre-Lab: Reading
The bones of the appendicular skeleton can be divided into those of the pectoral girdle, the upper limb, the pelvic girdle, and the lower limb. Let’s look at each individually.
Pectoral Girdle
The pectoral girdle (pek-TOHR-uhl; pect- = chest) is located at the posterior and superior thoracic cage. It consists of the two bones that frame the shoulder and support the upper limb: the scapula and the clavicle (Figure 8.29).
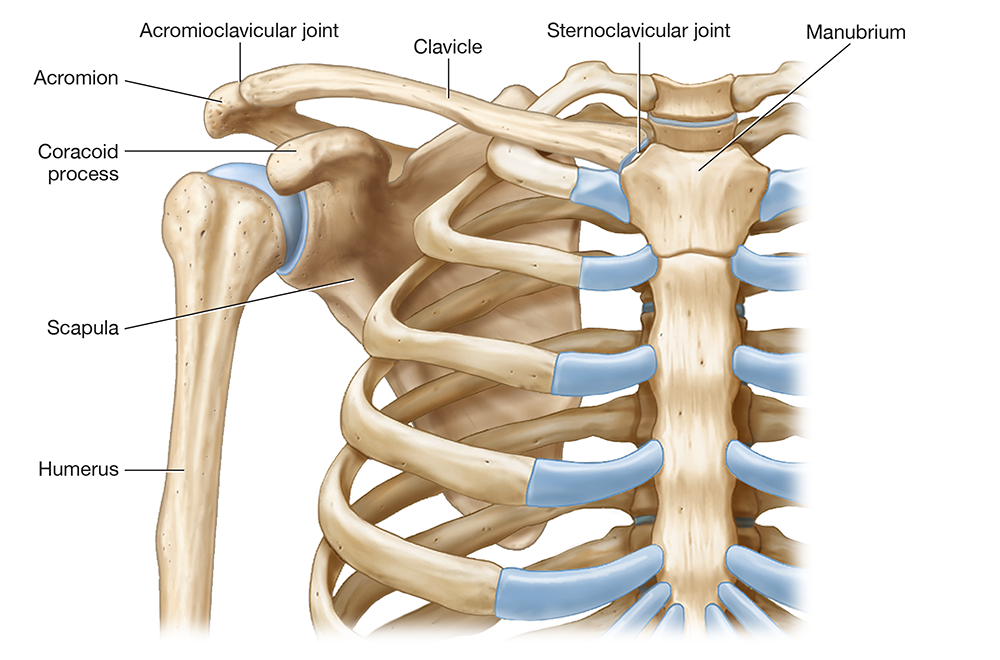
Figure 8.29 Pight pectoral girdle.
Long Text Description
The scapula (SKAP-yoo-luh; scapul- = “shoulder”), shown in Figure 8.30, is a roughly triangular-shaped bone with superior, lateral, and medial borders. The corners of the “triangle” are known as the superior, lateral, and inferior angles. The scapula’s broad, flat surface is the body, which has a broad indentation on its anterior surface called the subscapular fossa (sub- = “below;” Figure 8.30A).
On the scapula’s lateral surface is a shallow depression called the glenoid cavity (glen- = “socket”) that forms the shoulder joint with the humerus (Figure 8.30B). From this side, you can also get a good view of its two superior projections: the anterior coracoid process (KOHR-ah-koyd) and the posterior acromion (uh-KROH-mee-un; acrom- = “highest”). The acromion articulates with the lateral portion of the clavicle to form the acromioclavicular joint (uh-KROH-mee-oh-klah-VIK-yoo-lur; AC joint).
When we turn to the scapula’s posterior surface, we find a prominent ridge called the spine, which you can feel under your skin as your “shoulder blade” (Figure 8.30C). Superior and inferior to the scapular spine are two depressions: the supraspinous and infraspinous fossae.
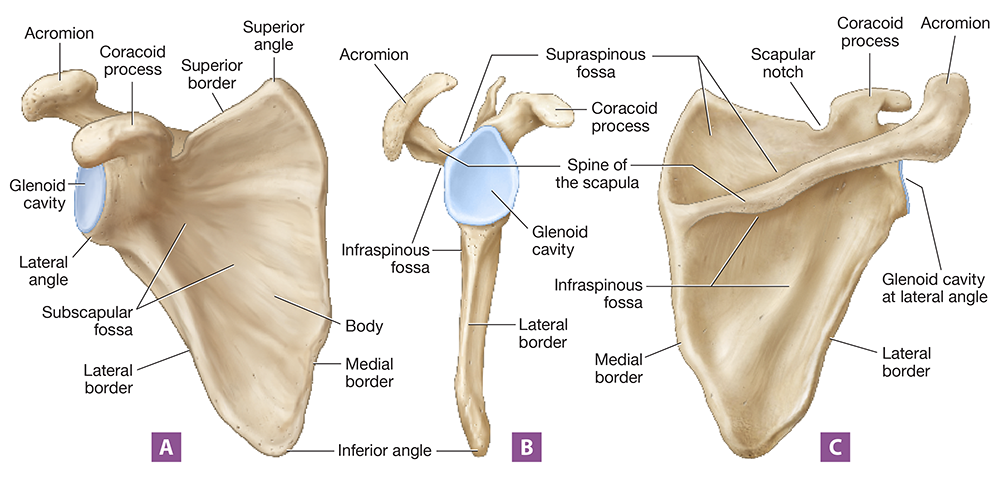
Figure 8.30 Right scapula: (A) anterior view; (B) lateral view; (C) posterior view.
Long Text Description
The clavicle is a small S-shaped bone—its “S” shape is best appreciated from the superior view shown in Figure 8.31, as the clavicle appears nearly straight from an anterior view. Laterally, the clavicle's acromial end articulates with the acromion, and medially, its sternal end articulates with the manubrium of the sternum. Note that this sternal attachment is the only bony connection between the pectoral girdle/upper limb and the axial skeleton. Functionally, the clavicle acts somewhat like a brace, holding the upper limb in place away from the body.
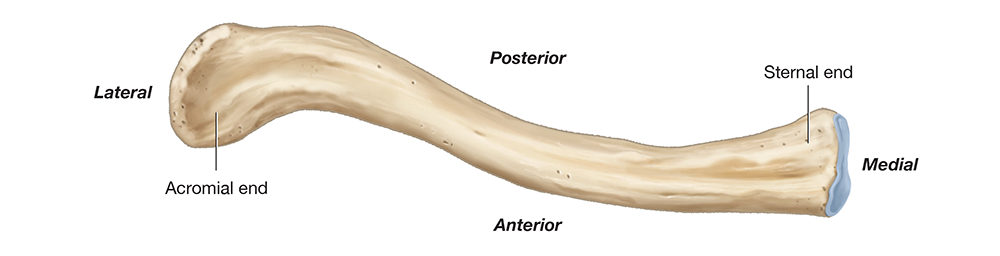
Figure 8.31 Right clavicle, superior view.
Long Text Description
Upper Limb
The upper limb consists of the arm, the forearm, the wrist, and the hand. The only bone within the arm is the humerus (HYOO-mur-uhs), a long bone that forms the shoulder joint with the scapula's glenoid cavity at its proximal end. At its distal end, it forms the elbow joint with the ulna and radius. The humerus' features include the following (Figure 8.32):
At its proximal end is a rounded head that articulates with the glenoid cavity. Just lateral to the head is the greater tubercle, separated from the smaller lesser tubercle by the intertubercular sulcus (in'-ter-too-BUR-kyoo-lur SUL-kuhs).
The diaphysis of the humerus features a projection called the deltoid tuberosity, which is where the deltoid muscle attaches. On the posterior diaphysis, we find another feature—the radial groove—which is an indentation along which the radial nerve travels.
At the humerus’ distal end, we find two small projections called the medial and lateral epicondyles. Distal to these are two larger condyles: the medial trochlea (TROH-klee-uh), which is shaped like a spool of thread, and the lateral capitulum (kuh-PIT-yoo-lum; capit- = “head”), which is ball-shaped. Just proximal to the trochlea are indentations in the humerus where the ulna and radius articulate—the anterior coronoid and radial fossae and the posterior olecranon fossa (oh-LEK-ruh-nahn; olec- = “elbow”).
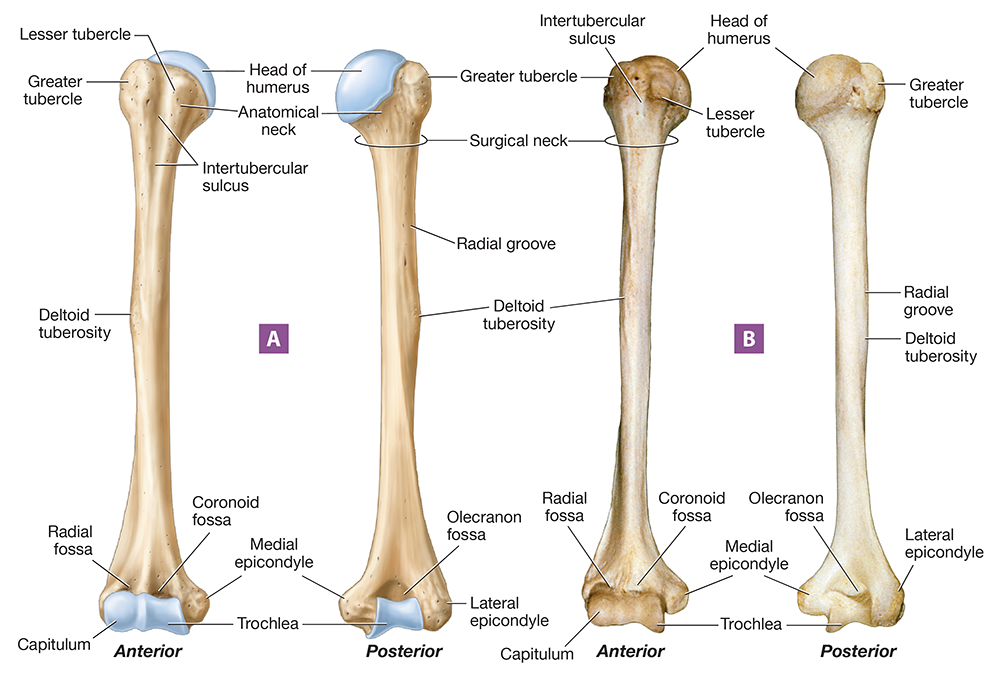
Figure 8.32 Right humerus: (A) illustration, anterior and posterior views; (B) photograph, anterior and posterior views.
Long Text Description
The two forearm bones, shown in Figure 8.33, are the lateral radius (RAY-dee-uhs) and medial ulna (UHL-nuh; ulna = “elbow”). If you have a hard time remembering which is which, stand in the anatomical position and take your radial pulse; the pulse is on the lateral side of the forearm, just like the radius. The ulna is wide proximally, where it articulates with the humerus, and thin distally, where it articulates with the bones of the wrist. Its proximal end has two processes—the large, posterior olecranon process and the smaller, anterior coronoid process. These two processes are separated by a deep groove called the trochlear notch.
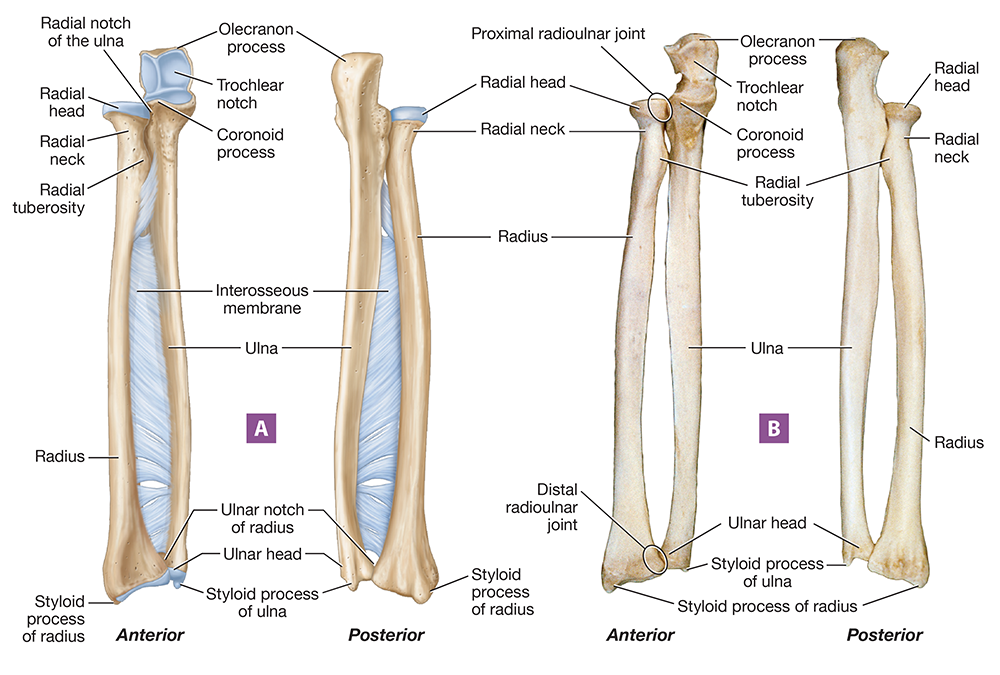
Figure 8.33 Right radius and ulna: (A) illustration, anterior and posterior views; (B) photograph, anterior and posterior views.
Long Text Description
As its name implies, the trochlear notch fits around the trochlea of the humerus. The olecranon process is the actual “elbow bone,” which you can feel on your posterior arm. The trochlear notch and the ulna’s two processes form a “U” shape when the ulna is held on its side. This makes the ulna easy to differentiate from the radius—think “U” for “ulna.”
The distal end of the ulna is known as the ulnar head. It articulates with a wrist (or carpal) bone called the lunate. On its medial side, it has a small projection called the styloid process that is palpable through the skin.
The shape of the radius is opposite to that of the ulna: It’s skinny proximally and wide distally. Proximally, it consists of a round, flattened radial head that articulates with the capitulum of the humerus to help form the elbow joint. Distal to the radial head, we find the radial neck and a projection called the radial tuberosity. At its most distal end, the radius articulates with several carpal bones. It also features a lateral styloid process, just as we found on the ulna.
Notice in the figure that the radius and ulna also articulate with one another. On the ulna’s proximal end is the radial notch, which is where the radius and ulna articulate at the proximal radioulnar joint. At the distal end of the radius is an indentation called the ulnar notch, which is where the radius and ulna articulate at the distal radioulnar joint. These joints are stabilized by the interosseous membrane, a band of dense regular collagenous connective tissue that joins the radius and ulna along their length.
The wrist is composed of eight short bones called carpals (KAR-pulz; carp- = “wrist”), which are arranged into two rows. The proximal row, from medial to lateral, consists of the triquetrum, pisiform, lunate, and scaphoid bones. The distal row, from medial to lateral, includes the hamate, capitate, trapezoid, and trapezium bones (Figure 8.34). The carpals articulate proximally with the radius and the ulna, and distally with the five long bones in the hand: the metacarpals. The metacarpals articulate distally with the fingers, which are formed from 14 long bones called phalanges (fuh-LAN-jeez). The second through fifth digits have three phalanges each: the proximal, intermediate (or middle), and distal phalanges. The thumb has only two: a proximal and a distal phalanx (FAY-laynx).
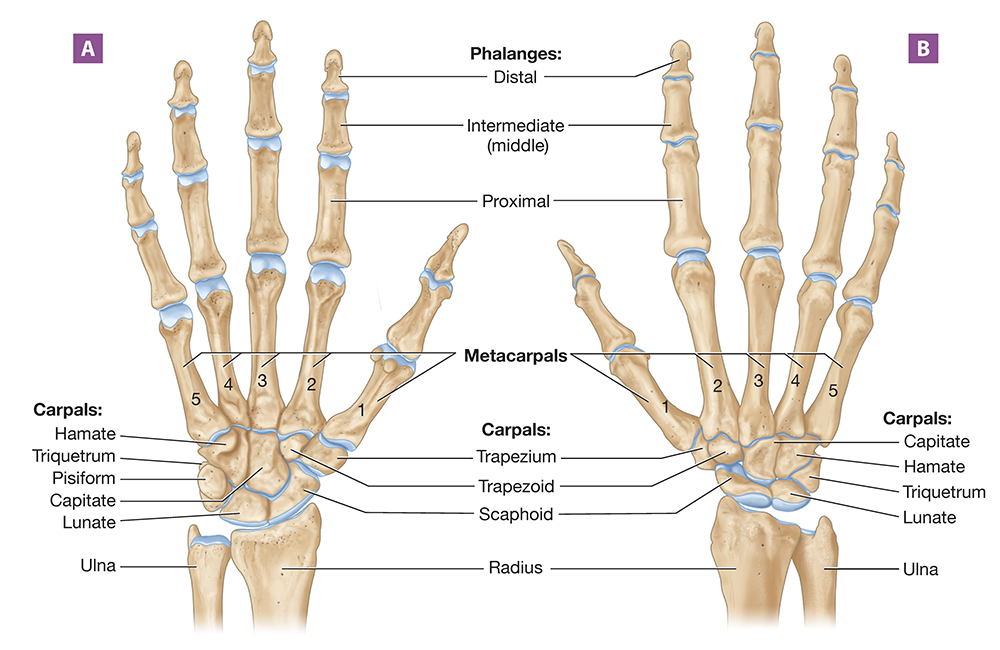
Figure 8.34 Right wrist and hand: (A) anterior view; (B) posterior view.
Long Text Description
Pelvic Girdle
A quick Google search of the terms “pelvis” and “pelvic girdle” will show you that there’s some disagreement on their definitions. Here, we’ll use the definitions provided by the anatomical texts Gray’s Anatomy and Terminologia Anatomica. Per these texts, the pelvis (plural = pelves; PEL-vees) is the bowl-shaped portion of the abdominopelvic cavity that connects the lower limbs to the trunk, supports the pelvic organs, and transmits the weight of the trunk to the lower limbs. The bony framework of the pelvis is formed by the pelvic girdle, which consists of two coxal bones (cox- = “hip”) and the sacrum (Figure 8.35). Recall that the coxal bones articulate with the sacrum at the two sacroiliac joints.
The opening into the pelvis is known as the pelvic inlet; the ridge around the inlet is the pelvic brim. The pelvic inlet and brim separate the greater pelvis (colored green in the figure), which sits superior to the pelvic inlet, from the lesser pelvis (colored yellow in the figure), which sits inferior to it. At the inferior edge of the lesser pelvis is the pelvic outlet.
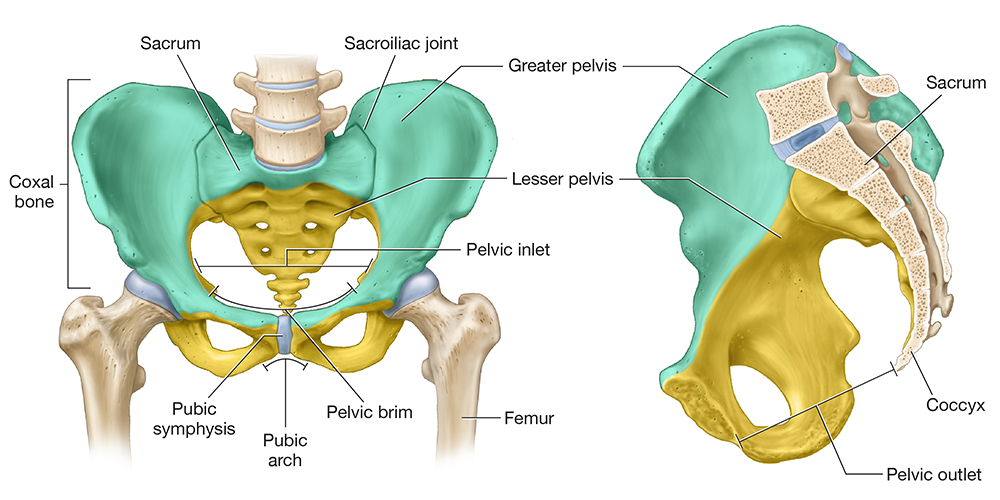
Figure 8.35 Pelvic girdle: (A) anterior view; (B) midsagittal section.
Long Text Description
Each coxal bone—also known as a hemipelvis (hemi- = “half”)—is composed of three fused bones: the ilium, ischium, and pubis (Figure 8.36). In the lateral view, you can see where all three bones come together to form a deep socket called the acetabulum (ă-suh-TAB-yoo-lum), which forms the hip joint with the femur. Notice also that there is a large hole called the obturator foramen (AHB-too-ray-tur) where the ischium and pubis meet. In a living person, this hole is covered with a membrane and allows only small blood vessels and nerves to pass through.
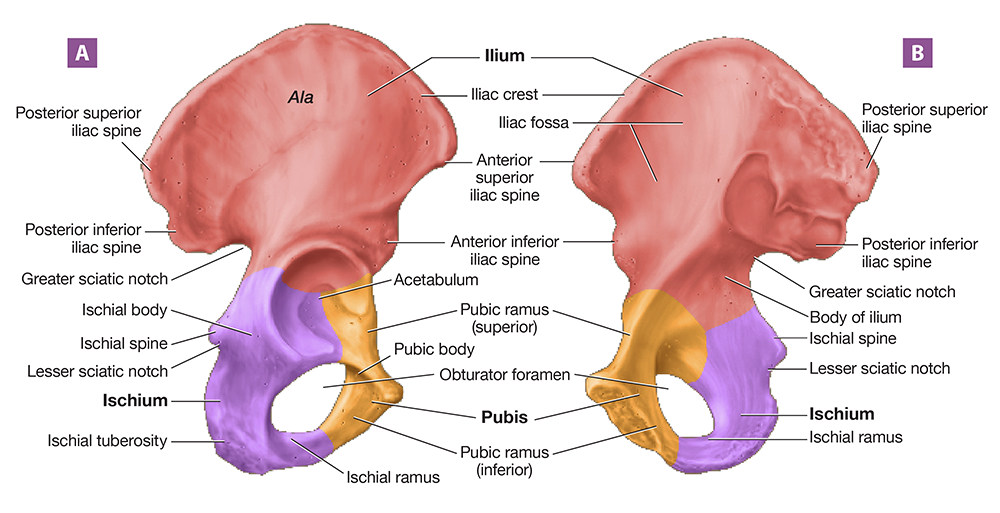
Figure 8.36 Right coxal bone: (A) lateral view; (B) medial view.
Long Text Description
Let’s look more closely at the three bones of the pelvic girdle and their features.
Ilium. The ilium (ILL-ee-um; ilia- = “flank”) is the largest of the three pelvic bones. Its largest part, the body, is topped by a superior “wing” called the ala (AY-luh). The medial side of the ala is concave; this indentation is the iliac fossa. The ridge of the ala, called the iliac crest, is where you rest your hands when your hands are on your hips. At the anterior end of the crest, we find two projections: the anterior superior iliac spine and the smaller anterior inferior iliac spine. A similar but smaller posterior superior iliac spine is located posteriorly, with a corresponding posterior inferior iliac spine. The posterior ilium also features an indentation called the greater sciatic notch (sy-Ă-tik; sciat- = “hip joint”), which allows the sciatic nerve to pass from the pelvis to the thigh.
Ischium. The ischium (ISS-kee-um; ischi- = “hip joint”) is the posteroinferior component of the coxal bone. Its two main components are the ischial ramus (ISS-kee-uhl) on the anterior side and the ischial body on the posterior side. The ischial body has three key features: the superior ischial spine, the middle lesser sciatic notch, and the thick, inferior ischial tuberosity. The ischial tuberosities are the “butt bones:" the bones that bear your weight when you sit down.
Pubis. The anterior component of the coxal bone is formed by the pubis (PYOO-bis; pub- = “groin”) or pubic bone. The pubis consists of a body and two extensions called the superior and inferior rami. The bodies of the two pubic bones meet at a fibrocartilage pad called the pubic symphysis (SIM-fih-sis; sym- = “together;” -physis = “growth;” look back to Figure 8.35). The angle that the pubic bones form when they meet, called the pubic arch, can help determine the sex of a skeleton.

Hints & Tips: How to Determine Sex Based on Pelvic Features
A skeleton’s sex can be determined based on the differences between the male and female pelves, as the female pelvis is adapted for pregnancy and childbirth. In general, the male and female pelvis can be distinguished by the features listed below and shown in the photos in Figure 8.37.
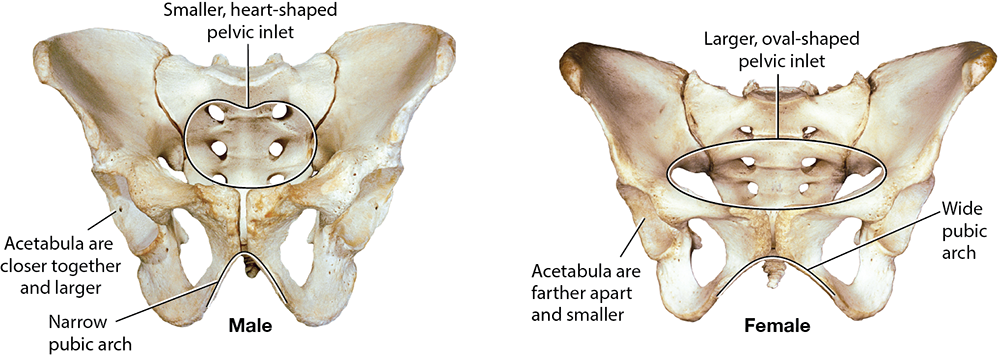
Figure 8.37 Male and female pelves.
Long Text Description
Feature | Male Pelvis | Female Pelvis |
|---|---|---|
Pelvic inlet shape | Narrower and heart-shaped | Wider and oval-shaped |
Pubic arch | Narrow angle | Wide angle |
Acetabula | Closer together | Farther apart |
Ischial tuberosities | Inverted (point inward) | Everted (point outward) |
Coccyx | Curved anteriorly, less movable | Straighter, more movable |

Lower Limb
The lower limb consists of the thigh, the patella or kneecap (puh-TEL-uh; “little plate”), the leg, the ankle, and the foot. The thigh contains only a single bone—the large, heavy femur (Figure 8.38). Proximally, the femur articulates with the acetabulum at its rounded head. In the center of the femoral head, we find a pit called the fovea capitis (FOH-vee-uh CAP-uh-tiss). This is the point of attachment for a ligament that holds the femur in the acetabulum. Just distal to the femoral head is its weakest part and the most common location for a hip fracture: the femoral neck. Where the femoral neck meets the femoral diaphysis, we find two large prominences: the anterolateral greater trochanter (TROH-kan-tur) and the posteromedial lesser trochanter. Between the two trochanters on the anterior side is a ridge called the intertrochanteric line (in’-ter-troh-kan-TEHR-ik). On the posterior side is another ridge in the same location known as the intertrochanteric crest.
The femoral diaphysis is mostly smooth, save for a few features that mark the attachment points for specific muscles on the posterior side:
The proximal gluteal tuberosity (GLOO-tee-uhl; glut- = “buttocks”) is a rough projection that serves as the attachment spot for the gluteus maximus muscle.
The linea aspera (LIN-ee-uh ASS-per-uh) is a prominent line that runs along the femoral diaphysis. It serves as an attachment point for many muscles that move the femur.
Near the femoral epiphysis, the linea aspera splits into the medial and lateral supracondylar lines (soo-pruh-KAHN-duh-lur), where hamstring muscles attach to the femur.
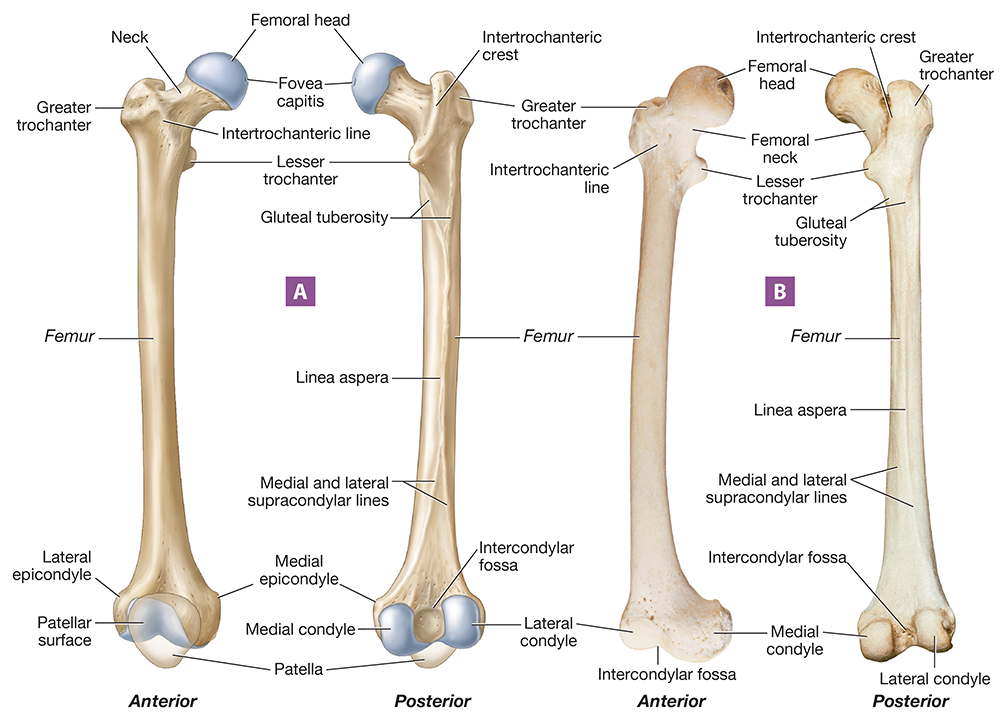
Figure 8.38 Right femur: (A) illustration, anterior and posterior views; (B) photograph, anterior and posterior views.
Long Text Description
Distally, the femur expands into two small projections, the medial and lateral epicondyles (ep-ih-KAHN-dyl’z). The femur’s most distal end features the large medial and lateral condyles, which form the knee joint with the largest bone of the leg—the tibia. On the posterior side of the distal femur is a depression between the two condyles, the intercondylar fossa.
The leg has two bones, the tibia and the fibula. The tibia (TIB-ee-uh) is the medial and larger of the two leg bones (Figure 8.39). Its flattened proximal end is the tibial plateau, where its medial and lateral condyles fit together with those of the femur. Between the medial and lateral condyles is a ridge called the intercondylar eminence. Just distal to the condyles is a rough projection called the tibial tuberosity, which is where the patellar ligament inserts. Along the anterior tibial diaphysis is a sharpened ridge known as the anterior crest, which is commonly known as the “shin.”
At the tibia’s distal epiphysis, it has a flat surface—the tibial plafond—that articulates with a tarsal bone called the talus at the ankle joint. The tibia’s terminal end is a projection called the medial malleolus (mal-ee-OH-luhs), which you may think of as your “medial ankle bone.” Like the tibial plafond, the medial malleolus articulates with the talus at the ankle joint.
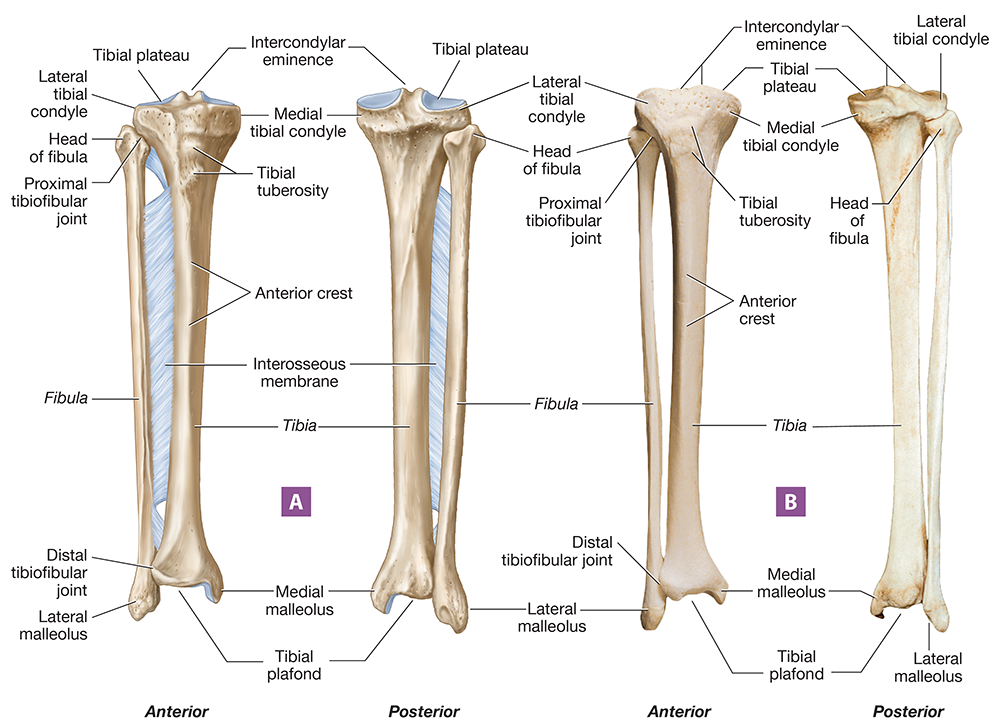
Figure 8.39 Right tibia and fibula: (A) illustration, anterior and posterior views; (B) photograph, anterior and posterior views.
Long Text Description
The other leg bone is the thin, lateral fibula (FIB-yoo-luh). The proximal fibular end is called the head, and its distal end is the lateral malleolus (your “lateral ankle bone”). The head has no articulation with the femur, but the lateral malleolus articulates with the talus at the ankle joint.
Notice in the figure that the tibia and fibula articulate with one another just as the radius and ulna do. At the proximal end, we find the proximal tibiofibular joint, and at the distal end, we find the distal tibiofibular joint. The two bones also are held together by a stabilizing interosseous membrane.
The ankle is composed of seven short bones called tarsals (TAHR-sulz; tars- = “ankle;" Figure 8.40). The largest tarsal bone is the calcaneus (kal-KAYN-ee-uhs; calcan- = “heel”), commonly called the heel bone. Resting on top of the calcaneus is the talus (TAY-luhs), which forms the ankle joint with the tibia and fibula. Distally, the talus articulates with a ship-shaped bone called the navicular. The remaining tarsals are, from medial to lateral, the medial cuneiform, intermediate cuneiform, lateral cuneiform, and cuboid bones.
The tarsals articulate distally with the five long bones in the foot called metatarsals (met-uh-TAHR-sulz). Notice in Figure 8.40B that there are two small sesamoid bones on the plantar surface of the head of the first metatarsal—these bones are found in a tendon located here. Like the bones of the fingers, the bones of the toes also consist of 14 phalanges. The second through fifth digits have three phalanges each: the proximal, intermediate (or middle), and distal phalanges. The big toe or hallux (HAL-uhx) has only two: a proximal and a distal phalanx.
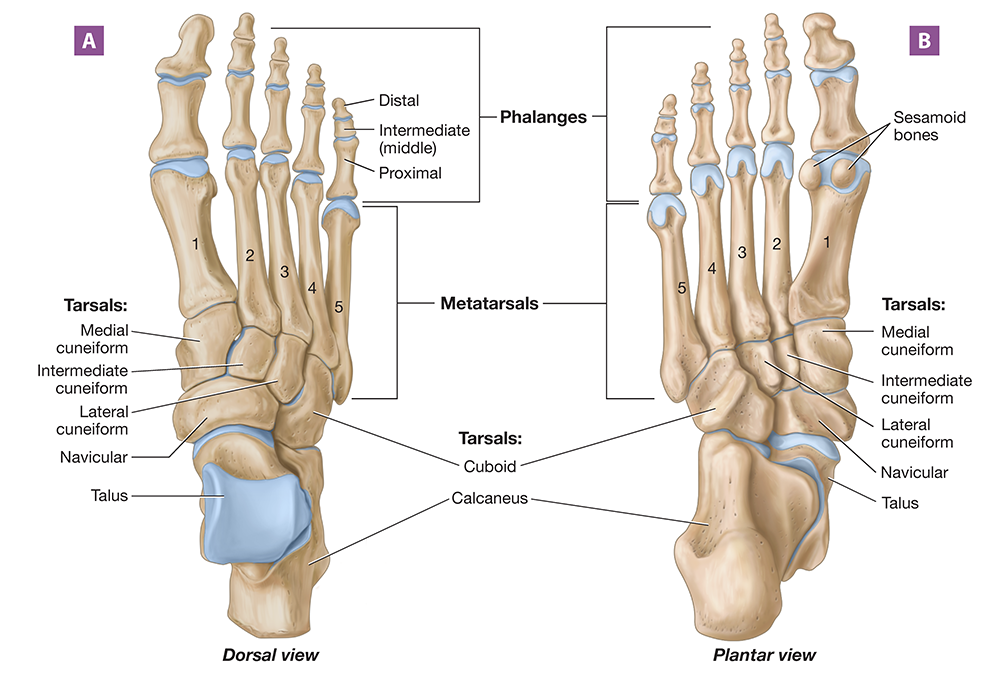
Figure 8.40 Right foot and ankle: (A) superior view; (B) inferior view.
Long Text Description
Exercise 9-1 Classification of Joints
L.O. 9.1 Classify joints based upon structure and function and identify examples of the different types of joints.
Key Terms
You should be familiar with these terms before coming to the lab.
Joint Classes by FunctionSynovial Joint Classes by StructureSynarthrosisPlaneAmphiarthrosisPivotDiarthrosisCondylarSaddleBall-and-socketJoint Classes by StructureHingeFibrousCartilaginousSynovialJoint Classes by FunctionSynarthrosisAmphiarthrosisDiarthrosisJoint Classes by StructureFibrousCartilaginousSynovialSynovial Joint Classes by StructurePlanePivotCondylarSaddleBall-and-socketHinge

Pre-Lab: Reading
Introduction
Most bones in the body form articulations, or joints, with one or more other bones. These articulations stabilize your skeleton while allowing you to perform a wide variety of motions involved in everyday movement. You probably don’t realize just how many joints are articulating when you do routine things such as scrolling on your phone, walking to the door, or holding a model in the A&P lab. You’ll get to discover that firsthand in this unit as we explore articulations. But first, let’s look at the structural and functional joint classes.
Structural and Functional Joint Classes
We can classify joints by their structure and by their function. We’ll start with the three functional classes, which relate to how much motion can occur at the joint.
Synarthroses (sin-ar-THROH-seez; syn- = “together”; arthr- = “joint”) are immovable joints. Rather than allowing motion, these joints stabilize the connections between two bones.
Amphiarthroses (am'-fee-ar-THROH-seez; amphi- = “both”) are joints that allow a small amount of motion. While they do provide stability, amphiarthroses are less stable than synarthroses.
Diarthroses (dy-ar-THROH-seez; dia- = “through”) are freely movable joints. These joints allow the most motion but provide the least stability.
Structurally, we classify joints by the type of connecting elements we find between the two bones. The first class is the fibrous joints, which consist of bones joined by short collagen fibers. Most fibrous joints allow no motion and are synarthroses, although some are amphiarthroses. Their main function is to provide stability between the bones. There are three subclasses of fibrous joints:
Sutures. A suture, which you learned about in the skeletal system unit, is a joint between two bones of the skull (Figure 9.1A). The edges of the bones feature interlocking wavy ridges that are united by short collagen fibers, a construction that makes these joints very stable.
Gomphosis. A gomphosis (gahm-FOH-sis; “bolt together”) is located between a tooth and its alveolus in the mandible or maxilla. It is held in place by a fibrous membrane called the periodontal ligament.
Syndesmosis. Syndesmoses (sin-dez-MOH-seez; “binding, fastening”) are located between two parallel articulating bones, such as the radius and ulna. The bones in a syndesmosis are joined by a long fibrous membrane called an interosseous membrane. There is some movement allowed between the bones in a syndesmosis, so these joints are classified as amphiarthroses.
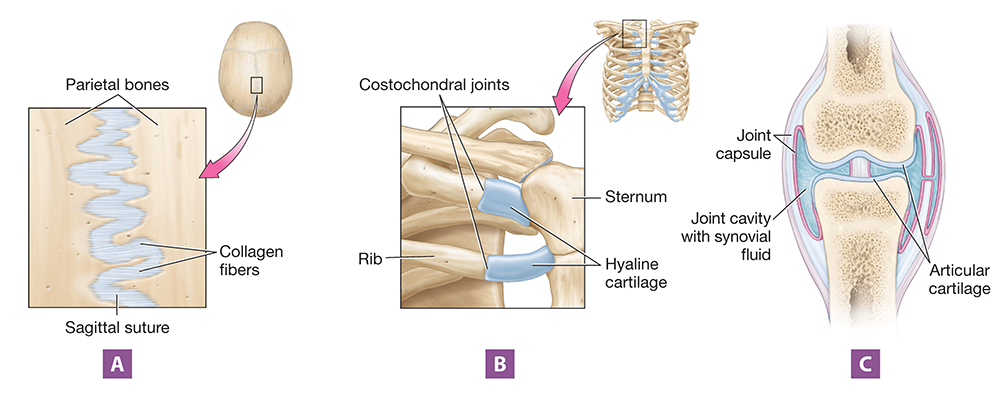
Figure 9.1 Structural joint classes: (A) fibrous joint, shown in the skull; (B) cartilaginous joint, shown in the rib cage; (C) synovial joint, shown as a generalized example.
Long Text Description
The next class is the cartilaginous joints, which, as their name implies, consist of bones united by hyaline cartilage or fibrocartilage. Most cartilaginous joints in adults allow some motion and are amphiarthroses. There are two types of cartilaginous joints:
Symphyses. A common type of cartilaginous joint in the body is the symphysis (SIM-fih-sis; sym- = “together;” -physis = “growth”), in which the bones are joined by a tough cartilaginous pad. Examples include the pubic symphysis and the joints between vertebral bodies.
Synchondroses. Synchondroses (sin-khan-DROH-seez) consist of bones joined by hyaline cartilage. The epiphyseal plate is an example of a synchondrosis, which is a temporary joint. After the plate closes and becomes the epiphyseal line, the joint ceases to exist. Permanent synchondroses include the costochondral joints and the first sternocostal joint, which are shown in Figure 9.1B.
The final structural class is the synovial joints (sih-NOH-vee-uhl), which feature bones separated by a fluid-filled space called a joint cavity (Figure 9.1C). Synovial joints are freely movable diarthroses, which makes synovial joints much less stable than either fibrous or cartilaginous joints. The bones in a synovial joint are united by a double-layered joint capsule that surrounds and encloses the joint cavity, which is filled with a liquid called synovial fluid.
Although all synovial joints are diarthroses, they don't all allow the same amount of motion, as this depends on the joint's structural subtype. These subtypes are illustrated in Figure 9.2 and include the following:
Plane. The bones of plane joints have flat articular surfaces, which allow the bones to glide past one another (Figure 9.2A). There are several examples of plane joints in the body, including the intertarsal joints, the intercarpal joints, and the articulations between the superior and inferior articular processes of vertebrae. These joints allow the least amount of motion of the synovial joints, which makes this the most stable synovial joint class.
Condylar. Condylar joints (KAHN-duh-lur) consist of one bone that fits into the shallow concave depression of another bone. Examples include the radiocarpal and metacarpophalangeal joints (Figure 9.2B).
Saddle. As shown in Figure 9.2C, saddle joints are appropriately named, involving two saddle-shaped bone surfaces. In a saddle joint, the convex articular surface of one bone fits into a concave surface of another bone—imagine a person sitting on a saddle. This shape permits a wide range of motion while also providing some stability. An example of a saddle joint is the first carpometacarpal joint of the thumb.
Hinge. In a hinge joint, the bones fit together much like the hinge of a door (Figure 9.2D). Generally, the convex articular surface of one bone fits into a concave articular surface of another bone in a way that allows motion in only one plane. Examples of hinge joints include the elbow and the interphalangeal joints of the fingers and toes.
Pivot. In a pivot joint, one bone rotates or “pivots” around another bone (Figure 9.2E). Generally, a pivot joint consists of one bone with a rounded projection that fits into a groove of another bone, such as the atlantoaxial joint and proximal radioulnar joint.
Ball-and-socket. Ball-and-socket joints are named for the rounded, ball-like end of one bone that fits into the concave “socket” of another bone (Figure 9.2F). The only examples of ball-and-socket joints in the body are the shoulder and hip joints. This class of joint allows the greatest range of motion in the body.
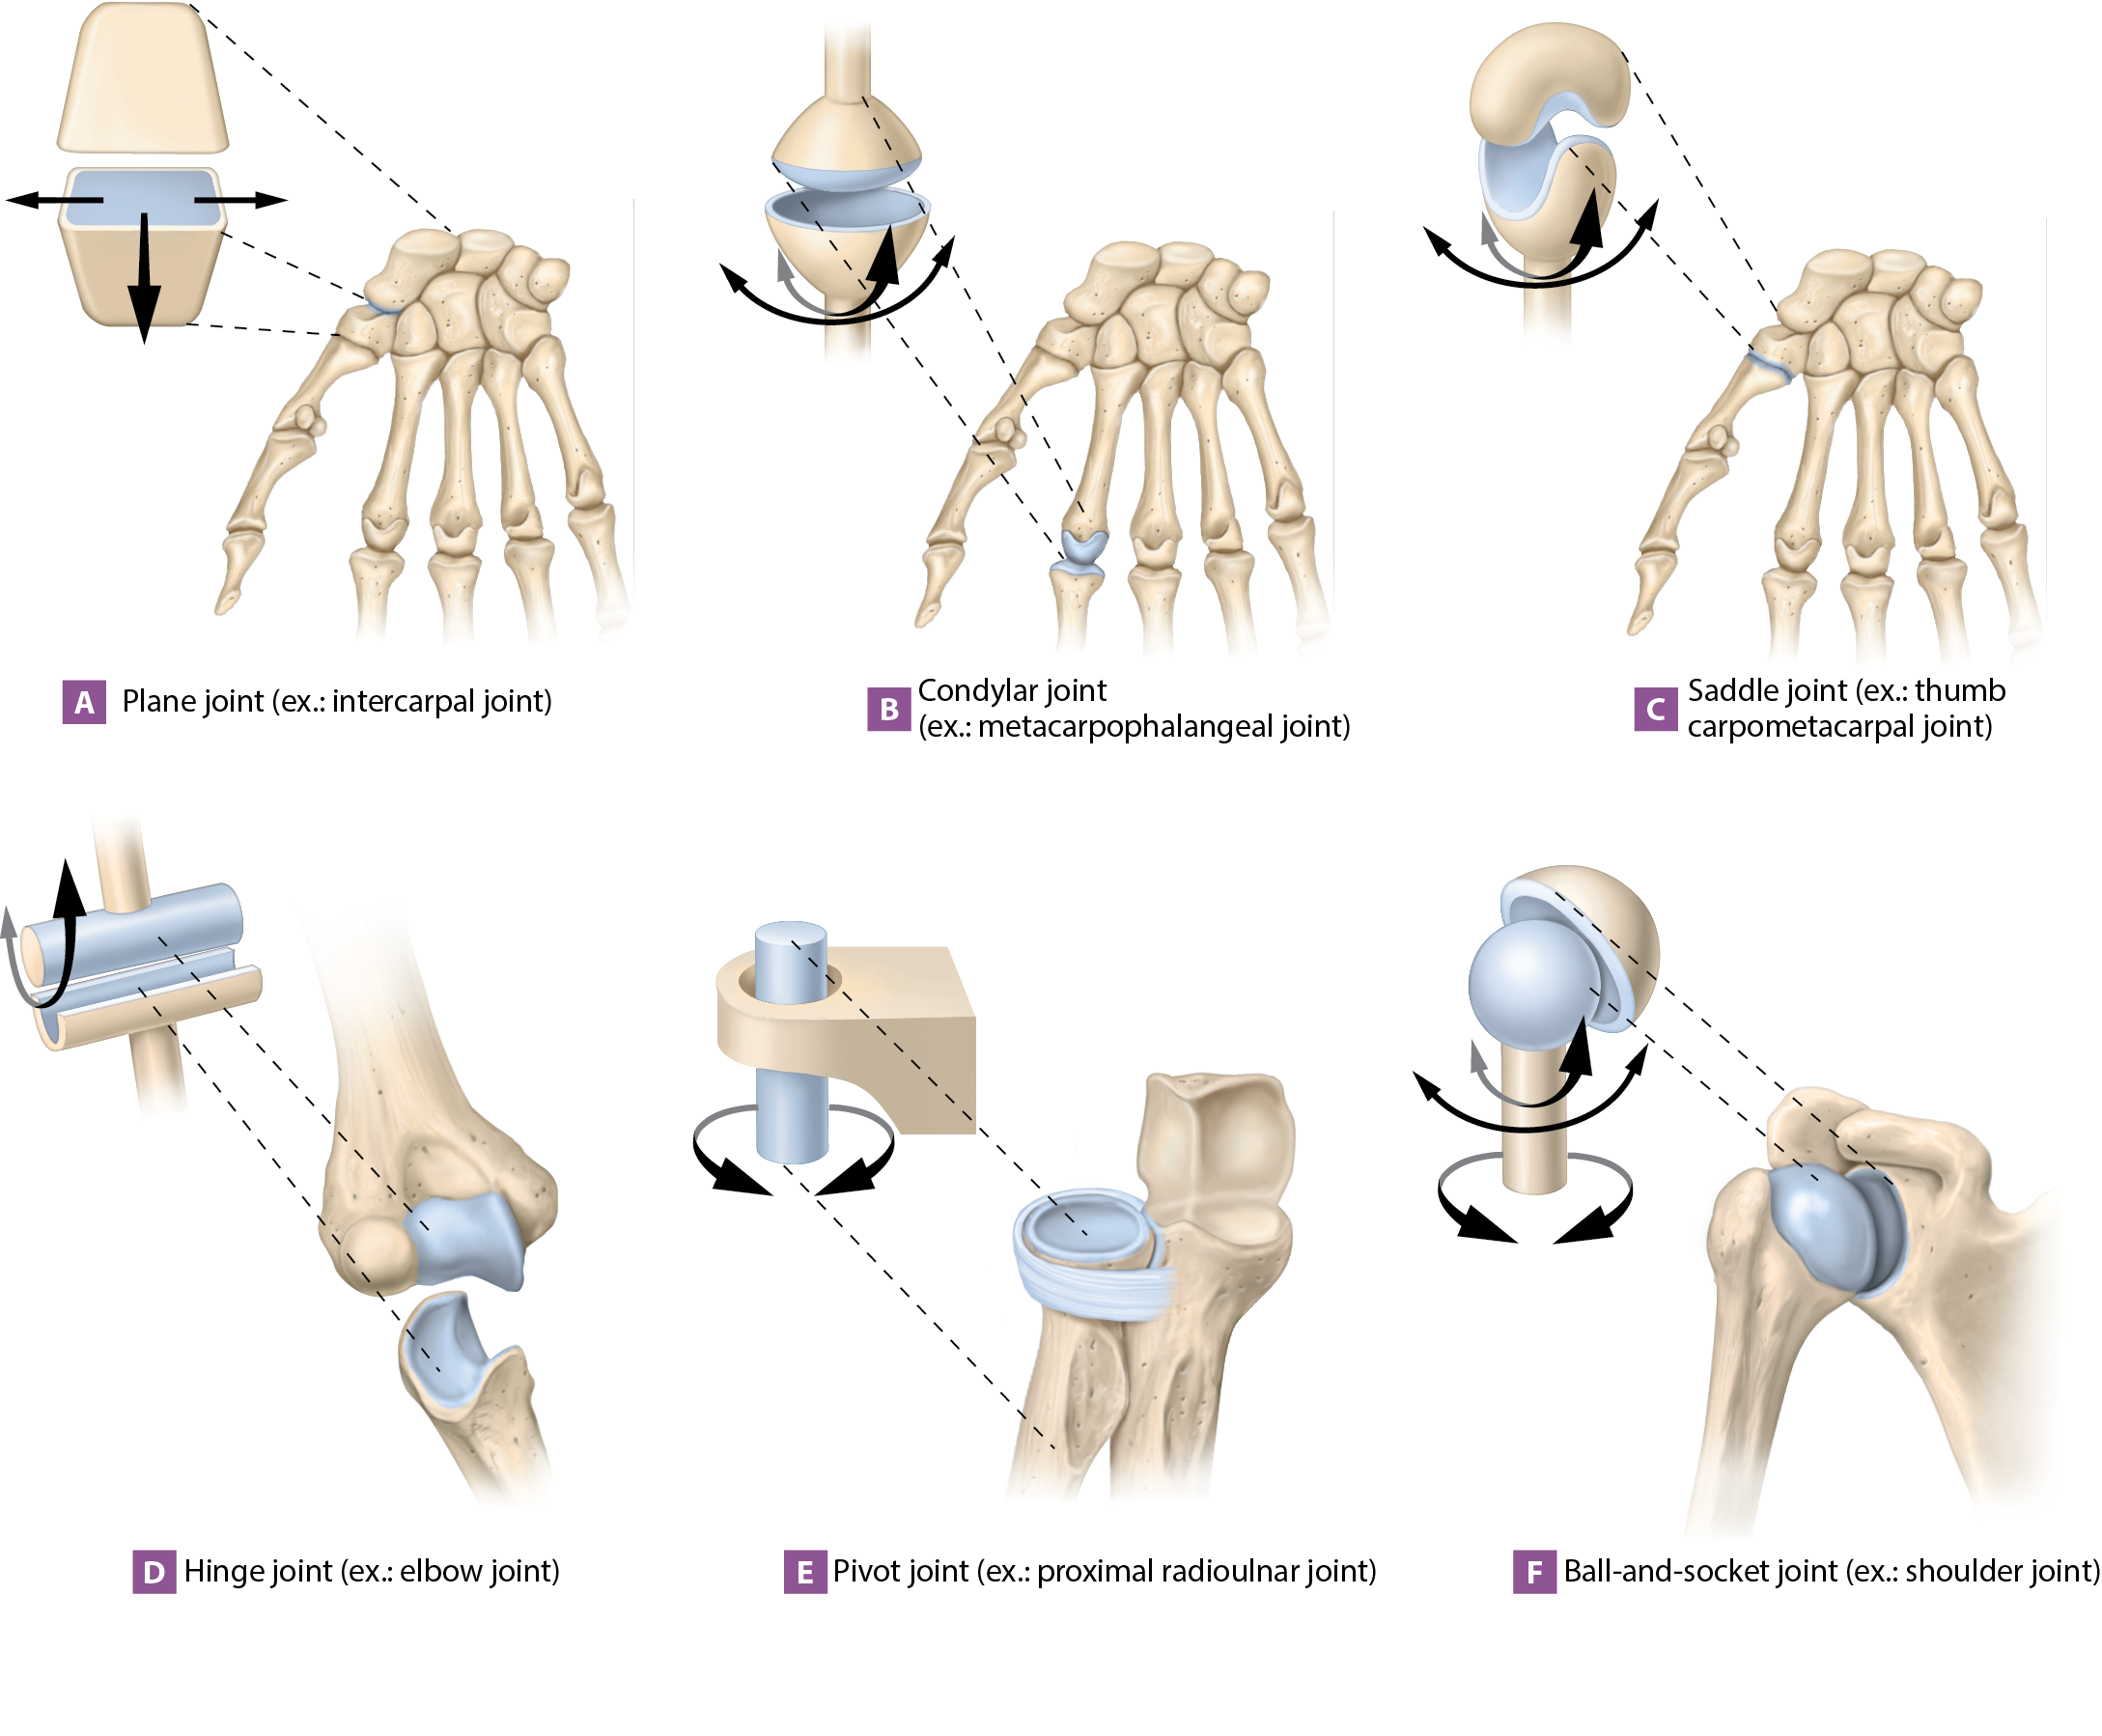
Figure 9.2 Structural classes of synovial joints.
Exercise 9-3 Knee Joint Structure and Function
L.O. 9.3 Identify and describe structures of the knee joint.
Key Terms
You should be familiar with these terms before coming to the lab.
Tibiofemoral jointAnterior cruciate ligament (ACL)Posterior cruciate ligament (PCL)Tibial collateral ligament (MCL)Fibular collateral ligament (LCL)Medial meniscusLateral meniscusPatellofemoral jointPatellar ligamentPatellar tendonTibiofemoral jointAnterior cruciate ligament (ACL)Posterior cruciate ligament (PCL)Tibial collateral ligament (MCL)Fibular collateral ligament (LCL)Medial meniscusLateral meniscusPatellofemoraljointPatellarligamentPatellartendon

Pre-Lab: Reading
Anatomy of the Knee Joint
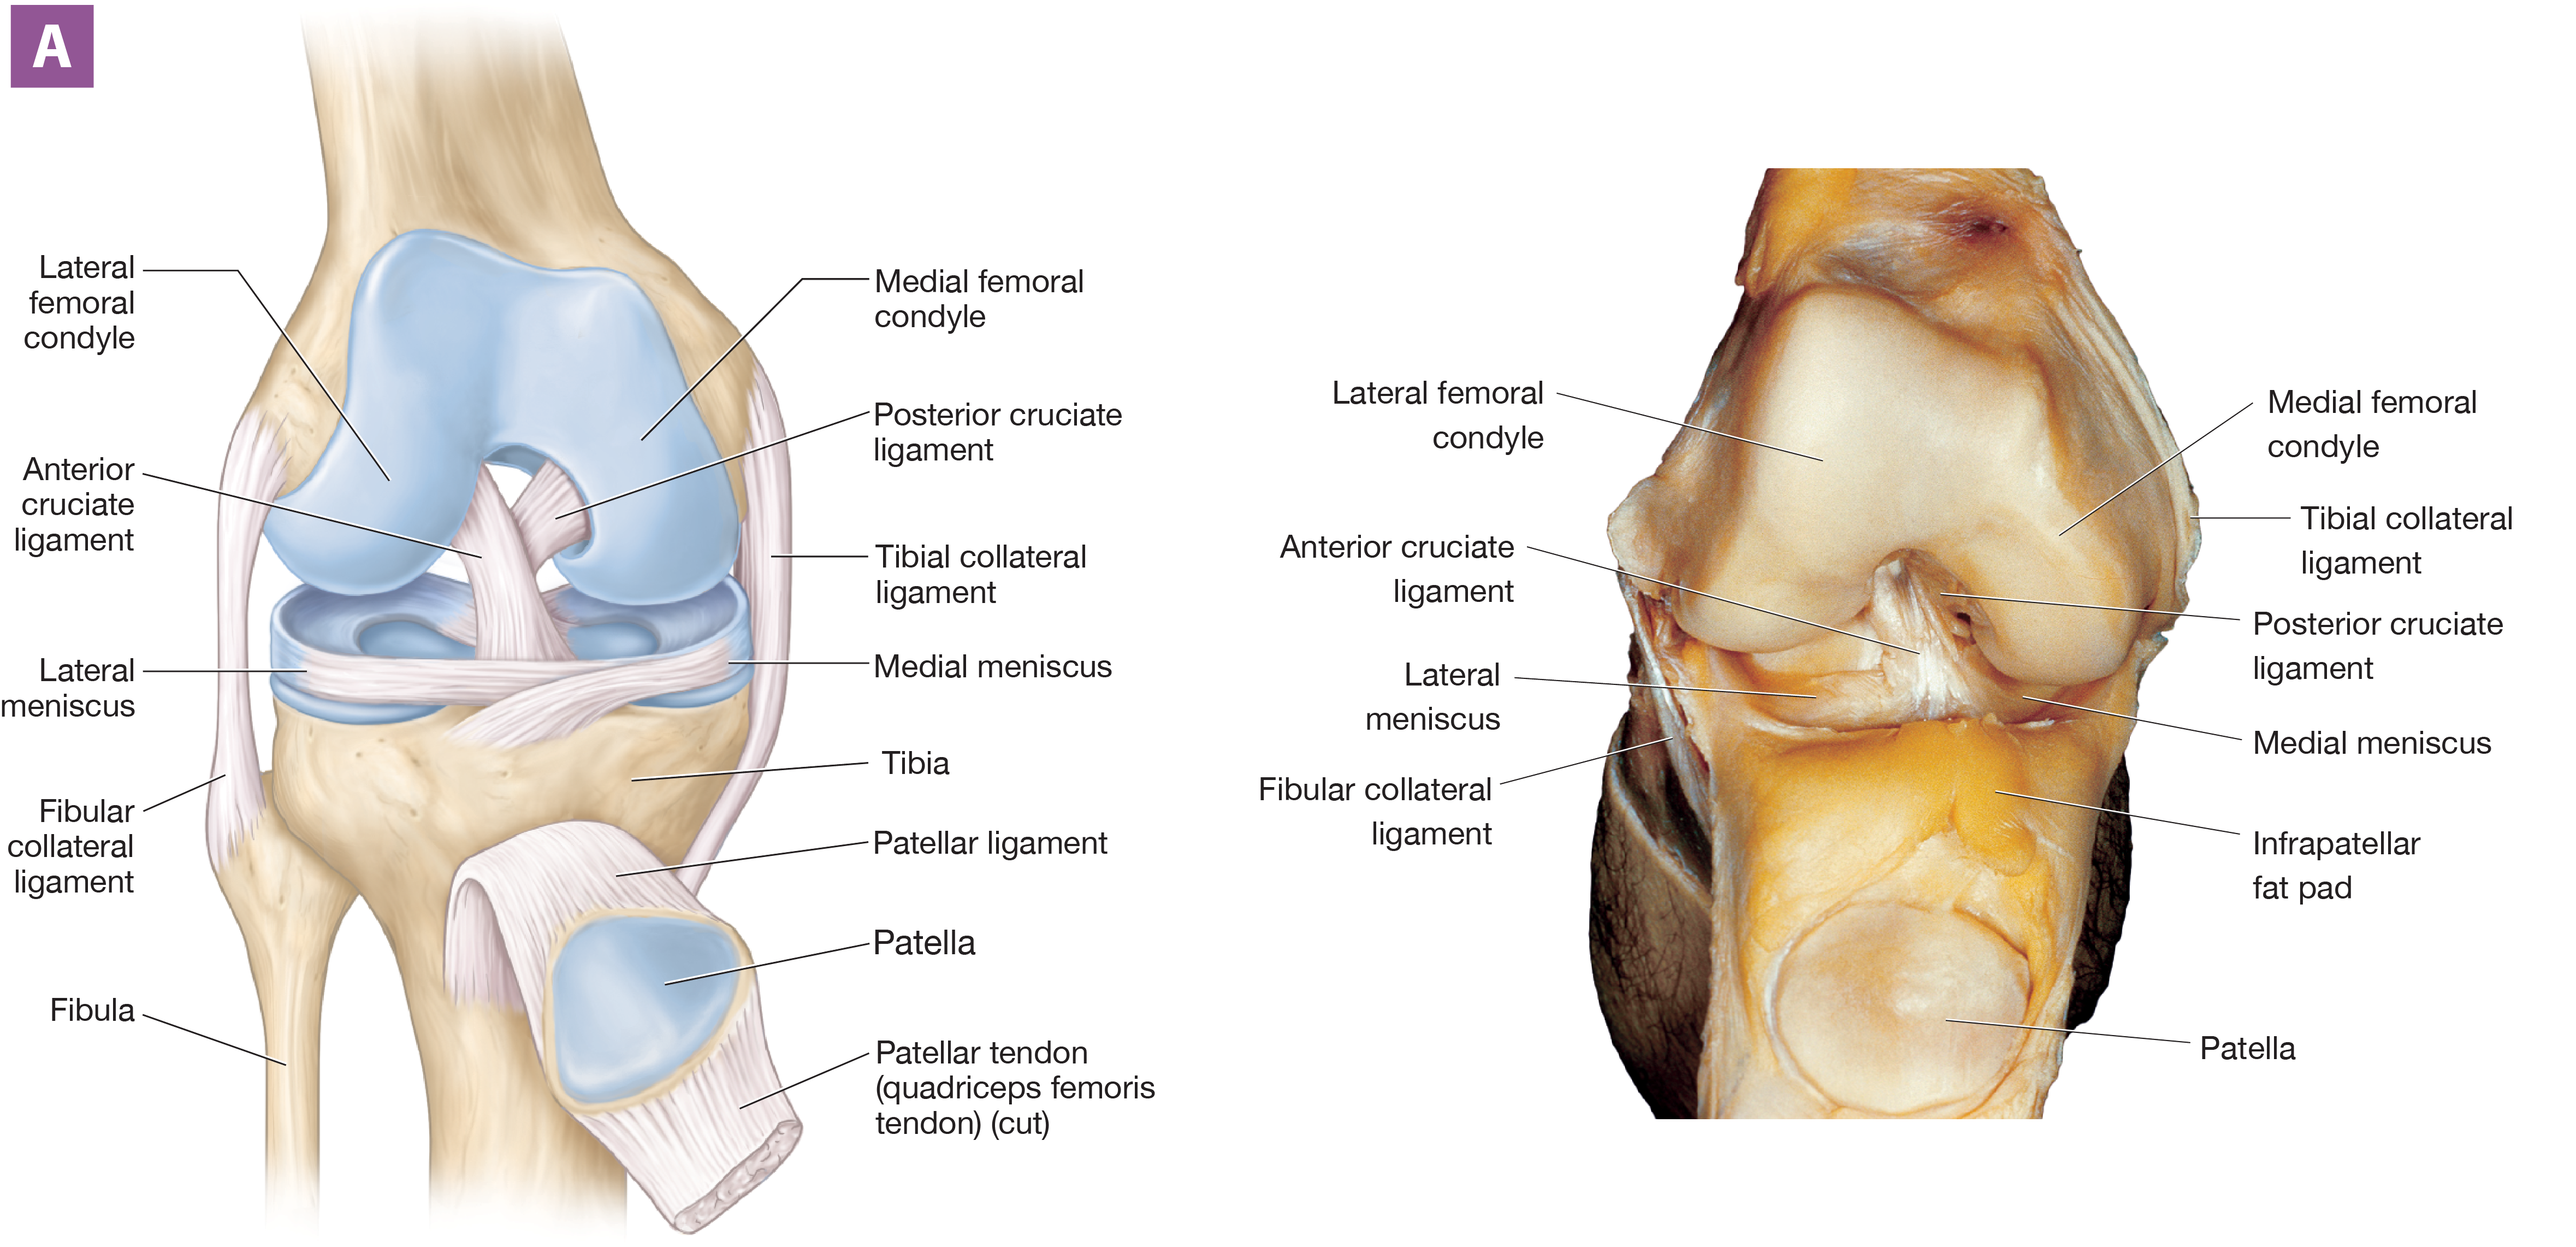
The knee joint, illustrated in Figure 9.6, is the largest diarthrosis in the body. It’s a modified hinge joint; specifically, it is a true hinge joint that allows only flexion and extension when the leg is extended, but the joint also permits some gliding and rotation when the leg is flexed.
The knee joint is made up of two articulations. The first, the tibiofemoral joint (tib’-ee-oh-FEM-uh-ruhl), is the articulation between the femoral condyles and the tibial plateau. The tibial plateau is relatively flat, so there isn't a tight fit between the femur and the tibia, and the joint isn't very stable. However, numerous ligaments help to improve this stability, including the following:
Anterior cruciate ligament (ACL). The anterior cruciate ligament (KROO-shee-ih), or ACL, is an intracapsular ligament that prevents hyperextension of the leg. It also prevents anterior displacement of the tibia on the femur, meaning that it stops the tibia from sliding forward on the femur. The ACL extends from the anterior tibial plateau to the posterior part of the lateral femoral condyle.
Posterior cruciate ligament (PCL). The posterior cruciate ligament, or PCL, is an intracapsular ligament that prevents posterior displacement of the tibia on the femur. This means it stops the tibia from sliding backward on the femur. It extends from the posterior tibial plateau to the anterior part of the medial femoral condyle, crossing under the ACL. Together, the ACL and PCL form an “X,” hence their names (cruci- = “cross”).
Tibial collateral ligament. The tibial collateral ligament, also known as the medial collateral ligament or MCL, is an extracapsular ligament that extends from the medial tibia to the medial femur. It resists stresses that pull the tibia laterally on the femur—those that bow the knee joint inward.
Fibular collateral ligament. Opposite the tibial collateral ligament is the fibular collateral ligament, also known as the lateral collateral ligament or LCL. This extracapsular ligament extends from the lateral fibula to the lateral femur. It resists stresses that pull the tibia medially on the femur—those that bow the knee joint outward.
Long Text Description
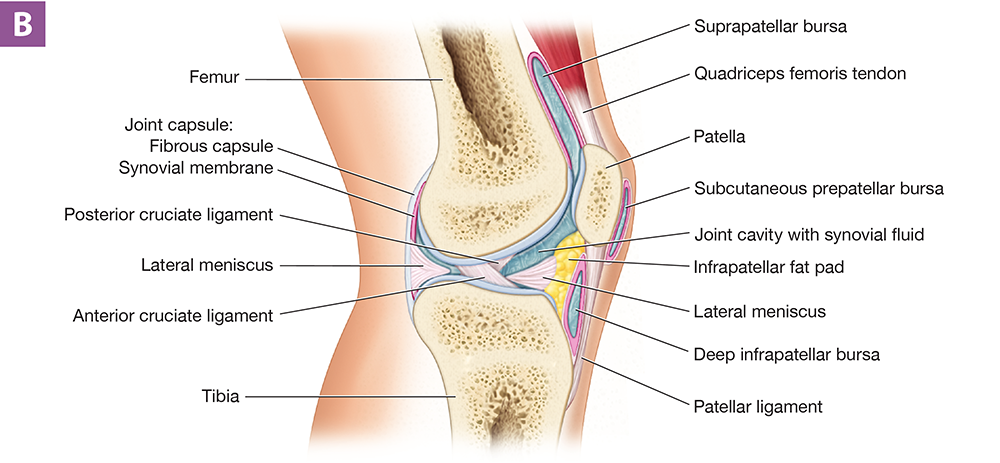
Figure 9.6 Right knee joint: (A) anterior view, illustration and photograph; (B) midsagittal section.
Long Text Description
Two other structures that improve the fit of the tibia and femur are the medial and lateral menisci. These half-moon-shaped articular discs are fibrocartilage pads located on the outer edges of the tibial plateau. The medial meniscus attaches to the tibial collateral ligament, which is why it’s often injured with tibial collateral ligament injuries. The menisci also function as shock absorbers, which is important because the tibias bear most of the body's weight.
In Figure 9.6B, you can see the knee’s second joint: the patellofemoral joint, which is the articulation between the posterior surface of the patella and the anterior surface of the femur. As you learned in Unit 8, the patella is a sesamoid bone located within the patellar tendon of the quadriceps femoris muscle. Distal to the patella, the tendon is known as the patellar ligament, which inserts into the tibial tuberosity. There are a number of bursae around the patellofemoral joint, including the suprapatellar bursa, which is between the patellar tendon and the femur; the subcutaneous prepatellar bursa, which is between the skin and the patella; and the deep infrapatellar bursa, which is between the patellar ligament and the tibia. The patellofemoral joint generates a lot of friction during motion, and these bursae can become inflamed as a result of repetitive activities.
Exercise 10-1 Skeletal Muscle Anatomy: Head, Neck, and Trunk
L.O. 10.1 Identify and describe the muscles of the head, neck, and trunk and describe their actions.
Key Terms
You should be familiar with these terms before coming to the lab.
Frontalis m.External intercostal mm.Occipitalis m.Internal intercostal mm.Orbicularis oculi m.Diaphragm m.Orbicularis oris m.Pectoralis minor m.Buccinator m.Rectus abdominis m.Platysma m.External oblique m.Zygomaticus major and minor mm.Internal oblique m.Risorius m.Transversus abdominis m.Masseter m.Erector spinae m.Temporalis m.Iliocostalis m.Sternocleidomastoid m.Longissimus m.Splenius capitis m.Spinalis m.Splenius cervicis m.Frontalis m.Occipitalis m.Orbicularis oculi m.Orbicularis oris m.Buccinator m.Platysma m.Zygomaticus major and minor mm.Risorius m.Masseter m.Temporalis m.Sternocleidomastoid m.Splenius capitis m.Splenius cervicis m.External intercostal mm.Internal intercostal mm.Diaphragm m.Pectoralis minor m.Rectus abdominis m.External oblique m.Internal oblique m.Transversus abdominis m.Erector spinae m.Iliocostalis m.Longissimus m.Spinalis m.

Pre-Lab: Reading
General Muscle Structure: Origin and Insertion
The human body has nearly 700 skeletal muscles that range dramatically in size and shape from the large trapezius muscle to the tiny corrugator supercilii muscle. But don't worry: This unit covers only about 70 muscles.
A muscle usually has two main attachment points. First is its origin, which generally is the body part that remains stationary. Second is its insertion, which, in most cases, is the part that the muscle moves. We are most familiar with muscles that insert into and move bones. Many muscles, however, insert into structures other than bones. Examples include the diaphragm muscle, which inserts into its own central tendon, and the muscles of facial expression, which insert into skin or other muscles.
In this unit, we divide skeletal muscles into muscle groups that have similar functions rather than strictly by their location. For example, the latissimus dorsi muscle is located on the back, but it moves the arm, so it’s discussed with the muscles that move the arm. This exercise uses the following groupings of skeletal muscles: muscles of facial expression; muscles of mastication; muscles that move the head and neck; and muscles that move the trunk. Note that for these muscles, some are found on the right and left sides of the body, whereas others are single muscles. So, for this exercise we’ll use either the singular or plural to indicate how many are present. However, in Exercise 10-2, all muscles are paired. In those discussions, for simplicity, we'll just discuss the muscles on one side.
Muscles of Facial Expression
The muscles of facial expression allow us to make the various facial movements that make nonverbal communication possible. One of the largest muscles of facial expression is the epicranius muscle (eh-pih-KRAY-nee-uhs), which elevates the eyebrows and skin of the forehead (Figures 10.1 and 10.2). The muscle has two parts, the two frontalis (frun-TAL-iss; fron- = “forehead”) and two occipitalis muscles (ahk’-sip-ih-TAL-iss; occipit- = “back of the head”). The frontalis and occipitalis muscles are connected by a broad, flat sheet of connective tissue that covers the skull called the epicranial aponeurosis (ap'-oh-noo-ROH-sis). The epicranial aponeurosis serves as the origin for the frontalis muscles, which insert into the skin of the eyebrows, and as the insertion for the occipitalis muscles, which originate from the occipital bone.
Just inferior to the frontalis muscles are the two circular orbicularis oculi muscles (ohr-bik’-yoo-LEHR-iss AHK-yoo-lye; orb = “circle”; ocul- = “eye”). Each muscle originates from the frontal and maxillary bones around the orbit and inserts into the skin around the eyelid. With this origin and insertion, and their circular structure, these muscles close and squint the eyes when they contract.
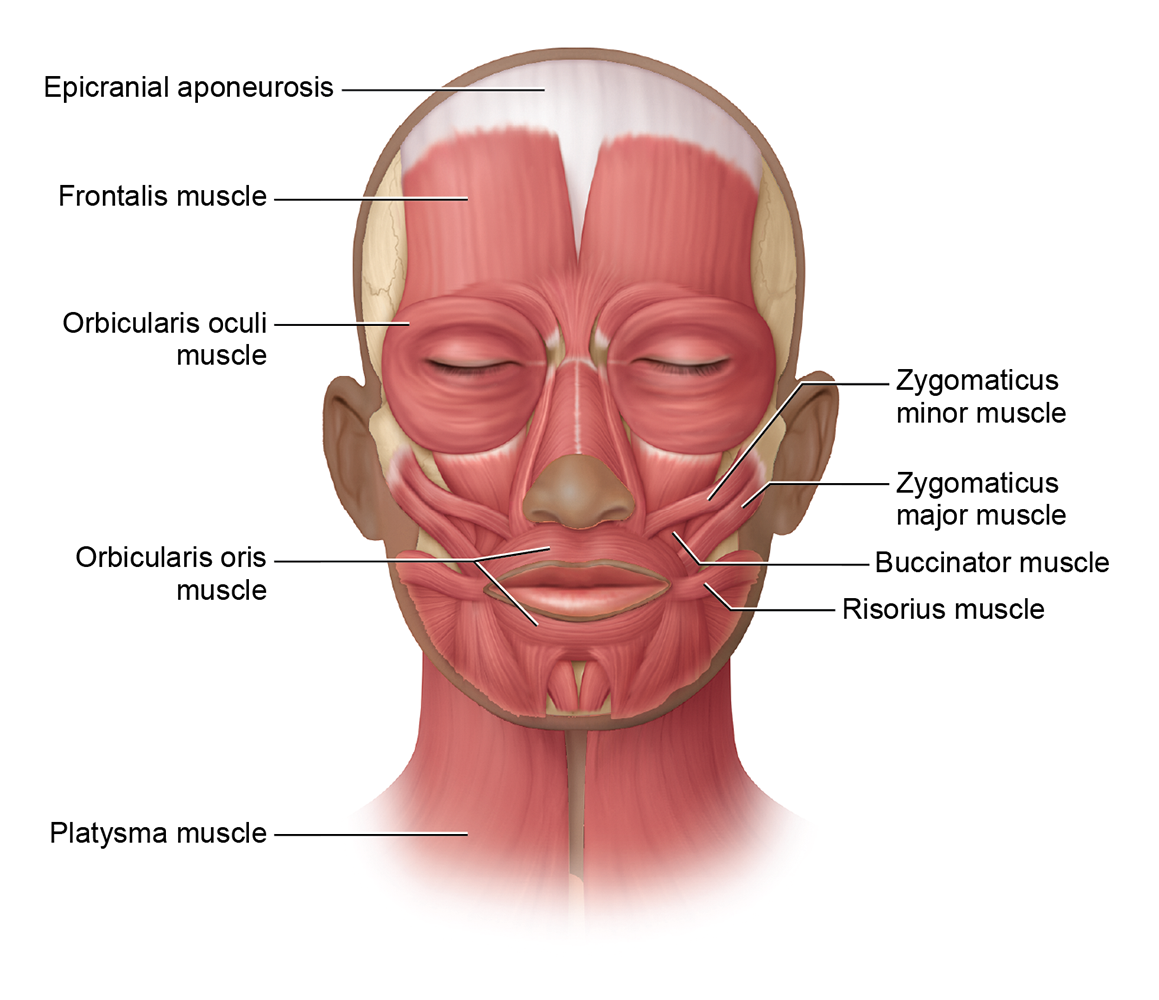
Figure 10.1 Muscles of the face, anterior view.
Long Text Description
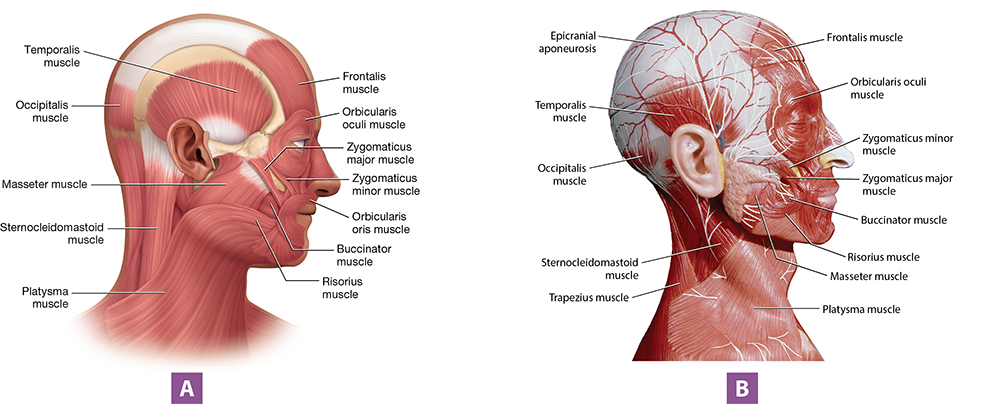
Figure 10.2 Muscles of the head and neck, lateral view: (A) illustration; (B) anatomical model photo.
Long Text Description
Other muscles of facial expression move the lips and skin around the mouth:
The most obvious muscle around the mouth is the circular orbicularis oris muscle (OHR-iss; or- = “mouth”), which originates from the mandible and maxilla and inserts into the skin around the mouth. When it contracts, this muscle purses the lips—the motion that produces “duck lips.”
Under the skin of the cheeks, we find the two buccinator muscles (BUK-sih-nay-tur; bucc- = “cheek”), which originate from the mandible and insert into the skin near the lower lip. When the buccinator muscles contract, they pull the cheeks inward, which allows you to perform motions such as whistling or drinking through a straw.
Covering the superficial surface of the neck are the broad, flat platysma muscles (pluh-TIZ-muh; platysm- = “flat plate”), which originate from two other muscles: the deltoid muscles over the shoulder and the pectoralis major muscles over the chest. Each inserts into the mandible and the skin inferior to the mouth. This enables them to tighten the skin of the neck and pull down the corners of the mouth, as occurs when you're frowning and grimacing. They also can assist other muscles in depressing the mandible.
Three muscles are involved in smiling. First are the two zygomaticus major muscles (zy-goh-MAT-ih-kuhs), which originate from the zygomatic bones and insert into the angles of the mouth. They pull the angles of the mouth laterally and superiorly, which can produce a smile when acting with the next two muscles. However, when they contract with other facial muscles, they can produce expressions of contempt and smugness. Superior to the zygomaticus major muscle are the smaller zygomaticus minor muscles, which originate from the zygomatic bones and insert into the corners of the mouth and the skin of the upper lip. These muscles elevate the upper lip during smiling. Finally are the risorius muscles (ry-ZOHR-ee-uhs; risus = “laugh”), which originate from connective tissue anterior to the ears and insert into the corner of the mouth. When they contract, they pull the corners of the mouth nearly directly laterally to produce a closed-mouth smile or smirk. Smiles produced by only the risorius muscles tend to look like “fake smiles.”

Self-Check: Muscles of Facial Expression
The 3D BioDigital models below show the muscles of facial expression. The first model shows all the facial muscles, and the next two show simplified views of the muscles around the eyes and mouth. Use the arrows in the top left-hand corner to navigate between them, then try to identify the muscles listed below. Click each muscle to find out if you are correct. Remember that you can rotate the models in 3D.
Buccinator mm.
Frontalis mm.
Occipitalis mm.
Orbicularis oculi mm.
Orbicularis oris m.
Platysma m.
Risorius mm.
Zygomaticus major mm.
Zygomaticus minor mm.
Loading...

Muscles of Mastication
As their name implies, the muscles of mastication are involved in mastication, or chewing. The thick masseter muscles (MASS-uh-tur) originate from the zygomatic bones and insert into the lateral sides of the mandible (see Figure 10.2). Their main action is to elevate the mandible. The fan-shaped temporalis muscles (tem-pohr-AL-iss) originate from the lateral surfaces of the skull and insert into the mandible’s coronoid processes. With the masseter muscles, the temporalis muscles elevate the mandible. In addition, the temporalis muscles retract the mandible (pull it posteriorly).
The animation below shows the muscles of mastication in action.
BioDigital: Mastication
Long Text Description
Muscles That Move the Head and Neck
Several muscles move the head, including the diamond-shaped trapezius muscles (trah-PEE-zee-uhs; look ahead to Figure 10.8A). Each trapezius muscle has three sections—the upper, middle, and lower—but only the upper sections act on the head. Originating from the occipital bone and cervical vertebrae and inserting into the lateral clavicles, they extend and hyperextend the head and neck.
In the lateral neck, we find the strap-like sternocleidomastoid muscles (stern’-oh-kly’-doh-MASS-toyd; stern- = “sternum/chest”; cleid- = “clavicle”), which originate from the sternum and clavicles and insert into the mastoid processes. When the two muscles contract together, they flex the head and neck. Acting individually, each muscle rotates the head toward the opposite side and flexes the head and neck laterally.
On the posterior neck, the splenius capitis muscles (SPLEN-ee-uhs CAP-ih-tiss; capit- = “head”) originate from the cervical vertebrae and insert into the occipital bone and mastoid processes (Figure 10.3). Contracting together, the two muscles extend the head; contracting individually, each muscle rotates the head to the same side. Inferior to the splenius capitis muscles are the splenius cervicis muscles (SUR-vuh-sis; cerv- = “neck”), which originate from the upper thoracic vertebrae (T3–T6) and insert into the cervical vertebrae (C1–C4). When they contract together, they extend the neck. When one contracts individually, it assists in rotating and laterally flexing the neck to the same side.
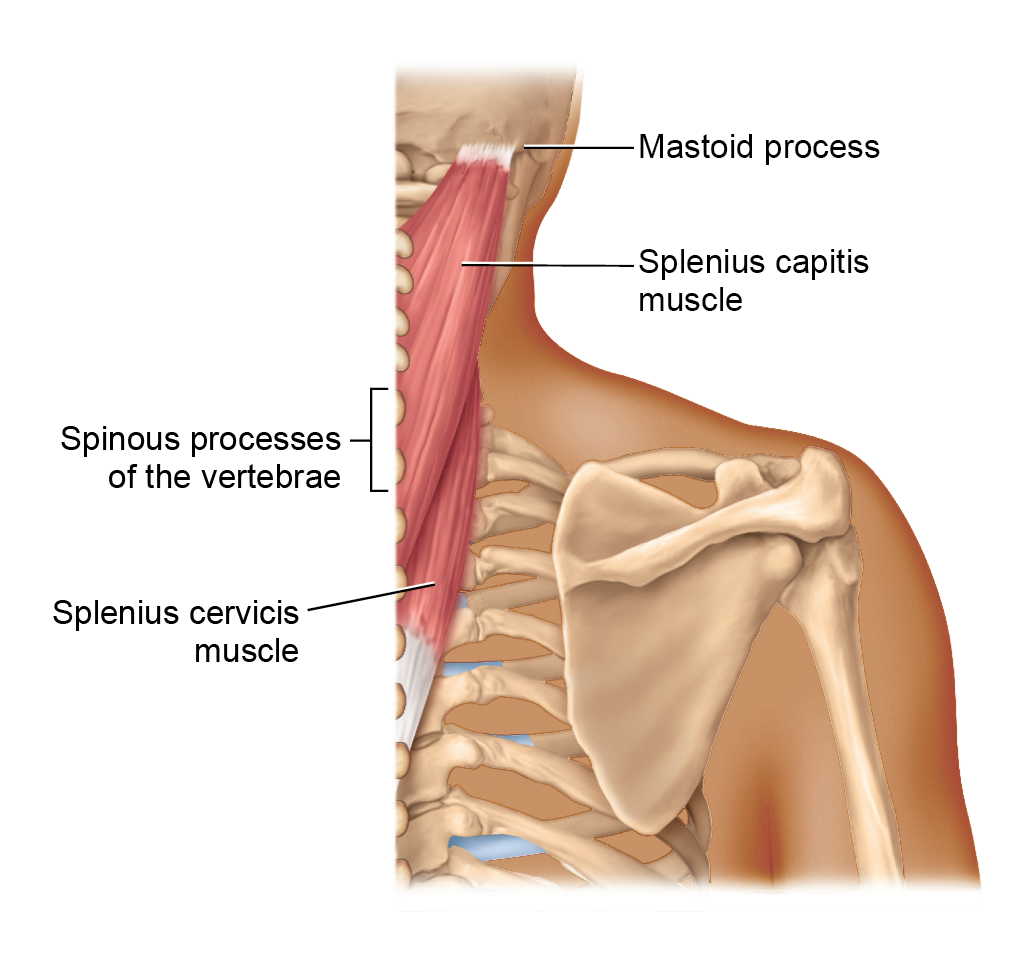
Figure 10.3 Splenius muscles of the head and neck, posterior view.
Long Text Description
The animation below shows the muscles we just discussed rotating the head. You can rotate the model to get better views of the sternocleidomastoid and splenius capitis muscles.
BioDigital: Head Rotation
Long Text Description
Muscles That Move the Trunk
The muscles that move the trunk include the muscles of the thorax, the muscles of the abdominal wall, and the postural muscles of the back. The next subsections look at each group.
Muscles of the Thorax
The muscles of the thorax generally are involved in the muscle movements associated with inspiration—breathing in—and expiration—breathing out. Note that normal, quiet expiration doesn't require muscle contractions, so muscles are only involved when expiration is forced, as occurs when you cough or blow out a candle.
First are the intercostal muscles, which are located between the ribs. The external intercostal muscles each originate from the rib above, and insert into the rib below (Figure 10.4A). The origins and insertions of the internal intercostal muscles are opposite to those of the externals: the internal intercostal muscles originate from the rib below and insert into the rib above (Figure 10.4B). The actions of these muscles depend on where they’re located on the rib cage. The external intercostal muscles on the superior and posterior ribs, along with the internal intercostal muscles next to the sternum, elevate the rib cage, leading to inspiration. However, the external intercostal muscles on the anterior and inferior ribs work with the internal intercostal muscles on the inferior ribs to depress the rib cage, leading to forced expiration.
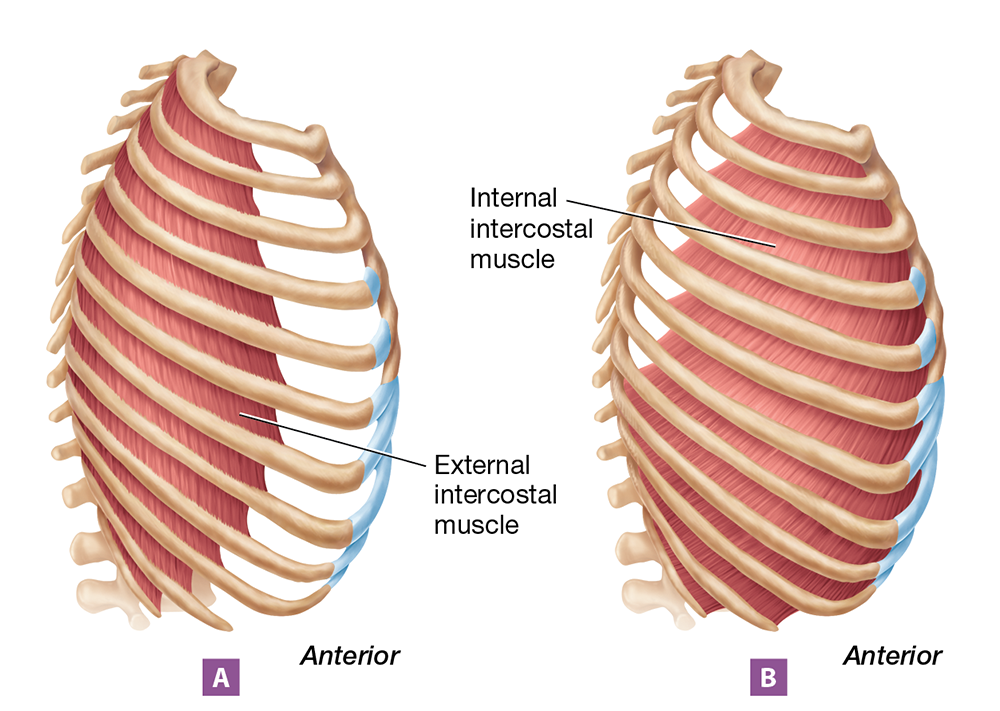
Figure 10.4 Intercostal muscles, lateral view: (A) external intercostal muscles; (B) internal intercostal muscles.
Long Text Description
Next is the dome-shaped diaphragm muscle (DY-uh-fram), which is the main muscle of inspiration (Figure 10.5). The diaphragm muscle has a broad origin, attaching to the lumbar vertebrae, the lower ribs, and the xiphoid process of the sternum. Its insertion is unusual in that it inserts into itself via a tendon located in the center of the muscle. So, when the muscle contracts, it pulls on itself and changes shape, going from dome-shaped when relaxed to flat when contracted. As the diaphragm muscle flattens during contraction, it pulls on the thoracic cavity. This increases the height of the thoracic cavity, which ultimately leads to inspiration.
Finally, we have the small pectoralis minor muscles (PEK-tohr-AL-iss; pect- = “chest”), located on the anterior chest wall deep to the larger pectoralis major muscles. Each pectoralis minor muscle originates from the third through fifth ribs and inserts into the coracoid process of the scapula. This means that their main action is on the scapulae, discussed shortly. However, when inspiration is forced, as occurs during a deep yawn, these muscles’ origins and insertions can switch, causing them to pull the rib cage outward and assist in inspiration.
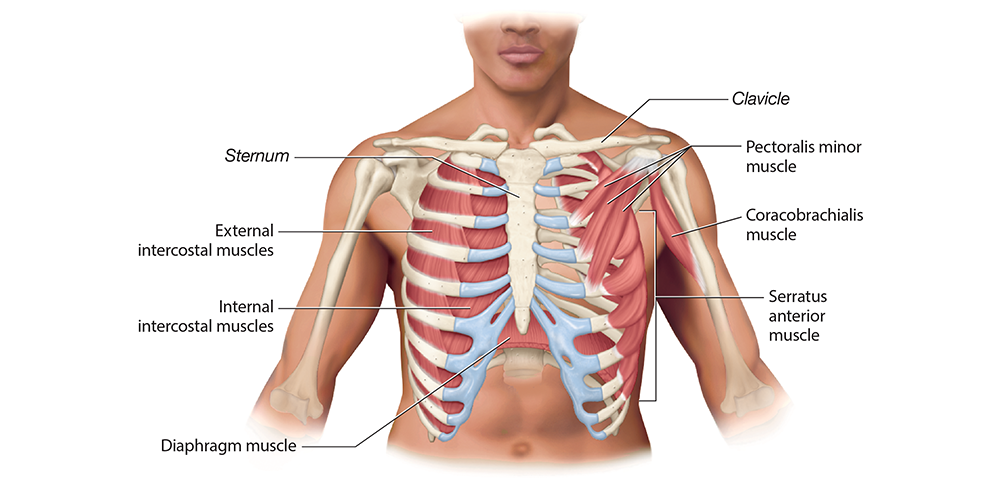
Figure 10.5 Deep muscles of the anterior thorax.
Long Text Description
Muscles of the Abdominal Wall
The central and superficial muscle of the abdominal wall is the rectus abdominis muscle (ab-DAHM-in-iss; rect- = “straight”). As you can see in Figure 10.6, the muscle is covered by a thick layer of connective tissue called the rectus sheath. Along the midline of the rectus sheath is a thickened band of connective tissue called the linea alba (LIN-ee-uh AL-buh; “white line”), which serves as a sort of central tendon for the abdominal muscles. Originating from the pubic bones and inserting into the costal cartilages of the inferior ribs, the rectus abdominis muscle flexes the trunk. In addition, it compresses the abdominal contents, an action that increases the pressure in the abdominal cavity, which is needed to facilitate urination and defecation. This action also pushes upward on the diaphragm, which assists in forced expiration.
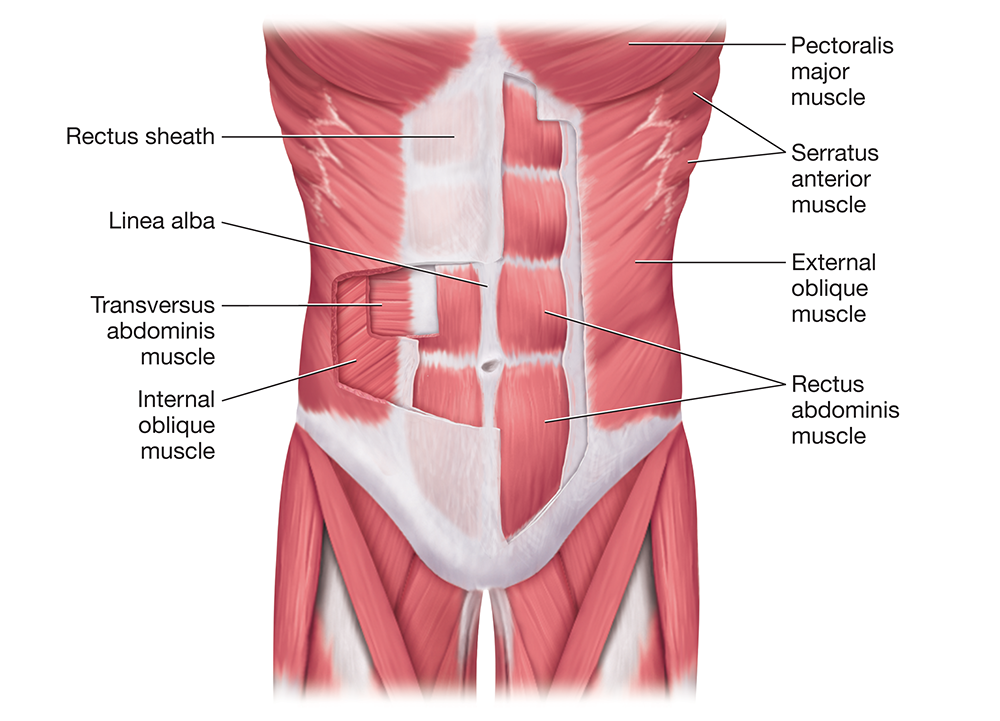
Figure 10.6 Muscles of the anterior trunk.
Long Text Description
On the lateral torso, we find the external oblique muscles, which originate from the inferior eight ribs and insert into the iliac crests, the pubic bones, and the linea alba (Figure 10.7A). Deep to the external oblique muscles are the internal oblique muscles, which originate from the iliac crest and inguinal ligament and insert into the inferior three ribs, the linea alba, and the pubic bones (Figure 10.7B). Together, these muscles laterally flex the trunk (bending to the same side as the contraction), flex the trunk, rotate the trunk, and compress the abdominal contents.
The deepest abdominal muscle is the transversus abdominis muscle (trans- = “across”; Figure 10.7C). This muscle has a broad origin from the inferior ribs, iliac crest, and inguinal ligament, and it inserts into the pubic bone and the linea alba. Running horizontally around the abdomen like a belt, it compresses the abdominal contents.
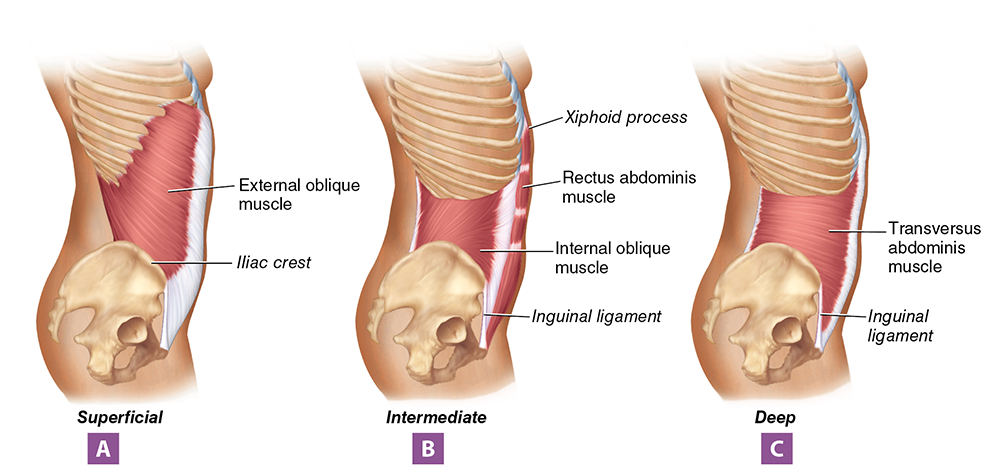
Figure 10.7 Individual abdominal muscles, lateral view: (A) superficial layer; (B) intermediate layer; (C) deep layer.
Long Text Description
Postural Muscles of the Back
As you can probably guess by the name, the erector spinae muscles (eh-REK-tuhr SPY-nee) ensure that the spine remains erect, which allows us to maintain an upright posture. Each erector spinae muscle is composed of three muscles—each of which has a further three components—including the lateral iliocostalis (ill’-ee-oh’-kahst-AL-iss), the middle longissimus (lahn-JISS-ih-muhs), and the medial spinalis muscles (spy-NAL-iss; Figures 10.8A and B). The origin of each erector spinae muscle is vast, spanning from the ilium and sacrum to the spinous processes of cervical vertebrae. The insertion is similarly vast, spanning from the posterior ribs to the occipital bone and mastoid processes. In addition to maintaining an erect posture, the erector spinae muscles extend the head, neck, and trunk, and the longissimus and iliocostalis muscles also laterally flex the trunk when contracting on only one side.
Another postural muscle group is the transversospinal group, which runs along each side of the vertebral column. This group includes the multifidus and semispinalis muscles, which largely originate and insert into different parts of the vertebrae (see Figure 10.8B). Assisting the erector spinae and transversospinal muscle groups are the deep quadratus lumborum muscles, each of which originates from the iliac crest and inserts into the lumbar vertebrae and the twelfth rib. Like the erector spinae muscles, the transversospinal and the quadratus lumborum muscles maintain erect posture and extend the back. In addition, the quadratus lumborum muscles laterally flex the trunk when contracting individually.
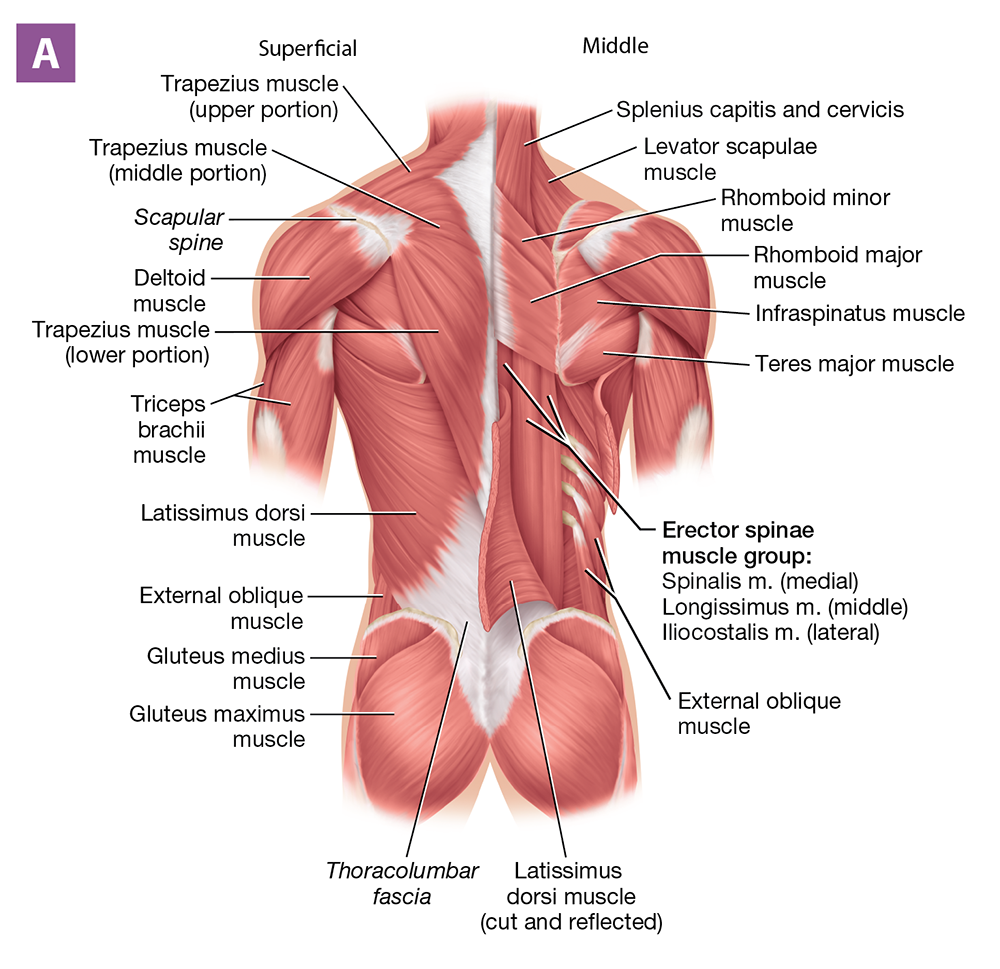
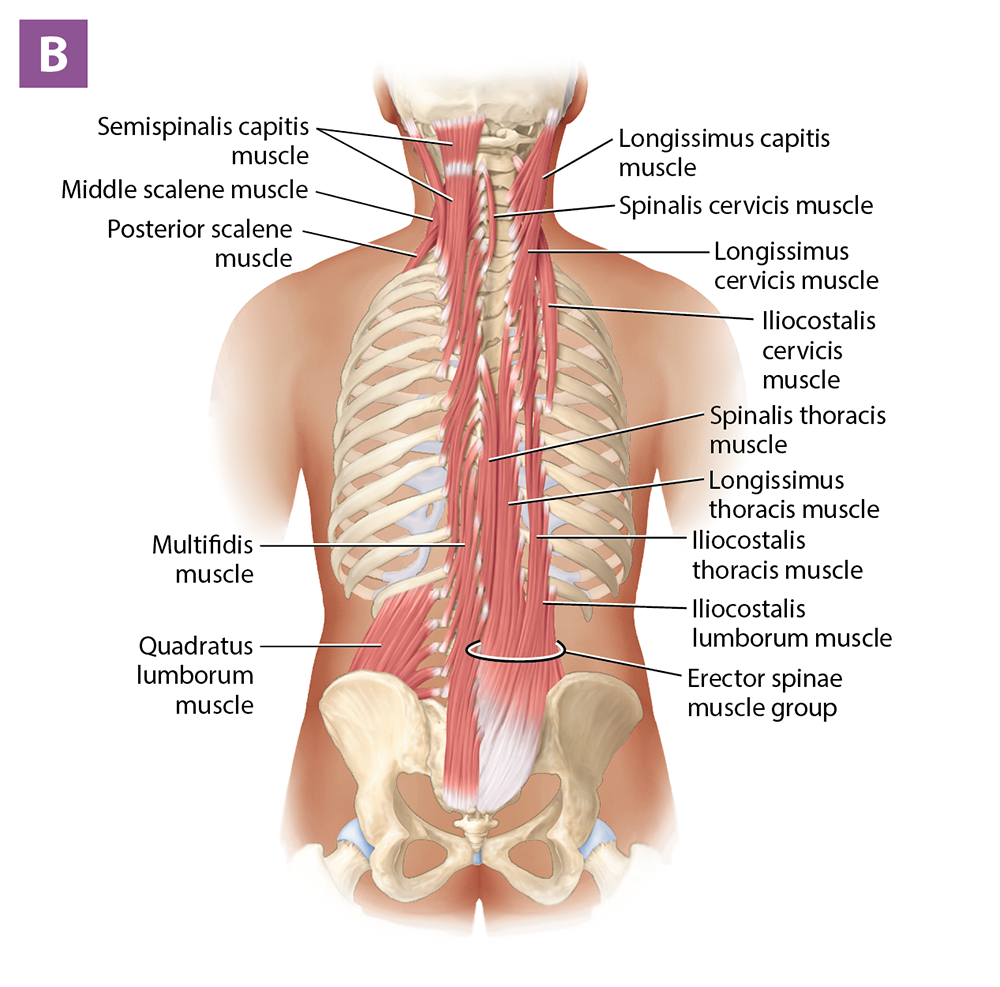
Figure 10.8 Muscles of the posterior trunk: (A) superficial and middle dissection; (B) deep dissection.
Long Text Description
Exercise 10-2 Skeletal Muscle Anatomy: Pectoral Girdle and Upper Limbs
L.O. 10.2 Identify muscles of the pectoral girdle, upper limb, pelvic girdle, and lower limb.
Key Terms
You should be familiar with these terms before coming to the lab.
Pectoral Girdle and Upper Limb MusclesSerratus anterior m.Biceps brachii m.Trapezius m.Brachialis m.Levator scapulae m.Brachioradialis m.Rhomboid major and minor mm.Triceps brachii m.Latissimus dorsi m.Flexor carpi radialis m.Teres major m.Flexor carpi ulnaris m.Pectoralis major m.Flexor digitorum superficialis m.Deltoid m.Flexor digitorum profundus m.Rotator cuff musclesExtensor carpi ulnaris m.−Infraspinatus m.Extensor carpi radialis longus m.−Teres minor m.Extensor digitorum m.−Supraspinatus m.−Subscapularis m.Pectoral Girdle and Upper Limb MusclesSerratus anterior m.Trapezius m.Levatorscapulaem.Rhomboidmajorandminormm.Latissimusdorsim.Teresmajorm.Pectoralismajorm.Deltoidm.Rotatorcuffmuscles−Infraspinatusm.−Teresminorm.−Supraspinatusm.−Subscapularism.Bicepsbrachiim.Brachialism.Brachioradialism.Tricepsbrachiim.Flexorcarpiradialism.Flexorcarpiulnarism.Flexordigitorumsuperficialism.Flexordigitorumprofundusm.Extensorcarpiulnarism.Extensorcarpiradialislongusm.Extensordigitorumm.

Pre-Lab: Reading
As with Exercise 10-1, we divide skeletal muscles into muscle groups that have similar functions in this exercise. Here, we use the following groupings of skeletal muscles: muscles that move the scapula; muscles that move the arm; and muscles that move the forearm, hand, and fingers.
Muscles That Move the Scapula
The serratus anterior muscle (ser-AY-tuhs; serra- = “saw”), named for its resemblance to a saw or knife, is located on the lateral thorax (Figure 10.11). Originating from the first nine ribs and inserting into the medial border of the scapula, it pulls the scapula anteriorly, protracting it, as in when throwing a punch, and rotating it superiorly, as in when doing a bench press. The serratus anterior muscle is assisted in protracting the scapula by the pectoralis minor muscle, which we discussed earlier. The pectoralis minor muscle also depresses the scapula.
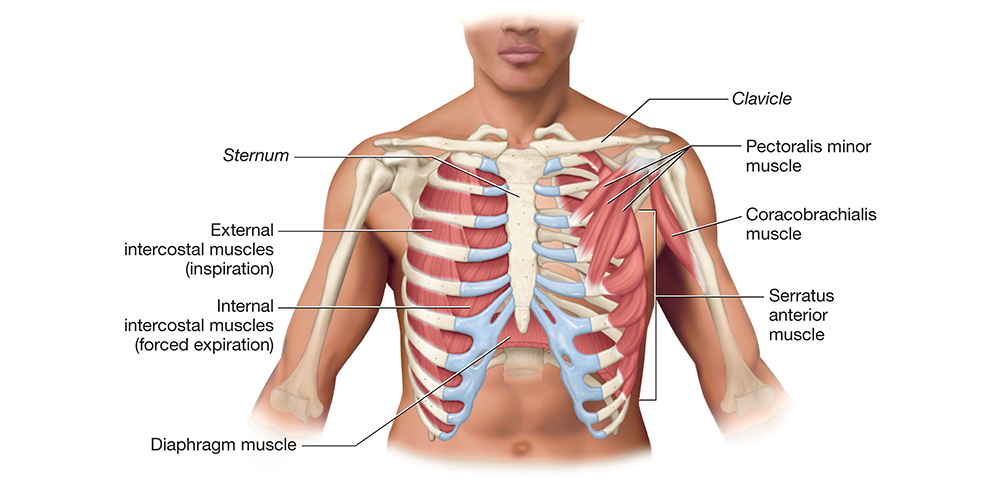
Figure 10.11 Deep muscles of the anterior trunk.
We find the next scapular muscle on the posterior neck and back: the trapezius muscle, which has three portions, each with different origins, insertions, and actions (Figure 10.12A). The upper trapezius muscle originates from the occipital bone and cervical vertebrae and inserts into the lateral clavicle, which enables it to elevate the scapula and rotate it superiorly. The middle trapezius muscle originates from the first three thoracic vertebrae and inserts into the scapular acromion. When it contracts, it pulls the scapula posteriorly, retracting it. Interestingly, when the middle trapezius muscle is weak and the upper trapezius muscle is overactive, the scapula protracts, leading to a hunched-over posture and neck and arm pain. Finally, the lower trapezius muscle originates from the remaining thoracic vertebrae and inserts into the scapular spine, which enables it to depress the scapula and assist with superior rotation.
Deep to the trapezius muscle is the levator scapulae muscle, which originates from the upper cervical vertebrae and inserts into the superior angle of the scapula (Figure 10.12B). True to the name, this muscle elevates the scapula. Also deep to the trapezius muscle are the rhomboid major and rhomboid minor muscles, which originate from C7–T5 and insert into the medial border of the scapula. These muscles work with the middle trapezius muscle to retract the scapula.
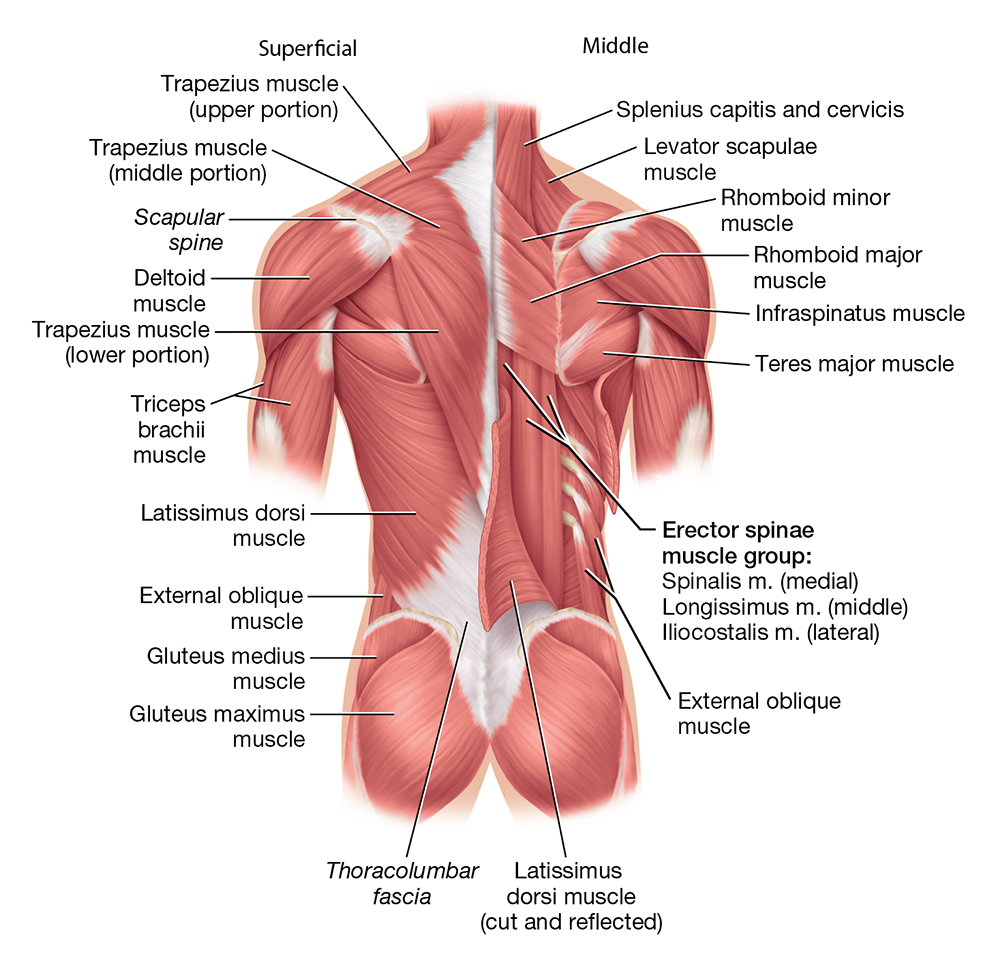
Figure 10.12 Muscles of the posterior trunk, superficial and middle dissection.
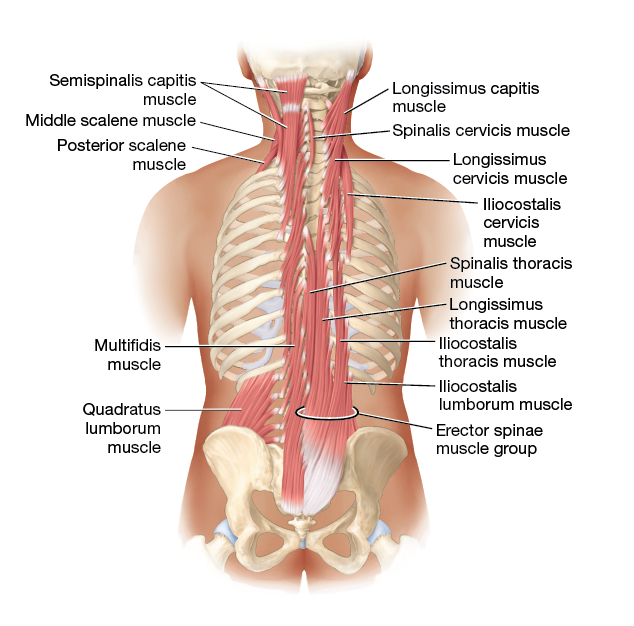
Figure 10.12 Muscles of the posterior trunk, deep dissection.
Muscles That Move the Arm
As you learned in the articulations unit, the shoulder joint has the greatest range of motion of any joint in the body. For this reason, there are many muscles acting on it, both to move the arm and to stabilize the joint. Some of these muscles include:
The pectoralis major muscle is the superficial muscle of the superior thorax (Figure 10.13A). It has a broad origin from the medial clavicle, sternum, and the cartilages of ribs 1–7, and it inserts into the proximal humerus. The pectoralis major muscle is the prime mover of arm flexion, and it also adducts the arm. It is assisted by the small coracobrachialis muscle on the proximal humerus.
The deltoid muscle (delt- = “triangular”) is the muscle you can feel over your shoulder, where you have likely received injections. It originates from the acromion, scapular spine, and lateral clavicle and inserts into the proximal humerus. This origin and insertion make the deltoid muscle the prime mover of arm abduction; it also assists in arm flexion, extension and adduction.
The posterior latissimus dorsi muscle (luh-TISS-ih-muhs DOHR-sye; latissimus = “broadest;” dors- = “back”) is a broad, superficial muscle on the back (Figure 10.13B). It has a wide origin from the iliac crest, all lumbar vertebrae, and the lower thoracic vertebrae, and it inserts into the proximal humerus. This path makes the latissimus dorsi muscle the prime mover of arm extension; also, it adducts and medially rotates the arm. The latissimus dorsi muscle is assisted in its actions by the teres major muscle on the posterior scapula.
The rotator cuff muscles collectively reinforce the shoulder joint’s capsule to prevent the humerus from dislocating from the scapula. The rotator cuff muscles include the infraspinatus muscle (in’-frah-spy-NAY-tuhs), which is inferior to the scapular spine; the teres minor muscle (TEHR-eez), which is superior to the teres major muscle; the supraspinatus muscle (soo’-prah-spy-NAY-tuhs), which is superior to the scapular spine; and the subscapularis muscle, which is on the anterior surface of the scapula (sub’-skap-yoo-LEHR-uhs; look ahead to Figure 10.16).
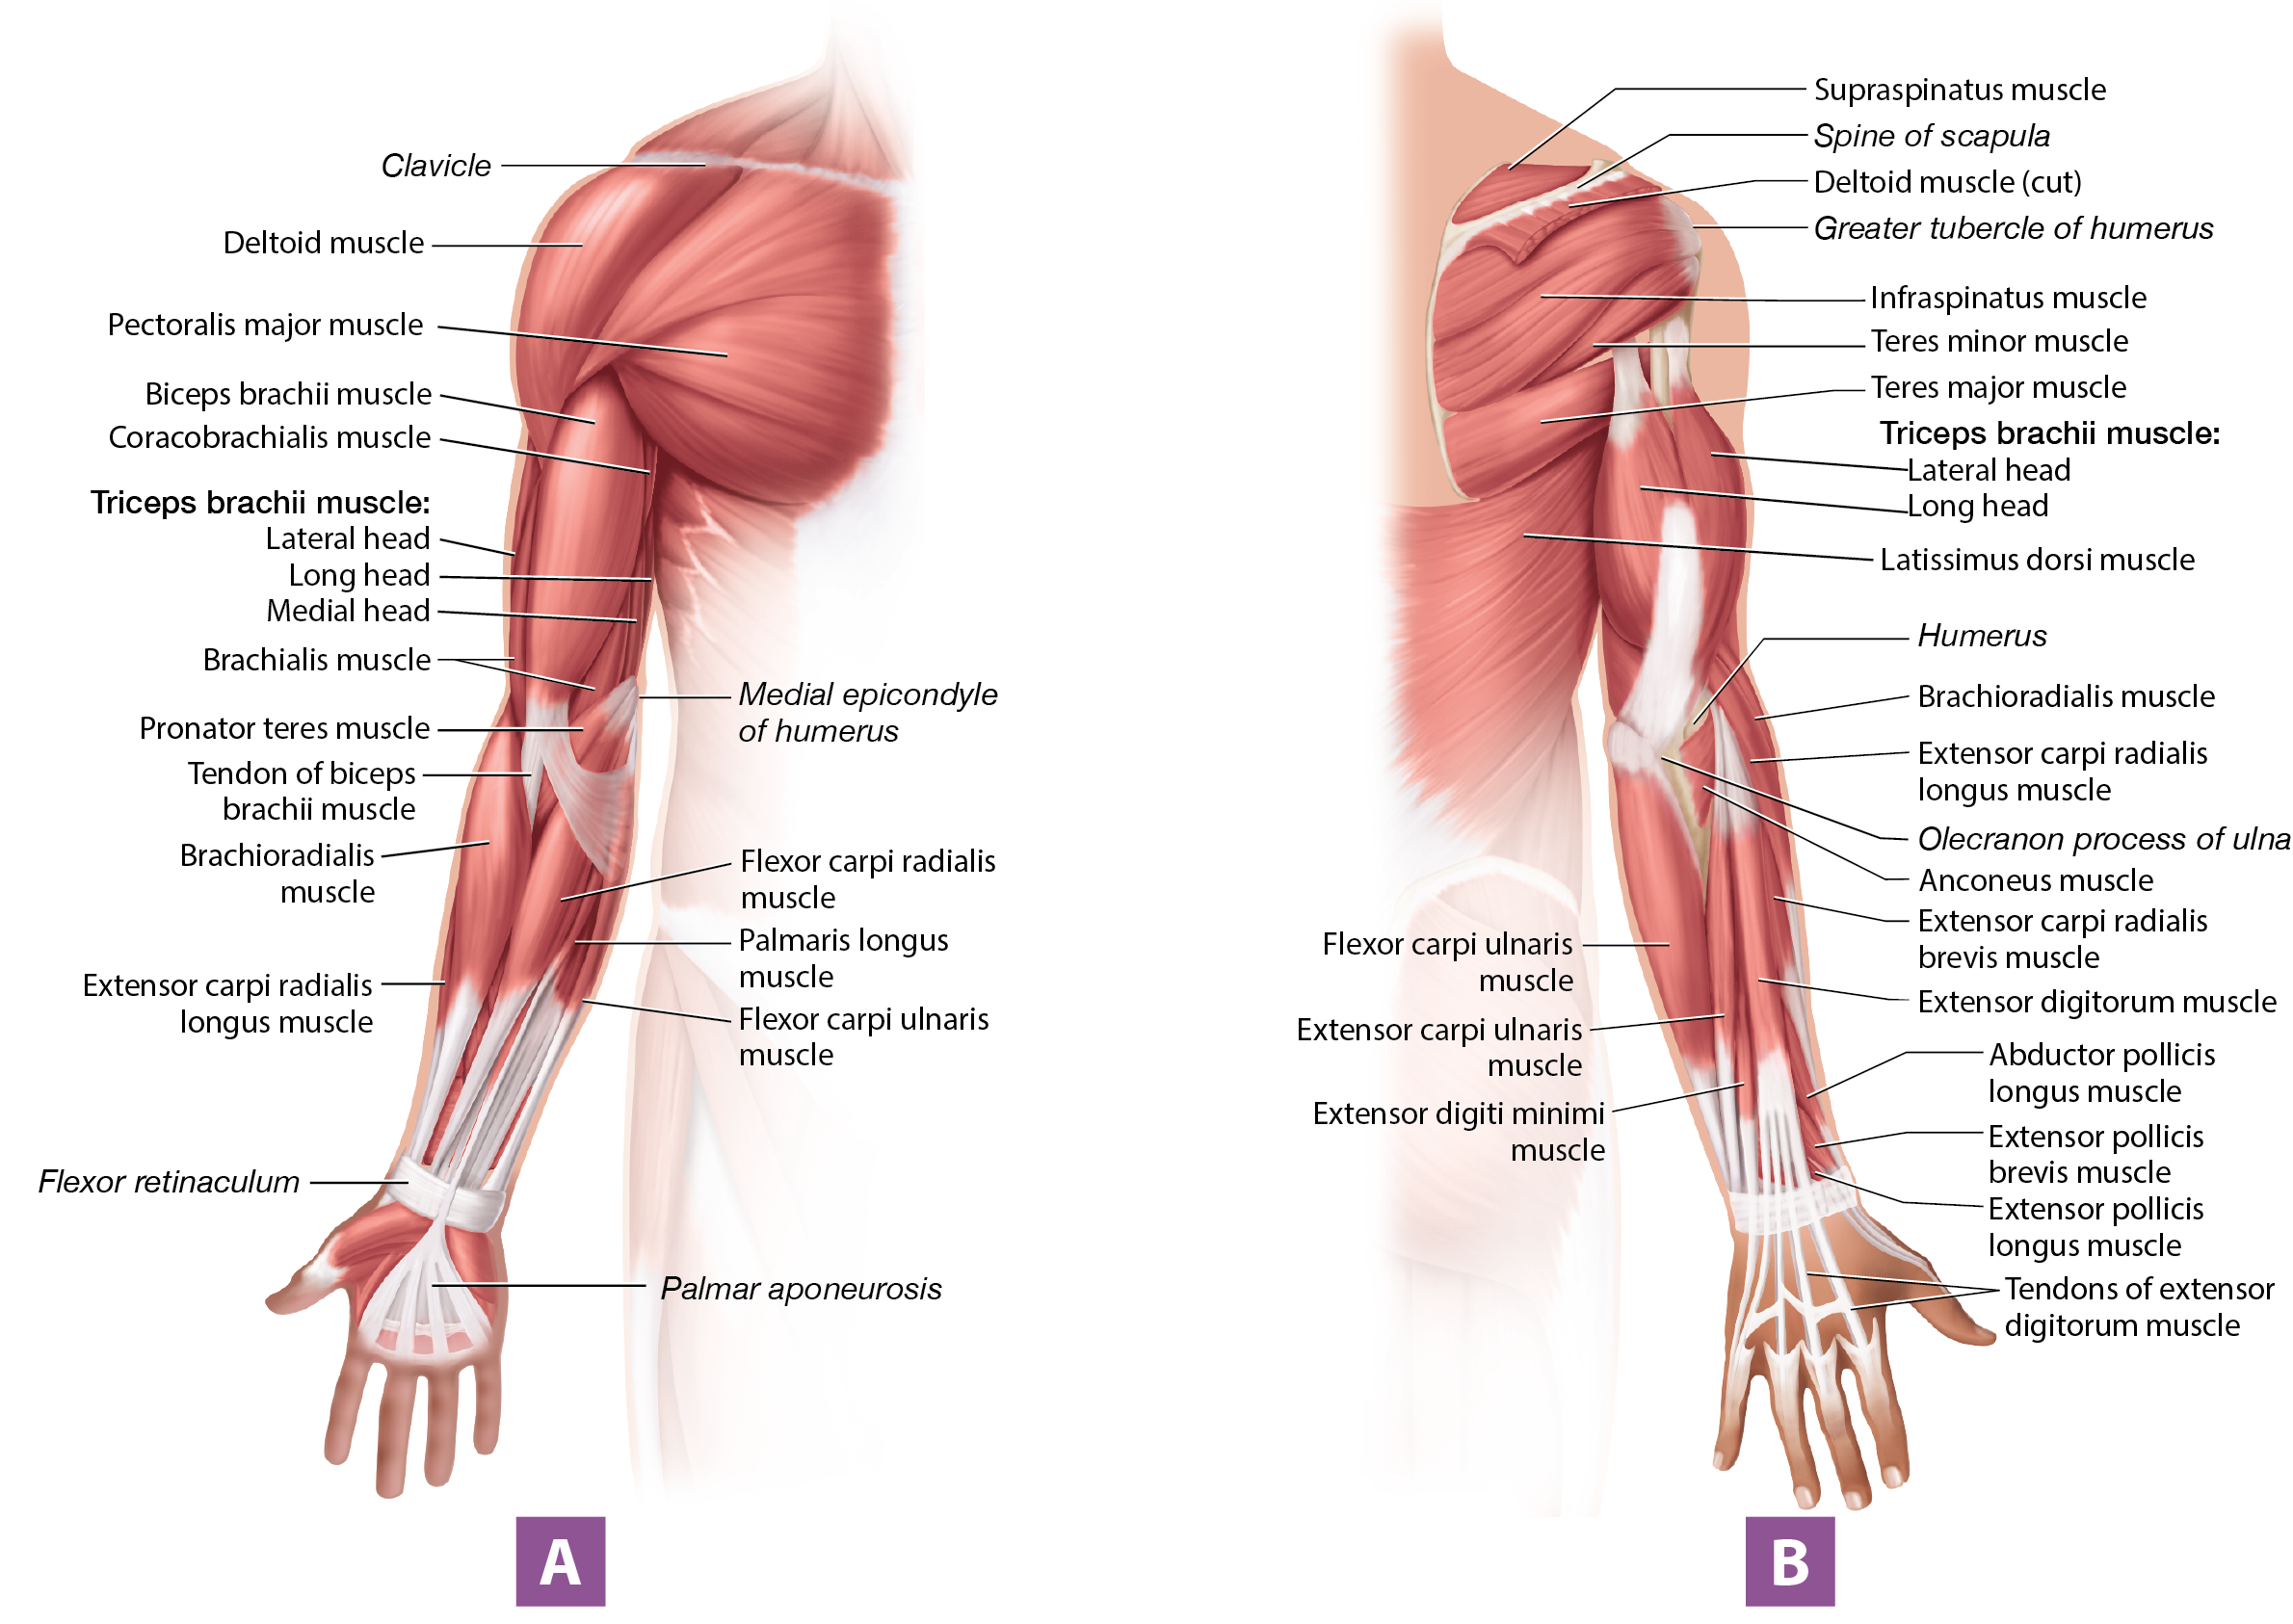
Figure 10.13 Muscles of the right upper limb (A) anterior view; (B) posterior view.
Long Text Description

Self-Check: Muscles That Move the Arm and Scapula
The animations below show several muscles in action through different arm and scapula movements. Use the arrows in the top-left corner to switch between the two animations. You can rotate the model to see the posterior muscles. Try to identify each muscle below, then click on the model to reveal its name and find out if you were correct.
Serratus anterior m.
Trapezius m.
Levator scapulae m.
Rhomboid major m.
Rhomboid minor m.
Deltoid m.
Pectoralis major m.
Latissimus dorsi m.
Teres major m.
Supraspinatus m.
Infraspinatus m.
Teres minor m.
Subscapularis m.
Loading...

Muscles That Move the Forearm, Hand, and Fingers
Four main muscles move the forearm. Starting on the anterior side, we find the biceps brachii muscle (BY-seps BRAY-kee-aye; biceps = “two-headed;” brach- = “arm”), which has two “heads,” or places of origin on the scapula. It inserts into the proximal radius, enabling it to flex the forearm. It also supinates the forearm, rotating it so the palm faces anteriorly. Deep to the biceps brachii muscle is the brachialis muscle (bray-kee-AL-iss). This muscle originates from the diaphysis of the humerus and inserts into the proximal ulna, which makes the brachialis muscle the prime mover of forearm flexion. The final anterior muscle is the lateral brachioradialis muscle (bray’-kee-oh-ray-dee-AL-iss). The brachioradialis muscle originates from the distal humerus and inserts into the distal radius, enabling it to assist in forearm flexion.
Located posteriorly is the three-headed triceps brachii muscle (TRY-seps; triceps = “three-headed"). It originates from both the scapula (the long head) and the posterior humerus (medial and lateral heads), and inserts via a common tendon into the ulna’s olecranon process. This makes the triceps brachii muscle the prime mover of forearm extension.
The remainder of the muscles of the upper limb act on the hand at the wrist, the hand itself (the intrinsic hand muscles), and/or the digits. Muscles that flex the hand, located on the anterior forearm, are the flexor carpi radialis (KARP-aye ray-dee-AL-iss), flexor carpi ulnaris (uhl-NEHR-iss), flexor digitorum superficialis, and flexor digitorum profundus muscles (profund- = “deep;” Figure 10.14). As implied by their names, the flexor digitorum superficialis and flexor digitorum profundus muscles also flex the digits.
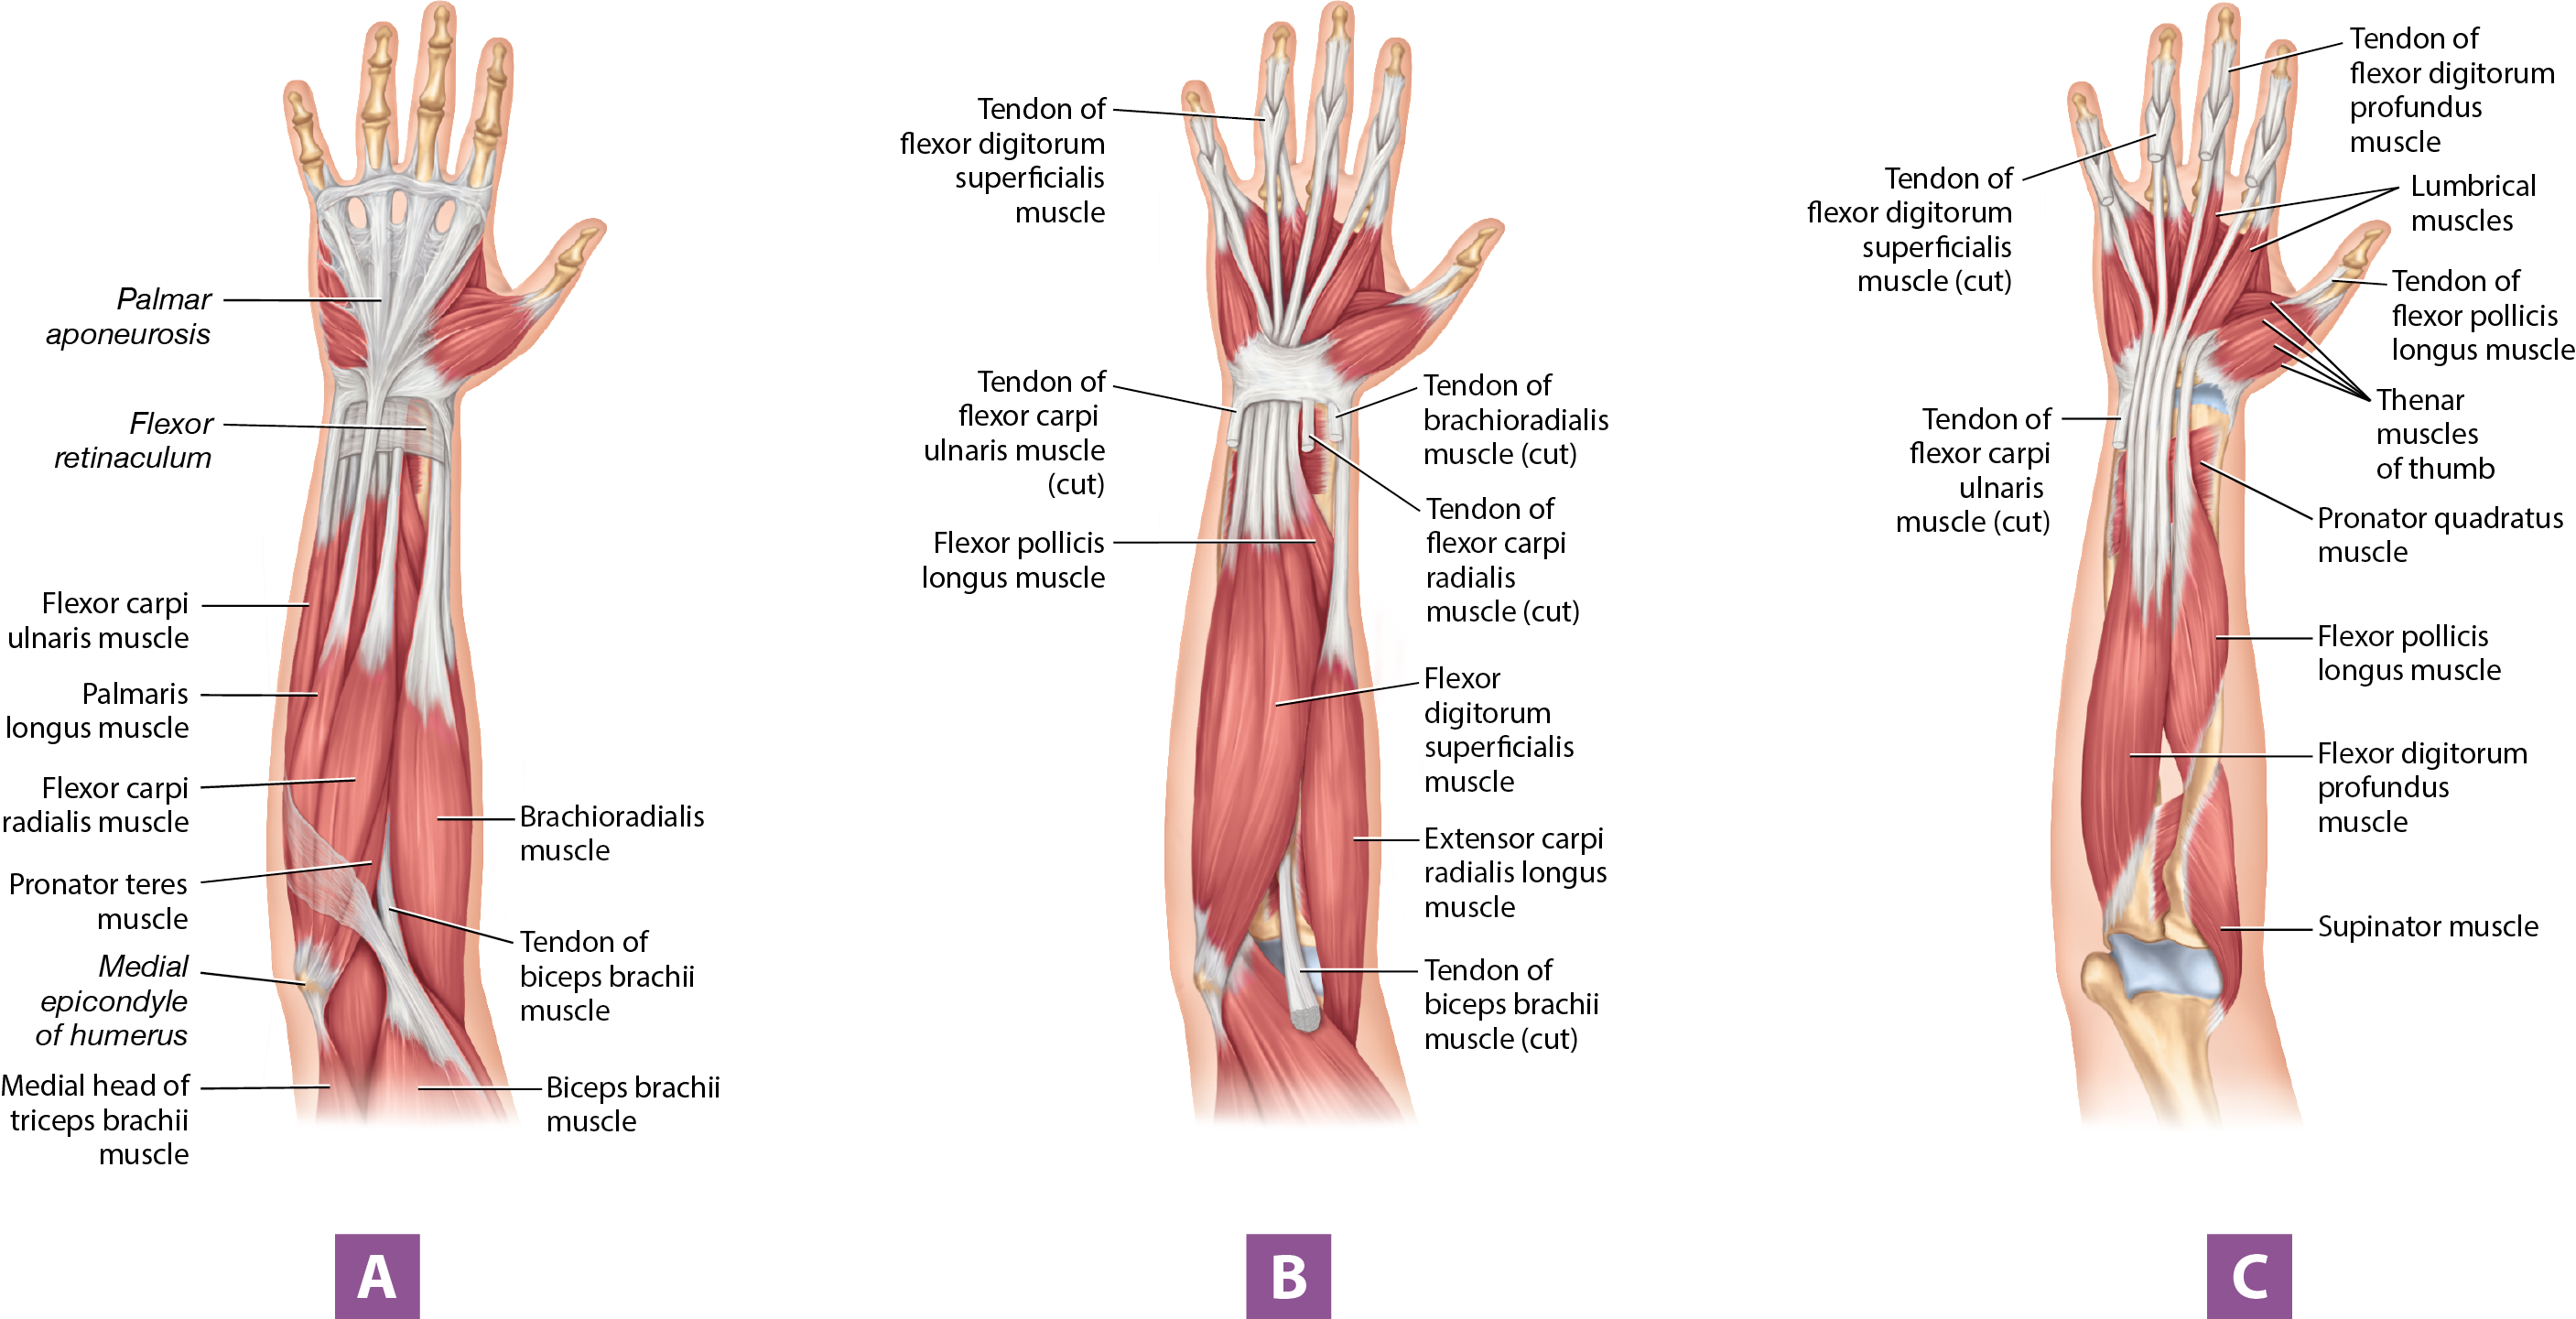
Figure 10.14 Muscles of the right forearm, anterior view: (A) superficial muscles; (B) intermediate muscles; (C) deep muscles.
Long Text Description
Muscles that extend the hand, located on the posterior forearm, are the extensor carpi radialis longus, extensor digitorum, and extensor carpi ulnaris muscles (Figure 10.15). The extensor digitorum muscle has an additional function of extending the digits. Other muscles that move the hand and digits are labeled in the figures for your reference. Figure 10.16 presents a view of an anatomical muscle model of the left upper limb, also for your reference.
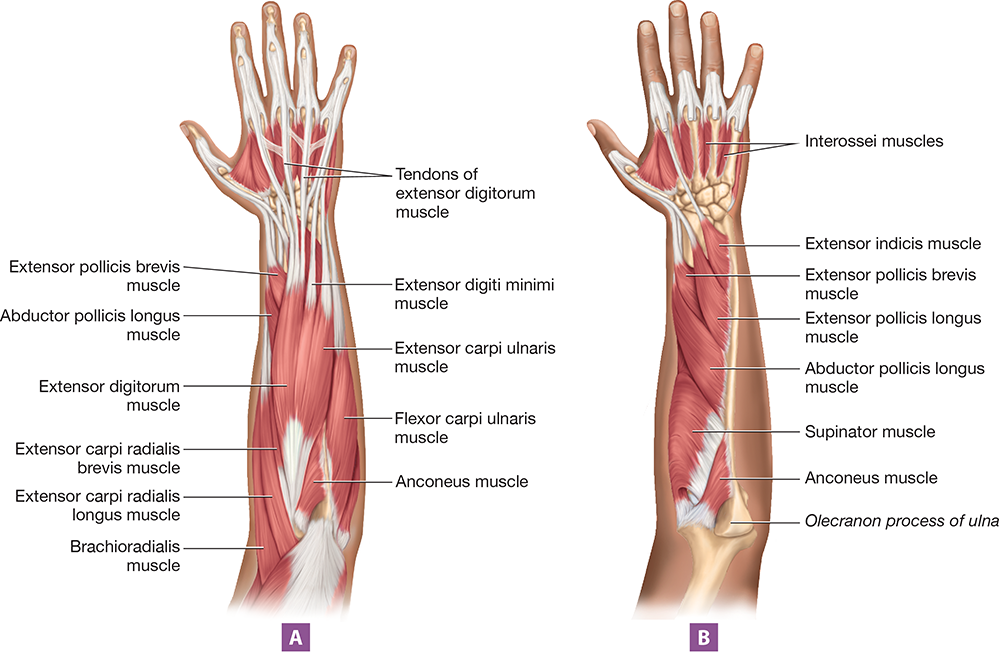
Figure 10.15 Muscles of the right forearm, posterior view: (A) superficial muscles; (B) deep muscles.
Long Text Description
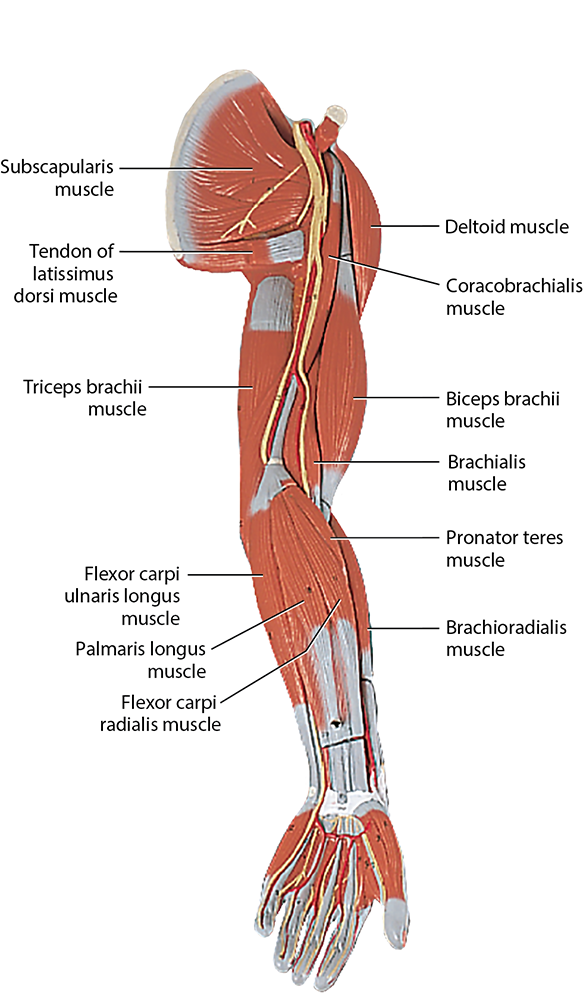
Figure 10.16 Muscles of the left upper limb, anteromedial view, anatomical model photo.
Long Text Description
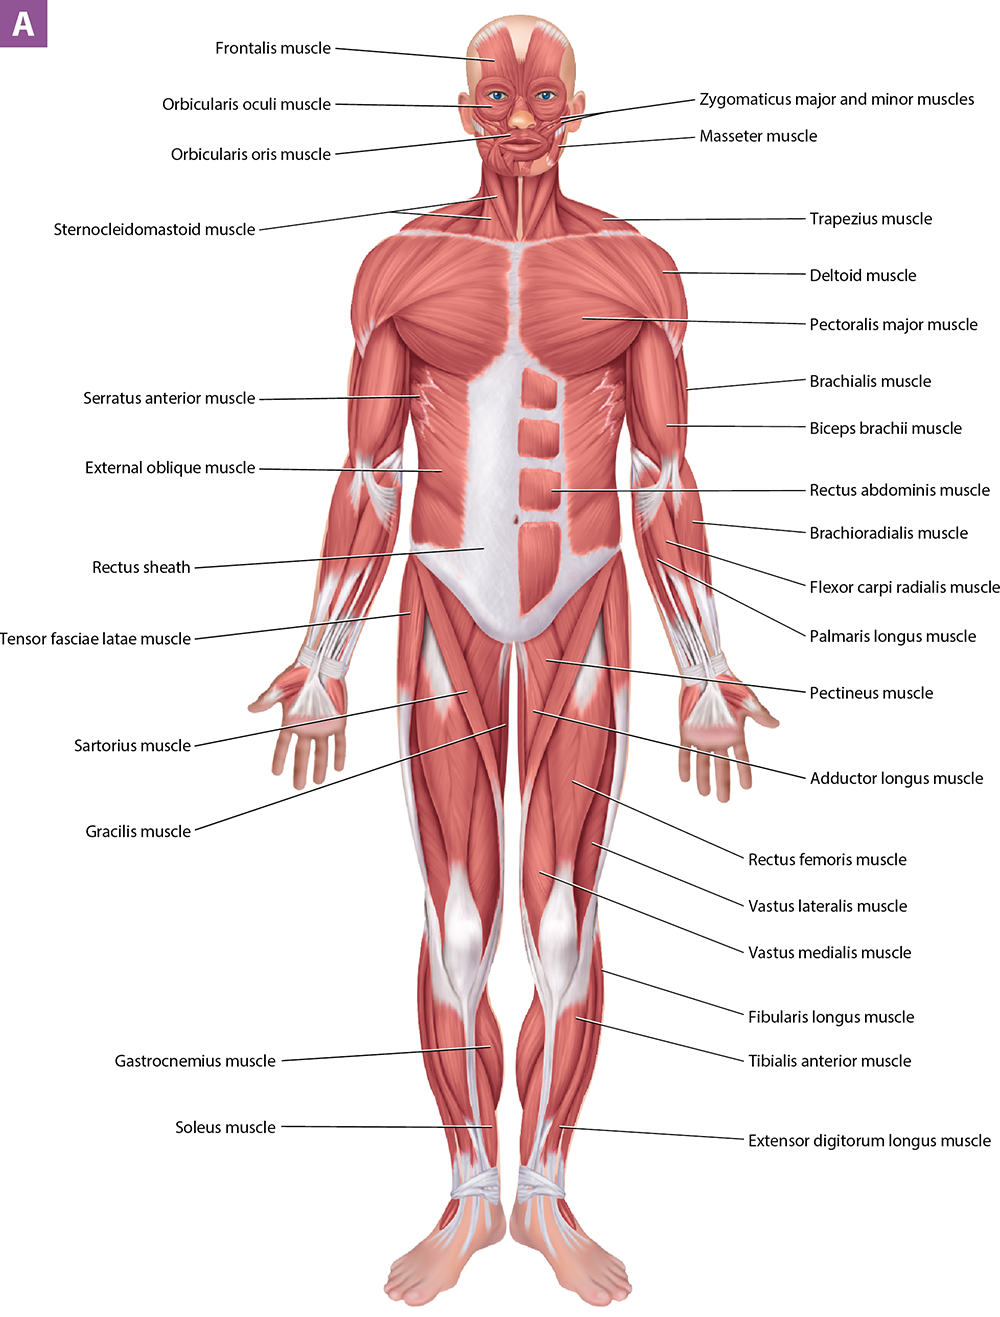
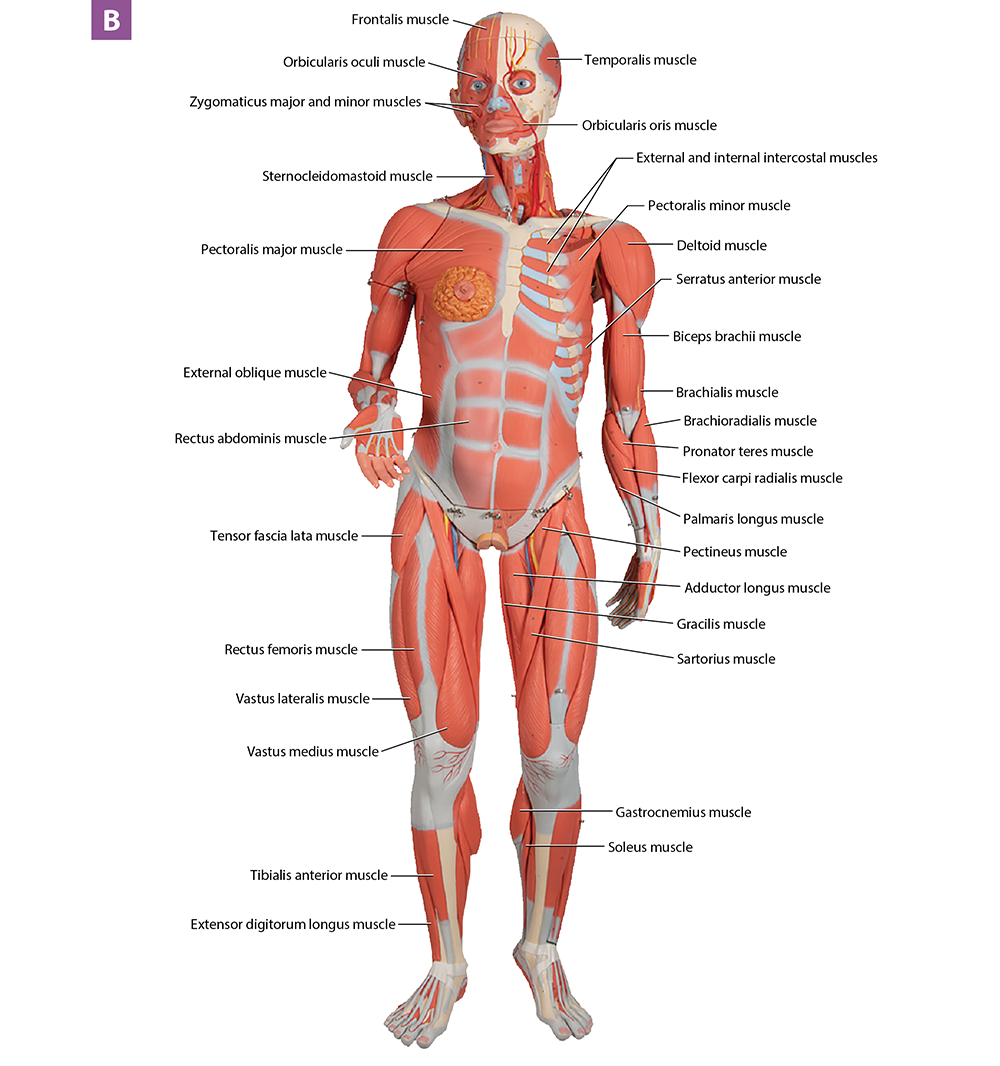
Figure 10.24 Muscles of the body:, anterior view (A) illustration, (B) anatomical model photo.
Long Text Description
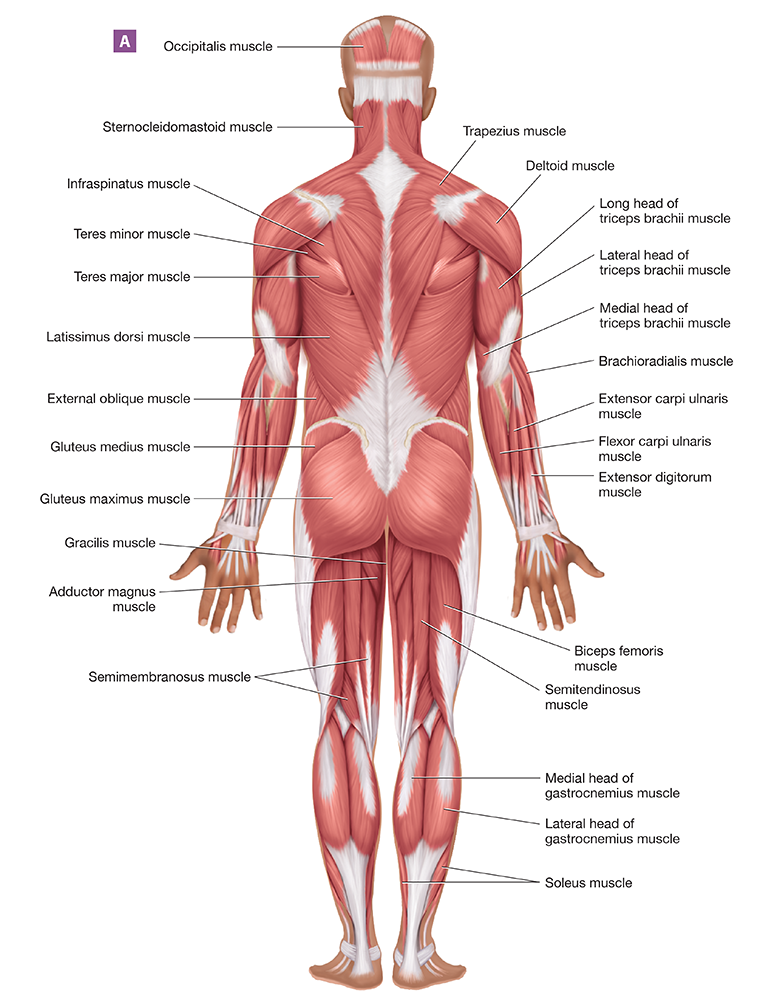
Long Text Description
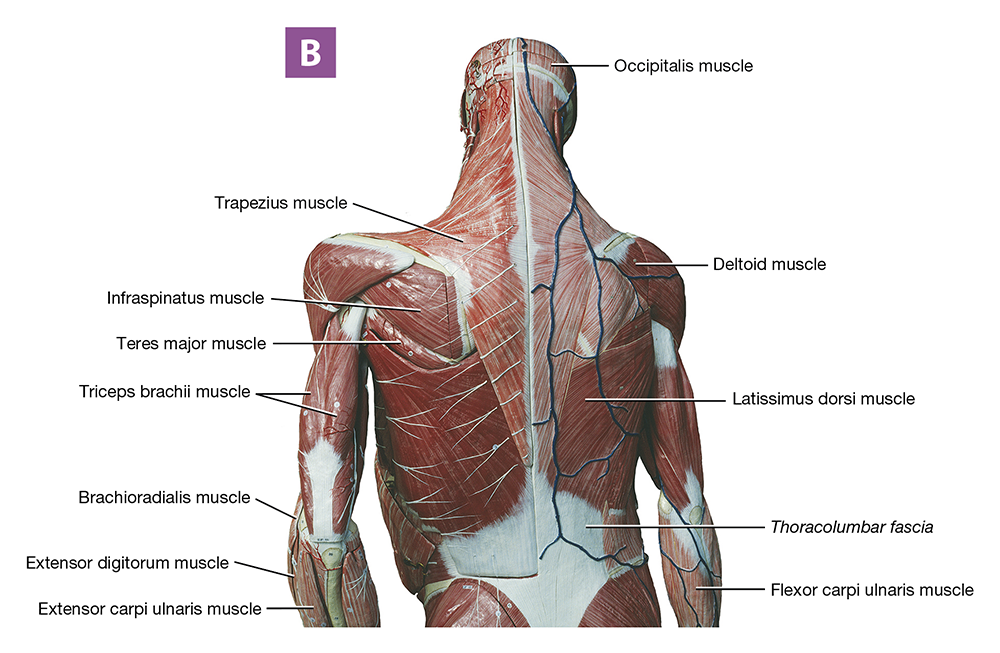
Figure 10.25 Muscles of the body, posterior view: (A) illustration,;(B) anatomical model photo.
l Muscle Anatomy: Lower Limbs
Completed
Exercise 10-3 Muscle Origins, Insertions, and Actions
Completed
Unit 10: Post-Lab
1 item
Unit 11: Muscle Tissue
Homework
First due in 7 days
Unit 11: Pre-Lab and In-Lab
3 items
Exercise 11-1 Skeletal Muscle Anatomy and Microanatomy
Completed
Exercise 11-2 The Neuromuscular Junction
Completed
Exercise 11-3 Muscle Physiology
Completed
Unit 11: Post-Lab
Homework
First due in 7 days
Exercise 10-2 Skeletal Muscle Anatomy: Lower Limbs
HomeworkDue on November 4, 2026
9/9 answered
Fullscreen
Exercise 10-2 Skeletal Muscle Anatomy: Pectoral and Pelvic Girdles and Lower Limbs
L.O. 10.2 Identify muscles of the pectoral girdle, upper limb, pelvic girdle, and lower limb.
Key Terms
You should be familiar with these terms before coming to the lab.
Pelvic Girdle and Lower Limb MusclesGluteus maximus m.Sartorius m.Gluteus medius m.Gracilis m.Adductor brevis m.Hamstrings muscle groupAdductor longus m.−Biceps femoris m.Adductor magnus m.−Semitendinosus m.Iliopsoas m.−Semimembranosus m.Pectineus m.Gastrocnemius m.Quadriceps femoris muscle groupSoleus m.−Rectus femoris m.Tibialis posterior m.−Vastus medialis m.Fibularis longus m.−Vastus intermedius m.Fibularis brevis m.−Vastus lateralis m.Extensor digitorum longus m.Tibialis anterior m.Pelvic Girdle and Lower Limb MusclesGluteusmaximusm.Gluteusmediusm.Adductorbrevism.Adductorlongusm.Adductormagnusm.Iliopsoasm.Pectineusm.Quadricepsfemorismusclegroup−Rectusfemorism.−Vastusmedialism.−Vastusintermediusm.−Vastus lateralis m.Sartoriusm.Gracilism.Hamstringsmusclegroup−Bicepsfemorism.−Semitendinosusm.−Semimembranosusm.Gastrocnemiusm.Soleusm.Tibialisposteriorm.Fibularislongusm.Fibularisbrevism.Extensordigitorumlongusm.Tibialisanteriorm.
Pre-Lab: Reading
As with Exercise 10-1, we divide skeletal muscles into muscle groups that have similar functions in this exercise. Here, we use the following groupings of skeletal muscles: muscles that move the thigh and leg; and muscles that move the foot and toes.
Muscles That Move the Thigh and Leg
We can divide the muscles that move only the thigh into three groups. The first group consists of the three gluteal muscles on the posterior pelvis (Figure 10.17). The large, superficial gluteus maximus muscle (GLOO-tee-uhs; glut- = “buttock”) originates from the posterior ilium, sacrum, and coccyx, and inserts into the femur’s gluteal tuberosity. This course makes it the prime mover of thigh extension. Deep to the gluteus maximus muscle is the gluteus medius muscle (MEE-dee-uhs). Originating from the lateral ilium and inserting into the femur’s greater trochanter, it is a major abductor of the thigh. The small, deep gluteus minimus muscle assists the gluteus medius muscle in its actions. Other deep muscles of the gluteal region are illustrated in the figure for your reference.
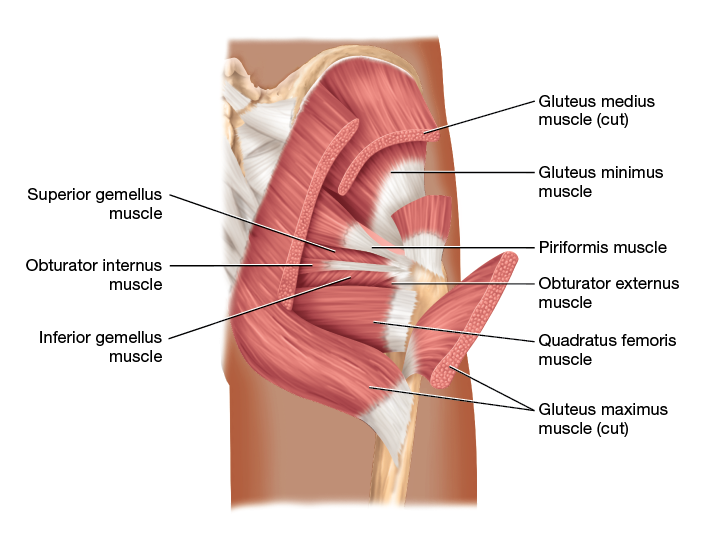
Figure 10.17 Muscles of the gluteal region.
Long Text Description
The second group of muscles that move only the thigh are three muscles on the medial femur known as the adductor group (Figure 10.18). This group includes the superior adductor brevis (brevis = “short”), the inferior adductor longus, and the deep, broad adductor magnus muscles (magnus = “large”). These muscles originate from the pelvis and insert into the femur, which makes them the prime movers of thigh adduction. In addition, they also medially rotate the thigh.
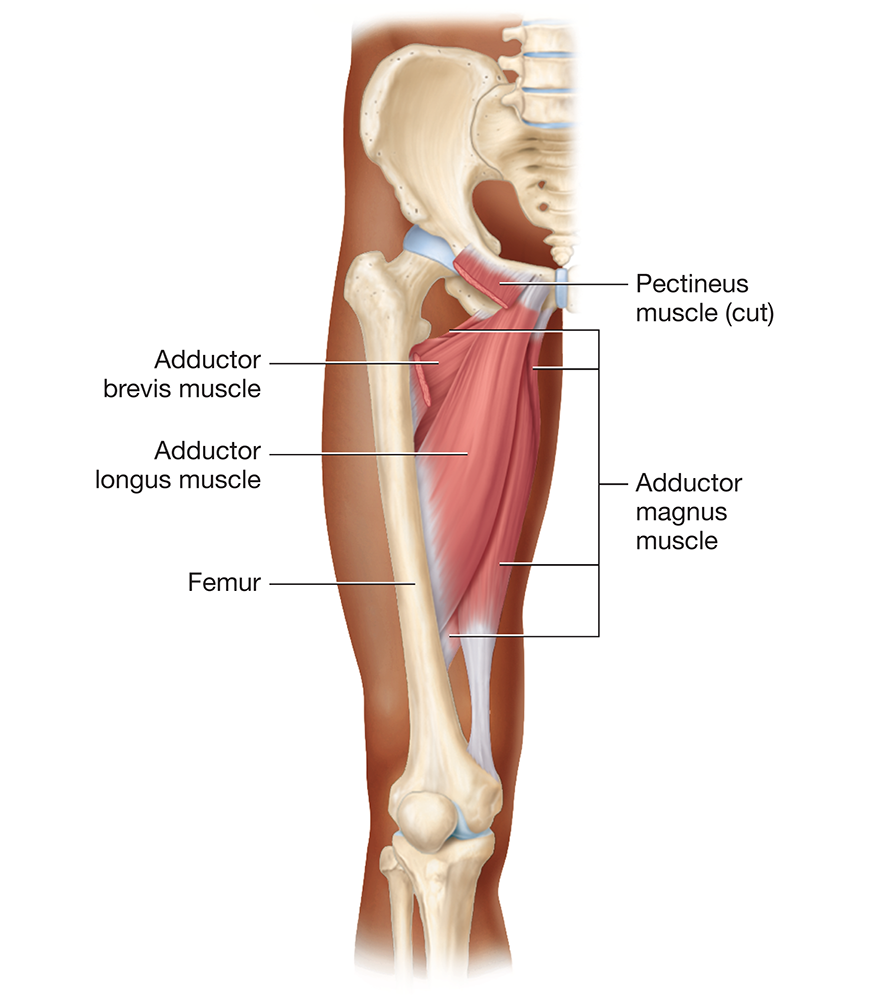
Figure 10.18 Muscles of the adductor muscle group.
Long Text Description
The final muscle group that acts on only the thigh is the iliopsoas muscle (ill-ee-oh-SOH-uhs). This muscle consists of two parts—the iliacus muscle (ill-ee-AK-uhs), originating from the iliac fossa of the ilium, and the psoas major muscle (SOH-uhs), originating from the lumbar vertebrae (Figure 10.19). The two muscles come together to insert via a common tendon into the lesser trochanter of the femur. The iliopsoas muscle is the prime mover of thigh flexion; it is assisted by the pectineus muscle (pek-TIN-ee-uhs) in the proximal thigh.
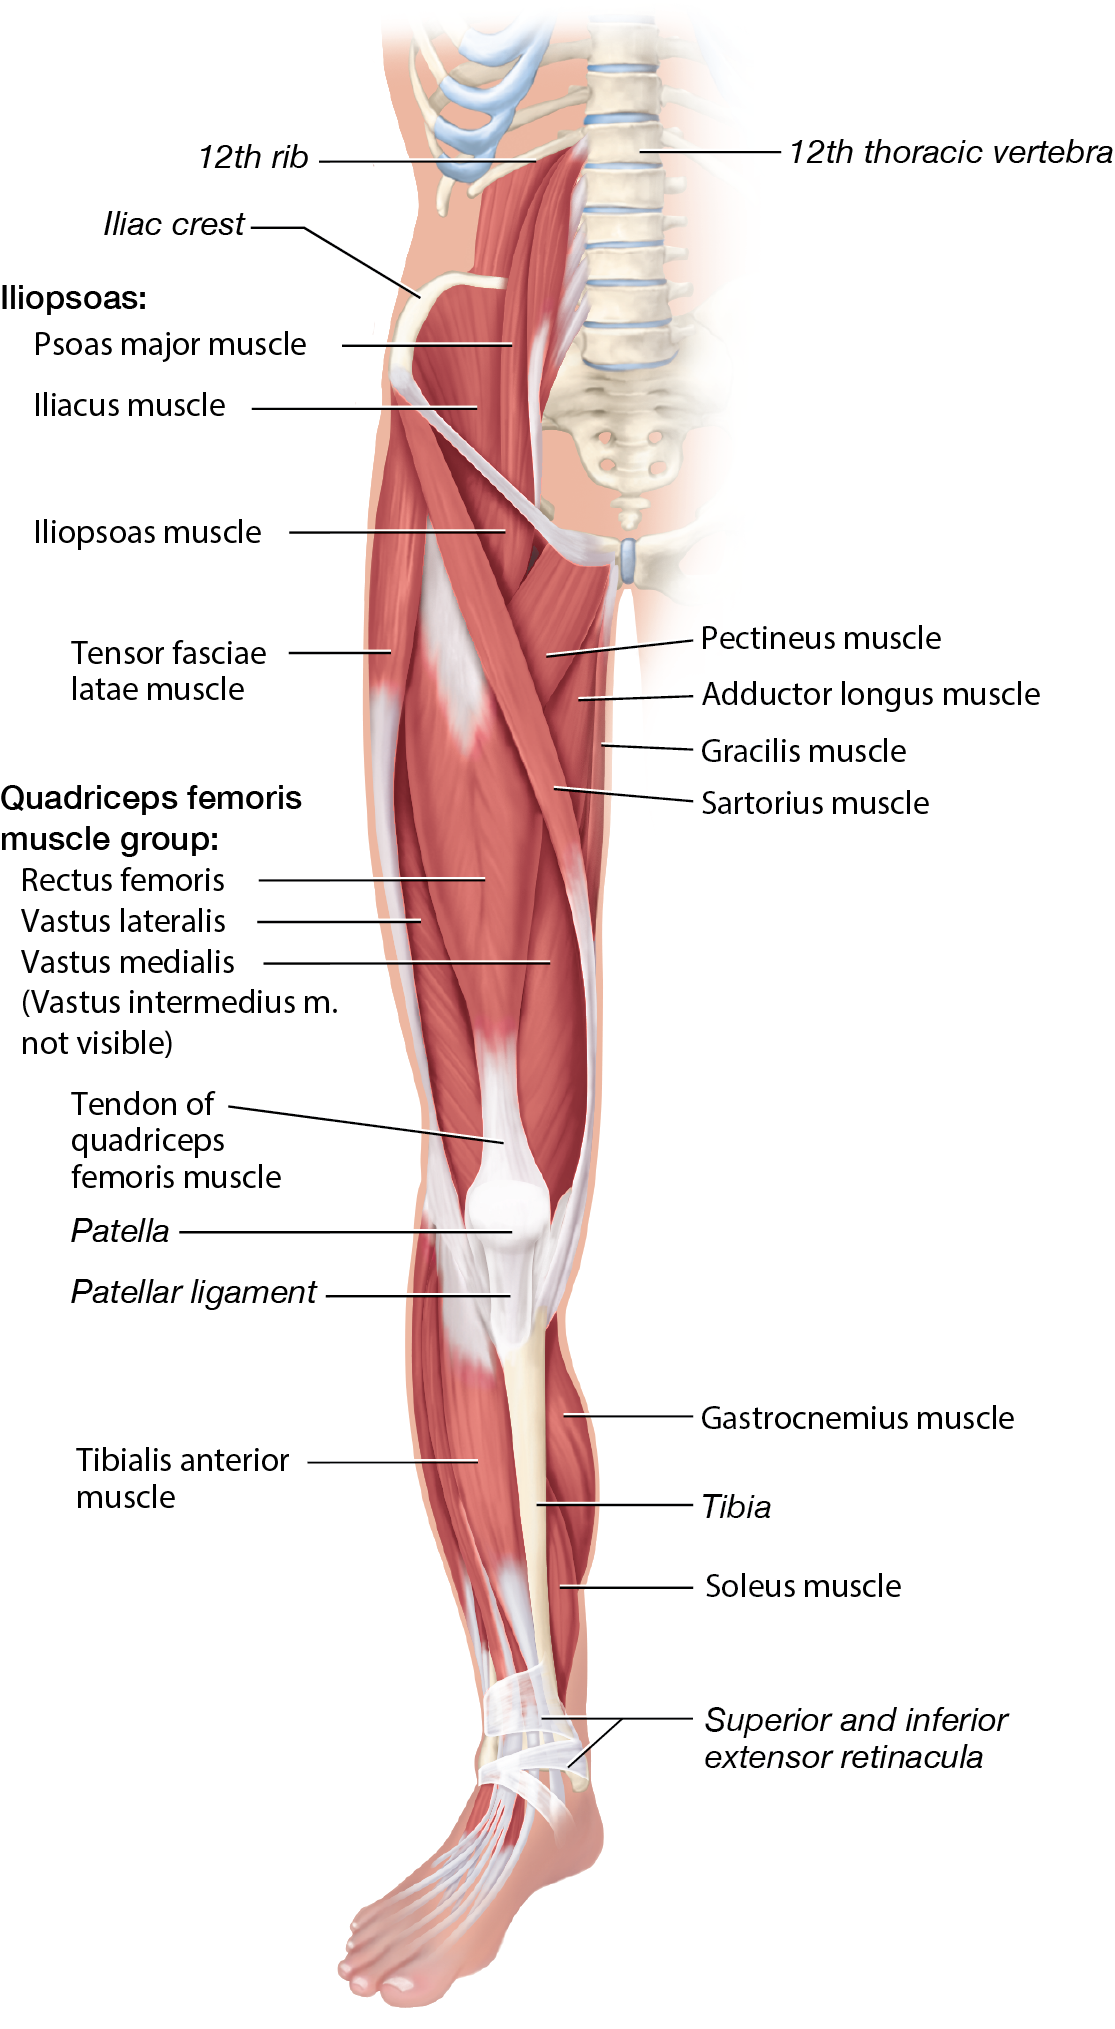
Figure 10.19 Muscles of the right lower limb, anterior view.
Long Text Description
The remainder of the thigh muscles may move both the thigh and leg, or may move only the leg. One of the most prominent groups of such thigh muscles is located in the anterior thigh: the quadriceps femoris group (quadricep = “four heads”). The name “quad” refers to the fact that it consists of four muscles, including the rectus femoris muscle, which originates from the ilium, and the three vastus muscles—the vastus medialis, vastus intermedius, and vastus lateralis muscles—which originate from the proximal femur (vast- = “broad;” note the vastus intermedius muscle is deep to the rectus femoris muscle and so is not visible in Figure 10.19). These four muscles converge to form the common quadriceps femoris tendon, also known as the patellar tendon, which envelops the patella. Distal to the patella, the tendon becomes the patellar ligament, which inserts into the tibial tuberosity. Due to the different origins of the rectus femoris muscle and the vastus muscles, they have different actions: the rectus femoris muscle flexes the thigh and extends the leg, while the vastus muscles only extend the leg.
Another prominent thigh muscle is the strap-like sartorius muscle (sar-TOHR-ee-uhs), which crosses from lateral to medial across the anterior thigh. The sartorius muscle originates from the anterior superior iliac spine and inserts into the medial side of the proximal tibia. Due to its unusual course, it has four actions: thigh flexion, lateral thigh rotation, thigh abduction, and leg extension. These four actions combine to pull your leg and thigh into the position that lets you look at something on the bottom of your shoe.
On the medial side of the thigh is the gracilis muscle (gruh-SILL-iss; gracil- = “slender”), which originates from the medial pelvis and inserts into the medial side of the proximal tibia. The gracilis muscle works with those of the adductor group to adduct and medially rotate the thigh. Due to its insertion into the tibia, the gracilis muscle also flexes the leg.
On the posterior thigh, we find the three muscles of the hamstrings group: the lateral biceps femoris muscle and the medial semitendinosus (sem’-aye-ten’-din-OH-suhs) and semimembranosus (sem’-aye-mem’-bruh-NOH-suhs) muscles (Figure 10.20). The three muscles share a common origin on the ischial tuberosity. The biceps femoris muscle, which has two heads, also originates from the femur. The semitendinosus and semimembranosus muscles insert into the medial side of the proximal tibia; the biceps femoris muscle inserts into the lateral side of the proximal tibia and the fibula. Together, the muscles of the hamstrings group are the prime movers of leg flexion; they also extend the thigh.
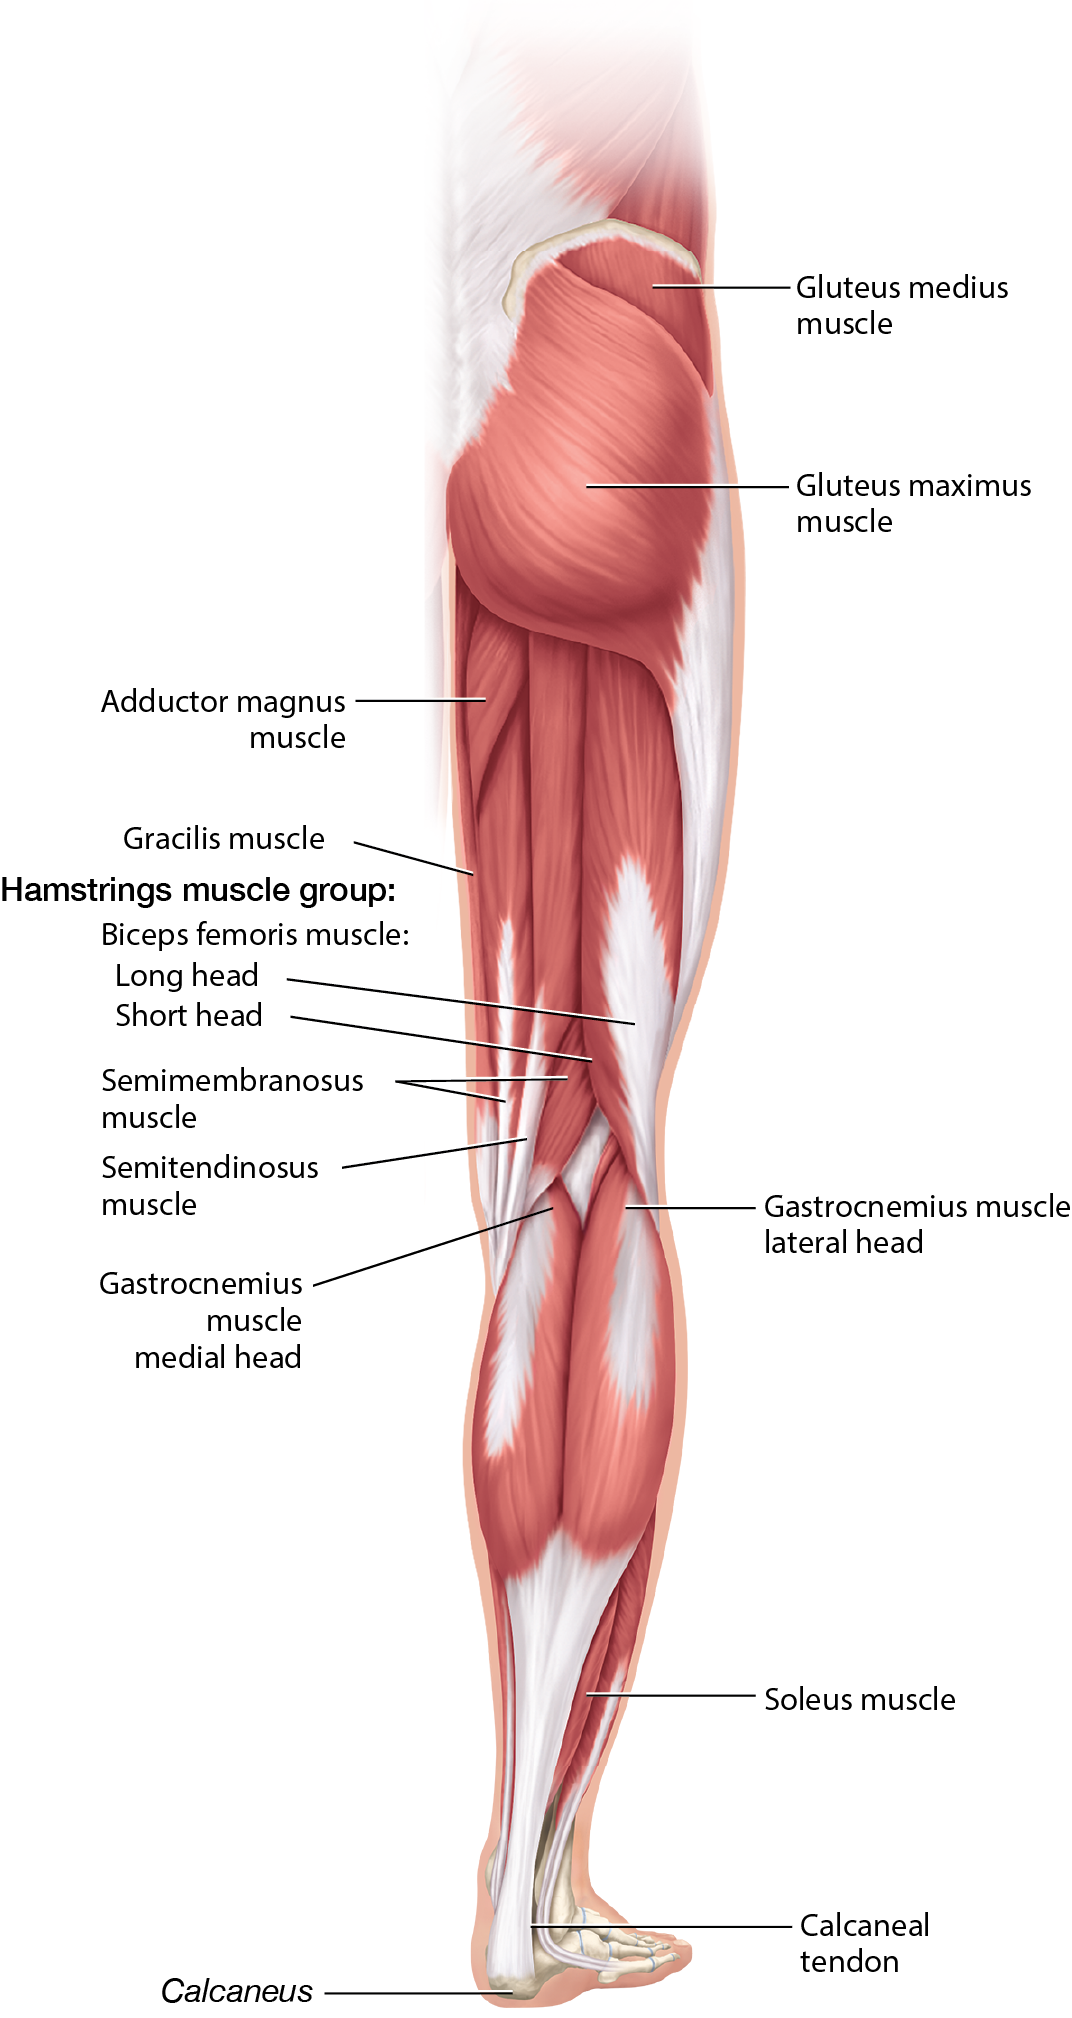
Figure 10.20 Muscles of the right lower limb, posterior view.
Long Text Description

Self-Check: Muscles That Move the Thigh
The animations below show several muscles in action through different thigh movements. Use the arrows in the top-left corner to switch between the three animations. You can rotate the models as needed. Try to identify each muscle below, then click on the model to reveal its name and find out if you were correct.
Gluteus maximus m.
Gluteus medius m.
Adductor muscle group
Iliopsoas m.
Pectineus m.
Rectus femoris m.
Vastus muscles
Sartorius m.
Gracilis m.
Biceps femoris m.
Semitendinosus m.
Semimembranosus m.
Loading...

Muscles That Move the Foot and Toes
The most obvious muscle of the posterior leg is the large gastrocnemius muscle (gas-trahk-NEE-mee-uhs), a two-headed muscle that originates from the distal femur. Just deep to the gastrocnemius muscle is the soleus muscle (SOHL-ee-uhs), which originates from the proximal tibia and fibula. Together, these two muscles insert into the posterior calcaneus via a common tendon called the calcaneal tendon (kal-KAY-nee-uhl), commonly known as the Achilles tendon. Together, the gastrocnemius and soleus muscles are known as the triceps surae muscle, and they are the prime movers of foot plantarflexion. Due to the gastrocnemius’ origin on the femur, it also assists in leg flexion.
Deep to the gastrocnemius and soleus muscles, we find the tibialis posterior muscle (tib-ee-AL-iss)—the main inverter of the foot (Figure 10.21). In addition, we find the muscles that plantarflex the foot and flex the digits, such as the flexor digitorum longus and flexor hallucis longus muscles (huh-LOO-sis).
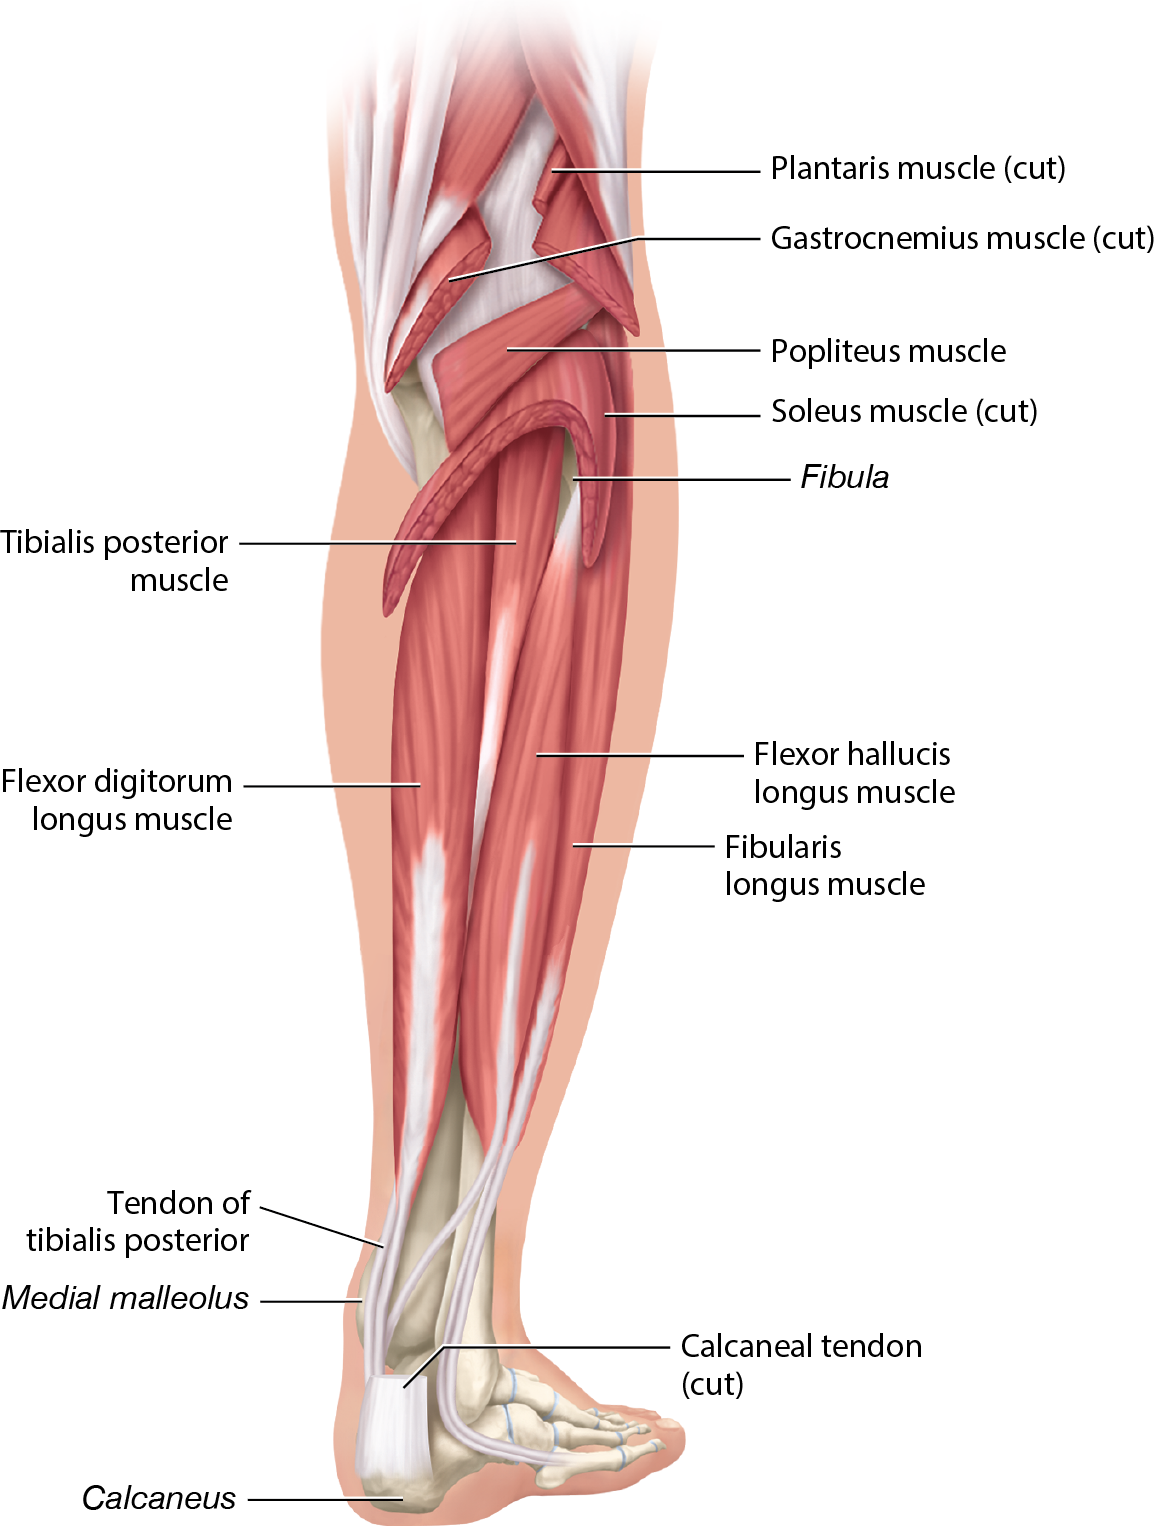
Figure 10.21 Deep muscles of the posterior leg.
Long Text Description
On the lateral leg, we find two muscles, the fibularis longus (fib-yoo-LEHR-iss) and fibularis brevis muscles, which are the main everters of the foot (Figure 10.22). Anteriorly on the leg, we find extensors such as the extensor digitorum longus muscle, which extends the toes, and the tibialis anterior muscle, which dorsiflexes the foot. These and other leg muscles are labeled in the figures for reference purposes. Figure 10.23 provides photos of anatomical models of the leg and lower limb, also for your reference.
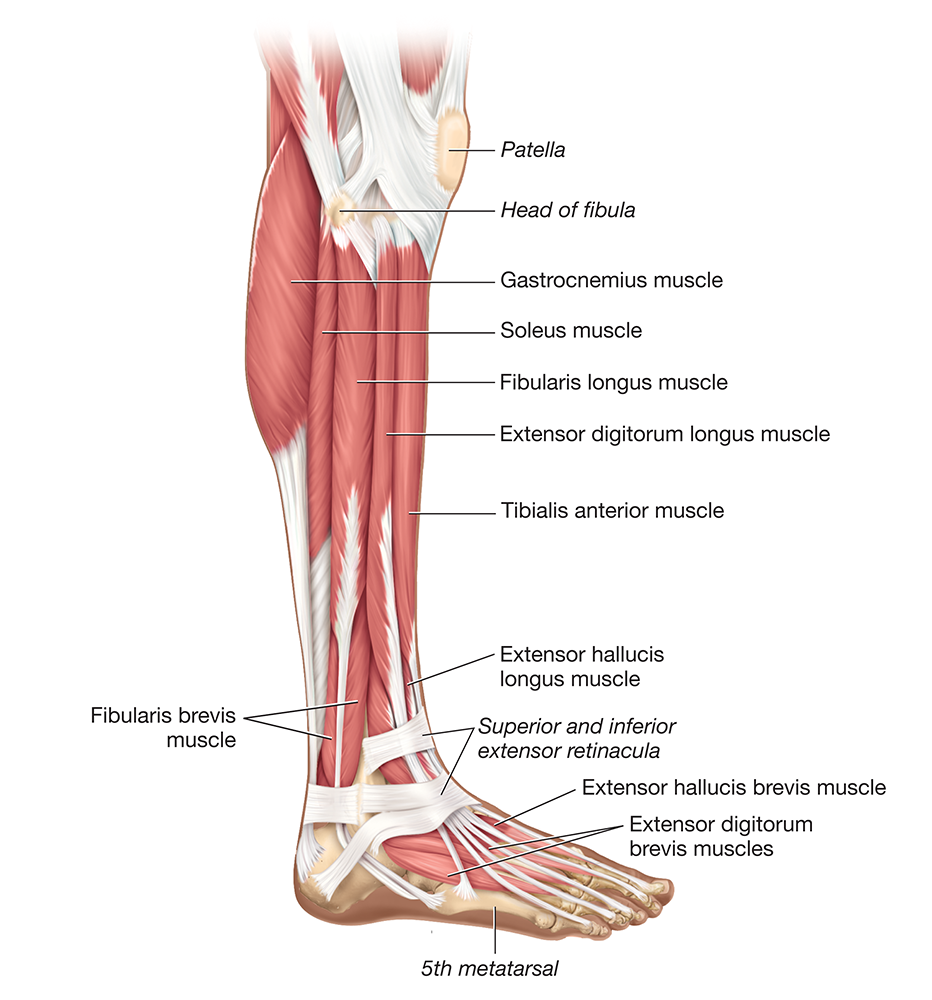
Figure 10.22 Muscles of the leg, lateral view.
Long Text Description
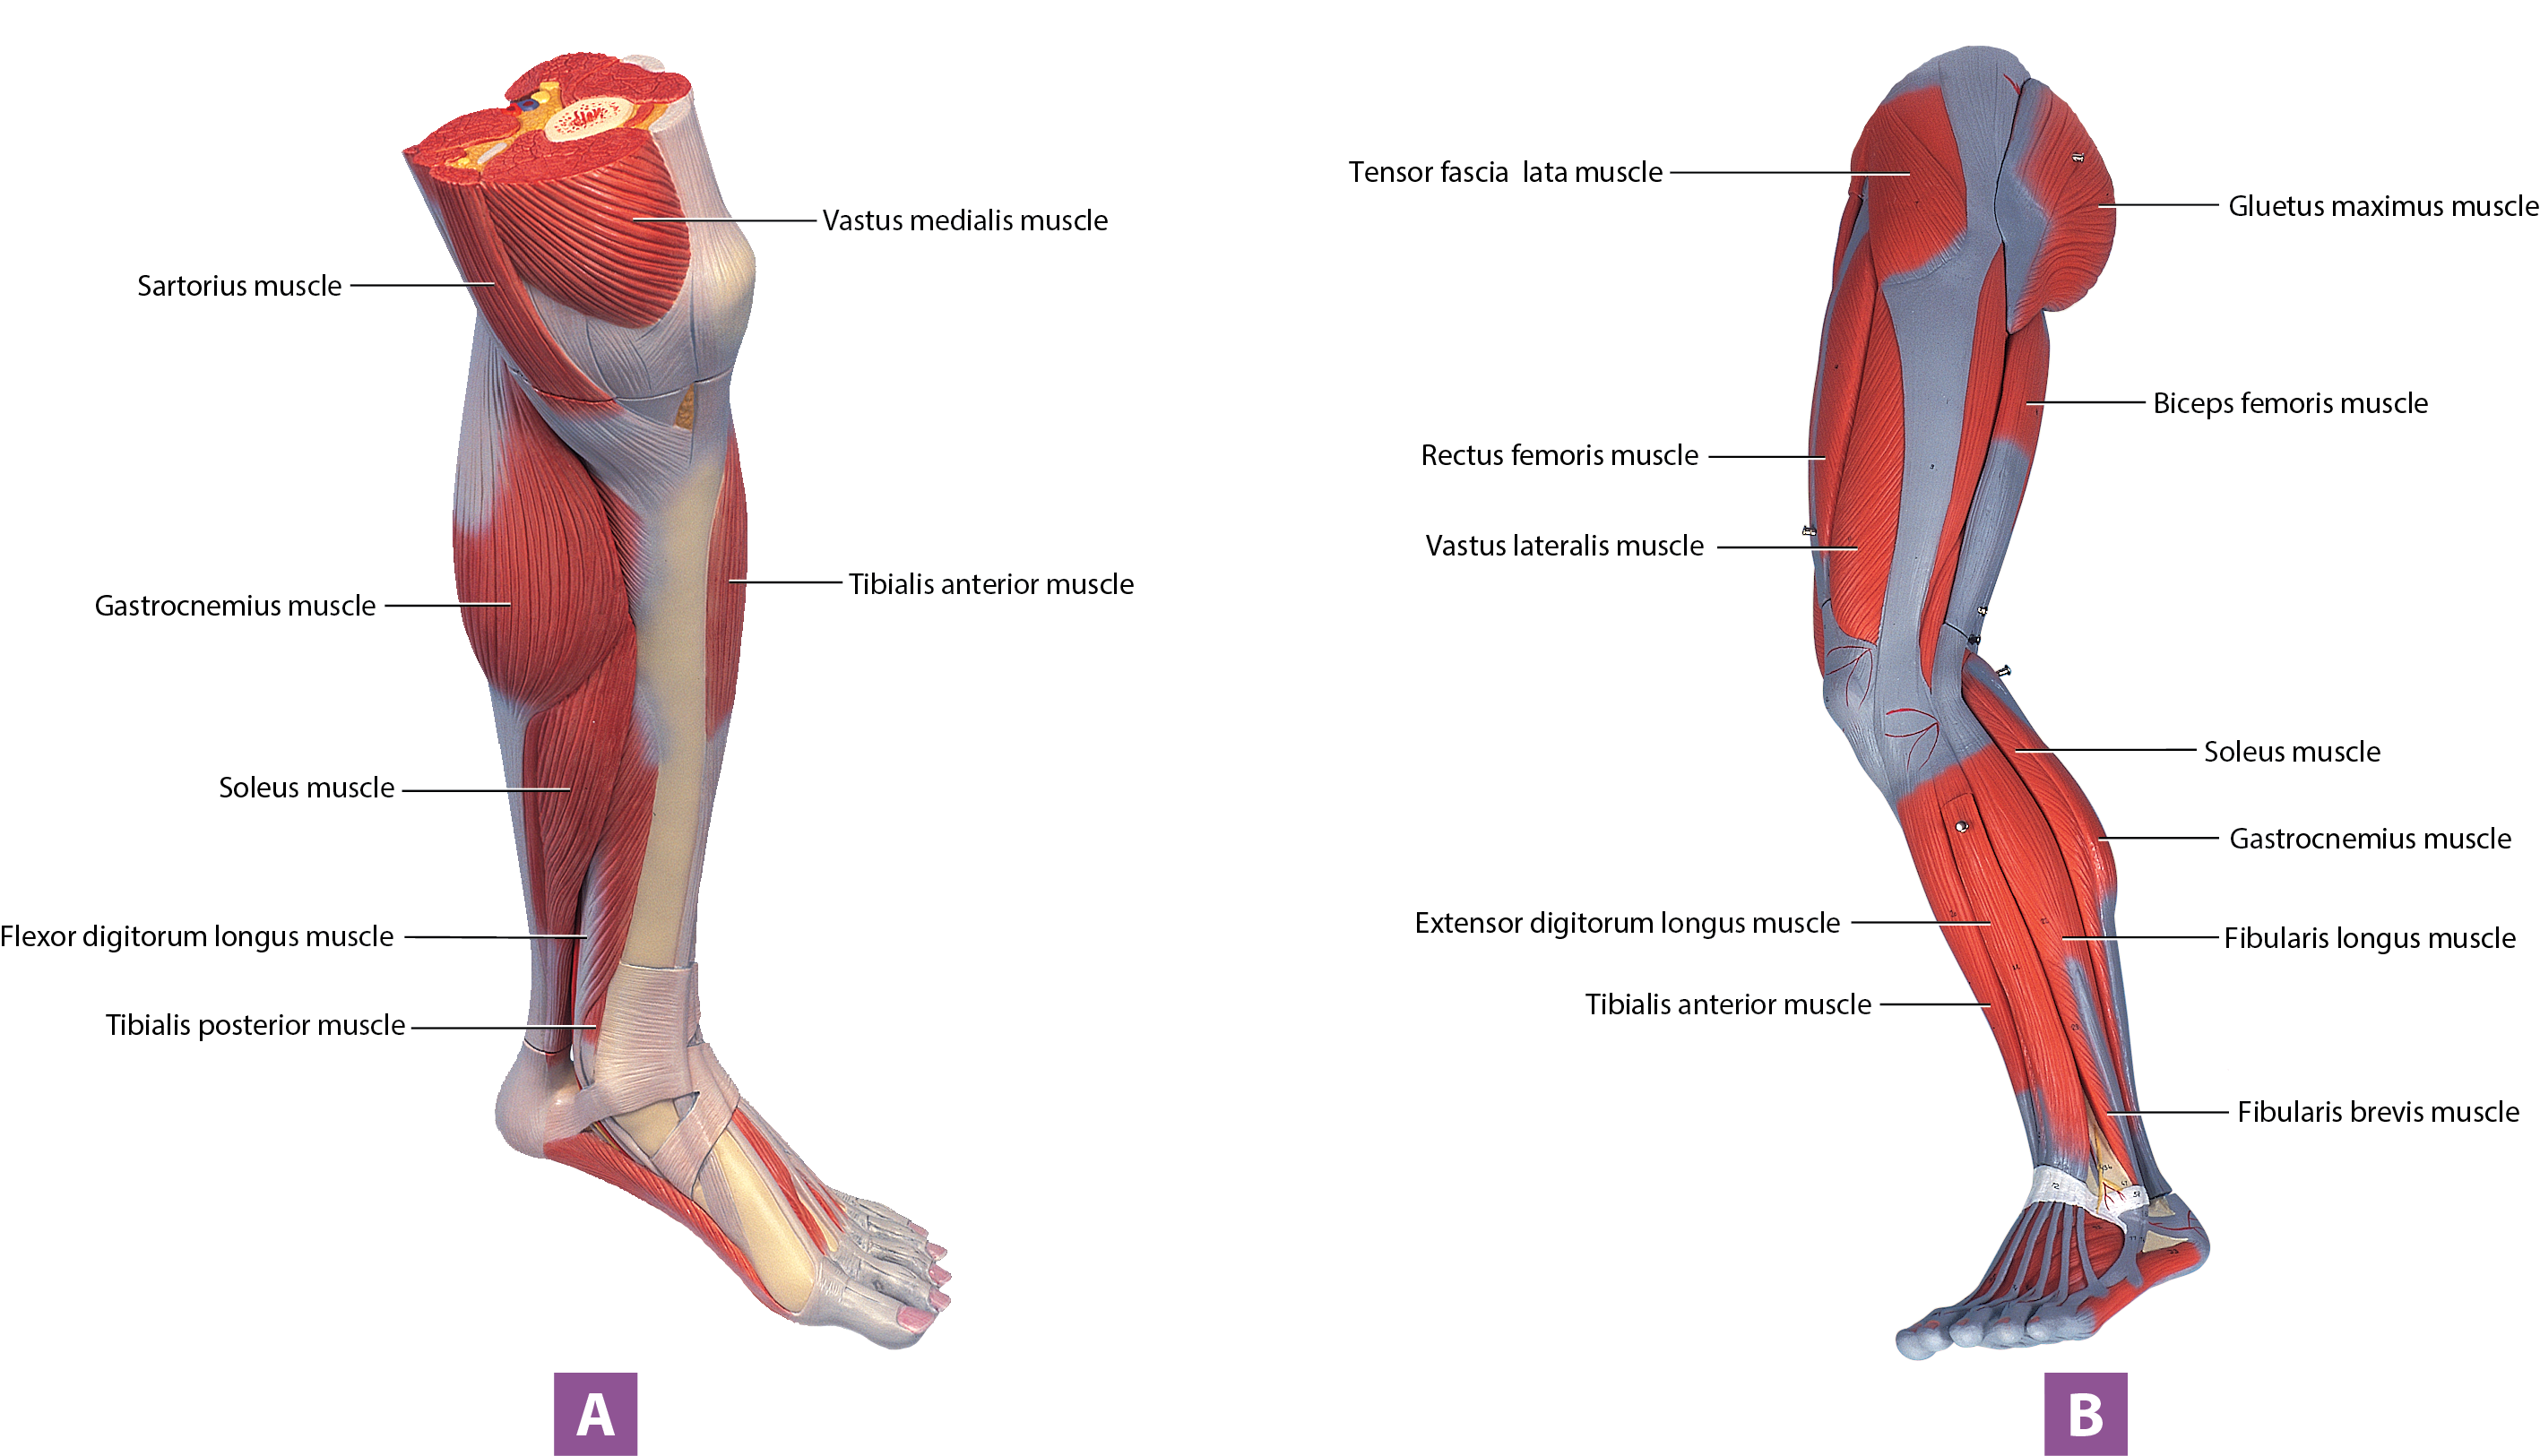
Figure 10.23 Lower limb muscles, anatomical model photos: (A) anteromedial view of the leg. (B) lateral view of the lower limb.
Long Text Description
Figures 10.24 and 10.25 provide whole-body views of many of the muscles we have just discussed. Other muscles and anatomical landmarks are labeled to help orient you and for your reference.
Figure 10.24 Muscles of the body:, anterior view (A) illustration, (B) anatomical model photo.
Long Text Description
Long Text Description
Figure 10.25 Muscles of the body, posterior view: (A) illustration,;(B) anatomical model photo.
Exercise 10-3 Muscle Origins, Insertions, and Actions
● L.O. 10.3 Describe the origin, insertion, and actions of selected muscles.
Key Terms
You should be familiar with these terms before coming to the lab.
Muscle tension Muscle actionOrigin InsertionMuscle tension MuscleactionOrigin Insertion

Pre-Lab: Reading
When a muscle contracts, it generates a force called muscle tension. By generating tension, skeletal muscles produce muscle actions, which may include body movements or stabilizing forces such as the maintenance of posture.
You can best understand a muscle’s actions by first understanding its origin and insertion. As we discussed in the introduction to this unit, a muscle’s origin generally is the part that remains more stationary when the muscle contracts, and its insertion typically is the part that moves. For example, you can see in Figure 10.28 that the short head of the biceps brachii muscle originates on the coracoid process. The muscle then crosses the elbow joint and inserts into the radial tuberosity. Notice also that the triceps brachii muscle originates from the humerus and the inferior scapula. It then crosses the elbow joint to insert into the ulna’s olecranon process.
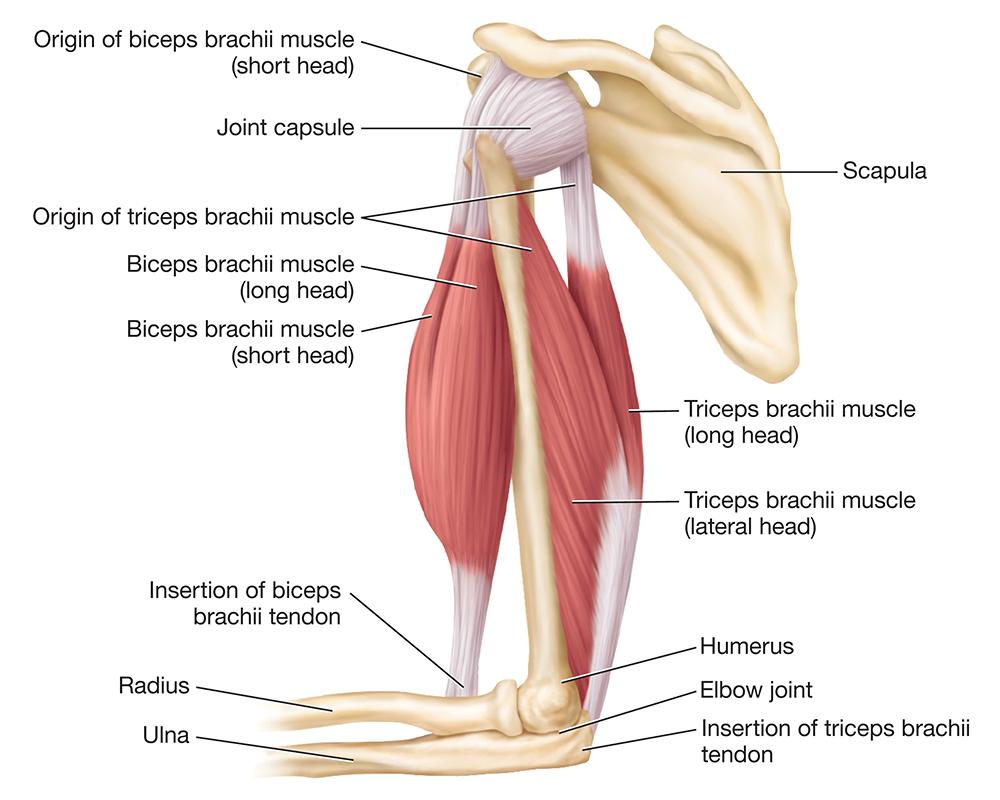
Figure 10.28 Origin and insertion of the biceps brachii and triceps brachii muscles, lateral view.
Long Text Description
After you determine a muscle’s origin and insertion, figuring out its actions becomes easy. The biceps brachii muscle inserts into the radial tuberosity, so we know it will move the forearm. Given how it crosses the anterior elbow joint, we can conclude it will cause forearm flexion at the elbow joint. The triceps brachii muscle inserts into the olecranon process, so we know it also will move the forearm. Given how it crosses the posterior elbow joint, we can conclude that it will cause forearm extension at the elbow joint. Now, wasn’t that easy? So, you don’t need to actually memorize most muscle actions—all you need to do is look at a muscle’s origin and insertion and use some basic logic to figure out its actions.

Hints & Tips: Muscle Names
What’s in a name? When it comes to skeletal muscle, there’s often a lot. The number of muscles we cover in this lab may seem intimidating, but it can be easier to figure out a muscle’s origin, insertion, and actions than you may think. Many muscles have descriptive names, which you may have noticed from reading Exercises 10-1 and 10-2. Some of the common features used in muscle names include the following:
Size. Many muscle names include clues about their size. Some of these are obvious—longus describes a long muscle, and a pair of major and minor muscles describes a set in which one is larger, and one is smaller. Others are a little less obvious, such as brevis, which means short (think “brief”), or vastus, which means wide (think “vast”).
Location. Many muscles are named for their location. This can include directional terms, such as lateralis, superficialis, or anterior. It can also include regional terms such as abdominis, cervicis (neck), brachii (arm), and costal (rib). Finally, some of the terms that describe location use words or prefixes with which you’re likely already familiar, such as sub- (below) and profundus (deep—think “profound”).
Appearance or shape. Several muscles have names based on their appearance or shape. For example, the semitendinosus muscle has a very long tendon, and the rhomboid major and minor muscles are shaped like a rhombus. Similarly, the orbicularis oris and orbicularis oculi muscles are named for their circular structure, as “orb” means “sphere.”
Points of origin. Related to appearance is a muscle’s number of points of origin, or “heads.” We see this with muscles named biceps, triceps, and quadriceps, which mean “two-headed,” “three-headed,” and “four-headed,” respectively.
Function. Finally, the function of many muscles is revealed in their names. As you can imagine, an extensor has extension as a primary action, and an adductor has adduction as a primary action.
When you take all this into consideration, it’s much easier to figure out the origin, insertion, and actions, even of complicated-sounding muscles. For example, you can tell that the brachioradialis muscle attaches to the arm (brachio-) and the radius (radialis), just from its name. And you can use this information to work out its actions. Similarly, the tibialis anterior muscle is clearly a muscle on the anterior tibia, and the iliocostalis muscle has attachments to the ilium and the ribs. If we take a more complicated muscle name, such as the extensor carpi radialis longus muscle, we can figure out that it's a long muscle that originates from the radius, inserts into the carpals bones, and extends the hand at the wrist. See? It’s not as difficult as you thought
Exercise 11-1 Skeletal Muscle Anatomy and Microanatomy
L.O. 11.1a Describe the gross organizational structure of a skeletal muscle.
L.O. 11.1b Describe and identify the microscopic anatomy of skeletal muscle fibers on anatomical models and microscope slides.
Key Terms
You should be familiar with the following terms before coming to the lab.
General Skeletal Muscle StructuresMyofibril structuresEpimysiumThick filamentFascicleMyosinMuscle fiberThin filamentEndomysiumActinPerimysiumTroponinFasciaTropomyosinTitinStructures of the Skeletal Muscle FiberElastic filamentSarcolemmaSarcomereT-tubuleZ-discSarcoplasmic reticulumH zoneTriadA bandMyofibrilI bandM lineGeneral Skeletal Muscle StructuresEpimysiumFascicleMuscle fiberEndomysiumPerimysiumFasciaStructures of the Skeletal Muscle FiberSarcolemmaT-tubuleSarcoplasmic reticulumTriadMyofibrilMyofibril structuresThick filamentMyosinThin filamentActinTroponinTropomyosinTitinElasticfilamentSarcomereZ-discHzoneAbandIbandMline

Pre-Lab: Reading
This unit explores the structure and function of muscle tissue. There are three types of muscle tissue: skeletal, cardiac, and smooth. Although the three types differ in structure, they all share the same basic function—to generate a force called tension.
In this unit, we focus on skeletal muscle tissue to build on what you learned about skeletal muscles as organs in the previous unit. Although we generally study anatomy and physiology from the microscopic to the gross level, we do it backward with the muscular system. The reason for this is simply one of continuity—skeletal muscles as organs have a close structural and functional relationship with the skeleton and joints, and muscle tissue has a close structural and functional relationship with nervous tissue, the topic of the next unit. We’ll start our exploration of muscle tissue with a look at how a skeletal muscle is organized, after which we’ll turn to its microscopic anatomy.
Skeletal Muscle Organization
Recall that skeletal muscle tissue is composed of skeletal muscle cells, also called muscle fibers. Individual skeletal muscle fibers are surrounded by their extracellular matrix, known as the endomysium (in-doh-MY-see-um; endo- = “within;” my- = “muscle”). Note that some of the endomysium is produced by the muscle fibers themselves, and the remainder is loose connective tissue produced by fibroblasts.1
Muscle fibers are arranged into groups called fascicles (FASS-ih-kullz; fasc- = “bundle”; Figure 11.1). Each fascicle is surrounded by a connective tissue sheath called the perimysium (pehr-ih-MY-see-um; peri- = “around”). The muscle as a whole is covered by another connective tissue sheath called the epimysium (ep-ih-MY-see-um; epi- = “on top”), which holds the muscle together structurally, even during forceful contractions. The most superficial connective tissue around a skeletal muscle is thick fascia (FASH-uh), which separates individual muscles and binds them into groups. Near the end of a muscle, its connective tissue layers merge to form cordlike tendons or flat aponeuroses (ay’-poh-noor-OH-seez), which connect the muscle to bones or soft tissue.
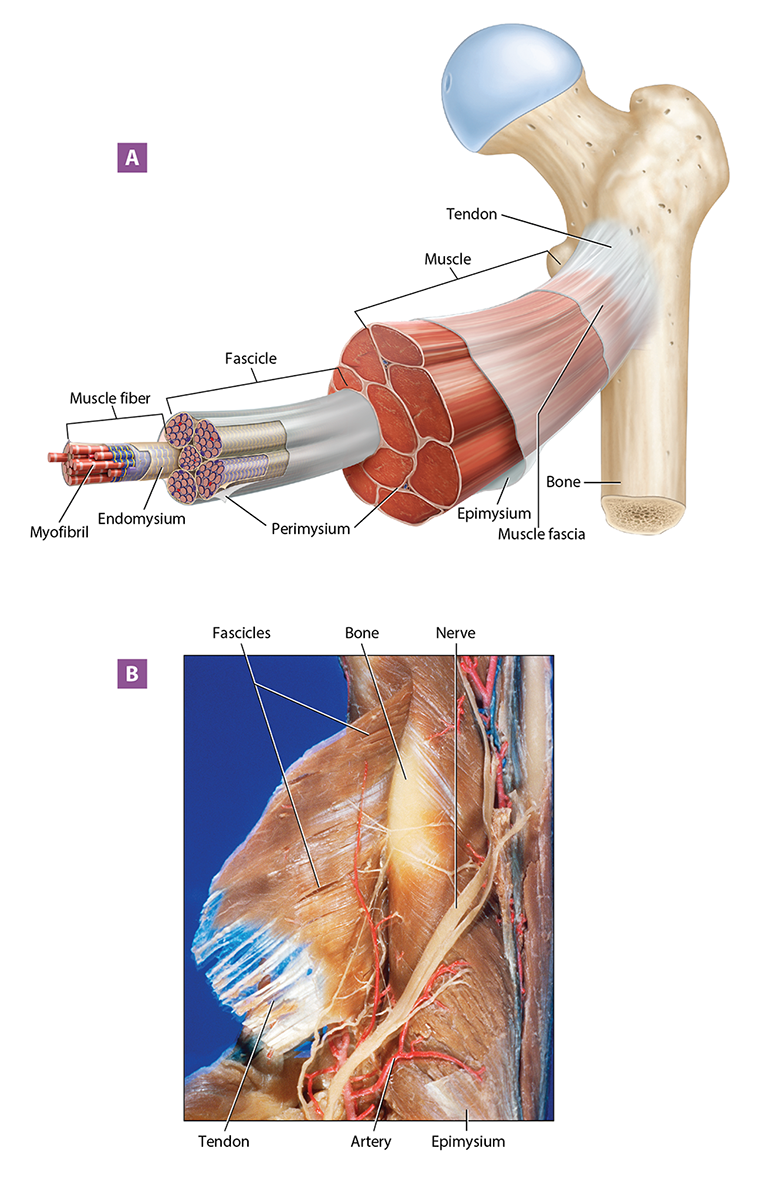
Figure 11.1 Overview of skeletal muscle structure: (A) the structural organization of a skeletal muscle; (B) dissected muscle.
Long Text Description
Skeletal Muscle Fiber Microanatomy
The long, multinucleated, cylindrical skeletal muscle fiber doesn’t look like the cells you’re used to seeing. Due to these differences, we use special terms to describe certain structures. For example, the muscle fiber’s plasma membrane is known as the sarcolemma (sar-koh-LEM-uh; sarc- = “flesh”; -lemma = “sheath”), and its cytoplasm is called sarcoplasm (SAR-koh-plazm).
Notice in Figure 11.2 that much of the skeletal muscle fiber’s sarcoplasm is filled with small, cylindrical organelles called myofibrils (my-oh-FY-brillz), which are composed of the proteins that allow a muscle to contract. Other organelles, such as mitochondria, are packed in between the myofibrils. Myofibrils are wrapped by the weblike sarcoplasmic reticulum (sar-koh-PLAZ-mik reh-TIK-yoo-lum; SR), which is a modified smooth endoplasmic reticulum that stores calcium ions. Myofibrils are also wrapped by inward extensions of the sarcolemma known as transverse tubules or T-tubules. On either side of a T-tubule, the SR swells to form terminal cisternae (sis-TUR-nee; cistern = “reservoir”); a T-tubule and two terminal cisternae form a structure called a triad. As we'll discuss in Exercise 11-3, these structures are critical for initiating a skeletal muscle contraction.
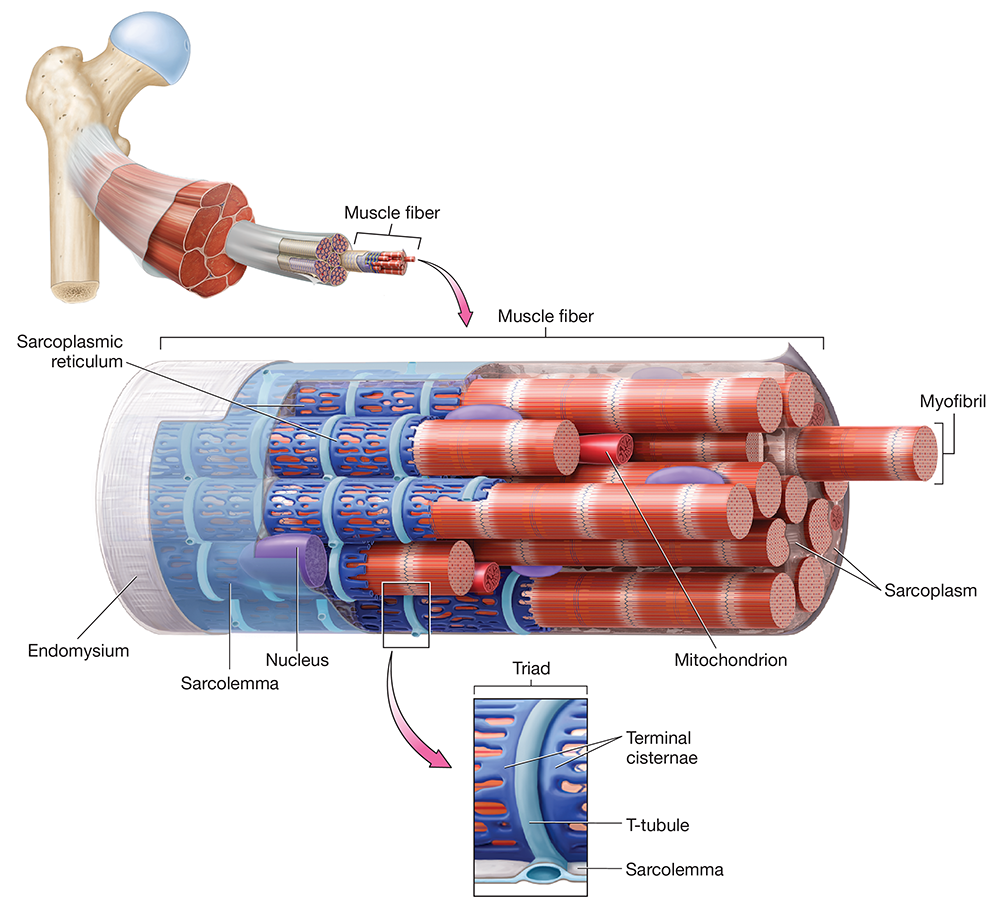
Figure 11.2 Structure of a skeletal muscle fiber.
Long Text Description
Myofilaments and Sarcomere Structure
Myofibrils are composed of subunits known as myofilaments, each of which contains one or more of the following types of proteins: contractile proteins, which generate tension; regulatory proteins, which control when a muscle contracts; and structural proteins, which maintain the architecture of the myofibril and muscle as a whole. There are three types of myofilaments in a myofibril, shown in Figure 11.3:
Thick filaments are composed primarily of many units of the contractile protein myosin (MY-oh-sin). Each myosin protein looks like two twisted golf clubs—the “handles” of the golf clubs are the myosin tails, and the “heads” of the golf clubs are—appropriately—the myosin heads.
Thin filaments are composed largely of the contractile protein actin (AK-tin; actin = “ray”). Each actin subunit is shaped somewhat like a bead, and the thin filament consists of multiple actin subunits arranged like beads on a string. Each actin subunit contains a location called the active site, which binds to myosin heads during a contraction. In addition to actin, the thin filament has both structural and regulatory proteins:
Tropomyosin. The long regulatory protein tropomyosin (trohp-oh-MY-oh-sin; trop- = “turning”) wraps around the actin strand. When a muscle fiber is not contracting, tropomyosin covers the actin subunits’ active sites, preventing actin from binding to myosin heads.
Troponin. Another regulatory protein associated with the thin filament is troponin (TROH-poh-nin or troh-POH-nin), which is a small, globular protein with multiple subunits. When a muscle fiber is not contracting, troponin holds tropomyosin in place over the actin subunits’ active sites. When calcium ions bind to one of troponin’s subunits, the position of troponin and tropomyosin shifts, and they move away from the active sites. As we’ll discuss in Exercise 11-3, this is when a muscle contraction can begin.
Nebulin. The large protein nebulin (NEB-yoo-lin) was long believed to be primarily a structural protein, being the “string” on which the actin subunits are arranged like beads. In this way, nebulin stabilizes the thin filament, controls its length, and stiffens it, which is needed for rapid tension generation during a muscle contraction. But nebulin is now understood to also be a regulatory protein, enhancing troponin’s sensitivity to calcium ions. What’s more, nebulin recruits myosin heads to bind to actin during a contraction, which plays an important role in the amount of tension generated during a contraction.
Elastic filaments are composed of two subunits of the structural and regulatory protein titin (TY-tin), which gets its name from the mythical Greek giants. True to its name, titin is a huge protein. Indeed, titin is the largest known protein in the body, and has a chemical name to match its enormous size—at 189,819 letters long, this name is often said to be the longest word in the English language. Much of the elastic filament is located in the core of the thick filament, anchoring it and the thin filament to other structural proteins. In this way, elastic filaments structurally stabilize the myofibril and resist excessive stretching. In addition, the end portion of titin is spring-shaped, which gives the myofibril a critical property: elasticity, or the ability to recoil back to its original size when a stretching force is removed. Elastic filaments also play an important regulatory role, which we revisit in Exercise 11-3 when we discuss the length-tension relationship.
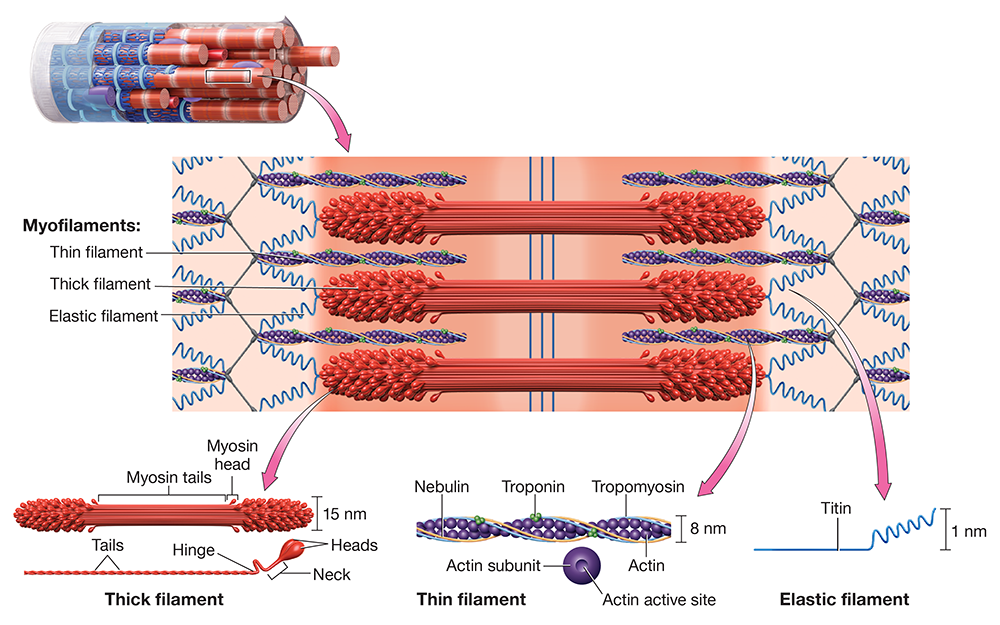
Figure 11.3 Structure of myofilaments.
One thing you should notice about Figures 11.2 and 11.3 is that the arrangement of myofilaments within the myofibrils gives skeletal muscle its characteristic striped or striated (stria- = “streak”) appearance. Each striation is given a specific name, as shown in Figure 11.4. The dark striations, called A bands, are dark because this is where we find overlapping thick and thin filaments or thick filaments alone. The light striations, called I bands, appear light because they contain only thin filaments.
On closer inspection, there are more lines and bands than simply the A and I bands:
In the middle of the A band is a lighter region called the H zone, where we find only thick filaments.
Running down the middle of the H zone are the M lines, which contain structural proteins that stabilize and support the thick filament. Remember the M lines by thinking of “M” as meaning “middle.”
On either side of the H zone is an area where both thick and thin filaments are found in the A band; this area is known as the zone of overlap.
In the middle of each I band is a dark line called the Z-disc, which consists of structural proteins that support the thin filaments, anchor the elastic filaments, and stabilize the structure of the myofibril. The Z-disc is easily remembered because it is the Z-shaped line.
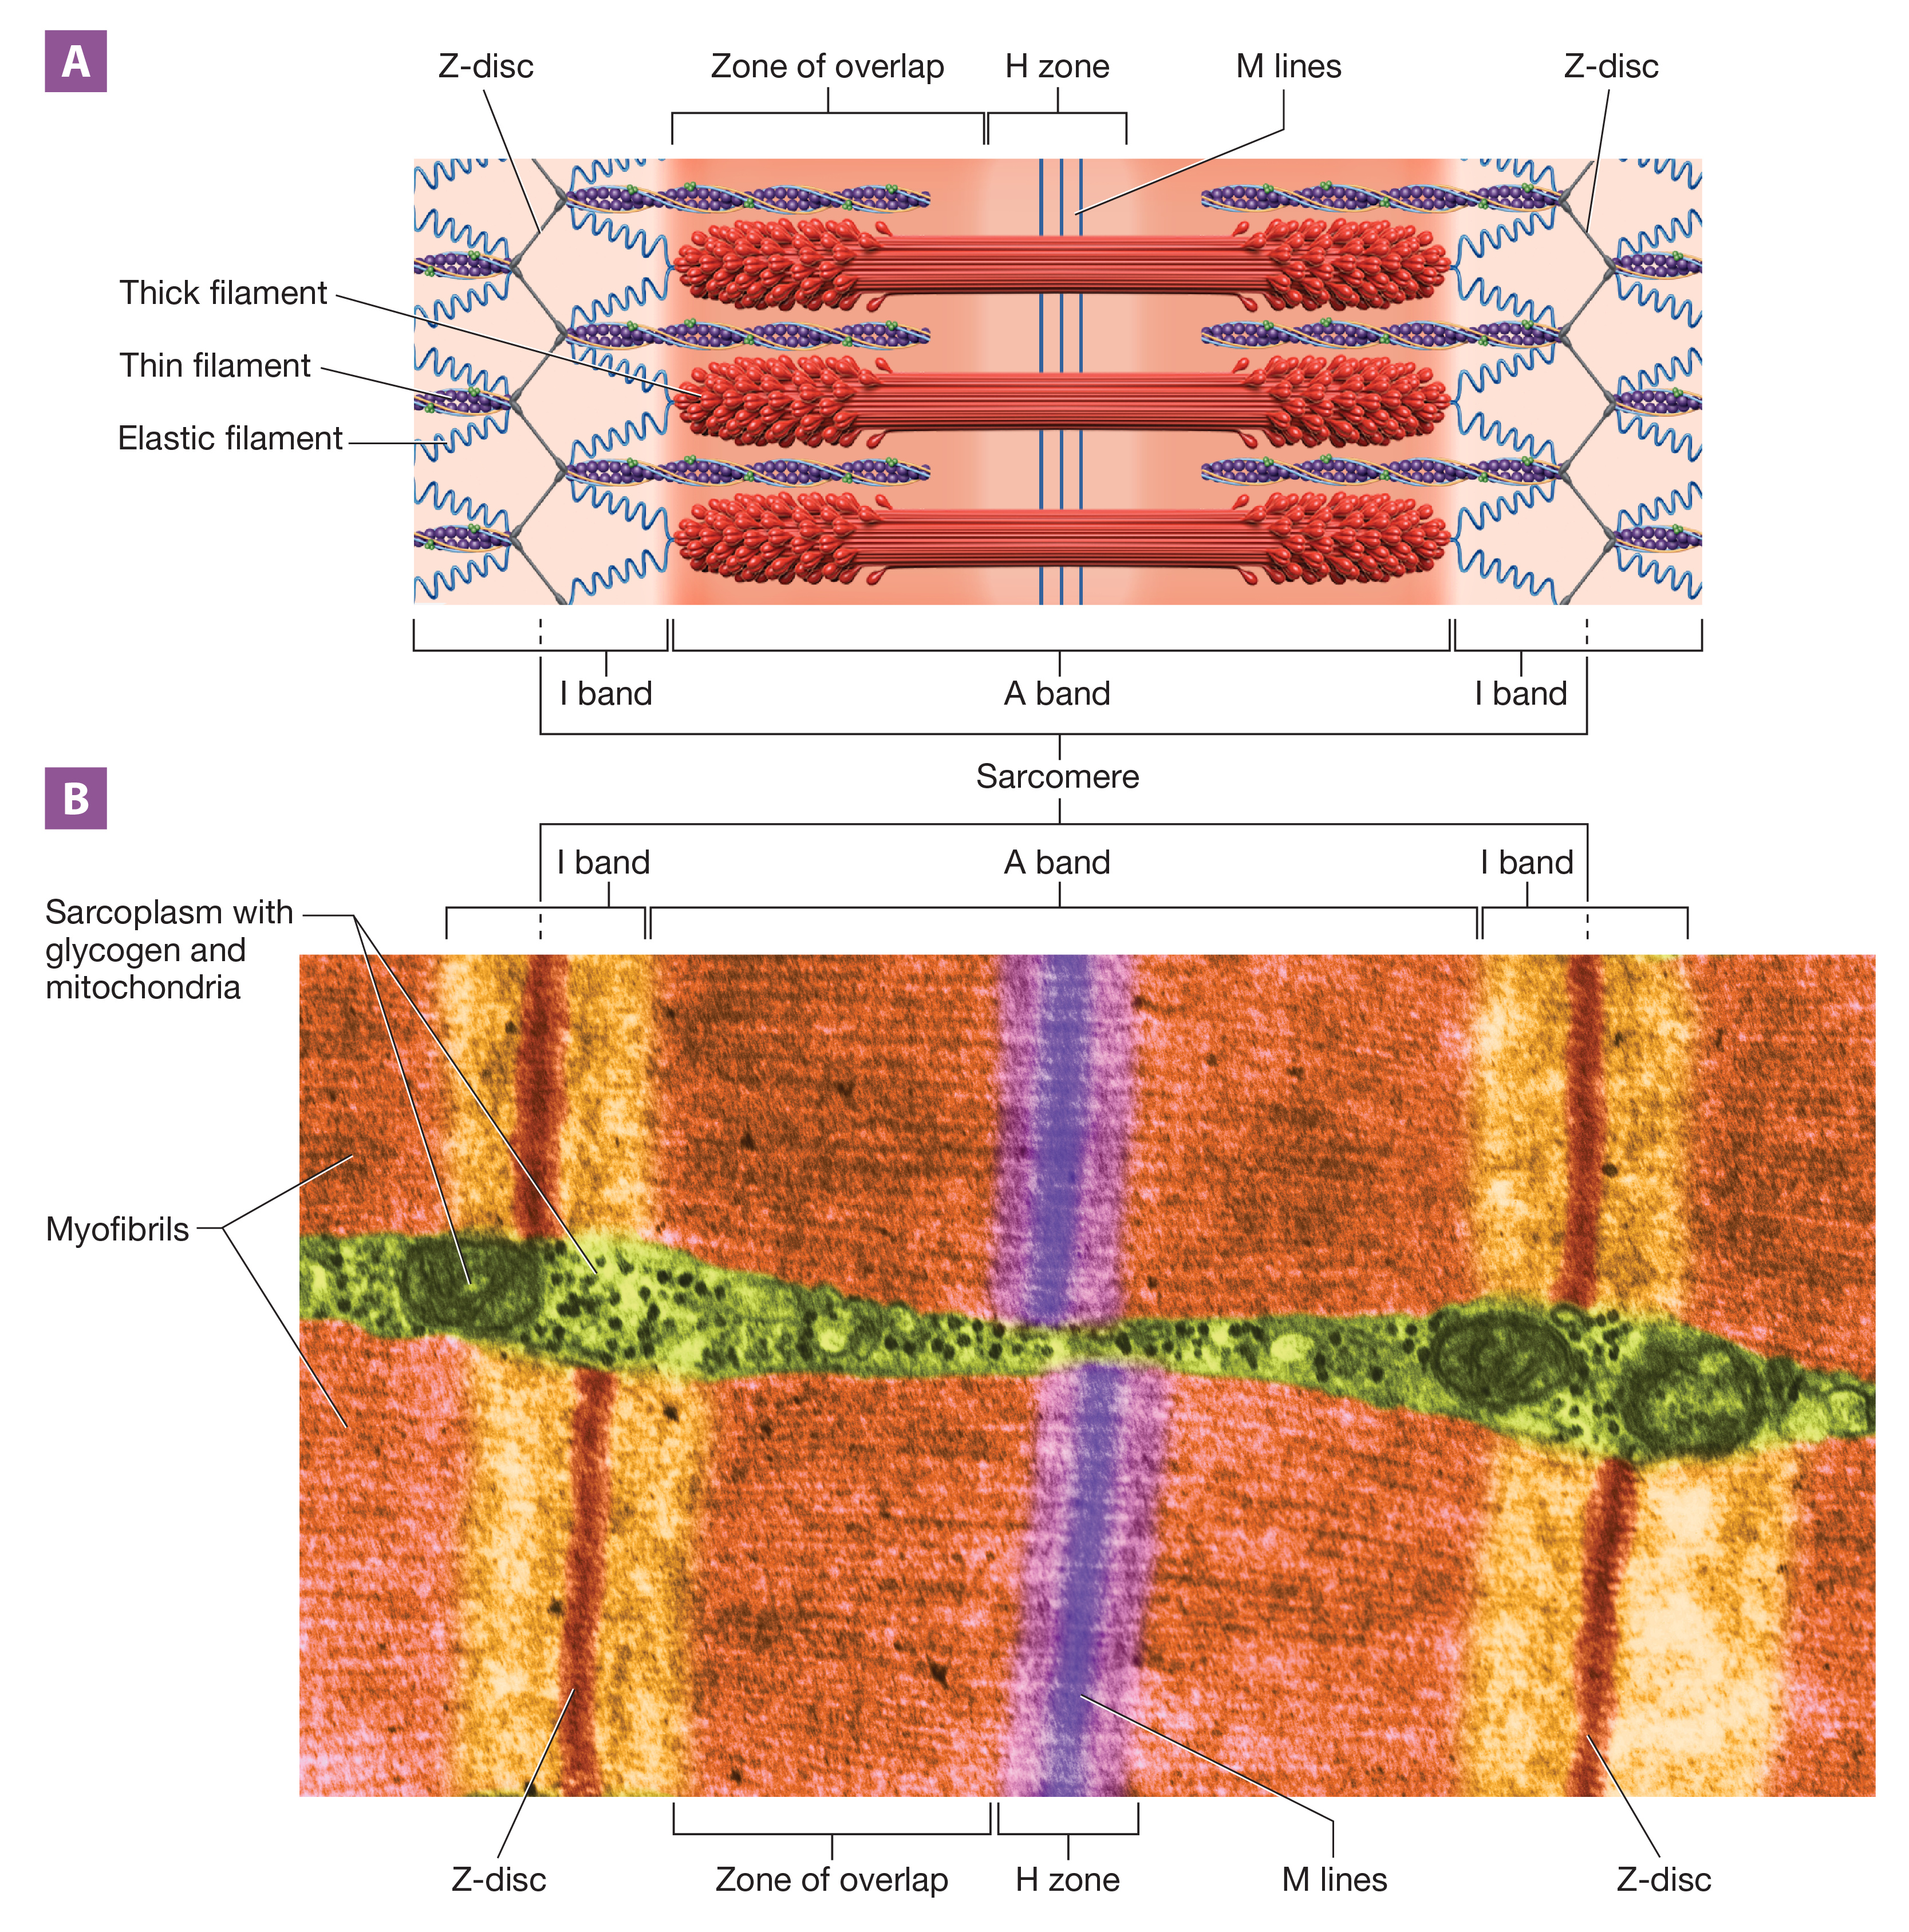
Figure 11.4 Structure of the sarcomere: (A) illustration; (B) transmission electron micrograph.
Long Text Description
Although these terms might sound like alphabet soup, they are important, as they are used to define the fundamental unit of contraction: the sarcomere (SAR-koh-meer; -mere = “part”). A sarcomere, defined as the space from one Z-disc to the next Z-disc, consists of a full A band and two half–I bands. This is where tension is generated during a contraction, and tension generated at one sarcomere is transferred to adjacent sarcomeres by Z-discs.
You can see the structures of the sarcomere, in addition to the other parts of the muscle fiber we’ve discussed, in Figure 11.5.
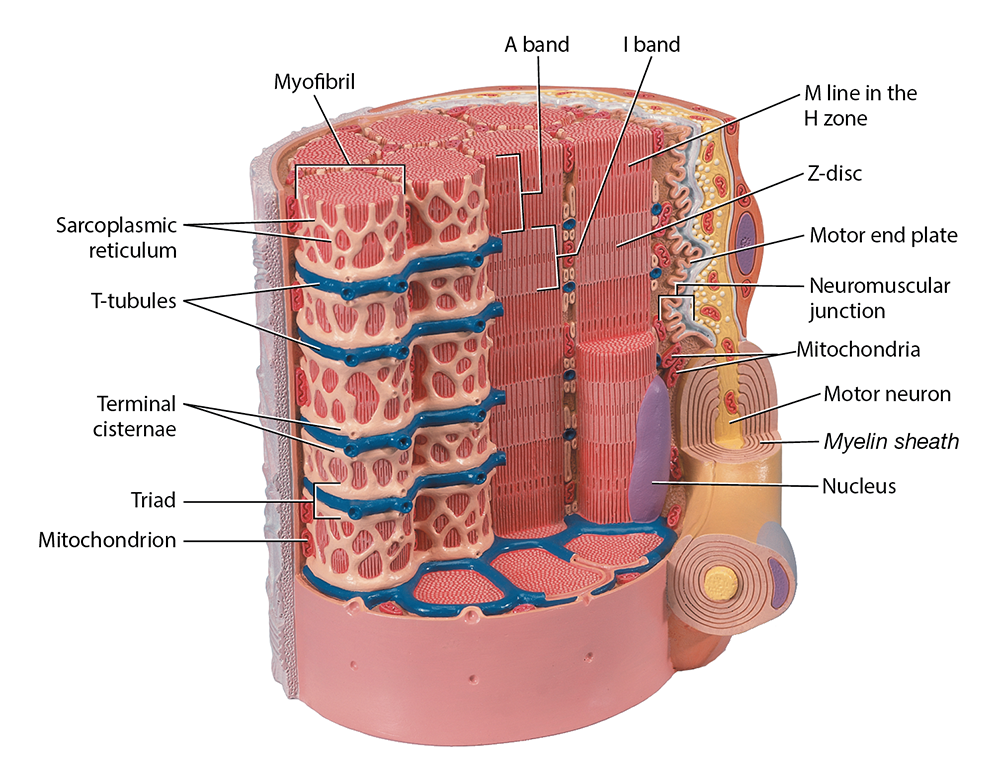
Figure 11.5 Skeletal muscle fiber, anatomical model photo.
Long Text Description
Note
[1] Purslow PP. The Structure and Role of Intramuscular Connective Tissue in Muscle Function. Front Physiol. 2020 May 19; 11:495.
Exercise 11-2 The Neuromuscular Junction
L.O. 11.2 Describe and identify the microscopic anatomy and structures of the neuromuscular junction.
Key Terms
You should be familiar with the following terms before coming to the lab.
Motor neuronSynapseNeuromuscular junctionAxon terminalSynaptic vesicleNeurotransmittersAcetylcholineSynaptic cleftAcetylcholine receptorMotor end plateMotor neuronSynapseNeuromuscular junctionAxon terminalSynaptic vesicleNeurotransmittersAcetylcholineSynaptic cleftAcetylcholine receptorMotor end plate

Pre-Lab: Reading
Skeletal muscle fibers are voluntary, which means that generally, they contract under the conscious control of the nervous system. Each skeletal muscle fiber communicates with a nerve cell called a motor neuron. When the motor neuron stimulates the skeletal muscle fiber, a contraction is triggered.
The junction between a neuron and its target cell is called a synapse (SIN-apz; “come together”). The specific type of synapse between a motor neuron and a muscle fiber is called the neuromuscular junction (noor-oh-MUSS-kyoo-lur; Figure 11.10), or NMJ. The neuromuscular junction consists of three parts:
Axon terminal. At its end, a motor neuron splits into many branches. Each branch terminates in a swollen axon terminal (or synaptic end bulb) that communicates with one muscle fiber. In the axon terminal's cytosol, we find synaptic vesicles (sih-NAP-tik) that contain chemical messengers known as neurotransmitters. Synaptic vesicles of motor neurons contain the neurotransmitter acetylcholine (uh-SEE-til-koh’-leen) or ACh.
Synaptic cleft. The axon terminal doesn’t come into direct contact with the muscle fiber; instead, they’re separated by a space called the synaptic cleft. Within the synaptic cleft is an extracellular gel that contains acetylcholinesterase (uh-see’-til-kohl’-in-ESS-ter-ayz; AChE), an enzyme that catalyzes the breakdown of ACh.
Motor end plate. The motor end plate is a specialized, folded region of the sarcolemma that contains acetylcholine receptors. These receptors are cation channels to which ACh binds.
When ACh binds to its receptors on the motor end plate, the cation channels open. As we’ll see in the next exercise, this begins the events that will eventually lead to a muscle contraction.
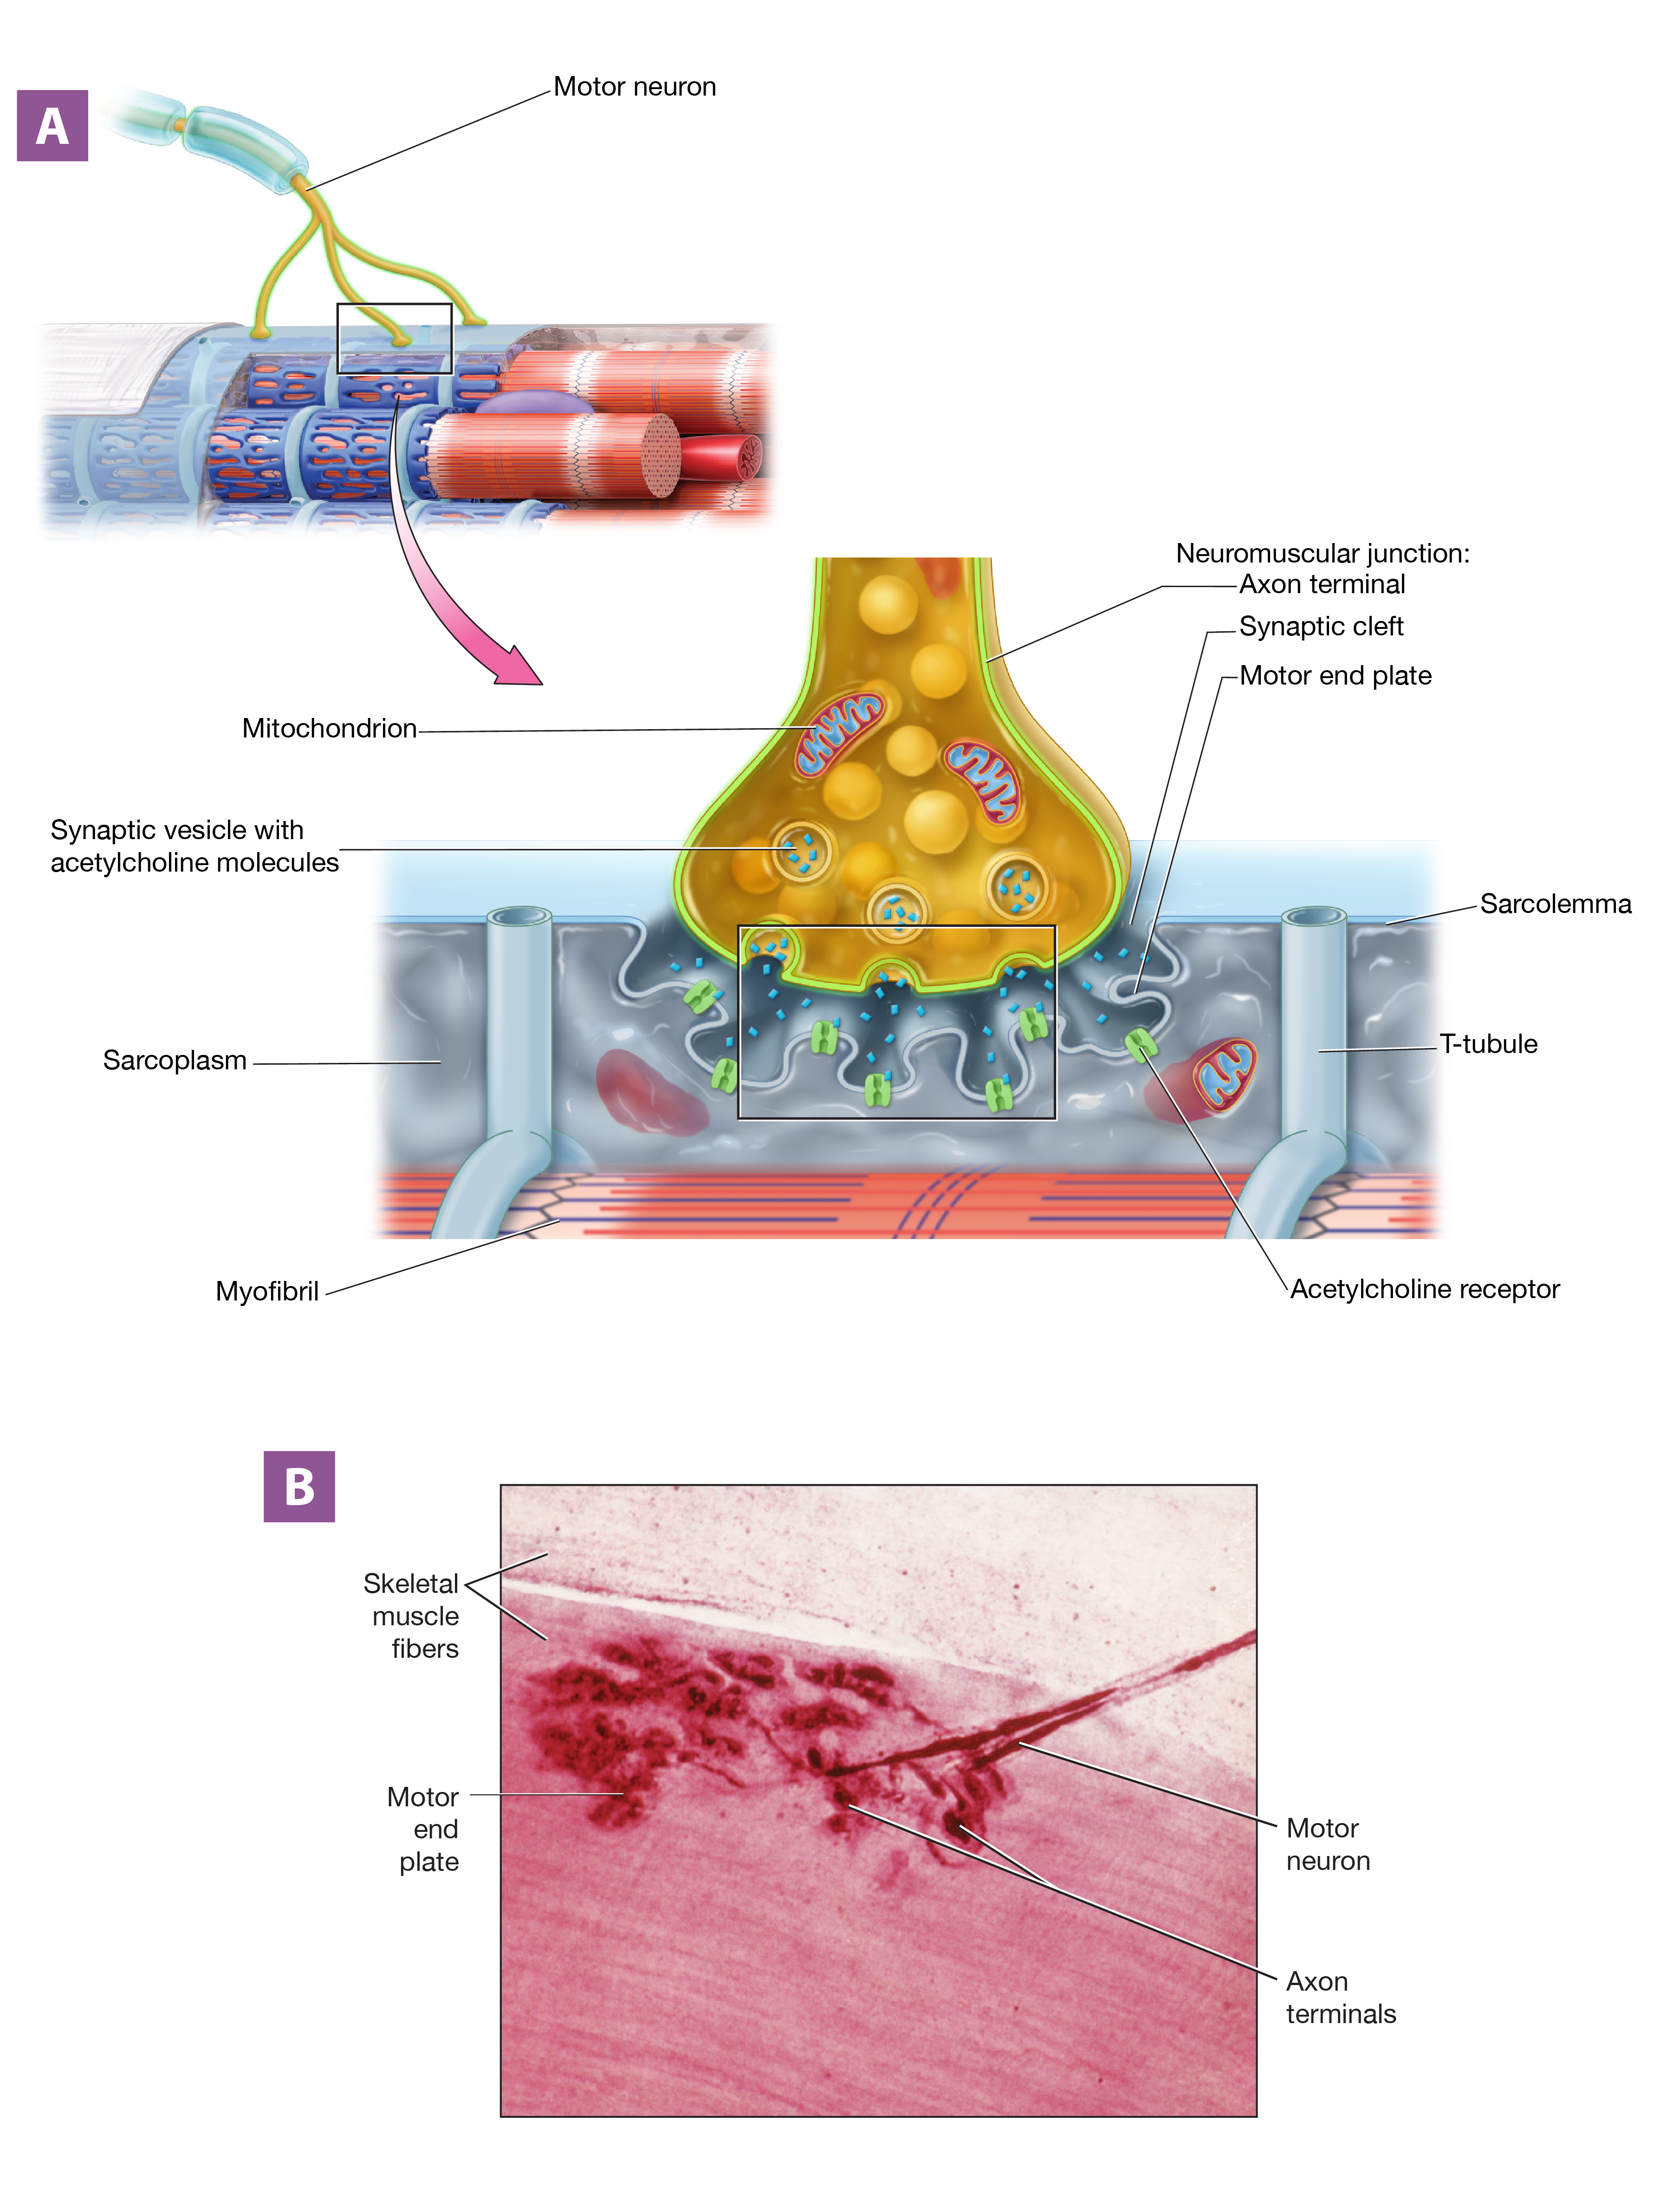
Figure 11.10 Structure of the neuromuscular junction: (A) illustration; (B) photomicrograph.
Long Text Description
Exercise 11-3 Muscle Physiology
L.O. 11.3A Describe the mechanism of skeletal muscle contraction, including the roles of ATP and calcium ions.
L.O. 11.3B Explain how excitation and contraction are coupled.
L.O. 11.3C Explain the mechanism of skeletal muscle relaxation.
L.O. 11.3D Describe and demonstrate the effect that resting muscle length has on the strength of a muscle contraction.
Key Terms
You should be familiar with these terms before coming to the lab.
Action potentialResting membrane potentialDepolarizationRepolarizationEnd-plate potentialCrossbridge cyclePower strokeExcitation-contraction couplingSliding filament mechanismLength–tension relationshipAction potentialRestingmembranepotentialDepolarizationRepolarizationEnd-plate potentialCrossbridge cyclePowerstrokeExcitation-contraction couplingSliding filament mechanismLength–tension relationship

Pre-Lab: Reading
We’ve said that skeletal muscle fibers contract when stimulated by the nervous system. In this exercise, we’ll see how this happens, and then we'll walk through the events of skeletal muscle contraction and relaxation.
Excitation-Contraction Coupling
Let’s return to the NMJ that we talked about in Exercise 11-2. In Figure 11.12, you can see what happens when an electrical impulse, called a neuronal action potential, reaches the axon terminal of the NMJ (step 1): The synaptic vesicles undergo exocytosis, releasing ACh into the synaptic cleft (step 2). ACh then diffuses across the synaptic cleft and binds to its receptors on the motor end plate. Recall that these receptors are cation channels, and when they open, cations cross the sarcolemma (step 3).
If this happens enough times, a muscle contraction is initiated. This relationship, in which nervous system excitation is directly linked—or coupled—to skeletal muscle contraction, is appropriately known as excitation-contraction coupling.
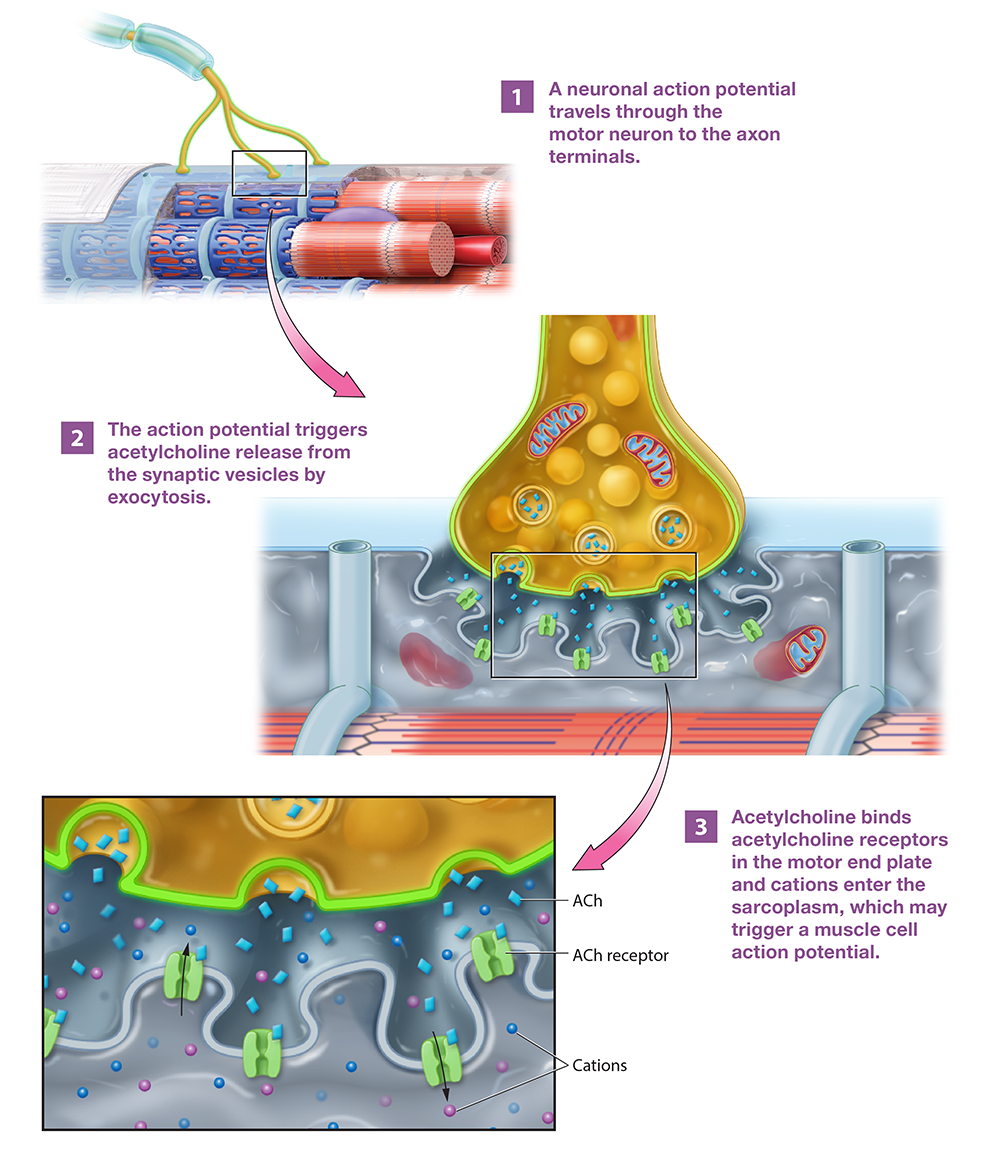
Figure 11.12 Events at the neuromuscular junction.
Long Text Description
Electrophysiology: Membrane Potentials
To understand how excitation and contraction are coupled, we need to understand some basics about the branch of physiology known as electrophysiology. Two points are important to consider, which are shown in Figure 11.13:
A muscle fiber at rest has a resting membrane potential. All cells, including muscle fibers, have an unequal distribution of charged particles near the plasma membrane: There is a thin layer of negative ions in the cytosol and a thin layer of positive ions in the extracellular fluid. This separation of charges is called an electrical potential, but really it’s simply an electrical gradient—positive and negative charges are separated by a barrier. The difference in electrical potential across the plasma membrane is called the membrane potential; the potential at rest is called, appropriately, the resting membrane potential. The resting membrane potential in a skeletal muscle fiber is a negative number, generally about –90 millivolts (mV). This means that along the sarcolemma, the sarcoplasm is 90 millivolts more negative than the cytosol.
Sodium and potassium ions are unequally distributed across the sarcolemma. We find another type of gradient across the membrane—a concentration gradient. Specifically, the concentration of sodium ions in the extracellular fluid is high, and the concentration in the sarcoplasm is low. The distribution of potassium ions is opposite—the concentration of potassium ions in the extracellular fluid is low, and the concentration in the sarcoplasm is high. This gradient is created and maintained by the ATP-consuming sodium-potassium ion pump, or Na+/K+ ATPase.
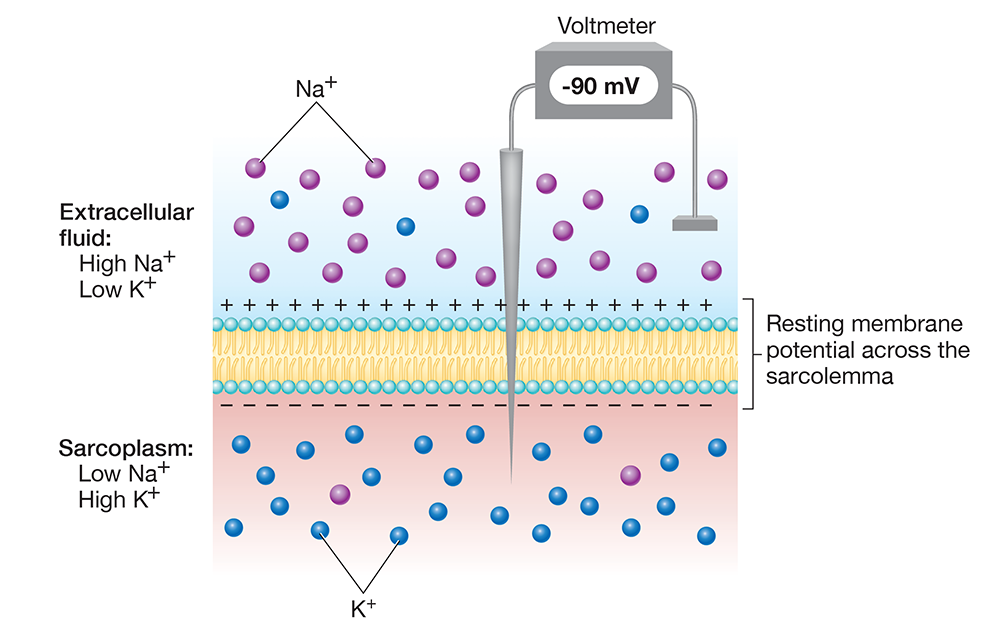
Figure 11.13 The resting membrane potential and the distribution of sodium and potassium ions across the sarcolemma.
Long Text Description
Understanding these two points allows us to understand the events of a muscle fiber action potential, which is a rapid, temporary change in the membrane potential from negative to positive, and then back to negative (Figure 11.14). In the first stage of the action potential, the membrane potential moves from −90 mV to +30 mV—a change known as depolarization. The action potential finishes with a return of the membrane potential to the resting value of −90 mV—a change known as repolarization. Note that repolarization must occur, or the motor neuron cannot re-stimulate the muscle fiber. In addition, repolarization completes before the contraction actually takes place, which allows the neuron to re-stimulate the muscle fiber rapidly.
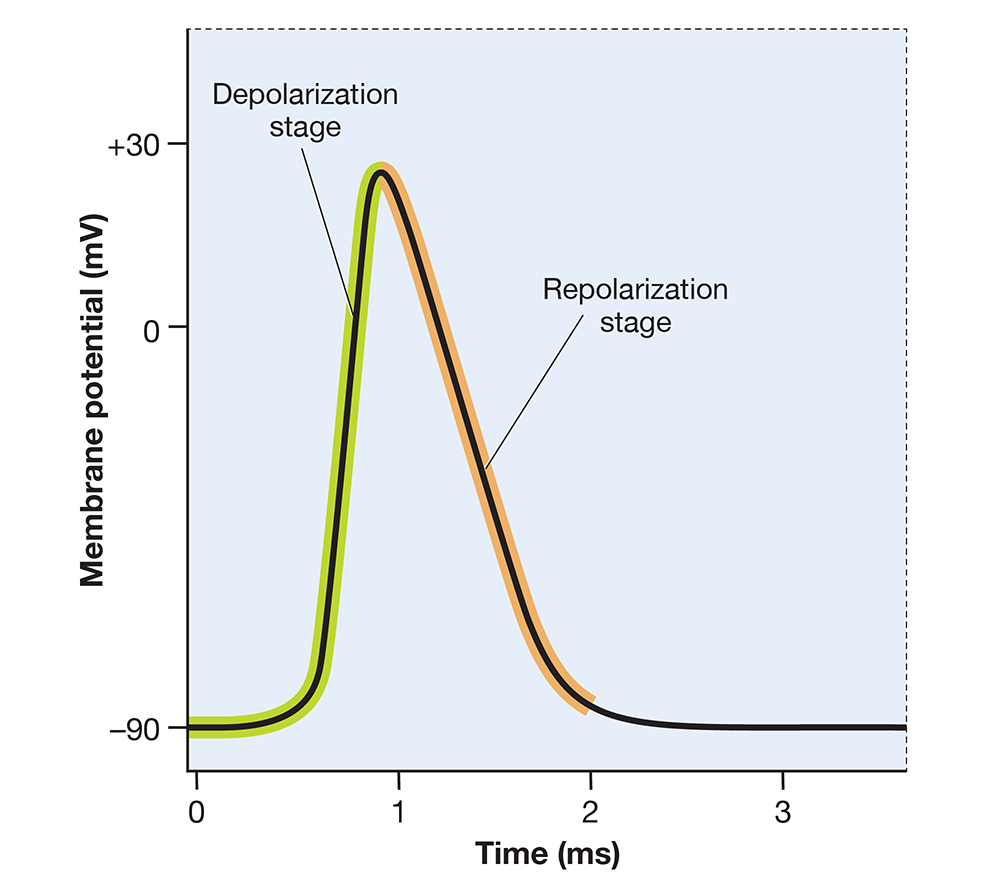
Figure 11.14 The change in membrane potential during a skeletal muscle fiber action potential.
Long Text Description
When ACh binds to its cation channel receptors in the motor end plate, a small depolarization called an end-plate potential results. If enough end-plate potentials occur, sodium ion channels in the sarcolemma around the motor end plate open, and an action potential occurs. What happens during an action potential? Let’s break it down.

Let’s Break It Down
Although the events of an action potential might look complex at first, they’re actually easy to work out—all you need to remember is the gradients for sodium and potassium ions. Let’s start with depolarization:
Loading...
Loading...
Loading...
Loading...
Loading...
Loading...
Now let’s turn to repolarization, which begins when sodium ion channels close and potassium ion channels open.
Loading...
Loading...
Loading...
Loading...

When an action potential begins, the depolarization spreads—or propagates—through the sarcolemma. The depolarization wave dives into the interior of the muscle fiber along the T-tubules, which you can see in step 1 of Figure 11.15. As the action potential spreads along the T-tubules, it passes calcium ion channels in the adjacent terminal cisternae. The depolarization triggers these calcium ion channels to open, which allows calcium ions to leave the sarcoplasmic reticulum and flood the sarcoplasm (step 2).
As calcium ions are being released, the sarcolemma is repolarizing. When repolarization completes, the motor neuron can re-stimulate the muscle fiber and initiate another action potential. This occurs repeatedly for contractions occurring in the body, and the concentration of calcium ions in the sarcoplasm increases with each action potential.
The increase in calcium ion concentration is what directly connects excitation and contraction. In a resting muscle fiber, actin and myosin can’t interact because the regulatory protein tropomyosin is blocking the actin subunits’ active sites. When calcium ions flood the sarcoplasm, they bind to troponin (step 3 of the figure). This causes troponin to shift its position, which pulls tropomyosin away from the actin subunits’ active sites (step 4), and actin and myosin can now bind (step 5).
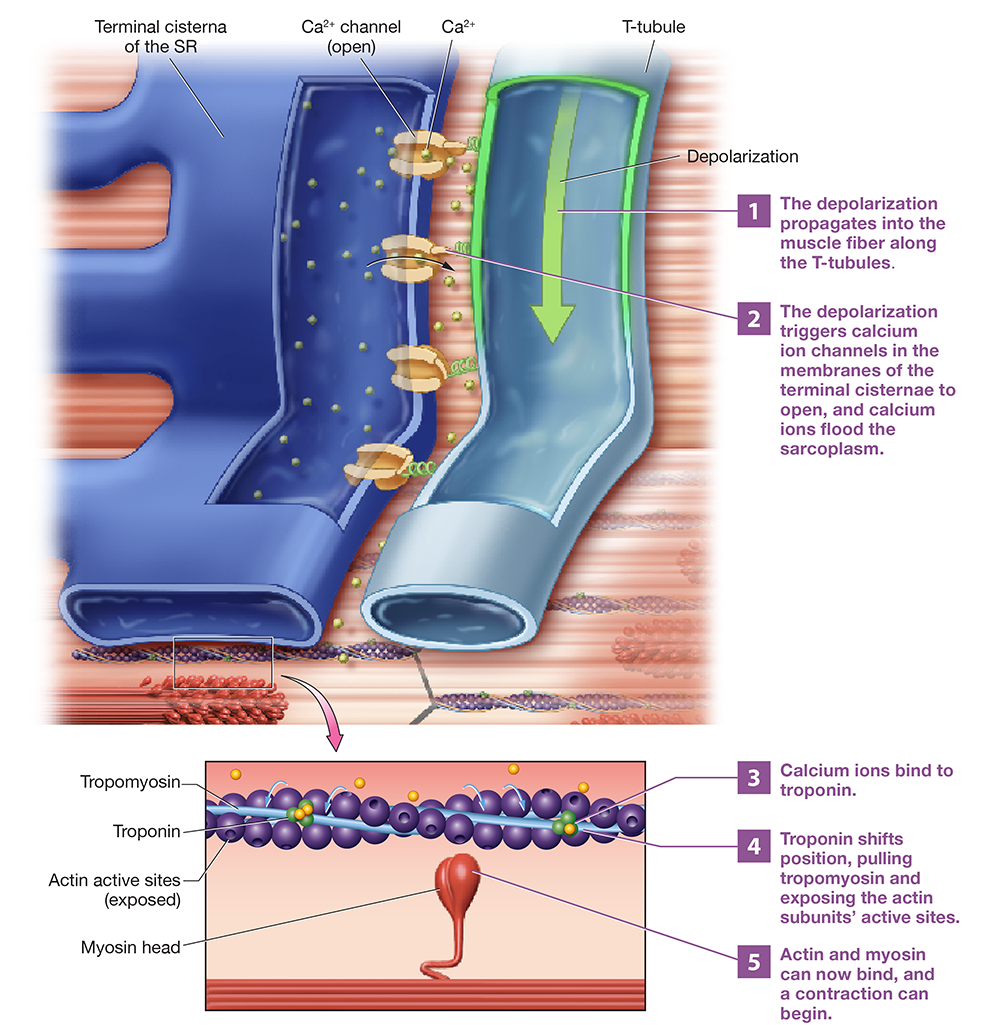
Figure 11.15 Calcium ion release, the event linking excitation and contraction.
Long Text Description
You can see the process of excitation-contraction coupling in the animation below.
BioDigital: Excitation-Contraction Coupling Animation
Long Text Description
The Mechanism of Muscle Contraction: Sliding Filament Mechanism
A skeletal muscle fiber contracts by a process known as the sliding filament mechanism, in which the myosin heads bind to actin and pull the thin filament toward the M lines of the sarcomere. As this occurs, the thick and thin filaments “slide” past one another. The key event of this mechanism is the crossbridge cycle, which consists of the following steps (Figure 11.16):
ATP hydrolysis “cocks” the myosin molecule at its hinge. We all know intuitively that muscle contraction requires energy. And like most cellular processes in the body, the energy that powers contraction comes in the form of ATP. Each myosin head contains an ATPase enzyme. When ATP binds a myosin head, this ATPase immediately catalyzes its hydrolysis. The energy released from this reaction “cocks” the myosin head into an upright position. Notice in the figure that the products of the reaction, ADP and phosphate, remain attached to the myosin head.
An actin-myosin crossbridge forms. The myosin head binds to the active site of an actin subunit, forming a crossbridge.2
A power stroke occurs. The phosphate leaves the myosin head as inorganic phosphate (Pi ), and the myosin molecule moves forward from its upright position into its relaxed position. This movement, called a power stroke, pulls the thin filament toward the M lines in the center of the sarcomere. At the end of the power stroke, ADP leaves the myosin head.
ATP binds to the myosin head and breaks the actin-myosin attachment. After the power stroke, actin and myosin will remain attached until a new ATP binds to the myosin head and breaks the attachment. If no ATP is available, the actin will remain bound to myosin, and the muscle fiber will remain in a contracted state.
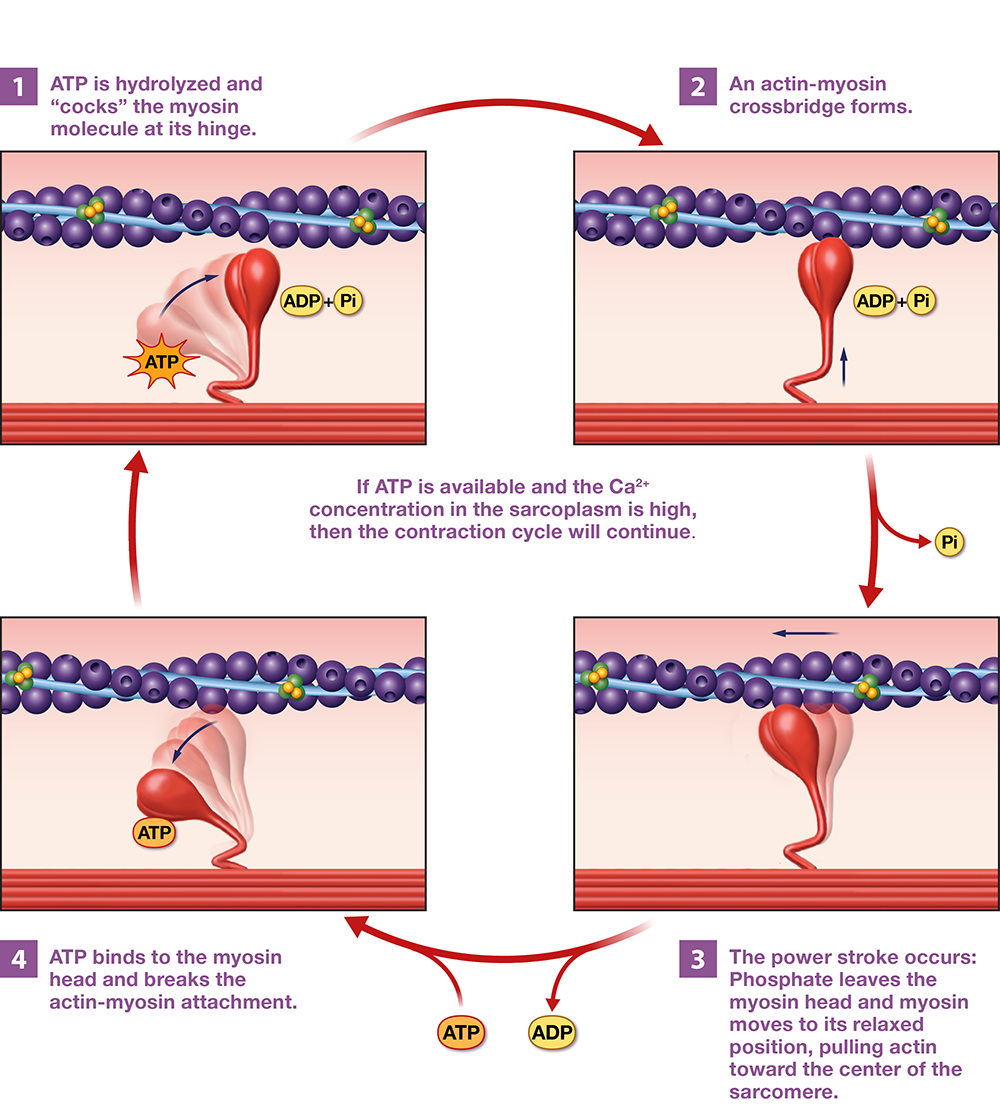
Figure 11.16 A single crossbridge cycle showing the sliding filament mechanism of contraction.
Long Text Description
As soon as the attachment is broken in step 4 of the crossbridge cycle, myosin’s ATPase enzyme will catalyze ATP hydrolysis, putting us back at step 1. The cycle will continue as long as ACh is in the synaptic cleft and calcium ions and ATP molecules are available.
You can see a crossbridge cycle and power stroke in the animation here:
BioDigital: Crossbridge Cycle and Power Stroke Animation
Long Text Description
Muscle Relaxation
A contraction terminates when the neuron stops releasing ACh, and all remaining ACh in the synaptic cleft is degraded in reactions catalyzed by the enzyme acetylcholinesterase. At this point, muscle relaxation occurs, as illustrated in Figure 11.17. When stimulation ceases, the sarcolemma undergoes a final repolarization (step 1). As the repolarization passes calcium ion channels in the terminal cisternae, the channels close (step 2), and the calcium ions in the sarcoplasm are pumped back into the SR by active transport calcium ion pumps in the SR membrane (step 3). As the calcium ion concentration decreases, calcium ions leave troponin, which changes position (step 4). This pulls tropomyosin back into its resting position, where it blocks the actin subunits’ active sites (step 5). At this point, actin and myosin can no longer bind, and the muscle fiber returns to its resting length.
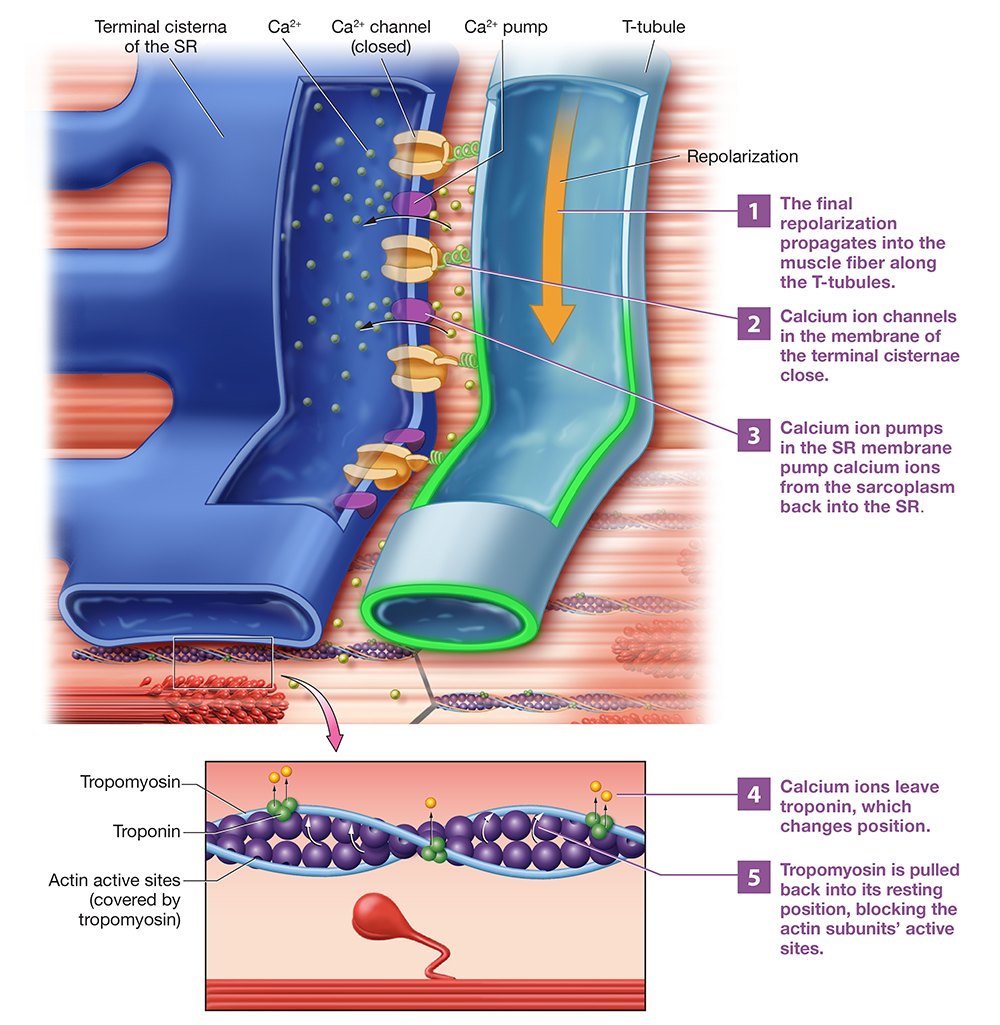
Figure 11.17 The process of skeletal muscle relaxation.
Long Text Description
The Length–Tension Relationship
Not all contractions generate the same amount of tension. Several factors influence tension, such as the timing and frequency of stimulation by the nervous system. Another factor that influences the amount of tension a contraction can generate is the size of the sarcomeres’ zones of overlap when the muscle fiber is at rest, a principle known as the length–tension relationship (Figure 11.18). When the muscle is stretched, the sarcomeres are longer and have a smaller zone of overlap, and when the muscle is shortened, the sarcomeres are shorter and have a larger zone of overlap.
Notice that the muscle fiber can generate the maximum amount of tension when its sarcomeres are at about 100 to 120% of their natural length. We believe this is because of elastic filaments—at this length, the elastic filaments reorient the thick and thin filaments to prime them for contraction. This decreases the concentration of calcium ions necessary to expose the actin subunits’ active sites, increasing the amount of tension produced.
Conversely, the amount of tension generated during a contraction diminishes when the muscle is overly stretched, making the zone of overlap too small, and when the muscle is excessively shortened, making the zone of overlap too large. Physiologists believe that, at these lengths, the elastic filaments can’t prime the thick and thin filaments, reducing the tension generated.
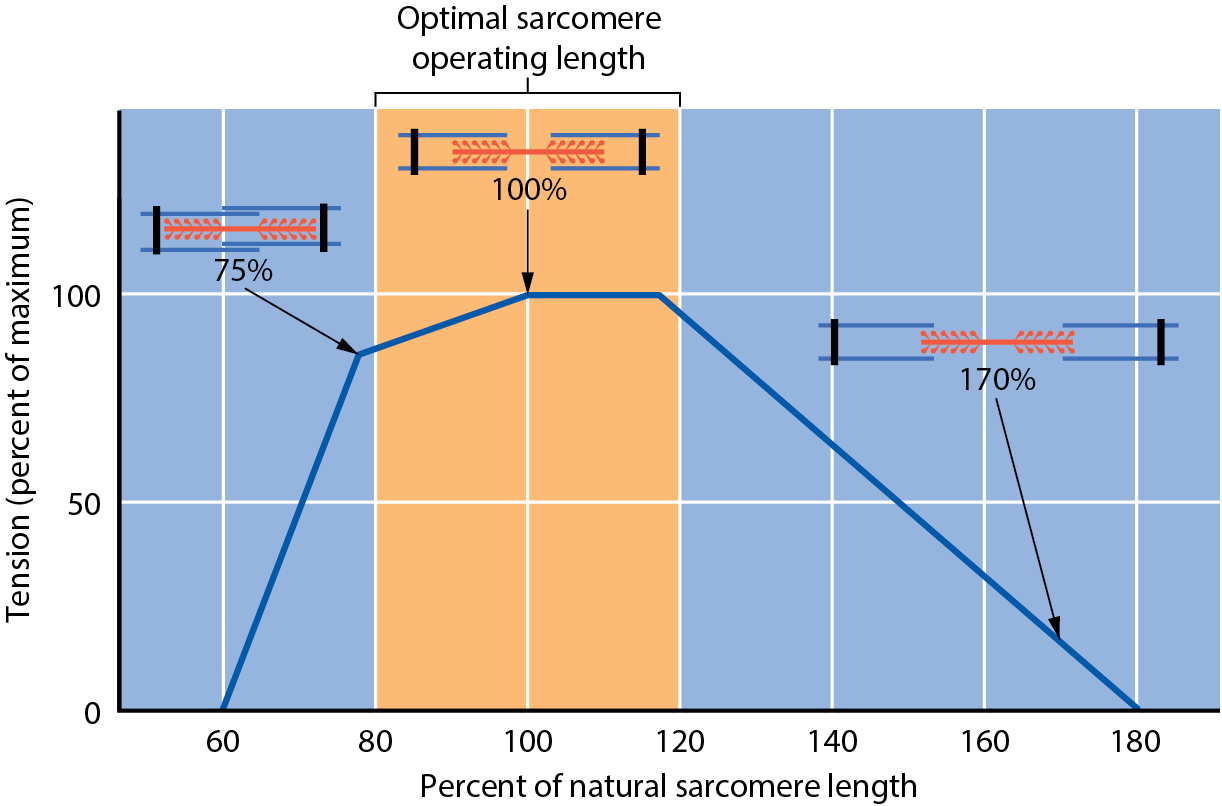
Figure 11.18 The length–tension relationship.
Long Text Description
Note
[2] There is some disagreement on the exact definition of a crossbridge. Graduate texts and the scientific literature generally refer to the crossbridge as the myosin head and neck, as this part of the molecule “bridges across” from the thick filament to the thin filament. Undergraduate texts, however, tend to use “crossbridge” to mean the bond between the myosin head and actin’s active site. We use this latter definition here because it is more likely to match your class materials.