Service Wheel Studs
Service Drive Axle Wheel Studs
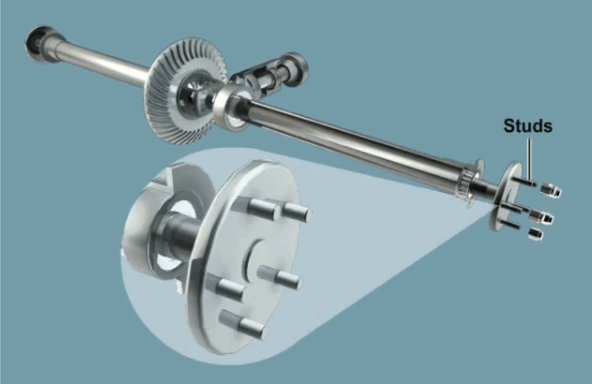
Wheel studs are part of the axle shaft and hub and bearing assembly.
They, along with lug nuts, are used to attach the wheels to the vehicle.
Wheel studs are threaded and resemble bolts without hex-shaped heads.
They are replaceable and come in two types: press-in and screw-in.
Screw-in studs: thread directly into the hub flange; the studs and lug nuts form one piece.
Press-in studs: are pressed into and held in place by the hub flange.
A special tool may be required to remove or install press-in wheel studs.
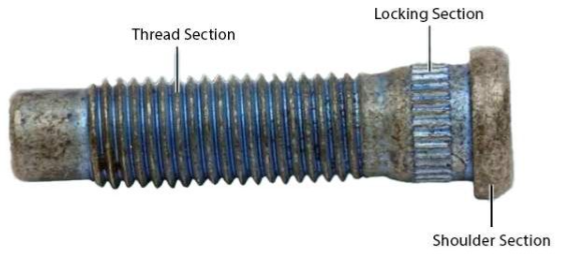
Wheel Stud Sections
A wheel stud has three sections: threaded, locking, and shoulder.
The threaded section is where the lug nut spins; it’s visible when the wheel is removed.
The locking section has raised grooves that mesh with the hub metal when pressed in, preventing the stud from rotating as the lug nut is tightened.
The shoulder section is the enlarged part that acts as a stop, preventing the stud from being pulled through the hub when the lug nut is tightened.
Tools to Remove and Install Wheel Studs
Wheel Stud Remover
A wheel stud remover is used to press the wheel studs out of the vehicle.
There are two main types of wheel stud remover tools:
C-shaped remover tool:
Has an open end where the pressed-out stud passes through.
The opposite end uses a large jam bolt that, when screwed in, presses the stud out.
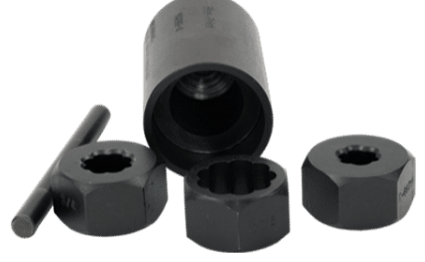
Screw-on remover tool:
Screws directly onto the wheel stud.
An adapter is placed over the stud, and a hammer is used to drive the stud out.
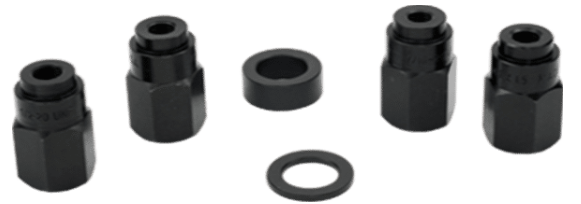
Wheel Stud Installer
A wheel stud installer is used to prevent damage when installing new wheel studs.
Insert the new stud into the hub or flange.
Thread the installer tool onto the stud.
Tighten the tool — this action pulls the stud securely into the hub or flange.
Service Wheel Studs
Step 1
With the vehicle on the ground, break loose the torque on the lug nuts.
Lift the vehicle using the appropriate lifting equipment.
Remove the lug nuts completely.
Remove the wheels from the vehicle.
Avoid inhaling brake dust, as it may contain asbestos and can be hazardous to your health.
Step 2
Remove the brake components, which may include the brake caliper, caliper bracket, and brake pads.
Take off the brake rotor from the drive axle, following the vehicle’s service information and recommended procedures.
Step 3
After removing the brake components, install the wheel stud removal tool according to the tool’s instruction manual.
Use a hammer to strike the removal tool and loosen the stud from the hub.
If the stud does not come out after one or two strikes, inspect for corrosion around the wheel stud that may be preventing removal.
Step 4
After removing the wheel studs, inspect the flange carefully.
Ensure the flange surface and wheel stud holes were not damaged during removal.
Check for any bends or warping in the flange.
Confirm that the wheel stud holes are free of corrosion, distortion, or other damage before installing new studs.
Step 5
Install the new wheel studs into the flange holes.
Attach the wheel stud installer tool onto the stud.
Finger tighten the installer tool.
Ensure the stud is straight in the hub hole and not tilted to one side before tightening further.
Step 6
Operate the stud installation tool by turning it with a wrench.
As you turn the tool, it draws the stud into the flange, seating it firmly against the flange surface.
Step 7
After installing the new wheel studs, reinstall the brake components.
This includes the brake caliper, caliper bracket, and brake pads.
Ensure all components are properly aligned and securely fastened according to the vehicle’s service specifications.
Step 8
Install the wheel onto the vehicle.
Torque the lug nuts to the manufacturer’s specified value using a calibrated torque wrench.
Inform the customer to return after driving approximately 25 miles to have the lug nuts re-torqued.
Re-torquing ensures the threads on the new wheel studs stay properly seated.
Failure to re-torque may cause the wheels to loosen, leading to potential damage or safety hazards.