W2: Indirect Ophthalmoscopy
Historical Anecdote & Motivation
Dialogue between Andrew (lecturer) and an optometrist colleague
Colleague: “I don’t use my BIO because I can’t see very well with it.”
Andrew: “You can’t see very well with your BIO because you don’t use it.”
Pedagogical moral: proficiency comes only with practice; indirect techniques are indispensable in primary eye-care.
Direct vs. Indirect Ophthalmoscopy – Core Differences
Direct Ophthalmoscopy
Uses a series of interchangeable lenses (Rekoss disc)
Image: upright, virtual
Very high magnification (≈) but extremely small field of view (≈)
Highly affected by patient/clinician refractive error & media opacities
Indirect Ophthalmoscopy (BIO, slit-lamp biomicroscopy, etc.)
Positive (“condensing”) lens forms a real, inverted and reversed aerial image
Provides stereopsis (binocular depth perception)
possible through dilated and undilated pupils
Moderate magnification with very large field of view
BIO: 10 x field of view of a direct ophthalmoscope
variable magnification settings on the slit lamp allows for varied viewing conditions with the same lens.
wide range of magnification options when various lenses are used
Far less dependent on refractive error; superior through cataract & other opacities
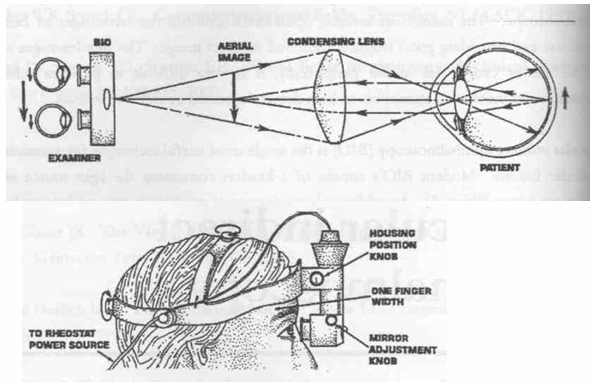
Indirect Technique:
Dynamic technique which enables most parts of the fundus to be viewed with only minor cooperation from the patient
Superior view can be obtained through media opacities compared to direct ophthalmoscopy
Particularly useful to assess the fundi behind cataract
View is relatively independent of high refractive errors • Image reversed and inverted
More difficult to record findings
Dilated pupils vs undilated:
Indirect techniques normally administered after the patient has been dilated
Easier to master the technique with larger pupils
Aim to maintaining a stable, binocular image
With practice, the ability to maintain excellent views through a small pupil improves
Dilate the pupil as required, unless contraindicated
When a thorough assessment is required (diabetic, suspected or known eye disease, history of injury, flashes or floater, etc…)
An asymptomatic patient with no ocular/systemic history and moderate to large pupils, can consider an undilated assessment
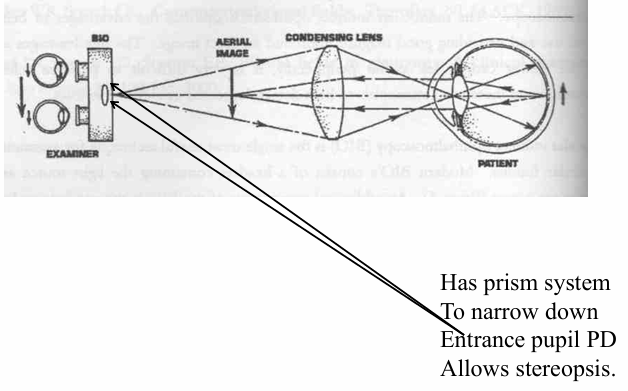
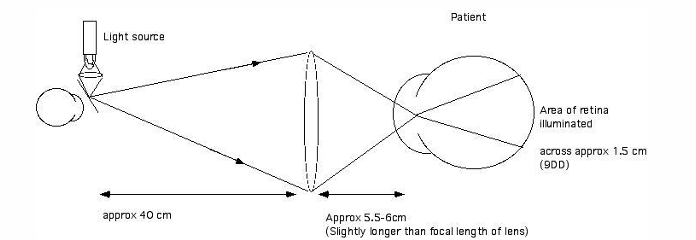
Light going in:
light goes through small entrance pupil, less back scatter
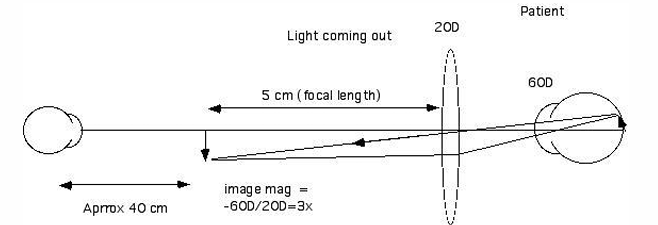
Light coming out:
Image formed is real, slightly magnified, and inverted. Relative near magnification depends on lens power, and how far observer is from image.
Physical Optics of Indirect Ophthalmoscopy
Positive lens placed ≈ focal length in front of patient’s eye; produces real aerial image ~ in front of lens
Two optical paths must fit through the patient’s pupil (“pupil matching”):
Illumination path from BIO → retina
Observation path from retina → aerial image → examiner
Prism/mirror system inside BIO narrows examiner’s inter-pupillary separation to match small entrance pupil → enables stereopsis even through pupils
Condensing Lenses – Power, Magnification & Field of View
Approximate near magnifications (relative to viewing retina at ):
Magnification is much less dependent on refractive error in indirect
Approximate angular / linear field of view & illuminated retina (one eye):
Trade-off: Higher power ⇒ lower magnification but wider field and smaller, lighter lens
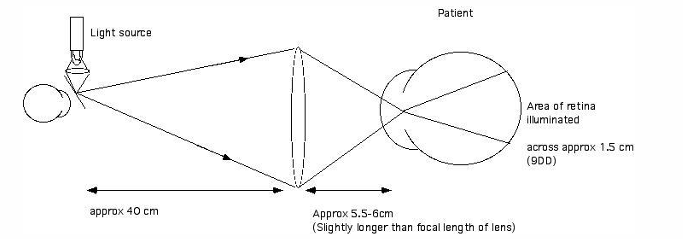
About 1.5 cm will be illuminated, about 9 10x linear extent, 80 to 100 x the area illuminated with direct.
light source slightly off to one side - shifts the area the patient see is slightly different to the part lit up on the retina.
Pupil Matching
image of clinician’s pupil is formed in patient’s pupil
when considering FOV it is as if one was standing in patient’s pupil looking into patient’s eyes.
Not quite the same field of view with each eye, (as a consequence, stereopsis).
images of clinician’s pupils (in patient’s pupil) slightly displaced, with respect to image of light source. Won’t see total amount of field that’s illuminated, but back scatter off cornea and crystalline lens will not interfere so much with view. (Useful for cataractous, other media opacity patients.)
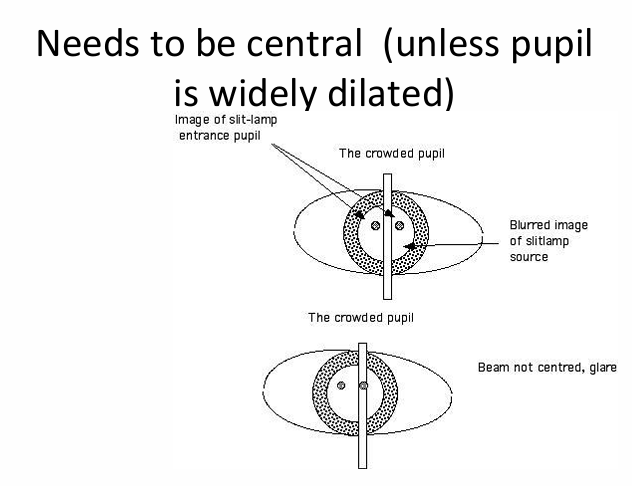
“Crowded Pupil” Concept
All three images (right & left examiner pupils + light source) must pass through patient’s pupil
Errors if lens is too close/far or decentered:
Light fails to enter ⇒ dark retina
Return light misses examiner’s pupil ⇒ dark view
Excess back-scatter from lens/cornea ⇒ glare
Remedy: precise lens distance (slightly > focal length) + centring + adjust mirror & entrance-pupil separation
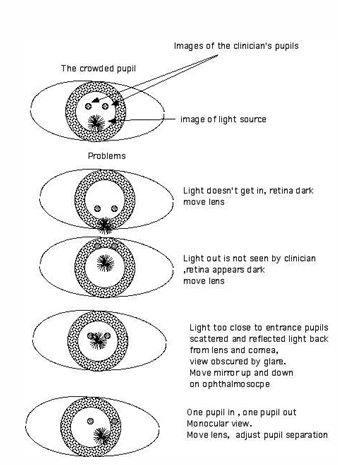
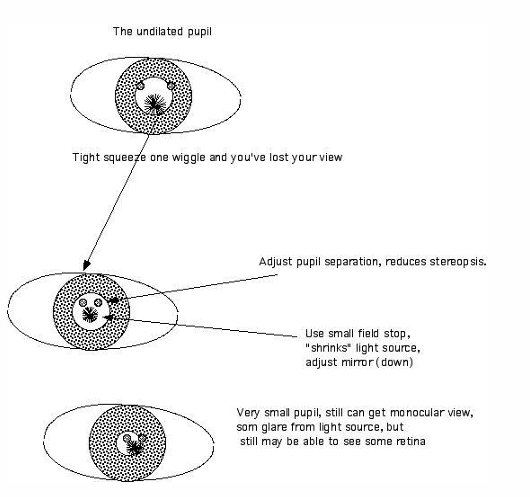
Moving mirror: too close to axis, glare
too far from axis: mismatch between illuminated and viewed fields
Narrow entrance pupil separation decreased sense of stereopsis.
Setting-Up & Aligning the BIO
On your head, adjust the crown and position of the BIO so that it is comfortable.
Headband centred; eyepieces ≈ from examiner’s eyes (or spectacles)
Include near add in eyepieces for presbyopes (≈)
Calibration routine (each session):
Thumb at , match R/L PD so binocular FOVs overlap
Light spot positioned in upper – of view
Ensure mirror adjustments not disturbed during storage
Pharmacologic Pupil Dilation – Protocol & Precautions
Contra-indications / cautionary factors
Narrow Van Herick (<) or closed angles (confirm with gonioscopy)
Angle-closure risk, iris-fixed or A/C IOLs, hyphema, miotic therapy, globe penetration, drug hypersensitivity, subluxated lenses/IOLs, suspected penetrating injury, patients under miotic therapy, hypersensitivity to requisite drug.
Pre-dilation steps
Case history (drug allergies)
Baseline IOP via contact tonometry (prior to anaesthetic-softening)
Van Herick → gonioscopy as required
Explain remote ACG risk; obtain & record consent
Typical regimen
drop tropicamide (± phenylephrine - avoid if uncontrolled HTN/cardiac)
Wait , then check dilation & post-exam IOP
BIO Examination Technique – Step-By-Step
Patient preferably supine (best view) or sitting; room lights off
Examiner–patient distance ≈ (avoid creeping forward)
Hold lens (pinkie finger) with stabilising contact on patient’s face (forehead, nose or cheek); other hand retracts lids. Stability is critical.
Sequence
Centre BIO light in pupil → centre pupil in lens (observe red reflex)
Slowly withdraw lens until red reflex fills lens → Fundus detail will become progressively magnified until the red reflex fills the entire area of the lens
If image lost: return lens toward eye, re-centre, pull back again
Scanning rules
In general, lens should always be perpendicular to line connecting BIO and patient’s pupil
If reflections from condensing lens, can move them out of view by slightly tilting the lens.
Lens and BIO move as one when scanning
Imagine that the center of the patient's pupil, the center of the condensing lens, and the examiner's visual axis are all connected by a rigid rod
Movement to an adjacent portion of the fundus should be performed with this concept in mind
Move your entire torso from side-to-side to get out further on the fundus and to scan the retina
All eight sectors of the fundus are examined in a systematic order
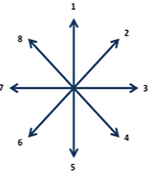
Patient’s gaze is directed toward the sector that the examiner wishes to view
For more peripheral viewing, you need to move in opposite direction
With the patient looking upwards, you will be viewing the superior retina
But image is reversed and inverted, so inferior part of retina is more superior in the lens
Move the yourself towards any lesion of interest to bring it closer to the centre of your image
Order:
Scan the peripheral areas first
Finish by examining the posterior pole
Have patient look at target past your right ear to scan around the nasal posterior pole areas (optic disc zone)
Have patient look at target past your left ear to scan around the temporal posterior pole areas (macula zone)
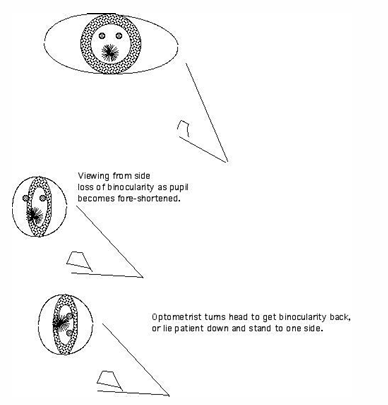
Peripheral challenges
Binocularity may drop; may tilt lens or narrow entrance PD to regain view
Small pupil ⇒ may require monocular view, field stop, reduced stereopsis
Although image is upside down where you look is still the same as direct. If you want to look at superior retina, have patient look up, if you want to look at nasal retina patient looks nasal.
If reflections from condensing lens, can move them out of view by slightly the lens. tilting
In general, lens should always be perpendicular to line connecting BIO and patient’s pupil.
Common Error / Tips
Lens stability and alignment
Handedness: useful to be ambidextrous, but most of the time not essential. Nice when looking at temporal fundus (so can get lens as close to nose as possible)
Examiner moving too close to the patient
Difficulties with accommodation, convergence and loss of binocularity may occur, as will a smaller field of view
Periphery: May have to tilt lens slightly to view periphery
Some lenses have a right way and a wrong way
Flatter side to patient, often have a ring marking which should face towards patient, writing bottom of letters to patient
30D lens smaller diameter, can maneuver around patient’s facial features to see periphery
Consider your own ergonomics – back position, arm position
BIO recording
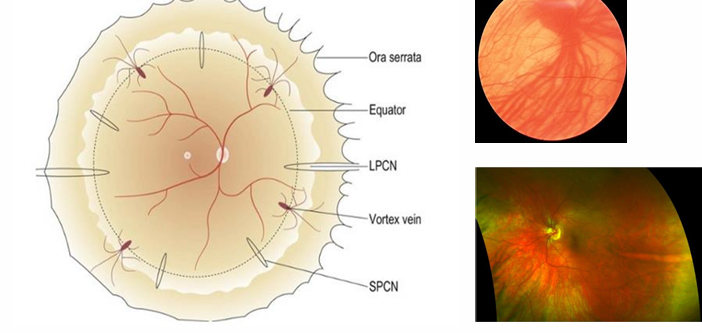
Long ciliary nerves 3 & 9
Short ciliary nerves
Ampullae of vortex veins in quadrants
Ora serrata not seen unless a scleral indenter is used to push the retina into field of view
Scleral Indentation for Ora Serrata & Extreme Periphery
Usually can’t see ora serrata unless a scleral indenter is used to gently push the retina into field of view.
Instruments: thumb-mounted or hand-held indenters
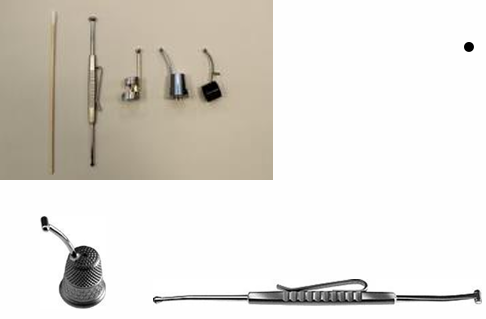
Explain the procedure, and that there may be mild discomfort.
Requirements: maximal dilation (tropicamide + phenylephrine ) + topical anaesthetic
Patient supine; instruct to look opposite area of interest → place indenter on lid crease over area → patient looks toward indenter → align BIO & lens → gentle tangential pressure
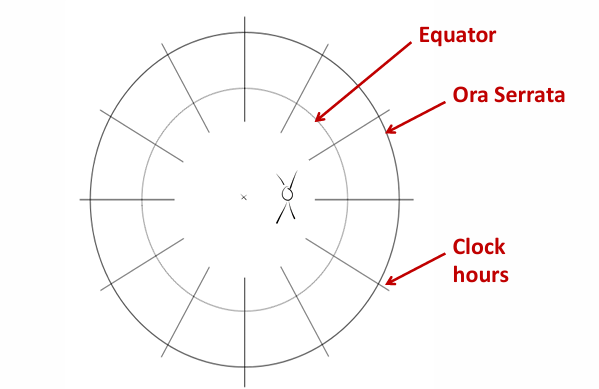
Landmarks: Ora from limbus; Equator from limbus
Frequent issue: indenter, lens & BIO not lined up
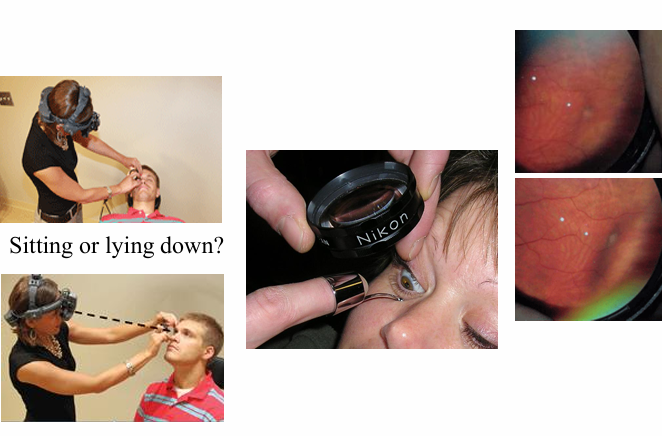
Fundus Biomicroscopy with Slit-Lamp
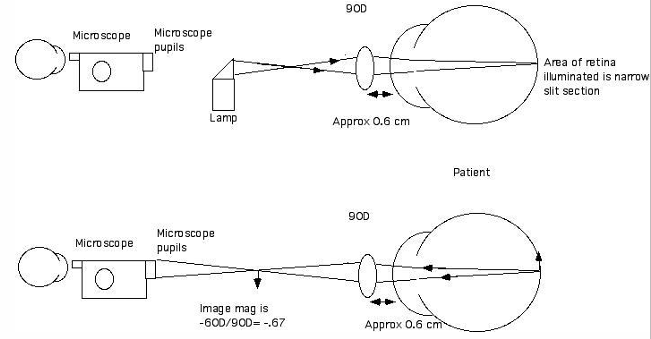
Utilises slit-lamp illumination + magnification; aerial image via or superfield lens
Plain or filtered, double aspheric.
Image: real, reversed & inverted; slit illumination yields narrow strip on retina
higher the power, the lower the magnification but greater the field of view.
Optical differences vs. BIO
Illumination and observation pupils are not perfectly matched → potential glare if beam oversized
Magnification adjustable on microscope (e.g., sl-lamp mag ≈ direct ophthalmoscope )
Image:
Magnification of slit lamp compensates. 20x mag of slitlamp gives approx same mag as direct
Image is upside down.
Light source is in wrong place for pupil matching.
Image on retina is a slit, can make it larger but if made too large will be too wide in pupil plane, start getting glare back.
Slit-Lamp Technique
Remove patient spectacles; align canthus at marker
Beam: medium parallelepiped, moderate width & low-mod intensity
Low microscope mag (≈)
Lens (held with hand closest to eye under exam) ≈ from cornea, centred
Pull slit-lamp back focusing: corneal reflex → anterior lens surface → aerial image with slight additional withdrawal (~)
Posterior pole systematic scan: along arcades, disc → macula (macula last due to photophobia)
Start with evaluation of disc and immediate surroundings
Systematically examine posterior pole Scan along arcades out and back to disc
Alternatively, some people scan left to right and top to bottom of visible field.
Maintain lens stability Slight movement of condensing lens in same direction of the beam movement
Examine posterior vitreous by pulling back slightly
Examine macula last
Peripheral retina: have patient look in desired direction; move slit-lamp & lens in same direction (if pupil moves up 1 mm, move SL and lens up 1 mm)
Quadrants systematically, e.g. S, SN, N, IN, et
Troubleshooting
Excess blinking: yellow filter, lower illumination, ring finger lid hold
Monocular image: slide lens toward blind eyepiece a few mm
Most common novice error: lens too far from eye
Excessive blinkers:
Encourage patient to keep eyes open, try not to touch lids
If need to lift lid, use ring finger
To reduce discomfort: try a yellow filter, lower illumination, narrow slit
Undilated Fundus assessment:
Usually possible, except with very small pupils
Try yellow filter, decrease light levels, narrow slit
Sometimes may only have a monocular view – lose stereopsis, but still a reasonable image
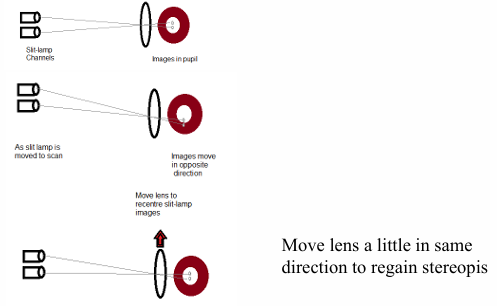
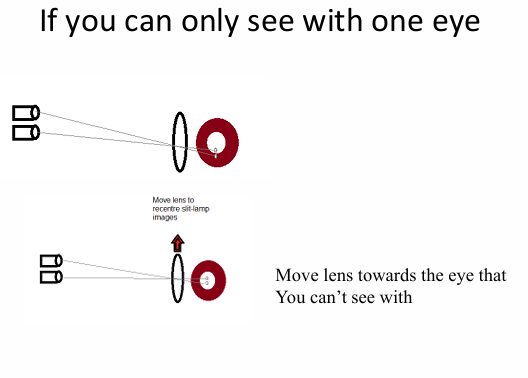
Tips for centring the lens
if you only have view down one eyepiece. Move the lens slightly towards the other eyepiece, until you regain a stereo view. (should only be a few mm).
Sometimes pupil is too small so can only get view through one eyepiece at a time.
Most common student mistake.. Lens too far from eye
Recording Findings
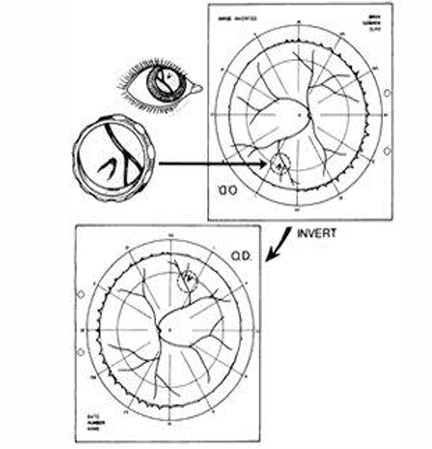
Images inverted & reversed → many clinicians “rotate sheet” or mentally invert when drawing
Standard landmarks to document: optic disc, macula, vascular arcades, vortex vein ampullae, long (& short) ciliary nerves, equator, ora serrata (if seen)
Use disc diameters (DD) & clock hours for size/location
Example: “Round chorioretinal atrophy at from disc”
Pertinent negatives: e.g., “No macular oedema,” “No retinal breaks”
Comparative Summary of Techniques
Parameter | BIO | SL + | Direct |
|---|---|---|---|
Magnification | (microscope-dependent) | ||
Field of View | Slightly < BIO | ||
Stereopsis | Moderate (limited by low mag) | Good | None |
Periphery | Ora → Equator | Beyond equator possible | ¾ to equator |
Resolution | Limited by lens aberrations poorest | better (system optics) | Depends on ocular media Best |
Common Errors & Practical Tips
Examiner too close → decreased FOV, convergence, loss of binocularity
Incorrect lens orientation (flatter side to patient; writing upright facing patient)
Mirror too close to axis → glare; too far → illumination/view mismatch
Not practising regularly; skill decay leads to “I can’t see with BIO” scenario
Ergonomics: maintain neutral spine & shoulder position to avoid fatigue
Ethical / Clinical Imperatives
Students & clinicians must dilate when clinically indicated (flashes/floaters, diabetes, trauma) and employ BIO + indenter for comprehensive safety
Slit-lamp fundus exam alone insufficient for symptomatic patients
Always inform about rare but serious risk of angle-closure; written consent advisable
Alternative / Adjunctive Technologies
Monocular Indirect Ophthalmoscope (MIO) – e.g., Welch-Allyn PanOptic
Claimed FOV; good view of the majority of the posterior pole but view limited macular/peripheral view; loses stereopsis
Fundus Contact Lens (e.g., Goldmann 3-mirror)
Reversed (not inverted) image; invasive (requires coupling gel/anaesthetic)
Improvised methods
Monocular direct + lens (test in lab)
“Pen-torch indirect” for paediatrics (light under examiner’s eye + lens)