Intruments
Health and Safety
PPE
MH
Appropriate hand instruments for task
Maintain sharp instruments
Correct grasp
Maintain appropriate finger rest
Correct adaptation, angulation and activation
Safe wiping of deposits from hand instruments
Equipment and Instrument Kits
Rest Exam Kit
PCP15/BPE probe
Straight probe
Tweezers
Mirror
Combi Perio Kit
2L/2R curette
4L/4R curette
Mini sickle scaler
Ultrasonic insert
Ultrasonic sleeve
Student Gracey Kit
Cavity Prep Kit
Instruments for sub PMPR:
Gracey curette
Slimline ultrasonic inserts
Mouth Mirror
Indirect vision
Retraction
Illumination
Retraction of the lip
Using a finger can often be more comfortable for the patient
Avoid
Hitting the mirror against teeth
Pulling the corner fo the mouth with the mirror
Resting the mirror against patient soft tissues
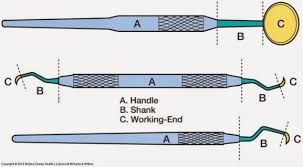
Shank
Connects the working end of the handle
May be angled, curved or straight
The more restricted the access, the greater the shank angle needed
For anteriors = shank staright
For posteriros = shank angled
Thickness of shank:
Rigid (thicker, stronger)
Flexible (thinner, more stactile, sensitivity)
Working End
Carries out the function
May be single or double ended having paired working ends for access to different surfaces
Cutting edge between the face and lateral surface
Cutting edges: stainless steel, carbon steel, tungsten carbide, plastic or titanium
Common scalers: curette and mini sickle
Principles of PMPR:
Locate and access deposits:
Depositis can be located by:
Drying the tooth
Looking
Feeling
Listening
Using the overhead light
Subgingival deposits are sometimes visible on radiographis (only interproximally)
Selection of appropriate instrument
The correct instrument should be used.
An intrument with a larger working end may be appropriate for removal of supragingival calculus on a molar tooth.
A smaller working end is necessary for the removal of subgingival calculus
Correct isnturment grasp
The modified pen grasp is the recommended method for holding a periodotnal instrument. It facilitates precise control of instrument, allows detection of rough areas on tooth surface, and lessens musculoskeletal stress. Gripping toot tight = fatigue and strain.
Finger rest
Stability is essential for effective and safe control and action of an intrument
A finger rest is used as a fulcrum on which the hand turns when moving an instrument
It should be maintained throughout the procedure
Adaptation
Toe/tip third is kept in contact with the tooth surface
First 1-2mm of the working end’s lateral surface is in contact with the tooth
Position below the deposit
This should be maintained throughout the instruments stroke
Angulaion
Is the relation between the face of the instrument and the tooth surface to which it is applied
For successful isntrumentation, correct adaptation and angulation of the working-end must be maintained throguhout the instruments stroke
For calculus removal, the ideal angle shoud be between 60-90
When scaling below the gingival margin, the angulation during insertion should be between 0-40 to prevent injury to the soft tissue
Activation (lateral pressure, stroke)
The act of applying equal pressure with th eindex finger and thumb inwards to press the working end against the deposit throughout the stroke. The level of pressure depends on the task. Pressure will range form light to firm, however heavy pressure is not recommended.
A stroke is a ingle unbroken movement made by an instrument
The technique is different for each type of instrument
It is important to remeber that instrumentation strokes are tiny, slow controlled movements
The working-end moves only a few mm with each strokes
Check
Modified Pen Grasp
Dominant hand holds and activates the instrument
Pad of thumb and index finger grip the lower part fo the handle
Side of middle finger pad rests on the sank
Tip of third finger rests on tooth
Little finger should be relaxed
Non dominant hand supports the jaw and retracts soft tissues.
Thumb and index finger are opposite to each other at or near the junction of the handle and the shank.
Ring finger rests securely on the tooth and remains straight. It acts as a support beam for the hand and a fulcrum on which to turn the instrument
→ The index, middle and ring finger should be in control at least at one point
→ Provides stability and strength in the grasp
Fulcrum
Keep the ring finger straight
Finger tip supports the weight of the hand
Location
1-4 teeth away fromt he tooth being worked on
Establish out of the line of fire
Rest on the incisal edge or occlusal surface
Never rest directly above the tooth surface being worked on
Types of Strokes
Horizontal
Oblique
Vertical
- Strokes should overlap
- Remove large supragingival deposits in sections
Wrist Action
Rotating the hand and wrist as a unit to provide the power for instrument stroke
Similar to the action of turning a door knob
Together the hand and wrist create more power to move the instruments
Causes the least amount of fatigue to the muscles of the hand and fingers
Avoid
Do not grip the instruments too tight
Finger rest ahould not be lifting off the tooth it is resting on
Avoid digit strokes
Wiping Off Instruments
Instruments become contaminatied with blood, saliva, plaque and calculus deposits
Wipe clean with a piece of guaze or cotton wool roll
Do not wipe between fingers or on gloves
Do not wipe on patient’s bib