Procedures
Explain different Types of Procedures Performed in SEP Offices and How to Perform Procedures
Procedure | Pap Smear | Sterile Technique | Sterile Gloves | Ear Irrigation | Eye Irrigation |
What it is for | Procedure to test for cervical cancer and STI’s (HPV) in WOMEN | Instructions and ensuring the area is sterile are essential before beginning the procedure. | Instructions to ensure sterile gloves are put on properly and are not contaminated. | Procedure for safely flushing a patient’s ear canal and removing any discharge, ear wax(CERUMEN),or foreign bodies | Procedure for foreign body removal and treatment of chemical injury to the eye |
Collecting cells from the cervix (at the bottom of the uterus) | Nitrile Gloves for you to prep it. Lay sterile drape, sterile equipment and gloves for provider to use. | Sterile gloves | Use ear spray bottle to give constant stream of water and ear basin bin to collect out fluid. NEVER DIG it out | Squirt water with syringe into patient’s eye | |
Span of pt receiving it | 21- 65 yrs old | Use when the skin is broken, impaired, or accessed, such as during surgeries and catheterizations. | Used for invasive procedures, surgical procedures, vascular access, interaction with chemotheraputic agency | ||
Done every 3 years (or more frequent per pt request) | |||||
more common in 30-50 year olds 2nd deadliest cancer for women 12,000 diagnosed with cervical cancer/year |
Pap Smear Procedures
Patient Instructions
Patient Removes all clothing including undergarments (mostly for first visit because of breast screening)
Put on gown with opening in the FRONT
Open drape and place over lap
Supplies
Brush and spatula or broom (which can do the same function as brush and spatula)
Used to collect samples
Thin prep (pt’s Name, DOB, and specimen origination written on it)
Speculum
Used to open up the walls of the vagina to visualize the cervix and aid in visualizing cervix
Light
Attaches to speculumn and aids in visualization of the cervix
Lubricant
Used to help ease discomfort with entering the speculum
MA Duties
Set up field for pap smear including the thin prep, sepculum, lubricant, broom or spatula and brush, gloves
Assist provider by handing them what they ask for
Properly prepare sample for send out
Place vial and requisition in a specimen bag for transport lab
This does not involve sterile technique
Sterile Technique Procedure
Put on NITRILE gloves (not sterile gloves)
Use the Sani-wipes to clean the designated area
While surface is drying, take off nitrile gloves and discard
Wash hands for 20 seconds
Set up sterile drape on the dry surface, making sure to only touch within the 1 inch border
Open containers to necessary equioment, avoid touching sterile equipment
Drop the necessary equipment nto the sterile field. Do not put your body over it. Just hover no more than 6 inches above the sterile field and drop the sterile equipment onto the drape.
Set out unopened STERILE gloves for your PROVIDER. NOT on sterile field, on the side
Sterile Gloves Procedure
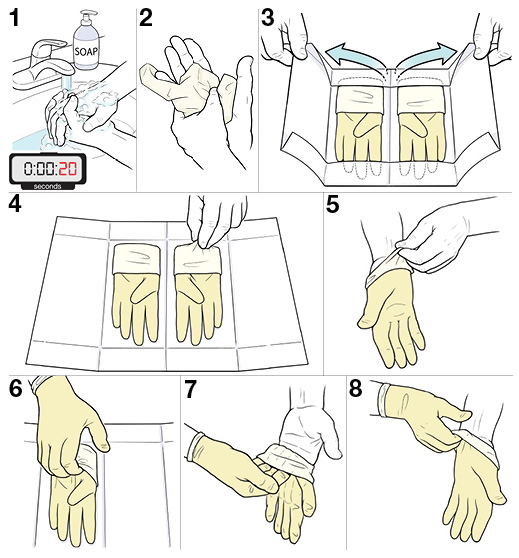
Ensure that gloves are the appropriate size for the provider before handing them over.
Wash your hands (this can be step 1 too)
Open the package completely making sure to only touch 1-inch of the outer border
Place your dominate hand in the glove on first by pinching the cuff and lift.
Put your dominant hand in the inside of the glove, palm up. Make sure you are only touching the inside of the glove that will be touching your skin (The bottom half of the glove is folded for unsterile hand to pinch)
Put the fingers of your gloved hand into the folded cuff of the other glove and lift.
Position your ungloved hand palm up and slide hand into the glove
Pull it over your and ensure that it fits snugly around your wrist. This will help maintain a sterile barrier and prevent contamination. hand
Once gloves have been applied, you can touch your two hands together and anything WITHIN the sterile field, not the 1 inch border. KEEP HANDS IN FRONT OF YOU. FACE STERILE FIELD
Do not drop your hands below the sterile field, reach over the sterile field exposing your arms, clothes to area or turn your back to the sterile field.
Ear Irrigation Procedure
Cerumen: earwax
Cerumen Impaction: is the result of buildup that prevents assessment of ear canal
Cerumen obstruction: buildup that blocks the ear canal. Results in inability to hear out of the ear
Supplies
Otoscope
used to look inside the ear
Confirm where build up is
Pull ear Up and back for Adults
Pull ear Down and back for Children
Ear wash spray bottle
Fill with lukewarm water (cold will make them pass out)
Mix with peroxide
Use single use eartip
Ear wash basin
Multi use
Designed to be placed under pt’s ear to catch fluid
Pt will hold this in place during procedure
Ear tips
Single use
Lure lock feature used to twist on to spray bottle
Discard after procedure
Procedure
Ensure there are no contradictions or situations in which the procedure would be harmful for the patient
Explain the procedure to the patient
Gather the necessary equipment. Remember to use a moisture proof pad for the patient overtheir shoulder
Throughly wash your hands
Have the patient remove any dangling earrings and pull their hair back
Instruct the patient to sit up with their head tilted toward their ear slightly. Ask them to hold the water basin under their ear
Fill your spray bottle with solution
prime the bottle by letting the air escape from rubing
Straighten patient’s ear so that it is aligned vertically, allowing for optimal drainage of the solution during the procedure.
Down and back for a child
Up and back for an adult
Inject a slow but steady strea of the solution against the roof of the ear canal. Do NOT block the canal with the irrigation nozzle, You want to make the solution flows unimpended
Once you have finished, gently place a cotton ball in the auditory meatus. Ask the patient to lie down on the side of their affected ear; they should use a towel or pad
DOCUMENT everything. Type, temperature, volume, and solution that you usedshould be recorded in the patient's chart to ensure proper follow-up and to maintain accurate medical records.
Eye Irrigation Procedure
Supplies
Large syringe or small recetacle with a pouring spout
Irrigating fluid (normal saline or clean water at roo temperature)
Local anesthetic eye drops
Towek or guaz swavs
Lid retractors if avaiable
A bowl or kidney dish
Procedure
Instill local anesthetic eye drops
With patient lying down, protect the neck and shoulders with a towel
Place the bowl or kidney dish against the cheek, on the affected side, with the head tilted sideways toward it
Fill dish with water and suck it up with syringe
Fill feeding cup or syringe with the irrigating fluid and test the temperature on your hand
Ask the patient to fix gaze ahead
Open the eyelids
Pour or syringe the fluid slowly and steadily, from no more than 5 cm away, onto the front surface of the eye, inside the lower eyelid and he upper lid
Ask the patient to move the eye in all directions while irrigation is maintained
Check and record visual acuity with Snellen chart when the procedure is finished.
If vision is worse, go tell provider
EKG or ECG at the Office
What is an EKG: a test used to record the electrical signals in the heart, quickly detect any heart problems, and monitor your patient’s heart health
Natural electrical impulses coordinate contractions of the different parts of the heart to keep blood flowing the way it should be. An EKG records these impulses to show how Fast the heart is beating, the Rhythm of the beats (steady or irregular), and the Strength and Timing of the electrical impulses as they move through the heart,
Common Terms and abbreviations
CP: chest pain
MI: heart attack
CAD: coronary artery disease
SOA: shortness of air
Arrythmia: irregular heart rhythm
Angina: chest pain
Why are EKGs Done?
For patient’s 55 years or older, it is required for an EKG to be done prior to a surgery. This is to determine the overall health of the heart
After treatment for conditions such as MI, endocarditism or after heart surgery or cardiac catheterization
To look for the cause of chest oain
To evaluate problems that may be heart related: severe fatigue, SOA, dizziness, or fainting.
What is the MA’s role?
Prepare ypur patient for the procedure (getting them comfortable and calm)
Utilizing effective communication skills with patients and families to gain the trust and cooperation necessary to get an accurate reading
Provide post-procedural assistance
Accurately and effectively perfroming the test
Noting obvious abnormalities
Maintain equipment (report when it is broken)
Oreoare testing paterials for provider interpretation (print it out)
Preparing A Patient
Communication is Key. Communication allows the patient to understand the why, what, and how BEFORE the EKG is performed.
What: Use non-medical terms, hat is an EKG: a test to test your heart health
Why” explain to them why they need one and the importance
check their charts before hand
“it is for your surgery…” “it is to check your heart health since your last visit for (insert heart issue)”
How: explain in detail the process so patient knos what to expect. Ex: disrobing, gowining, and draping instructions
Patient positioning: supine, Semi-Fowler’s(45 degree angle), Fowlers
Best is Supine
but people with chronic back pain, old age, obesity is unable to do this
Semi'-Fowler’s is restricted because what if patient is in a wheelchair or doesn’t have legs
Fowler-lots of artifacts, just inform provider the patient was in Fowler position before they read EKG so provider will know
Patient’s skin needs to be dry and oil free.
Use alcohol sway to clean the skin prior to electrode placement.
Remove excess hair with shaving or trimming.
12 Lead EKG
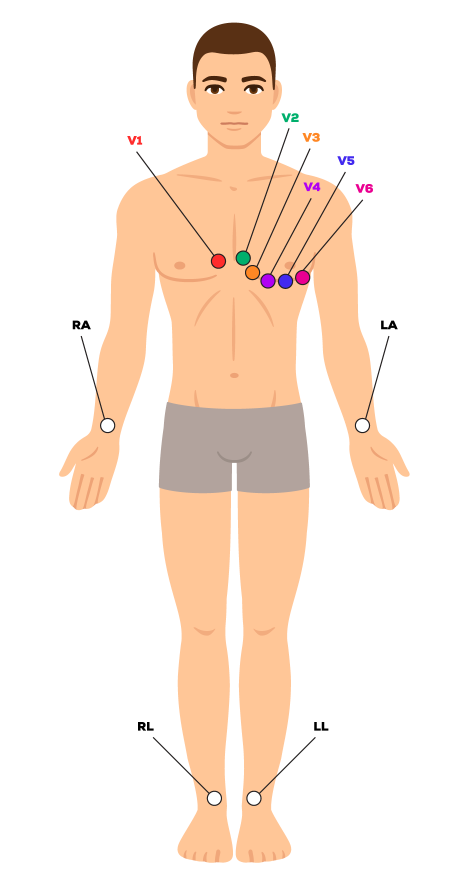
6 leads go on the chest that follow the shape of the breast dip
4 leads go on the arms and legs (1 on each arm and leg)
The total number of leads is 10
Total images of the heart seen is 12, which is why it is called 12 Lead EKG
MidMark Machine are the cords for the leads
Ordering an EKG
Go to Point of Care Testing and select POCT EKG($$$) or POCT EKG Welcome to medicare
Go to enter/edit results and double click the order to begin the resulting process.
Click Acquire to initiate the MidMark workflow
Once the EKG leads are placed properly on the patient, and the EKG is running, clock the acquire button to capture the live results
After clicking acquire you may be prompted to enter additional information. You enter your name for Technician. Reviewed By Field is required-that is the Provider’s name going there. Once ythis is entered, click saved. This will transmit the report back to Epic
Enter any additional required information in this screen(current date,time, your name for collector). Status should be marked as IN PROCESS so provider can still acess it
Waveforms is a PQRST
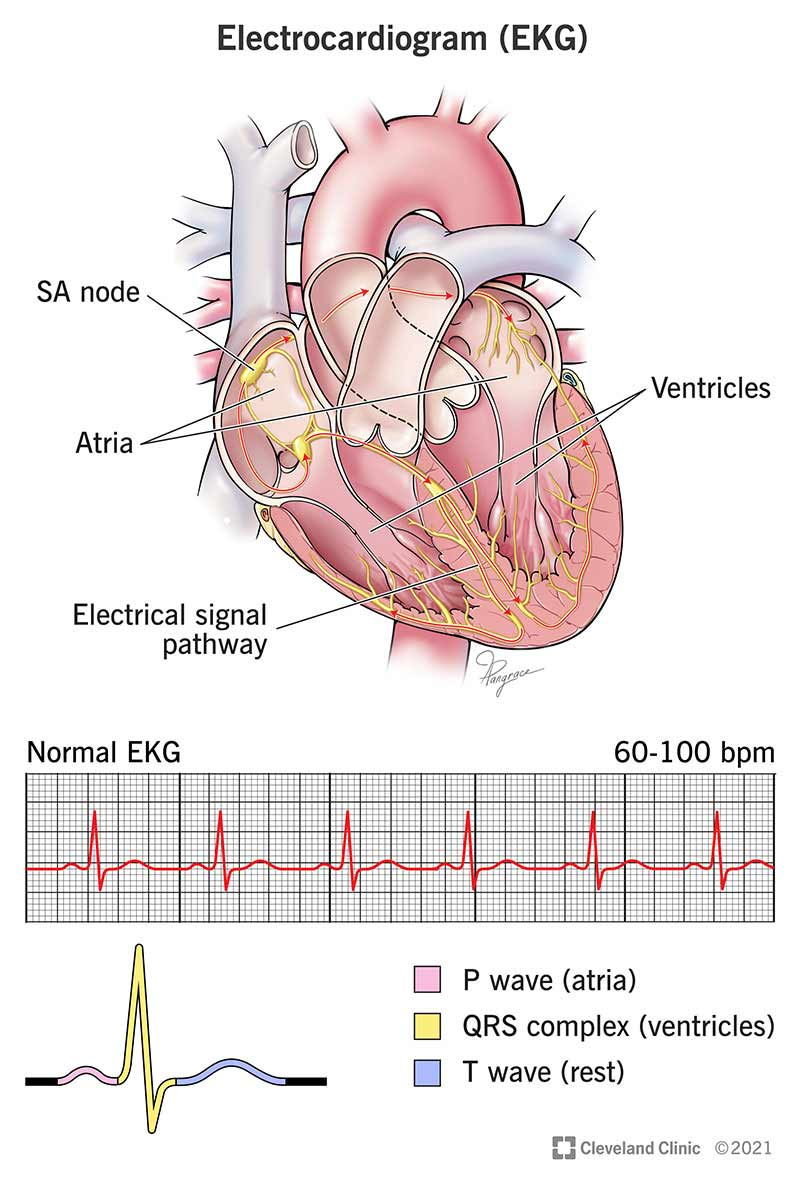
Interval is Waveform+Segment
Artifacts are electrical interferences form an outside source NOT “heart-made”
Coughing, talking, sivering, movement, Parkinson’s, Cell Phones can cause artifacts.
For uncontrolled muscle movement, have patient place hands under buttocks (palms down)
Ensure proper grounding of machine (that the MidMark Machine is plugged into the system
Turn off unnecessary devices
Make sure skin is clean and the elctrodes adhere to the skin properly
Make sure wires are not crossed.