photography
photography
The Basics –
Positioning, Headroom and Leadroom
There are a few simple ways to get a great looking photograph.
- Position the subject or item
Position the person or object you are taking a picture of make sure they aren’t facing the sun (they will squint) and make sure the sun isn’t behind them (this will take away the detail in their face)
Position yourself
Where you stand when you take the picture can drastically change the look of the photograph. Look for less distractions in the background, and get at their eye level (if possible)
Frame the picture
Now that you have positioned your subject so they are looking their best and you’ve positioned yourself so you will get a great composition it’s time to frame the picture. There are two main rules for taking any photograph. Making sure you have proper headroom and leadroom.
Headroom
Refers to the area above the subject head in a photograph or video. In order to make your subject the focus of the picture you need to eliminate excess room around them. Here is how to achieve this: Mentally divide your frame into thirds horizontally. The bottom line is referred to as the 1/3rd line the 2nd line is referred to as the 2/3rd line. You should always have the eyes of the subject fall on the 2/3rd line. This eliminates excess room above their head and keeps the focus on the person in the picture.
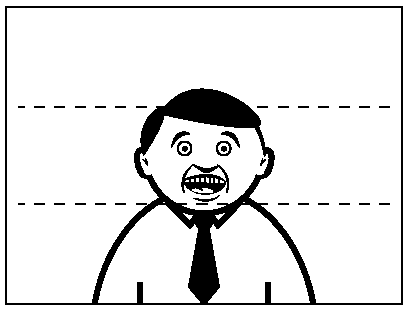 too much head room
Leadroom
Refers to an area on either side of the person. When taking a photograph, your subjects wont always be looking directly at the camera. Sometimes you will want to capture candid photographs. Like headroom it is important to frame your subject so they are the focus of the picture. To achieve this, mentally divide your frame into thirds vertically. Again you have a 1/3rd line and a 2/3rd line. Whichever direction your subject is looking, allow 1/3rd of the picture for “look room” this will connect the viewer to wonder what the subject is looking at.
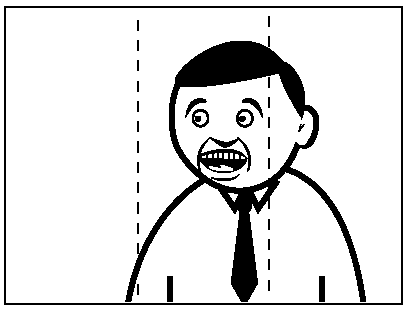
 Incorrect lead room, eyes are drawn to area where there is nothing
 proper lead room
red eye effect:
Incorrect lead room, eyes are drawn to area where there is nothing
proper lead roomWhen taking pictures of subjects in low lighting situations, it is important to reduce the red eye effect as much as possible. When the flash occurs too fast for the pupil to close, much of the very bright light from the flash passes into the eye through the pupil, reflects off the fundus at the back of the eyeball and out through the pupil. The camera records this reflected light. The main cause of the red colour is the ample amount of blood in the choroid which nourishes the back of the eye and is located behind the retina. In simpler terms, the flash goes into the eye, lights up the blood vessels in the back of the eye and the lens picks this up.
The amount of red light emerging from the pupil depends on the amount of melanin (pigments) in the layers behind the retina. This amount varies strongly between individuals. Light skinned people with blue eyes have relatively low melanin in the fundus and thus show a much stronger red-eye effect than dark skinned people with brown eyes. The same holds for animals. The color of the iris itself is of virtually no importance for the red-eye effect. This is obvious because the red-eye effect works best when photographing dark adapted subjects, hence with fully dilated pupils. Photographs taken with infra-red light through night vision devices always show very bright pupils because, in the dark, the pupils are fully dilated and the infrared light is not absorbed by any ocular pigment.
In a photograph of someone’s face, red-eye in one eye but not the other actually be leukocoria, which may be caused by the cancer retinoblastoma, and the child's eyes should be looked at by a doctor or an ophthalmologist.
Red Eye Reduction
Is a function on a camera which makes the camera flash twice. The first flash is intended to make the pupils extract and the second flash in combination with the shutter takes the picture. Sometimes the red eye reduction will not effectively remove the red eye effect, if your subject is not looking directly at the camera it will not have the desired effect.
DSLR (digital single reflex camera)
Is a digital still image camera that uses a single lens reflex (SLR) mechanism. Most professional cameras were analog single lens reflex until digital SLRs emerged in the early 1990s. Following are the two major advantages of DSLRs.
Removable Lenses
No single lens can handle every photographic requirement, and SLR cameras have always used removable lenses. A wide variety of lenses are available for each camera system, and many lenses that fit 35mm film SLRs also fit DSLRs.
Through the Lens
In an SLR, the photographer sees the image through the actual picture lens. To compose the picture, a mirror reflects the light from the lens to the viewfinder. When the picture is taken, the mirror momentarily flips out of the way to allow the light to pass through the lens diaphragm to the CCD or CMOS sensor (or to film in analog SLRs). Through-the-lens viewing enables precise manual focusing.
flash:
A built-in flash is provided with every digital camera. The camera’s computer determines the need for flash according to the exposure metering, focusing and zoom systems. On compact cameras the built-in flash is triggered to go off in perfect sync with the shutter, but it’s hard to control the timing and intensity of the flash. This can result in washed-out photos. DSLRs have pop-up flashes that can be controlled in various ways to be in-sync with the shutter or drag behind the shutter; in addition the intensity can be manipulated in accordance to the overall light of the scene. DSLR cameras allow for more pleasing and artistic use of the flash.
shutter speed:
The term “shutter speed” refers to how long the shutter is open inside the camera while taking the picture. You can adjust the shutter speed which will adjust the amount of sharpness or blurriness of your subject.
You can use the Semi-Manual mode of “Shutter” by selecting the “TV” on the dial. Then use the wheel to select the shutter speed you want
Fast Shutter speed
By selecting a fast shutter speed, the shutter will open and close very quickly causing your subject to be “frozen” and look very sharp. Because the shutter opens and closes quickly this limits the amount of light that is able to get in. So if you are going to take a fast shutter picture you need to be in a well lit area OR increase your ISO.
Slow Shutter Speed
Slow Shutter Speed will keep the shutter open for a set amount of time. This allows the items or people moving in the shot to blur. This can create some artistically beautiful shots. Using a tripod is invaluable and will allow the stagnant pieces of the composition to remain in perfectly sharp focus while the rest is blurred.
Lighting and white balance
Colour of Light
Light travels in waves just like sound. When light from the sun hits our atmosphere it scatters most colours and the one left (most “powerful”) is blue.
Therefore on Earth Sunlight is mostly a blue colour
This is important because still and video cameras can not tell the difference between indoor light and outdoor light so if you are using a MANUAL setting you must “white balance” your cameras. If you are using an AUTOMATIC setting the camera will adjust these colours but a lot of the time you can still see a tinge of unwanted colour.
White balance
Is a control that tells the camera what is white so it can adjust the colours/brightness accordingly. It involves holding a piece of white plain paper in front of the camera lens – pushing the white balance button and you will see the colour adjust to a “normal look”.
This is very important for a multi-camera shoot when the director cuts between cameras the colours need to look the same.
Indoor incandescent light bulb = orange light (new energy efficient ones can give off a beige/yellow or blue/purplish colour)
Indoor fluorescent light = green light
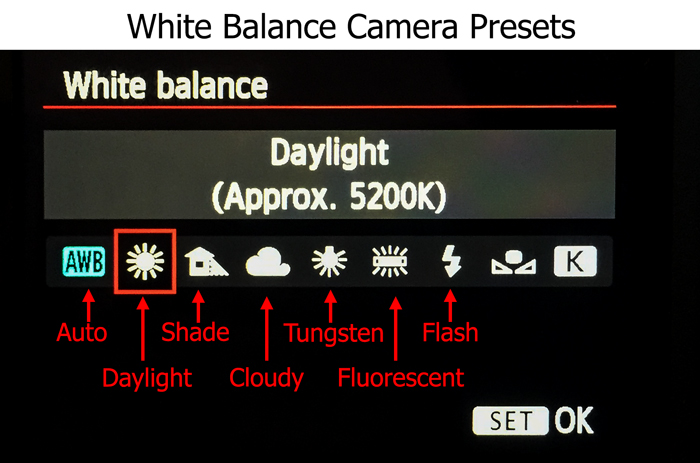
Setting your camera for WHITE BALANCE is important when using a Semi-Manual or Manual mode.
Click on the WB button:
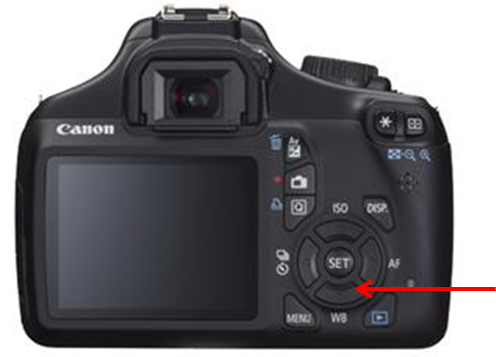
and choose the light source you are using:
Shot Types and What They Communicate
Extreme Wide Shot – EWS
| |
Wide Shot – WS
| |
Medium Shot – MS
| |
Close up – CU
| |
Extreme Close up – ECU
| |
One Shot
| |
Two Shot
|


Pan shot - A HORIZONTAL camera movement, used to communicate or reveal something new in the frame – can be dramatic!
Tilt Shot - A VERTICAL camera movement, used to communicate or reveal the size of a subject – can be dramatic!
Hand Held Shot - No Tripod used for a documentary feel, communicates realism, “anything can happen”, TV news.
Crane Shot - An extremely high shot (usually WIDE) from a crane or small “Jib”. Great for an ESTABLISHING shot.
Dolly Shot - Recording the shot while the camera is moving from right to left or vise versa
Tracking Shot - Recording the shot while the camera is moving forwards or backwards. (Great for POV shot)
Point-of View (POV) Shot - The camera represents the POV of the subject – encourages viewer to identify with the subject.
Over-the-shoulder (OTS) Shot - The camera is looking over the shoulder of a person at something (eg. person or scenery). Encourages identification with the subject.
Camera Height – Effects how we perceive the subject – low camera height makes subject look imposing, powerful while high camera height makes subject look weak and vulnerable.
Aperture Priority (Av or A)
Aperture priority can be thought of as a ‘semi-automatic’ shooting mode. When this is selected, you as the photographer, set the aperture and the camera will automatically select the shutter speed.
The aperture is the size of the opening in the lens through which light is allowed to pass, whenever the shutter is opened – the larger the aperture, the more light passes through.
The aperture is measured in ‘f-stops’ and is usually displayed using an ‘f-number’, e.g. f/2.0, f/2.8, f/4.0, f/5.6, f/8.0 etc, which is a ratio of focal length over diameter of the opening. Therefore, a larger aperture (a wider opening) has a smaller f-number (e.g. f/2.0) and smaller aperture (a narrower opening) has a larger f-number (e.g. f/22). Reducing the aperture by one whole f-stop, e.g. f/2.0 to f2/8 or f/5.6 to f/8.0, halves the amount of light entering the camera.

Aperture is one of the most important aspects of photography as it directly influences the depth of field – that is, the amount of an image that is in focus. A large depth of field (achieved by using a small aperture (large f-number) would mean that a large distance within the scene is in focus, such as the foreground to the background of the landscape below.

Very even focus throughout
An aperture of f/13 was used here to give a large depth of field, ensuring that the whole image, from the foreground grasses to the background mountains. was sharp
Whereas a shallow depth of field (achieved by using a large aperture (small f-number) would produce an image where only the subject is in sharp focus, but the background is soft and out of focus. This is often used when shooting portraiture or wildlife, such as the image below, to isolate the subject from the background:
 particular focal point and the rest is blurred out
large aperture of f/4.5was used to capture this water vole, against a soft, out of focus background
So when using aperture priority, you can get complete control over your depth of field, whilst the camera takes care of the rest.

Types of photography
Candid Photography:
Is best described as un-posed and unplanned. Candid photography captures “moments of life”. Candids are the kinds of pictures taken at children's birthday parties and on Christmas morning, opening the presents; the pictures a wedding photographer takes at the reception, of people dancing, eating, and socializing with other guests.
Examples:


Still Life Photography:
Capturing inanimate subject matter, most typically a small grouping of objects that are either human-made or "natural." Still life photography, more so than other types of photography, such as landscape or portraiture, gives the photographer more leeway in the arrangement of design elements within a composition.
Still life photography is a demanding art, one in which the photographers are expected to be able to form their work with a refined sense of lighting, coupled with compositional skills. The still life photographer makes pictures rather than takes them. Knowing where to look for propping and surfaces also is a required skill.
o | |


Portrait Photography:
Is the capture by means of photography of the likeness of a person or a small group of people (a group portrait), in which the face and expression is predominant. The objective is to display the likeness, personality, and even the mood of the subject. Like other types of portraiture, the focus of the photograph is the person's face, although the entire body and the background may be included. A portrait is generally not a snapshot, but a composed image of a person in a still position. A portrait often shows a person looking directly at the camera.


Sports Photography:
Refers to the genre of photography that covers all types of sports. In the majority of cases, it is a branch of photojournalism.
The main application of sports photography is for editorial purposes; dedicated sports photographers usually work for newspapers, major wire agencies or dedicated sports magazines. However, sports photography is also used for advertising purposes both to build a brand and as well as to promote a sport in a way that cannot be accomplished by editorial means.


Landscape photography :
Is intended to show different spaces within the world, sometimes vast and unending, but other times microscopic.
Many landscape photographers show little or no human activity in their photos, striving to attain pure, unsullied landscapes and have a void of human influence, using instead subjects such as strongly defined landforms, weather, and ambient light.


Nature photography:
Refers to a wide range of photography taken outdoors and devoted to displaying natural elements such as landscapes, wildlife, plants, and close-ups of natural scenes and textures.


|  When you switch to portrait mode, your camera will automatically select a large aperture (small number) which helps to keep your background out of focus (ie it sets a narrow depth of field – ensuring your subject is the only thing in focus and is therefore the centre of attention in the shot). Portrait mode works best when you’re photographing a single subject so get in close enough to your subject (either by zooming in or walking closer) so that you’re photographing the head and shoulders of them). Also if you’re shooting into the sun you might want to trigger your flash to add a little light onto their face. | |
| ||
| Macro mode lets you move your closer into your subject to take a close up picture. It’s great for shooting flowers, insects or other small objects. Different digital cameras will have macro modes with different capabilities including different focussing distances (usually between 2-10cm for point and shoot cameras). When you use macro mode you’ll notice that focussing is more difficult as at short distances the depth of field is very narrow (just millimeters at times). Keep your camera and the object you’re photographing parallel if possible or you’ll find a lot of it will be out of focus. You’ll probably also find that you won’t want to use your camera’s built in flash when photographing close up objects or they’ll be too bright. Lastly – a tripod is invaluable in macro shots as the depth of field is so small that even moving towards or away from your subject slightly can make your subject out of focus.  | |
| ||
Landscape Mode | This mode is almost the exact opposite of portrait mode in that it sets the camera up with a small aperture (large number) to make sure as much of the scene you’re photographing will be in focus as possible (ie it give you a large depth of field). It’s therefore ideal for capturing shots of wide scenes, particularly those with points of interest at different distances from the camera. At times your camera might also select a slower shutter speed in this mode (to compensate for the small aperture) so you might want to consider a tripod or other method of ensuring your camera is still. | |
| ||
| Photographing moving objects is what sports mode (also called ‘action mode’ in some cameras) is designed for. It is ideal for photographing any moving objects including people playing sports, pets, cars, wildlife etc. Sports mode attempts to freeze the action by increasing the shutter speed. When photographing fast moving subjects you can also increase your chances of capturing them with panning of your camera along with the subject and/or by attempting to pre focus your camera on a spot where the subject will be when you want to photograph it (this takes practice). | |
| ||
| This is a really fun mode to play around with and can create some wonderfully colorful and interesting shots. Night mode (a technique also called ’slow shutter sync’) is for shooting in low light situations and sets your camera to use a longer shutter speed to help capture details of the background but it also fires off a flash to illuminate the foreground (and subject). If you use this mode for a ’serious’ or well balanced shot you should use a tripod or your background will be blurred – however it’s also fun to take shots with this handheld to purposely blur your backgrounds – especially when there is a situation with lights behind your subject as it can give a fun and experimental look (great for parties and dance floors with colored lights).
| |
| ||
| Not all cameras have this mode but it provides several quick shots (with quick shutter speeds) immediately following each other. | |
| This mode extends your digital camera from just capturing still images to capturing moving ones. Most new digital cameras these days come with a movie mode that records both video but also sound. The quality is generally not up to video camera standards but it’s a handy mode to have when you come across that perfect subject that just can’t be captured with a still image. Keep in mind that moving images take up significantly more space on your memory storage than still images. | |


Other less common modes:
Panoramic/Stitch Mode – for taking shots of a panoramic scene to be joined together later as one image.
Snow Mode – to help with tricky bright lighting at the snow
Fireworks Mode - for shooting firework displays
Kids and Pets Mode – fast moving objects can be tricky – this mode seems to speed up shutter speed and help reduce shutter lag with some pre focussing
Underwater Mode – underwater photography has it’s own unique set of exposure requirements
Beach Mode – another bright scene mode
Indoor Mode – helps with setting shutter speed and white balance
Foliage Mode - boosts saturation to give nice bold colors
Using full manual
In order to get the full benefit out of your DSLR camera, you should be using it on FULL MANUAL. This means you will set the ISO, APERTURE and SHUTTER SPEED.
If you set these three settings you will make an EXPOSURE TRIANGLE and create a professional looking picture.
Use this Triangle to help you determine what setting you need.

Using Manual Focus
There is a switch on the lens that reads AF/MF (Auto focus/Manual Focus) Switch it to Manual focus.

Now use the wheel on the camera to cycle through the different dots until it lands on the area you want to be in focus.
