Bitewing Radiography Notes
Learning Outcomes
Assess bitewing image characteristics for diagnostic use.
Adopt a systematic approach for interpreting bitewing images.
Recognize common observations on bitewing radiographs.
Cardinal Rule
Radiographs are an adjunct to thorough history, clinical examination, and diagnostic tests.
Do not diagnose based on radiographs alone.
Uses of Bitewings
Detect primary and secondary caries.
Monitor caries progression and non-carious tooth loss.
Evaluate pulpal anatomy and changes.
Evaluate restorations and periodontal/crestal bone status.
Detect calculus deposits.
Characteristics of a Good Image
Minimal magnification, sharp, minimal shape distortion.
Good contrast & density, free from artifacts.
Structures of interest fully captured.
Achieving a Good Image
Correct exposure settings: mA, kV, time for good density/contrast.
Correct placement: detector and beam positioning.
Correct processing: chemicals for film, software for digital.
Good viewing conditions: orientation, dim lighting, light box, magnification.
Steps in Interpretation / Diagnosis
Assess image quality, then interpret systematically.
Assessing/Critiquing the Image
Exposure factors – density, contrast.
Detector orientation.
Horizontal/vertical detector position.
Horizontal/vertical beam angulation.
Central ray/beam position.
Rotational position of collimator.
Image sharpness.
Overall diagnostic quality.
Interpreting the Image: Be Systematic
Examine the complete image; assess non-dental structures first, then teeth last.
Learn normal tissue appearance.
Consider lesion position.
Radiographic Limitations
Superimpositions in 2D images.
Low sensitivity: Requires significant mineral loss to detect lesions.
Anatomy variations.
Things to Note on Bitewings
Non-dental pathology, teeth present, bone levels, PDL space, crestal bone.
Restorations, calculus.
Caries, non-carious tooth loss (NCTL).
Pulp chamber size/position.
Normal Radiographic Anatomy: Note
Crowns and roots of posterior teeth.
Enamel and dentine thickness.
Pulp chamber & pulp horns size.
Crest of alveolar bone, PDL space.
Abnormalities Relating to Tooth Number & Position
Agenesis (Hypodontia, Oligodontia, Anodontia).
Supernumerary teeth.
Unerupted teeth (Delayed, Ectopic, Impaction).
Crowding, Malposition/tilting.
Abnormalities Relating to Tooth Structure & Form
Enamel/dentine abnormalities (appearance, thickness, shape, caries, NCTL, fractures).
Pulp chamber, pulp horns, pulp canals abnormalities (size, shape, pulp stones, resorption).
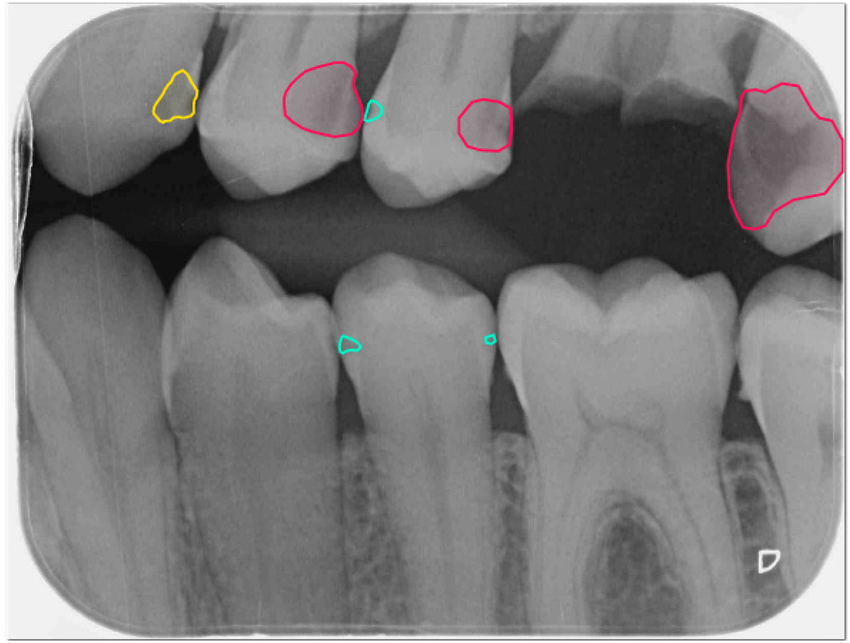
Caries
Caries detection is primary use.
Describe location, extent, shape, and type (primary, secondary, arrested).
Occlusal Caries
Often diagnosed clinically; look for radiolucent line in dentine.
Proximal Caries
Begins apical to contact point; describe depth.
Buccal & Lingual Caries
Superimposed; confirm with clinical exam.
Secondary (Recurrent) Caries
Radiolucency around restoration margins; check for defective restoration or poor hygiene.
Abrasion
Pathological wearing; confirm clinically.
Attrition
Physiological/pathological wear; flattened edges.
Erosion
Reduced enamel thickness; examine clinically.
Periodontal Pathology
Assess alveolar bone height and loss (horizontal/angular).
Look for calculus, overhangs, tilted teeth.
Restorations
Metallic or non-metallic; check overhangs, contacts, contour.
Other Findings
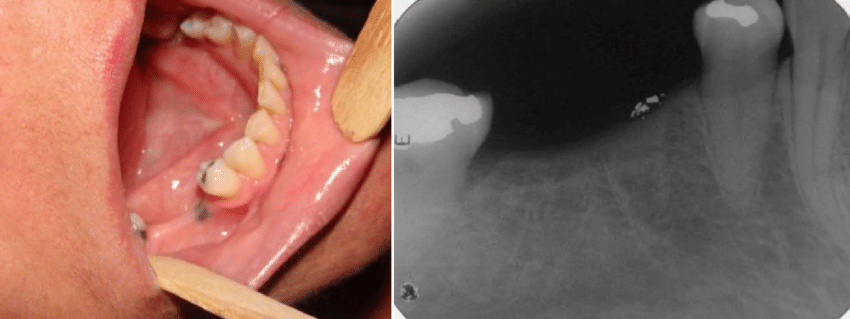
Calculus, amalgam tattoo, implants, foreign objects.
Other Pathologies
Recognize abnormalities and advise tutor; further views may be needed.
Radiographic Artifacts
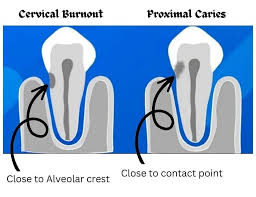
Cervical Burnout
Radiolucent areas due to x-ray penetration; mimics caries.
Mach Band
Radiolucent line in dentine; optical illusion mimicking caries.