Lab 301 Pre Reading Knowledge:
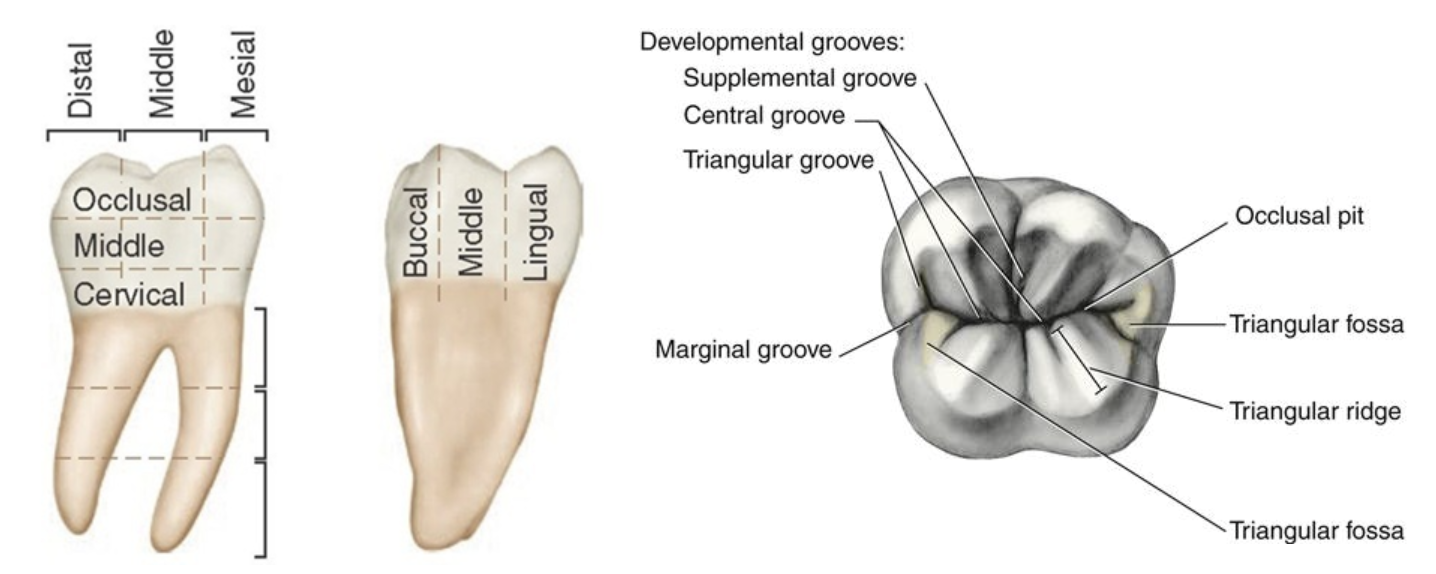
Posterior Teeth Surfaces
The posterior teeth, including molars and premolars, have several important surfaces and structures that play key roles in dental anatomy and function:
Occlusal Surface: The top surface of posterior teeth that comes into contact with the opposing teeth during biting and chewing.
Buccal (Facial) Surface: The outer surface of posterior teeth facing the cheeks or lips.
Lingual Surface: The inner surface of posterior teeth facing the tongue.
Mesial Surface: The surface of a tooth that is closer to the midline or center of the dental arch.
Distal Surface: The surface of a tooth that is away from the midline or center of the dental arch.
Proximal Surfaces: The collective term for the mesial and distal surfaces, emphasizing the areas where adjacent teeth come into contact.
Interproximal Space: The space between adjacent teeth at their contact points.
Contact Points: Specific areas of the tooth where it touches an adjacent tooth in the same arch.
Marginal Ridge: Elevated ridges of enamel on the mesial and distal aspects of the occlusal surface.
Fossa: Depressions or concavities on the occlusal surface, often serving as functional or structural features.
Grooves: Linear depressions on the occlusal surface that can aid in directing the flow of food during chewing.
Pits: Small, pinpoint depressions in the occlusal surface, often located at the junction of grooves.
Cusps: Pointed or rounded elevations on the occlusal surface of posterior teeth, contributing to the chewing and grinding of food.
Ridge: A ridge formed by the union of two triangular ridges, often extending across the occlusal surface.
Dominion Explorer posterior teeth.
Before Dominion explorer in the posterior sextants, it is imperative to determine the appropriate working-end. This process involves careful observation and selection based on the relationship of the lower shank to the distal surface of the tooth.
Selection Process: Start by choosing a tooth with clear visibility, such as the first premolar, within the sextant. Randomly pick one of the explorer working-ends and position the tip against the distal surface of the first premolar.
Correct Working-End: The correct working-end is identified when the lower shank aligns parallel to the distal surface of the premolar. When the working-end is adapted to a distal surface of a posterior tooth, the correct working-end has the following relationship between the shank and the tooth.
Lower shank is parallel to the distal surface
Functional shank goes up and over the tooth
Think: “Posterior = Parallel. Functional shank up and over!”
Incorrect Working-End: The lower shank extends across the facial surface of the premolar. This misalignment is visually evident, indicating that the explorer's lower shank is not parallel to the distal surface.
Application to Mandibular Right Posterior Sextant: Using the mandibular right posterior sextant as an illustrative example, one working-end of the explorer is tailored to the facial aspect, while the other working-end is customized for the lingual aspect of the sextant.
This meticulous process ensures the appropriate working-end of the explorer based on the specific tooth anatomy and spatial relationships within the posterior sextants. Accurate identification and adaptation contribute to effective dental examinations and procedures.
Instructions for Using a Dominion Explorer on Posterior Teeth
When using the Dominion Explorer for posterior teeth assessment, follow these key steps to ensure effective and precise instrumentation:
1. Instrument Selection and Positioning
Choose the correct working end for the specified posterior area.
Insert the instrument with the terminal shank parallel to the long axis of the tooth.
2. Adaptation and Pressure Control
Use minimal pressure to avoid displacing the gingiva at the cervical margin.
Adapt the lateral surface of the area behind the tip (1/3 of the explorer) to the tooth surface.
3. Stroke Application and Coverage
Apply small, controlled V-shaped strokes to explore the cervical area of the tooth.
Ensure systematic coverage of the entire sextant.
For posterior teeth:
Strokes should cover the distal 1/3 and mesial 2/3 of the tooth surface.
For anterior teeth:
Strokes should extend from the midline to the interproximal in both mesial and distal directions.
4. Control and Precision
Maintain maximum control over the instrument to prevent slipping.
Ensure comprehensive and thorough exploration of all surfaces.
By following these steps, you will effectively detect calculus, root irregularities, and carious lesions while maintaining patient comfort and instrument precision.