3. Device Considerations in Breast Augmentation
■ Breast augmentation is the most common aesthetic procedure performed in the United States and perhaps in the world.
Developmental and Involutional Hypomastia
Developmental hypomastia is often seen as primary mammary hypoplasia or as a sequela of thoracic hypoplasia (Poland syndrome) or other chest wall deformity.
Involutional hypomastia may develop in the postpartum setting and may be exacerbated by breastfeeding or significant weight loss.
Evolution of Saline Implants
The use of inflatable saline-filled breast implants was first reported in 1965 by Anon in France.
Saline-filled implants are manufactured with a range of recommended fill volumes.
Mild breast asymmetry may be corrected by taking advantage of this fill range during implant placement.
Underfilling saline implants is not recommended, as it may lead to:
Increased deflation rates due to folding or friction on the implant shell
A wrinkled appearance or rippling in certain positions
Saline implants have historically performed better when slightly overfilled and when placed under thicker soft-tissue coverage.
Aggressive overfilling may result in:
A more spherical shape
Scalloping along the implant edge
Knuckle-like palpability and unnatural firmness
Another disadvantage of saline-filled implants is that their palpation consistency is similar to water, rather than the more viscous feel of natural breast tissue.
Historical Perspective
The first report of successful breast augmentation appeared in 1895, when Czerny described transplantation of a lipoma from the trunk to the breast in a patient deformed by partial mastectomy.
In 1954, Longacre described the use of a local dermal-fat flap for breast augmentation.
Eventually, both adipose tissue and omentum were also used for breast augmentation.
During the 1950s and 1960s, breast augmentation was performed using solid alloplastic materials, including:
Polyurethane
Polytetrafluoroethylene (Teflon)
Expanded polyvinyl alcohol formaldehyde (Ivalon sponge)
Use of these materials was discontinued due to:
Local tissue reactions
Firmness
Breast distortion
Significant discomfort
Various other solid and semi-solid materials were injected directly into the breast parenchyma, including:
Epoxy resin
Shellac
Beeswax
Paraffin
Petroleum jelly
Liquid silicone
In 1961, Uchida reported injection of liquid silicone into the breast.
Injection of liquid silicone resulted in frequent complications, including:
Recurrent infections
Chronic inflammation
Drainage
Granuloma formation
Necrosis
Breast augmentation by injection of free liquid silicone was abandoned in the United States because of these complications.
Evolution of Silicone Implants
First Generation (1962)
The first-generation silicone gel-filled implant was introduced in 1962 by Cronin and Gerow.
The shell consisted of a thick, smooth silicone elastomer, constructed as a two-piece envelope with a peripheral seam.
The shell was filled with a moderately viscous silicone gel.
The implant was anatomically shaped (teardrop) and included Dacron fixation patches on the posterior surface.
These early implants had a relatively high capsular contracture rate, attributed to:
Shell quality
Lack of gel cohesivity
Second Generation (1970s)
Developed to reduce capsular contracture using:
A thinner, seamless shell
Removal of Dacron patches
Implants were round and filled with less viscous silicone gel to provide a more natural feel.
These implants were plagued by silicone gel bleed, caused by:
Thin, permeable shells
Low-viscosity gel
Diffused silicone produced an oily, sticky residue within the periprosthetic capsule, often noted during explantation.
Third Generation (1980s)
Focused on improving shell strength and permeability to:
Reduce silicone gel bleed
Reduce implant rupture and gel migration
Shells were redesigned using multilayered silicone elastomer.
Introduction of a barrier layer and thicker shell significantly lowered shell failure rates.
Fourth and Fifth Generations
After FDA-mandated restrictions in 1992, fourth- and fifth-generation implants evolved.
These implants were designed under more stringent ASTM and FDA-influenced criteria.
They are currently available from Sientra, Allergan, and Mentor.
Anatomically shaped implants were introduced with the fifth-generation devices.
These implants feature:
A textured surface
A more cohesive silicone gel
Surface
The evolution of textured implants began with polyurethane-coated implants, which demonstrated lower capsular contracture rates.
These implants were later removed from the US market due to:
Difficulty with complete removal
Theoretical concerns regarding malignant transformation
In the 1980s, manufacturers transitioned to textured silicone shells with varying pore sizes.
Studies demonstrated that pore size is critical for tissue adherence, producing the “adhesive effect” and improving implant stabilization.
Smooth implants are manufactured by dipping a mandrel into liquid silicone, creating multilayers that are cured in a laminar flow oven.
Textured implants require additional manufacturing steps beyond those used for smooth implants.
Filler
Earlier studies demonstrated an effect of filler material on capsular contracture rates.
These studies compared third-generation silicone implants with saline implants.
Outcomes may differ with current fourth-generation silicone implants, for which safety and long-term outcomes have been described.
Shell
Extensive chemical cross-linking of silicone gel polymers produces a solid silicone elastomer with a flexible, rubber-like quality.
Silicone elastomers are used in:
Facial implants
Tissue expanders
The outer shell of all breast prostheses
Implant Shape
The more cohesive the gel, the higher the gel–shell fill ratio.
Enhanced bonding of the gel to the shell leads to improved shape maintenance.
Diagnosis and Patient Presentation
Preoperative mammography is recommended for patients over 35 years of age or for patients of any age with significant risk factors for breast cancer.
Most surgeons agree that there are shared characteristics representing the aesthetic ideal of the female breast. These characteristics include:
A profile with a sloping or full upper pole
A gently curved lower pole
The nipple–areolar complex at the point of maximal projection
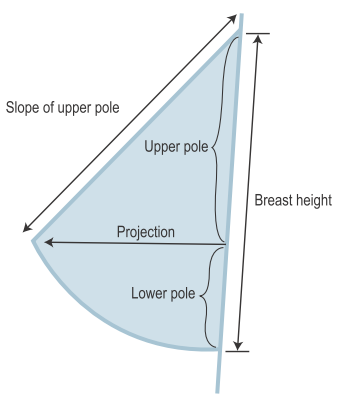
Careful palpation of all quadrants of the breast and axilla is required to rule out dominant masses or suspicious lymph nodes.
During palpation, the surgeon should assess the quantity and compliance of the parenchyma and soft-tissue envelope.
The soft-tissue pinch test is performed by gathering the superior pole between the thumb and index finger and measuring tissue thickness.
A pinch test < 2 cm often indicates the need for subpectoral implant placement.
Skin elasticity should be assessed by observing resistance to deflection and noting skin redundancy or stretch marks.
Patient Selection
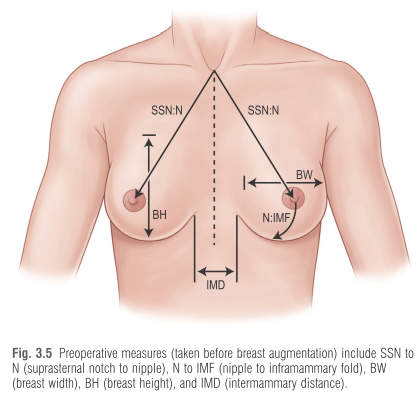
Precise measurements must be taken using the IMF, nipple–areolar complex, and suprasternal notch as key landmarks.
Measurements include:
Breast width (BW) at the widest point
Breast height (BH)
Nipple–areolar complex to inframammary fold distance (N:IMF)
Suprasternal notch to nipple distance (SSN:N)
Intermammary distance (IMD)
It is often helpful to make preoperative markings in the seated position with a permanent marker.
It is imperative to mark the original IMF.
It is a good idea to mark the true midline of the anterior chest.
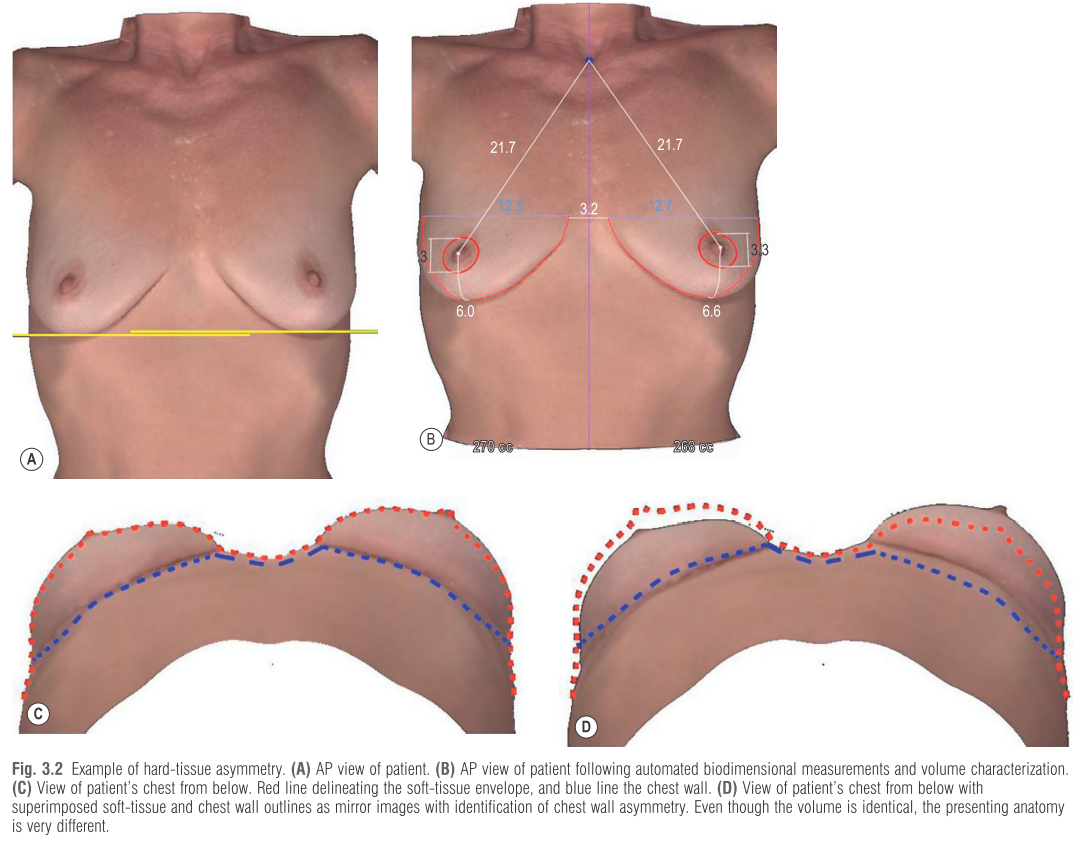
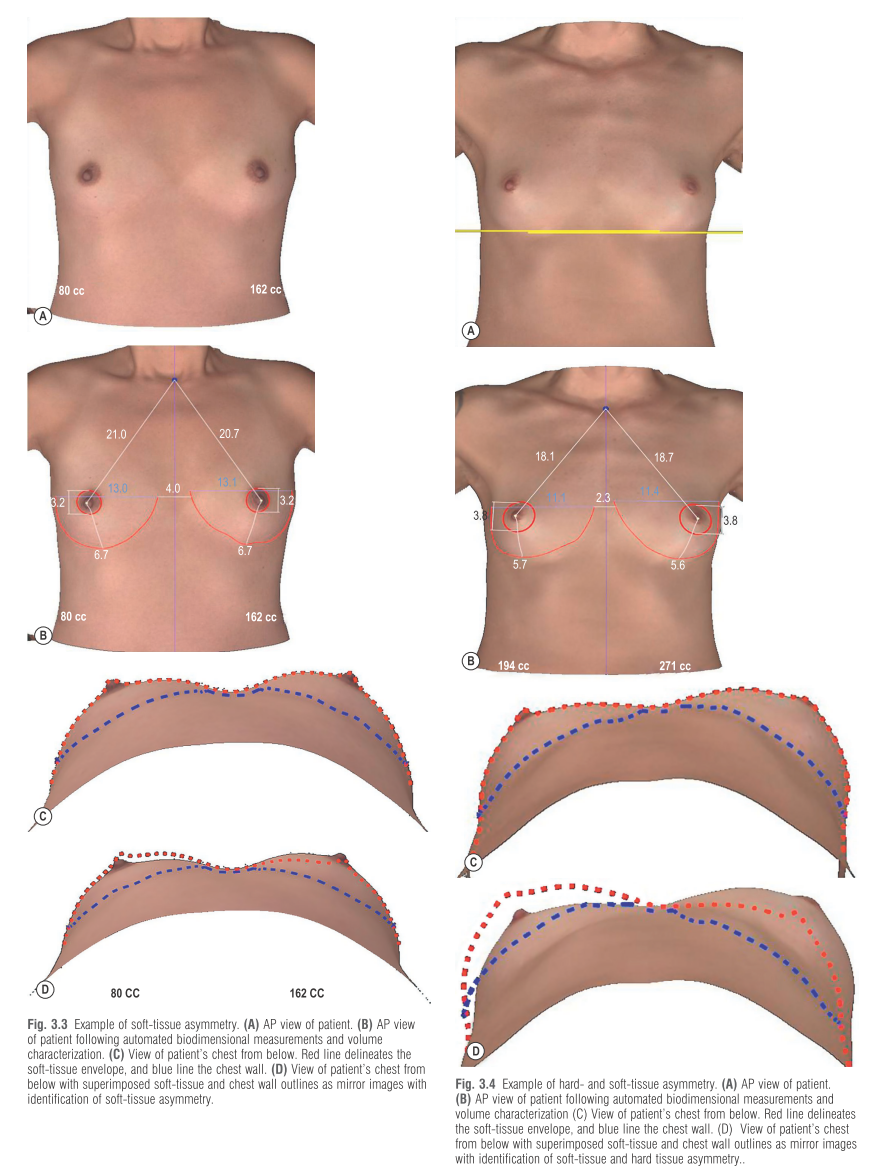
In addition to manual measurements, 3D imaging is available to facilitate the measurement process.
3D imaging systems can automatically measure and characterize both the soft tissue and chest wall, which is an important step in surgical planning.
Informed Consent
To be “informed,” the patient must receive adequate information regarding risks, benefits, and treatment alternatives.
The authors recommend the use of official ASPS informed consents.
To “consent,” the patient must:
Be an adult
Be capable of rational communication
Be able to understand the information provided
A checklist of specifics, initialed by the patient, is considered advisable.
“Before and after” photographs may be shown but should be realistic.
Patient photographs are a necessary form of documentation and require appropriate permission.
Confidentiality must be maintained unless permission is granted for other use.
A male surgeon should be accompanied by a female chaperone during breast photography and examinations.
Because of multiple options in breast augmentation, a second office visit is advisable.
There must be a clear, documented understanding between patient and surgeon regarding:
Desired outcome (size, shape)
Alternative methods to achieve it
Risk–benefit ratio of the chosen pathway
Operative Planning
Incision Length and Placement
Four incision types are commonly used in breast augmentation:
Transaxillary
Inframammary
Periareolar
Transumbilical
After implant selection, the patient and surgeon decide which incision to use.
Surgeons should offer only techniques they are comfortable performing.
Inframammary Incision
Permits complete visualization of the subpectoral or subglandular pocket.
Allows precise placement of virtually all implants.
Leaves a visible scar within the inframammary fold.
Smaller incisions (< 3 cm) may be used for saline implants.
Silicone gel implants often require incisions 5.0–6.0 cm in length.
The incision should be placed in the projected IMF, not the existing fold, to avoid scar visibility and widening.
Multiple techniques exist to identify the expected IMF.
Periareolar Incision
Placed at the areolar–cutaneous junction and usually heals inconspicuously in lightly pigmented patients.
Allows easy IMF adjustment and direct access to the lower parenchyma for scoring and release in constricted lower poles.
Disadvantages include:
Limited exposure
Transection of parenchymal ducts (often colonized with Staphylococcus epidermidis)
Potentially increased nipple sensitivity changes
Visible scarring on the breast mound
Should not routinely be used in patients with areola diameter < 40 mm.
May not allow placement of larger or enhanced cohesive gel implants.
Some reports suggest an increased risk of capsular contracture.
Transaxillary Incision
May be performed bluntly or with endoscopic assistance.
The endoscope allows precise release of the inferior musculofascial attachments of the pectoralis major and visualization for hemostasis.
Avoids scarring on the breast mound.
Can be used with saline or gel implants in subpectoral or subglandular pockets.
Disadvantages include:
Difficulty with parenchymal alterations
Increased likelihood of requiring a second incision for revision
More difficult precise implant placement
Transumbilical Incision
Offers a single, well-hidden, remote incision.
Can be used only with saline implants.
Requires experience for precise pocket dissection.
Pocket is dissected bluntly and hemostasis may be difficult.
Revisions often require a second incision on the breast mound, similar to the transaxillary approach.
Pocket Position
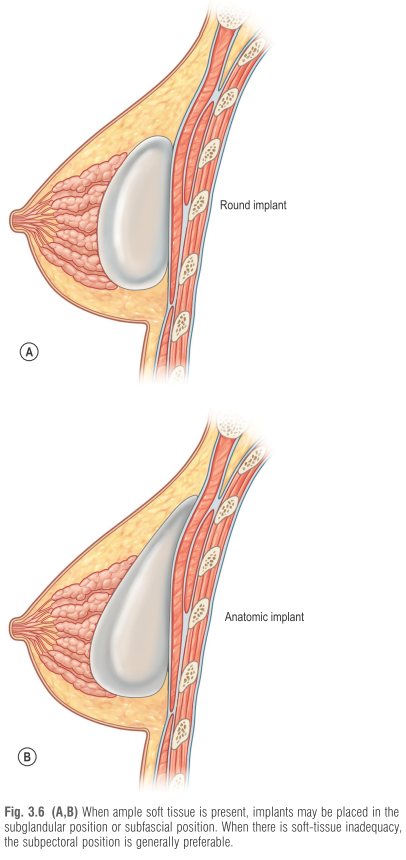
In theory, the best position for a mammary implant is in the subglandular plane, as this is the most anatomically correct position to maintain natural shape and form.
The authors no longer utilize the subglandular plane and instead prefer the subfascial plane.
Placement of implants in the subpectoral plane is performed to minimize implant visibility and palpability.
The risk of capsular contracture in either plane is dependent on surgical preparation and technique, and not necessarily on the pocket selected.
The authors believe the subfascial pocket is superior to the subglandular pocket.
Theoretically, placement of the implant in the subfascial position between the anterior fascia of the pectoralis major and the muscle may provide:
Additional support to the soft-tissue envelope
Less distortion of breast form
Decreased implant mobility within the pocket
In patients with a pinch test > 2 cm, the implant can safely be placed in the subfascial plane.
Textured implants are the preferred implants for subfascial placement.
If smooth gel implants are used in the subfascial plane, additional measures to prevent capsular contracture are required, including:
Larger pocket dissections with displacement exercises
Possible dilute steroid pocket irrigation
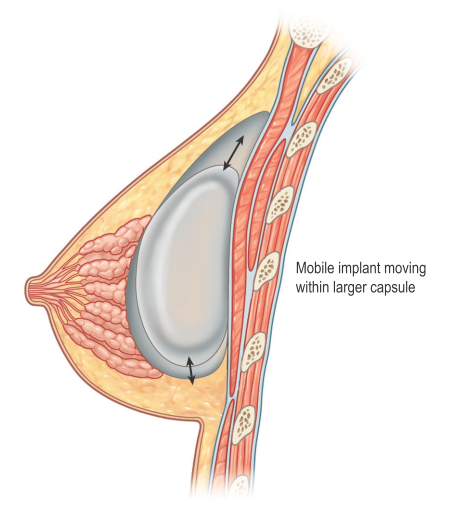
Anatomic-shaped textured implants are placed in the appropriate pocket based on soft-tissue thickness.Pockets for these implants are made only minimally larger than the implant footprint to minimize displacement or malrotation.
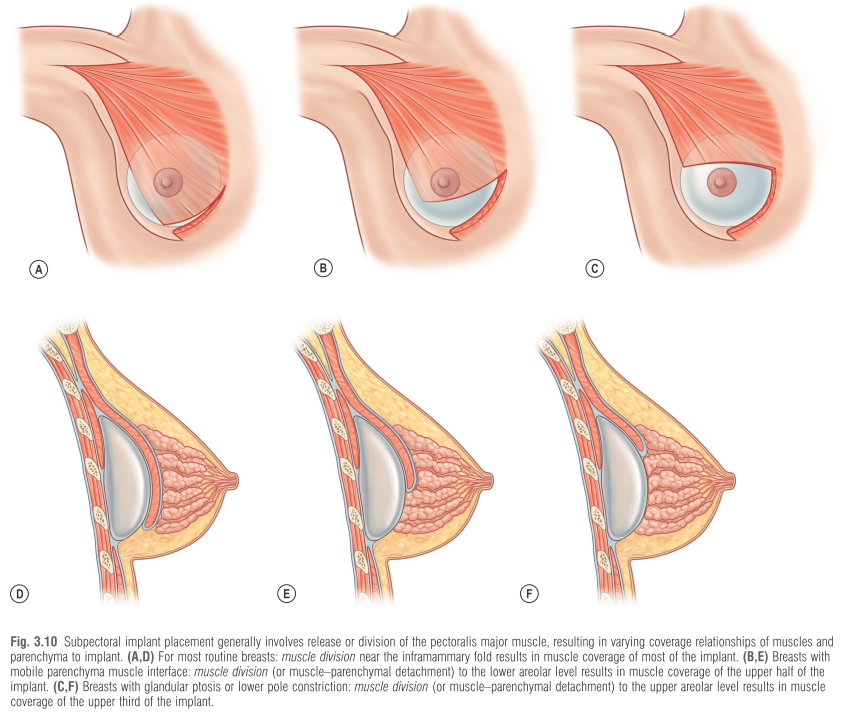
When subpectoral pockets are selected, the origin of the pectoralis major muscle is generally divided just above the inframammary fold to:
Improve lower pole projection
Maintain a natural inframammary fold
This results in the superior portion of the implant being subpectoral and the inferior portion being subglandular.
In constricted (tuberous) breasts or ptotic breasts, or when greater lower pole fill is required, additional dissection between parenchyma and muscle allows:
Less muscle coverage of the implant
Greater subglandular implant coverage
Alternatively, dividing the pectoralis muscle at a higher level may produce a similar result.
Implant Selection: Filling Material
In the United States, there are two implant materials available:
Saline-filled
Silicone-filled
Although the authors prefer silicone gel implants, saline implants placed in the subpectoral position can produce good results with a low incidence of capsular contracture.
The thicker the soft tissue overlying a saline implant, the better it performs.
Some patients continue to have concerns about silicone-filled devices, and subpectoral saline implants remain a reasonable alternative.
The final decision rests with the patient.
The addition of shaped devices provides another option for patients seeking a more natural appearance.
Implant Selection: Implant Size
The critical factors in selecting implant size include:
Dimensions of the nascent breast
Compliance and characteristics of the soft-tissue envelope
Desired volume of the resulting augmented breast
Breast base width is related to chest width and proportional to overall body habitus and must be respected. The same principle applies to breast height, though to a lesser degree.
Generally, the surgeon should select an implant that is slightly less wide than the existing breast.
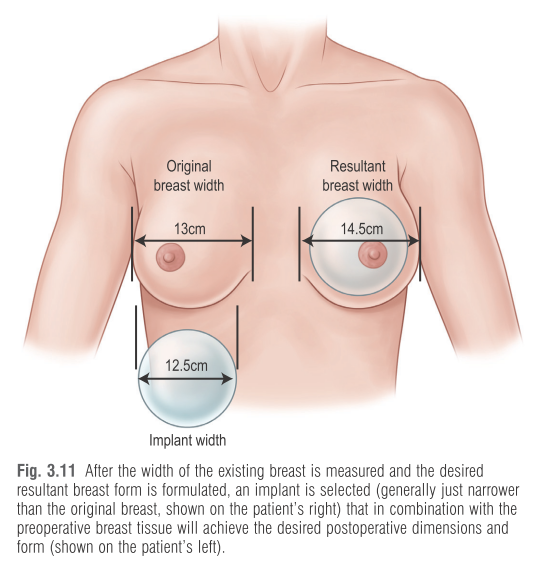
Manufacturers now offer implants with varying degrees of projection for a given base width. This allows attainment of the desired projection while preserving normal aesthetic breast proportions.
4D imaging may be used to demonstrate expected outcomes based on implant selection.
Implant Selection: Implant Surface Texture
The decision between textured and smooth-walled implants applies only to round implants. Anatomic implants are textured by design to minimize malrotation.
For round implants, the choice is based primarily on minimizing capsular contracture. (less with textured)
In subpectoral augmentation, either textured or smooth implants may be used with comparable results. In the subfascial pocket, textured implants are preferred.
If a smooth-walled implant is chosen, the pocket should be large enough to allow implant displacement exercises.
Implant Selection: Implant Shape
An anatomically shaped implant of a given base width and volume produces less upper pole convexity than a round implant of the same dimensions.
This characteristic is particularly useful when a patient desires significant volume augmentation but has a relatively narrow breast width.
Treatment and Surgical Technique
The patient is placed in the supine position, centered on the operating table, with the pelvis directly over the flexion point of the bed.
The arms are secured to arm boards placed at 90-degree angles to the torso.
These preparations allow the patient to be placed in the upright seated position as often as needed during the procedure.
Triple antibiotic solution irrigation is used for all implant cases, regardless of incision type. The implant pocket is irrigated with an antibiotic solution containing:
50 000 units of bacitracin
1 g of cefazolin
80 mg of gentamicin
per 500 mL of saline
Immediate postoperative stretching exercises are utilized.
Inframammary Incision
The incision is placed in the predicted location of the new inframammary fold (IMF).
The incision should be designed with the majority lateral to the breast midline so the scar lies in the deepest portion of the new IMF.
For subfascial placement, dissection proceeds:
Below the pectoralis fascia
Above the pectoralis major muscle
The fascia becomes thicker cephalad as dissection proceeds.
Medial intercostal perforating vessels may be encountered and should be avoided or coagulated.
For smooth-walled implants, a larger pocket is dissected to allow mobility.
For anatomic implants, the pocket is precisely dissected to snugly accommodate the implant.
Care must be taken to preserve the lateral intercostal cutaneous nerves, especially the fourth intercostal nerve, which provides primary sensory innervation to the nipple–areolar complex.
Subpectoral Dissection
Dissection begins laterally to identify the lateral border of the pectoralis major.
The inferior origin of the pectoralis major is released from lateral to medial at the level of the IMF.
Multiple slips of origin are commonly encountered and divided.
Division continues medially to the sternal border.
Partial deep division may be performed 1–3 cm above the xiphoid, depending on implant selection.
Lateral dissection may be performed bluntly with a finger to avoid injury to lateral neurovascular bundles.
When elevating the pectoralis major, the pectoralis minor must remain on the chest wall to minimize bleeding and allow proper implant placement.
Muscle interdigitations between the pectoralis major and minor are carefully dissected.
If a dual-plane pocket is planned, further dissection over the muscle is carried out according to the desired dual-plane level.
Implant Placement and Closure
Exact implant sizers (gel or saline) are used to evaluate pocket dimensions and breast form.
With sizers in place, the patient is positioned upright at 90 degrees and evaluated from multiple perspectives.
Areas of asymmetry or under-dissection are marked.
After achieving hemostasis and finalizing pocket dimensions, the pocket is irrigated with an antibiotic solution.
Implants are placed using a minimal-touch technique.
Final assessment is performed with the patient in the sitting position.
Closure is performed in multiple layers with absorbable sutures.
Steri-Strips are applied along the incision lines.
Periareolar Incision
The periareolar approach was described by Jenny in 1972.
The incision is placed along the inferior areolar–cutaneous junction.
The primary advantage is a well-camouflaged, inconspicuous scar.
This approach allows:
Easy adjustment of the IMF
Direct access to the parenchyma for scoring and release in constricted lower poles
Visualization and dissection are inadequate in patients with areolas < 3 cm.
Disadvantages include:
Risk of contamination if lactiferous ducts are transected
Increased risk of nipple sensitivity changes
Risk of hypopigmented scars in darkly pigmented areolas
The limits of the incision are the 3-o’clock and 9-o’clock positions.
Dissection proceeds straight through the breast parenchyma to the pectoralis major fascia.
Radial scoring of the inferior gland may be performed in constricted breasts to allow redraping.
Hemostasis is ensured and the pocket irrigated prior to implant placement.
The gland is precisely reapproximated with layered absorbable sutures to prevent nipple–areolar distortion.
Transaxillary Incision
The transaxillary approach was described by Hoehler in 1973 and popularized by Bostwick.
It may be performed:
Bluntly using a Montgomery dissector
With endoscopic assistance
It is more difficult for placement of large pre-filled implants or anatomic devices.
For incision marking:
The arm is placed in complete adduction
The most anterior axillary point is marked
The incision must not extend beyond this line
The arm is abducted to ~45° and a high axillary crease is selected
Incision length:
2.5–3.5 cm for saline implants
Larger for silicone implants
Superficial dissection to the lateral pectoralis border prevents injury to the intercostobrachial nerve.
The correct plane is identified before continuing dissection:
Deep to fascia for subfascial placement
Deep to muscle for subpectoral placement
Endoscopic assistance allows controlled release of the pectoralis major origin.
The pectoralis fascia is repaired with a single absorbable suture, and the incision closed in one or two layers.
Transumbilical Approach
With the patient supine, a line is drawn from the umbilicus to the medial border of the areola bilaterally.
An umbilical incision is made large enough to admit an index finger.
An endotube with a blunt obturator is passed just above the rectus fascia toward the breast.
Constant palpation ensures force is directed away from the thoracic and abdominal cavities.
For subglandular placement, the obturator is directed upward at the IMF to avoid slipping beneath the pectoralis major.
Subpectoral placement is possible with careful entry into the fascial plane.
An expander is inserted and filled to 150% of final implant volume.
After expansion, the expander is removed and the implant placed in the same manner.
Implant position, valve patency, and hemostasis are verified.
Closure is performed with a single layer of absorbable suture, and an abdominal binder is applied.
Postoperative Care
Patients receive:
Oral analgesics
A 3-day course of prophylactic oral antibiotics
Yoga-type chest stretching exercises are initiated on the day of surgery.
Dressings may be removed and showering resumed on postoperative day one.
First follow-up occurs 1–3 days postoperatively.
Implant mobility exercises are initiated for smooth implants.
A circumferential elastic strap may be used for patients at risk of superior implant displacement.
Return to work occurs within a few days; rigorous exercise is avoided for 2–3 weeks.
Follow-up visits are scheduled at:
4–6 weeks
3 months
1 year
The author places patients on vitamin E 400 IU daily for two years to minimize capsular contracture, despite limited evidence in augmentation populations.
Complications
Perioperative complications
Alterations of nipple sensitivity after augmentation mammaplasty may present as anesthesia or hyperesthesia and are thought to result from traction injury, bruising, or transection of the lateral intercostal cutaneous nerves.
The incidence and severity of nipple sensation changes does not vary with the surgical approach employed. (but they say that it is bigger in periareolar ones above -.-)
Periprosthetic seroma fluid is usually resorbed by the soft tissues within the first week of surgery, and use of topical antibiotics intraoperatively has been shown to decrease the rates.
The authors do not use drains for primary breast augmentation.
Hematoma after breast augmentation has deleterious effects in the early and late postoperative period, including pain, blood loss, disfigurement, and capsular contracture.
Preoperatively, patients should receive a list of prescription and OTC medications that may contribute to excessive bleeding.
It is imperative that patients discontinue medications and herbal supplements that impair clotting or platelet function at least one week prior to surgery (for suplements it’s generally 2-3 week prior and resume only 2 weeks latter).
If a hematoma develops perioperatively, immediate evacuation and pocket exploration is recommended; the source is only rarely identified at exploration.
Delayed hematoma may occur 1–2 weeks or even months to years after augmentation; frequently there is a history of breast trauma.
Expanding hematomas require exploration and drainage regardless of time from augmentation.
Nonoperative management of small nonexpanding hematomas is an option but places the patient at higher risk of subsequent periprosthetic capsular contracture.
Postoperative wound infection may range from mild cellulitis to purulent periprosthetic space infection.
Staphylococcus epidermidis is part of normal skin flora and is the most frequently identified pathogen in postoperative wound infections.
A significant number of infections respond to oral or IV antibiotics if therapy is initiated very early.
If infection persists or progresses, the implant should be removed and the wound allowed to heal over a drain or, in severe cases, by secondary intention.
Once infection has totally cleared, secondary augmentation and scar revision should be planned in 6–12 months.
Mondor’s disease is a superficial thrombophlebitis of the breast that may occur in up to 1–2% of augmentation patients. It usually affects veins along the inferior aspect of the breast and occurs most frequently with the inframammary approach. It is self-limiting and usually resolves with warm compresses over several weeks.

Herbs, herbal teas, homeopathic medicines, and dietary supplements associated with increased bleeding risk
Herbs and herbal extracts
Garlic
Ginger
Ginseng
Ginkgo (Ginkgo biloba; Maidenhair tree)
Feverfew (Tanacetum parthenium)
Bromelain
Liquorice/licorice (Glycyrrhiza glabra)
Red chili pepper (Capsaicin)
Saw palmetto (Serenoa repens)
Oil of wintergreen (Methyl salicylate)
Devil’s claw (Harpagophytum procumbens)
Chinese agrimony (Agrimonia pilosa)
Danshen (Salvia miltiorrhiza)
Baical skullcap root (Scutellaria baicalensis)
Geum japonicum
Chinese peony (Paeoniae rubra)
Poncitrin (Poncirus trifoliata)
Fritillaria bulbs (Fritillaria cirrhosa)
Japanese honeysuckle (Lonicera japonica)
Herbal formulas
Kangen-karyu
Bak foong pill
Herbal teas
Te gastronol
Seasonal tonic
Homeopathic medicines and other dietary supplements
Guīlinggāo (Tortoise jelly)
Vitamin E
Arnica montana (Leopard’s bane; Wolf’s bane)
Fish oil (Eicosapentaenoic acid)
Chondroitin
Glucosamine
Delayed complications of augmentation mammaplasty
Periprosthetic capsular contracture
One of the most common delayed complications is a palpable and deforming periprosthetic capsular contracture.
All surgical implants undergo some degree of encapsulation due to the natural foreign body reaction.
Histology demonstrates circumferential linear fibrosis, especially severe when formed in response to smooth shell implants.
In 1975, Baker proposed a clinical classification system of capsular contracture that is still commonly used.
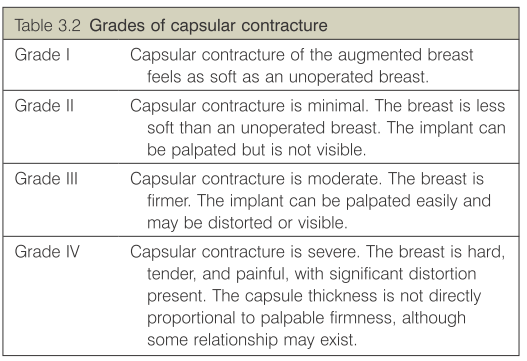
Although factors have been identified, the precise etiology remains unknown.
The hypertrophic circumferential linear scar likely involves stimulation of myofibroblasts within the periprosthetic capsule.
Irritation from hematoma, seroma, or silicone gel bleed may incite capsular contracture.
Other foreign body particles (glove powder, lint, dust) may contribute.
Infectious etiologies have also been studied and are thought to play a role.
Strategies to prevent capsular contracture include:
Creation of a large implant pocket and maintenance with implant displacement exercises
Use of textured implants, which has been shown to reduce capsular contracture rates
Minimizing operative trauma to reduce the risk of seroma or hematoma formation
Leukotriene receptor antagonists used for asthma were studied but should be used cautiously due to side effects. Zafirlukast (Accolate) and montelukast (Singulair) have been shown to reverse clinical signs of capsular contracture in patients taking them for asthma.
Treatment of established capsular contracture usually requires operative intervention.
Open capsulotomy involves scoring the capsule circumferentially and anteriorly to release and expand the soft-tissue envelope.
With very thick fibrous capsules, or calcified capsules with silicone granulomas, partial or complete capsulectomy may be necessary.
Implant site change surgery has become popular for established or recurrent capsular contracture.
Implant rupture and deflation
Any defect in the silicone elastomer shell of a saline-filled implant ultimately results in deflation.
Saline leaks out and is harmlessly absorbed.
Deflation is usually recognized by the patient and virtually always requires explantation and replacement.
Trauma is frequently elicited; true spontaneous shell failure is relatively rare.
Breast MRI is considered the state-of-the-art technique for evaluating implant integrity.
Modern fourth- and fifth-generation silicone gel implants are more cohesive than second- and third-generation gel and are less likely to leak even when ruptured.
Secondary procedures
Revisionary breast surgery (secondary or tertiary) for late complications poses a continual challenge and is complex, challenging, and unpredictable.
Long-term issues include thinned tissues from large implants in subglandular or subpectoral positions with complications such as:
Implant extrusion
Gel bleed
Rupture with extravasation
Saline deflation
Capsular contracture
Palpability
Rippling
“Double bubble”
“Snoopy breast”
Symmastia
Implant malposition
Historical options for revision have included:
Replacing saline with gel implants
Capsular flaps for stability/coverage
Site change operations
None of these procedures have resulted in complete resolution of the described complaints.