Radar
1/21
There's no tags or description
Looks like no tags are added yet.
Name | Mastery | Learn | Test | Matching | Spaced | Call with Kai |
|---|
No analytics yet
Send a link to your students to track their progress
22 Terms
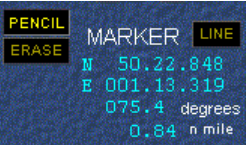
PENCIL: This tool lets you draw a small point or symbol on the screen to mark a specific spot you want to remember.
ERASE: You use this to remove any marks or lines you drew if they are no longer needed or were made by mistake.
MARKER: This shows the exact address of a spot on the map using numbers called Latitude and Longitude.
LINE: This tool draws a straight path between two points to help you plan where the ship should go.
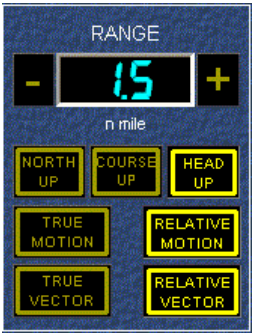
Range Selection and Mode of Operation
Display Orientations
North Up: The map stays still with North always at the top, which is best for comparing your screen to a paper chart.
Course Up: The top of the screen shows the direction you intended to travel, making it best for staying on a planned path.
Head Up: The top of the screen shows exactly where the front of your boat is pointing right now, which is best for seeing things directly ahead of you.
Motion and Vectors
True Motion: Fixed objects like land stay still while your boat moves across the screen, making it best for seeing your actual travel path.
True Vector: A line shows the real speed and direction of other ships, which is best for knowing exactly where those ships are heading.
Relative Motion: Your boat stays in the center of the screen while everything else moves around you, making it best for spotting things that might hit you.
Relative Vector: A line shows if another ship is getting closer or moving away from your boat, which is best for avoiding crashes at sea.
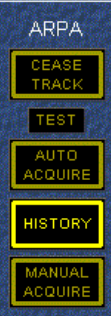
ARPA functions
Cease Track: This button stops the radar from following a specific target, and it is best used when a ship has passed safely and you no longer need to watch it.
Test: This runs a quick check to make sure the computer's tracking system is working correctly, and it is best used before you start your watch or enter busy waters.
Auto Acquire: The radar automatically finds and starts tracking any new ships that enter a certain area, which is best used when you are in the open ocean and want the computer to stay alert for you.
History: This shows dots or lines where a ship has been in the past few minutes, and it is best used to see if another ship is turning or changing its speed.
Manual Acquire: You choose exactly which ship on the screen you want the radar to track by clicking on it, which is best used in crowded areas where you only want to focus on the most important targets.
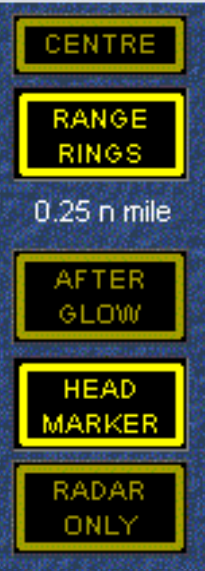
Display Arrangement and Overlays
Centre: This button snaps your ship's icon back to the middle of the screen, and it is best used if you have moved the view around and got lost.
Range Rings: These are circles that show set distances from your ship, and they are best used to quickly guess how many miles away a target is.
After Glow: This leaves a faint trail behind moving objects on the screen, and it is best used to see which way other ships are heading at a glance.
Head Marker: This is a bright line that points exactly where your ship’s bow is facing, and it is best used to make sure you are steered straight toward your goal.
Radar Only: This hides extra map layers and only shows the raw radar echoes, and it is best used when the screen feels too cluttered and you just want to see solid objects.
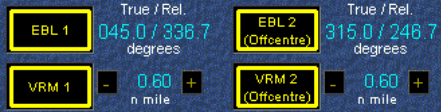
EBL and VRM
EBL 1 (Electronic Bearing Line): This is a straight line you can rotate to see the exact direction of an object, and it is best used to check if you are on a collision course with another ship.
VRM 1 (Variable Range Marker): This is an adjustable circle that tells you the precise distance to a target, and it is best used to find out exactly how many miles away a lighthouse or buoy is.
EBL 2 (Offcentre): This is a second direction line that you can move away from your own ship, and it is best used to measure the angle between two different landmarks on the map.
VRM 2 (Offcentre): This is a second adjustable circle that can be moved anywhere on the screen, and it is best used to measure the distance between two other objects instead of measuring from your own boat.
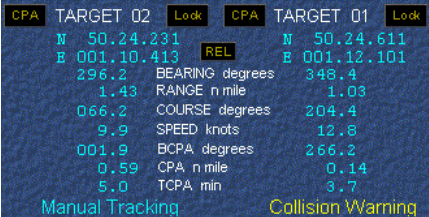
Target Data
CPA (Closest Point of Approach): This button highlights the predicted gap between you and another ship, and it is best used to quickly see which targets are most likely to cause a collision.
Target 01 / Target 02: These are the ID names the radar gives to different objects it is watching, and they are best used to keep track of which ship is which when there are many on the screen.
Lock: This keeps a target’s information permanently on your data display, and it is best used when you want to monitor one specific ship closely without the radar switching to a different one.
REL (Relative): This shows that the data you are seeing is based on how the other ship looks from your own moving boat, which is best used for spotting if someone is steering toward you.
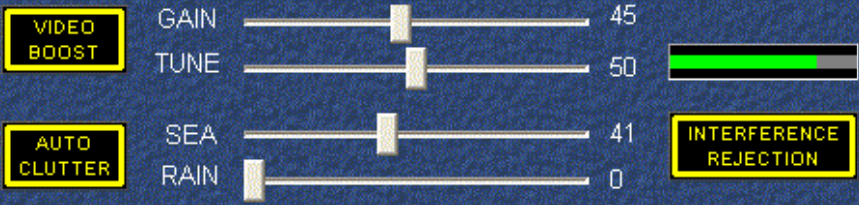
Gain, Tune and Clutter Rejection Controls
Video Boost: This makes the faint signals on the screen appear brighter and thicker, which is best used when you are trying to spot very small boats or weak echoes.
Auto Clutter: This lets the computer automatically adjust the settings to remove messy spots from the screen, which is best used when you are busy and want the radar to clean up the image for you.
Interference Rejection: This removes "noise" or weird dots caused by other radars nearby, and it is best used when you are in a crowded harbor with many other ships.
Gain: This adjusts how sensitive the radar is to picking up objects, and it is best used to find the right balance so you see ships without the screen getting too "fuzzy."
Tune: This fine-tunes the radar receiver to the exact frequency of the signal, and it is best used to make sure the echoes on your screen are as sharp and clear as possible.
Sea: This slider removes the messy reflections caused by waves near your boat, and it is best used on a windy day when the ocean surface is making the screen look cluttered.
Rain: This slider hides the "clouds" on the radar caused by falling water, and it is best used during a storm so you can see the actual ships hiding inside the rain.
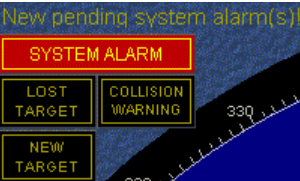
Alarms and Warnings
System Alarm: This tells you that a part of the radar equipment has a problem, and it is best used to know when you need to fix a technical error.
Lost Target: This pops up when the radar can no longer find a ship it was previously tracking, which is best for alerting you to look out the window to find it.
Collision Warning: This flashes when the computer thinks you are about to hit another ship, and it is best used to tell you to change direction immediately.
New Target: This lights up when the radar finds a brand new ship that just entered your area, and it is best used to help you keep track of everyone nearby.
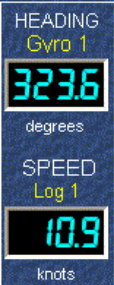
Heading and Speed
Heading (Gyro 1): This shows the compass direction your ship is currently facing in degrees, and it is best used to make sure you are steering the boat correctly.
Speed (Log 1): This tells you how fast your ship is moving through the water in knots, and it is best used to figure out how long it will take to reach your destination.
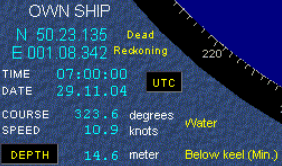
Own Ship’s Data
UTC: This shows the official world time (Universal Coordinated Time), which is best used so all ships around the world are using the same clock for logs.
Depth: This shows how much water is under the bottom of your boat, and it is best used to make sure you don't run aground in shallow areas.
Dead Reckoning: This is a way the computer guesses your position based on your last known spot and speed, and it is best used if your GPS signal ever fails.

Menus
ARPA: This opens the settings for your smart tracking assistant, and it is best used when you want to change how the radar follows other ships.
RADAR: This menu controls the main power and signal settings, which is best used for adjusting the raw picture you see on the screen.
DISPLAY: This tab lets you change the colors and layout of the screen, and it is best used to make the radar easier to read during the day or night.
NAVIGATE: This section shows your ship's own speed and position data, and it is best used to make sure you are following your planned route.
MAP: This allows you to show or hide electronic charts and lines, which is best used for seeing where the land and shallow water are located.
TRIAL: This lets you practice a turn on the screen before you actually steer the ship, and it is best used to see if a planned move will keep you safe from other boats.

ARPA
Display Zone: This turns on a visible box on your screen that marks a safe area, and it is best used to see exactly where the radar is looking for new targets.
Auto Track Zone (Forward/Starboard/Port): These settings tell the radar how far to look in front and to the sides, which is best used to make sure the computer automatically catches ships coming from any direction.
Minimum Track Range: This sets the closest distance the radar will try to track a ship, and it is best used to stop the computer from getting confused by small waves or objects right next to your boat.
Stern Blind Sector: This tells the radar to ignore the area directly behind the ship where your own equipment blocks the view, which is best used to prevent false alarms from your own boat's "shadow."
Tracker Performance: This button shows how well the computer is doing its job of following targets, and it is best used to check if the radar is struggling in bad weather.
Auto Cease: This automatically stops tracking ships once they move far away and are no longer a threat, which is best used to keep your screen from getting cluttered with old data.
History Interval: This sets how many minutes of a ship's past path you want to see on the screen, and it is best used to see if a ship has been steering in a straight line or turning.
Test Target (Course/Speed): This creates a "fake" ship on your screen with a set direction and speed, which is best used to practice your navigation skills and make sure the alarms are working.
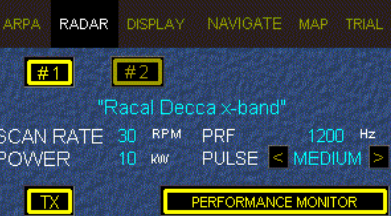
Radar
#1 / #2: These buttons let you switch between the different radar antennas on the ship, and they are best used if one radar breaks or you need a different view.
TX (Transmit): This button turns on the radar's signal so it can start "seeing" the world, and it is best used once you leave the dock and are ready to navigate.
Performance Monitor: This runs a test to see if the radar is sending and receiving signals at full strength, which is best used to make sure your equipment is working perfectly.
Pulse (Long/Medium/Short): This changes the length of the radar beam, and it is best used to see things far away (Long) or get a very clear picture of things nearby (Short).

Display
Night Colours: This changes the screen to darker colors, which is best used to protect your eyes and see better in the dark at night.
Stern Marker: This shows a line pointing exactly where the back of your ship is, which is best used when you are backing up or checking what is behind you.
Bearing Scale: This turns on a circle of numbers around the edge of the screen, which is best used to read exactly what direction an object is located.
Own History: This draws a line showing where your own boat has traveled recently, and it is best used to check if you have stayed on your planned path.
Intensity (Sliders): these adjust how bright the lines like Range Rings and the Head Marker are, and they are best used to make sure the screen isn't too bright or too dim.
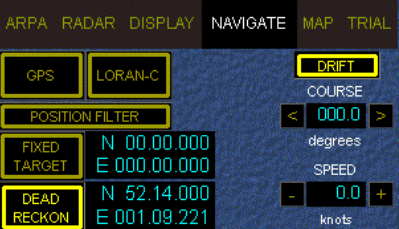
Navigate
GPS: This uses satellites to find your exact location on Earth, and it is best used as your main way to navigate every day.
LORAN-C: This is an older system that uses land-based radio towers to find your position, and it is best used as a backup if your GPS stops working.
Position Filter: This smooths out any jumpy or messy data from your sensors, and it is best used to make sure your ship’s icon moves smoothly across the screen.
Fixed Target: This lets you mark a stationary object like a buoy or rock to help calculate your position, which is best used when you are near the coast.
Dead Reckon: This guesses your location by using your last known spot, your speed, and your direction, and it is best used if you lose all satellite and radio signals.
Drift (Course/Speed): This tells the computer how much the wind and ocean currents are pushing your boat sideways, and it is best used to fix your path so you don't get blown off course.
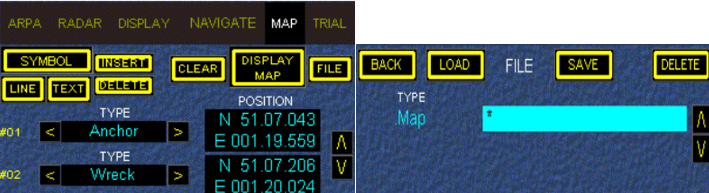
Map
Symbol: This lets you pick a picture like an anchor or a wreck to put on the map, which is best used to mark a specific spot you want to remember.
Line: This allows you to draw straight lines on the screen, and it is best used to mark a safe path through a narrow channel.
Text: This lets you write short labels or notes on your map, which is best used to name a specific island or buoy so you don't forget which is which.
Insert / Delete: These buttons let you add a new drawing or erase an old one, and they are best used to keep your map updated as you move.
Clear: This button wipes away every drawing you made at once, which is best used when you leave one area and want a fresh, clean screen for the next part of your trip.
Display Map: This turns your custom drawings on or off, and it is best used when the screen gets too busy and you need to see the raw radar clearly.
File: This lets you save the map you drew or open an old one, which is best used if you travel the same route often and want to use the same notes.
Position (N/E): These boxes show the exact latitude and longitude of a spot on the map, and they are best used to find the perfect place to drop your anchor.
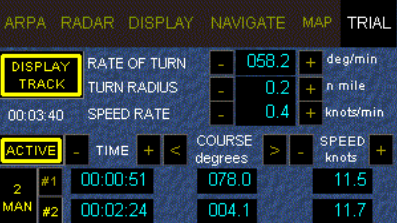
Trial
Display Track: This shows a dotted line of your planned trial turn on the screen, and it is best used to visualize where your ship will go.
Rate of Turn: This sets how fast your ship will swing during the trial turn, which is best used to simulate a sharp or slow curve.
Turn Radius: This determines how much space the ship needs to complete the turn, and it is best used to make sure you won't hit land or other boats.
Speed Rate: This sets the speed for your fake ship during the test, which is best used to see how fast you should go to stay safe.
Active: This button starts the "practice mode" simulation on your screen, and it is best used when you want to see if your plan works in real-time.
Time: This counts how long the practice turn has been running, which is best used to know exactly when a collision might happen.
Course: This sets the final direction you want the ship to face after the trial turn, making it best for planning a new destination.
Speed: This shows how fast the fake ship is moving during the test, which is best used to compare with your actual speed.
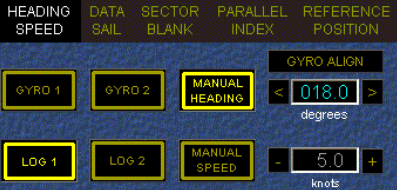
Heading and Speed
Gyro 1 / Gyro 2: These are compasses that tell the ship which way it is facing, and they are best used to steer a very straight line.
Log 1 / Log 2: These sensors measure how fast your ship is moving through the water, which is best used to calculate your arrival time.
Manual Heading / Speed: This lets you type in your own numbers, and it is best used if your main sensors ever stop working.
Gyro Align: This lets you fix the compass if it is slightly off, making it best for keeping your map perfectly accurate.
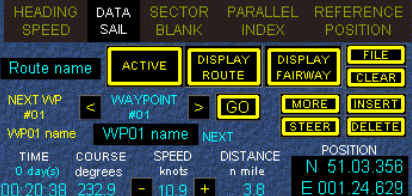
Main DATA SAIL menu
Route Name / NEXT WP: This shows your current travel plan and the next "stop sign" or waypoint on the ocean, which is best used to make sure you are heading toward your destination.
Active (Route): This button turns on your specific travel route so it shows up on the screen, and it is best used when you are ready to start your trip.
Display Route / Fairway: these show your planned path and the "safe road" in the water, which is best used to stay away from shallow spots or rocks.
STEER: This helps you keep the ship pointed exactly on your path, and it is best used when you want to make sure you aren't drifting sideways.
Go: This starts the computer's tracking for your selected path, which is best used at the very beginning of a new journey.
TIME / DISTANCE: These count down how long and how far it is until you reach your next waypoint, making it best for knowing when you will arrive.
POSITION (N/E): This shows your ship's exact "address" on Earth using latitude and longitude numbers, which is best used for emergency calls or checking a map.
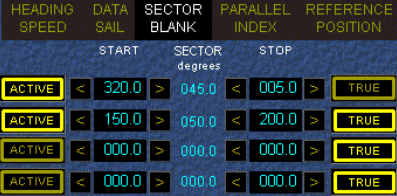
Sector Blank
Active: This button turns on a specific blanking zone you have set up, and it is best used when you want the radar to start ignoring a certain area.
Start: This sets the exact compass degree where the radar should begin being "blind," which is best used to mark the left edge of your ship's crane or mast.
Stop: This sets the compass degree where the radar should start "seeing" again, and it is best used to mark the right edge of an object blocking the view.
Sector Degrees: This number shows the total width of the area the radar is ignoring, which is best used to check if the "blind spot" is the right size for the object in its way.
True: This setting makes the blind zone stay in one fixed compass direction, which is best used to ignore a large bridge or building nearby.
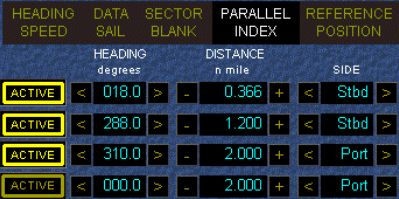
Parallel Index
Active: This button turns on a specific reference line on the screen, and it is best used when you want to start monitoring your distance from a nearby shore.
Heading: This sets the angle of the line to match the direction of a coast or a straight channel, which is best used to keep your ship perfectly parallel to the land.
Distance: This sets how many miles away the line should be from your ship, and it is best used to create a "safety wall" that you should not cross.
Side (Stbd / Port): This lets you choose if the line appears on the right (Starboard) or left (Port) side of your ship, which is best used depending on which side the danger is located.
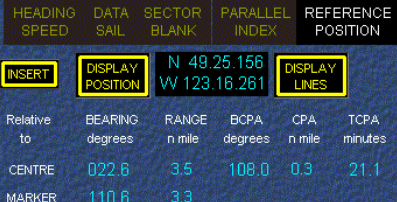
Reference Position
INSERT: This button lets you add a new mark or point of interest onto the digital map.
DISPLAY POSITION: This shows the exact coordinates—Latitude and Longitude—of where the ship is located right now.
DISPLAY LINES: This button turns on or off the extra lines on the screen that help with measuring distances.